一、前言:
在实际的开发中,我们经常会用到弹框,以此来显示一个警告或提醒或者提供一系列选项让用户选择。前段时间在开发时,要用到弹框,突然意识到好像两个都可以完成需求,当时我在想,那它们到底有什么区别呢?于是查了相关资料后,整理如下:
1. AlertDialog的基本属性和用法
AlertDialog是Dialog的子类,所以它包含了Dialog类的很多属性和方法,由于AlertDialog的构造方法全部是Protected的,所以不能直接通过new一个AlertDialog来创建出一个AlertDialog。
要创建一个AlertDialog,就要用到AlertDialog.Builder中的create()方法。
使用AlertDialog.Builder创建对话框需要了解以下几个方法:
setTitle :为对话框设置标题 setIcon :为对话框设置图标 setMessage:为对话框设置内容 setView : 给对话框设置自定义样式 setItems :设置对话框要显示的一个list,一般用于显示几个命令时 setMultiChoiceItems :用来设置对话框显示一系列的复选框 setNeutralButton :普通按钮
setPositiveButton :给对话框添加"Yes"按钮 setNegativeButton :对话框添加"No"按钮 create : 创建对话框 show :显示对话框
 AlertDialog alertDialog = new AlertDialog.Builder(this).
             setTitle("对话框的标题").
             setMessage("对话框的内容").
             setIcon(R.drawable.ic_launcher).
             create();
             alertDialog.show();
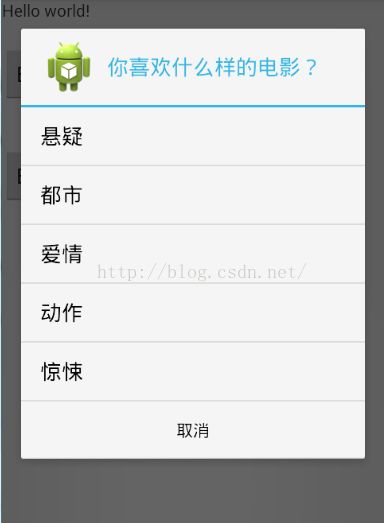
setItems(CharSequence[] items, final OnClickListener listener)方法来实现类似ListView的AlertDialog
第一个参数是要显示的数据的数组,第二个参数是点击某个item的触发事件
final String[] array = new String[] { "悬疑", "都市", "爱情", "动作" ,"惊悚"};

              Dialog alertDialog = new AlertDialog.Builder(this).
                setTitle("你喜欢什么样的电影?").
                setIcon(R.drawable.ic_launcher)
                .setItems(array, new DialogInterface.OnClickListener() {

                 @Override
                 public void onClick(DialogInterface dialog, int which) {
                  Toast.makeText(getApplicationContext(), array[which], Toast.LENGTH_SHORT).show();
                 }
                }).
                setNegativeButton("取消", new DialogInterface.OnClickListener() {

                 @Override
                 public void onClick(DialogInterface dialog, int which) {
                  // TODO Auto-generated method stub
                 }
                }).
                create();
              alertDialog.show();
setSingleChoiceItems(CharSequence[] items, int checkedItem, final OnClickListener listener)方法来实现类似RadioButton的AlertDialog
第一个参数是要显示的数据的数组,第二个参数是初始值(初始被选中的item),第三个参数是点击某个item的触发事件
final int selectedFruitIndex = 0;
            final String[] arrayFruit = new String[] { "苹果", "橘子", "草莓", "香蕉" };

              Dialog alertDialog = new AlertDialog.Builder(this).
                setTitle("你喜欢吃哪种水果?").
                setIcon(R.drawable.ic_launcher)
                .setSingleChoiceItems(arrayFruit, 0, new DialogInterface.OnClickListener() {

                 @Override
                 public void onClick(DialogInterface dialog, int which) {
                  //selectedFruitIndex = which;
                 }
                }).
                setPositiveButton("确认", new DialogInterface.OnClickListener() {

                 @Override
                 public void onClick(DialogInterface dialog, int which) {
                  Toast.makeText(getApplicationContext(), arrayFruit[selectedFruitIndex], Toast.LENGTH_SHORT).show();
                 }
                }).
                setNegativeButton("取消", new DialogInterface.OnClickListener() {

                 @Override
                 public void onClick(DialogInterface dialog, int which) {
                  // TODO Auto-generated method stub
                 }
                }).
                create();
              alertDialog.show();
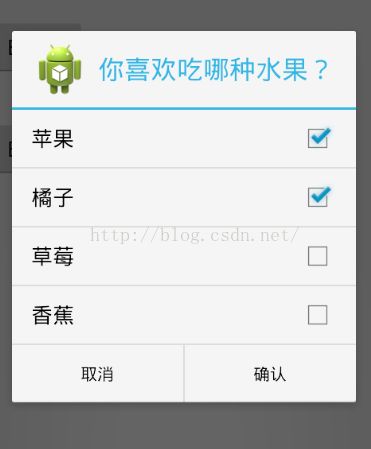
setMultiChoiceItems(CharSequence[] items, boolean[] checkedItems, final OnMultiChoiceClickListener listener)方法来实现类似CheckBox的AlertDialog
第一个参数是要显示的数据的数组,第二个参数是选中状态的数组,第三个参数是点击某个item的触发事件
final String[] arrayFruit = new String[] { "苹果", "橘子", "草莓", "香蕉" };
        final boolean[] arrayFruitSelected = new boolean[] {true, true, false, false};

        Dialog alertDialog = new AlertDialog.Builder(this).
                setTitle("你喜欢吃哪种水果?").
                setIcon(R.drawable.ic_launcher)
                .setMultiChoiceItems(arrayFruit, arrayFruitSelected, new DialogInterface.OnMultiChoiceClickListener() {

                    @Override
                    public void onClick(DialogInterface dialog, int which, boolean isChecked) {
                        arrayFruitSelected[which] = isChecked;
                    }
                }).
                setPositiveButton("确认", new DialogInterface.OnClickListener() {

                    @Override
                    public void onClick(DialogInterface dialog, int which) {
                        StringBuilder stringBuilder = new StringBuilder();
                        for (int i = 0; i < arrayFruitSelected.length; i++) {
                            if (arrayFruitSelected[i] == true)
                            {
                                stringBuilder.append(arrayFruit[i] + "、");
                            }
                        }
                        Toast.makeText(Dialog_AlertDialogDemoActivity.this, stringBuilder.toString(), Toast.LENGTH_SHORT).show();
                    }
                }).
                setNegativeButton("取消", new DialogInterface.OnClickListener() {

                    @Override
                    public void onClick(DialogInterface dialog, int which) {
                        // TODO Auto-generated method stub
                    }
                }).
                create();
        alertDialog.show();
    }
}
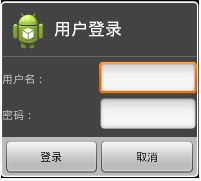
实际中,我们也经常会自定义View,来满足我们的开发需求
比如说我们要实现一个Login画面,有用户名和密码,这时我们就要用到自定义View的AlertDialog
然后在Activity中去加载我们的布局
// 取得自定义View
        LayoutInflater layoutInflater = LayoutInflater.from(this);
        View myLoginView = layoutInflater.inflate(R.layout.login, null);

        Dialog alertDialog = new AlertDialog.Builder(this).
                setTitle("用户登录").
                setIcon(R.drawable.ic_launcher).
                setView(myLoginView).
                setPositiveButton("登录", new DialogInterface.OnClickListener() {

                    @Override
                    public void onClick(DialogInterface dialog, int which) {
                        // TODO Auto-generated method stub
                    }
                }).
                setNegativeButton("取消", new DialogInterface.OnClickListener() {

                    @Override
                    public void onClick(DialogInterface dialog, int which) {
                        // TODO Auto-generated method stub
                    }
                }).
                create();
        alertDialog.show();
    }
2. PopupWindow的属性和方法及使用
它可以使用任意布局的View作为其内容,这个弹出框是悬浮在当前activity之上的。
PopupWindow的位置按照有无偏移分,可以分为偏移和无偏移两种;按照参照物的不同,可以分为相对于某个控件(Anchor锚)和相对于父控件。具体如下
showAsDropDown(View anchor):相对某个控件的位置(正左下方),无偏移
showAsDropDown(View anchor, int xoff, int yoff):相对某个控件的位置,有偏移
showAtLocation(View parent, int gravity, int x, int y):相对于父控件的位置(例如正中央Gravity.CENTER,下方Gravity.BOTTOM等),可以设置偏移或无偏移
View popView = LayoutInflater.from(this).inflate(
                    R.layout.pop_style, null);
            pop = new PopupWindow(popView, 400, 350);
            pop.setBackgroundDrawable(new BitmapDrawable());//这些要在show之前设置,否则无法作用
            pop.setOutsideTouchable(true);
            Button popButton = (Button) popView.findViewById(R.id.button1);
            popButton.setOnClickListener(new OnClickListener() {

                @Override
                public void onClick(View v) {
                    // TODO 自动生成的方法存根
                    Log.e("pop----->", "bt");
                }
            });
            pop.showAtLocation(bt2, Gravity.CENTER, 0, 0);
其中的bt2是点击弹出框相对于它的显示位置
 int[] location = new int[2];
                view.getLocationOnScreen(location);
                pop.showAtLocation(view, Gravity.NO_GRAVITY, (ScreenUtils.getScreenWidth() - pop.getWidth()) / 2, location[1] - pop.getHeight() + 10);
修改popwindown显示的位置
注意:有时候比如点击button后天弹出对话框,当点击外部时,弹框消失。这时候可能会遇到一个问题:假如点击的外部区域是button,这个时候就会出现button先消失,后又出现的问题。大多数情况下,我们这时候还是希望点击button时弹框消失就好了,再次点击button时就出现。为此,可以这样做:
1)在你点击弹出popowinddow的view上添加点击事件view.setOnClick(false)
2)在popwind初始化后设置
popupwindow.setOnDismissListener(new PopupWindow.OnDismissListener() {
@Override
public void onDismiss() {
handler.postDelayed(new Runnable() {
@Override
public void run() {
view.setClickable(true);
}
}, 100);
}
});
3. AlertDialog和PopupWindow的区别
(1)Popupwindow在显示之前一定要设置宽高,Dialog无此限制。
(2)Popupwindow默认不会响应物理键盘的back,除非显示设置了popup.setFocusable(true);而在点击back的时候,Dialog会消失。
(3)Popupwindow不会给页面其他的部分添加蒙层,而Dialog会。
(4)Popupwindow没有标题,Dialog默认有标题,可以通过dialog.requestWindowFeature(Window.FEATURE_NO_TITLE);取消标题
(5)二者显示的时候都要设置Gravity。如果不设置,Dialog默认是Gravity.CENTER。
(6)二者都有默认的背景,都可以通过setBackgroundDrawable(new ColorDrawable(android.R.color.transparent));去掉。
其中最本质的差别就是:AlertDialog是非阻塞式对话框:AlertDialog弹出时,后台还可以做事情;而PopupWindow是阻塞式对话框:PopupWindow弹出时,程序会等待,在PopupWindow退出前,程序一直等待,只有当我们调用了dismiss方法的后,PopupWindow退出,程序才会向下执行。这两种区别的表现是:AlertDialog弹出时,背景是黑色的,但是当我们点击背景,AlertDialog会消失,证明程序不仅响应AlertDialog的操作,还响应其他操作,其他程序没有被阻塞,这说明了AlertDialog是非阻塞式对话框;PopupWindow弹出时,背景没有什么变化,但是当我们点击背景的时候,程序没有响应,只允许我们操作PopupWindow,其他操作被阻塞。我们在写程序的过程中可以根据自己的需要选择使用Popupwindow或者是Dialog。
原文链接:https://blog.csdn.net/android_cmos/article/details/51223776


