python web(bottle框架)知行合一之-简单知识付费平台-”全栈“实践(7)---ORM数据库
每日细语:所有的奋不顾身,只为了更好的明天!
续言
不知不觉,时间真的快如闪电,转瞬即逝! 这几天有点小忙,也就放慢了节奏!
但既然给了自己承诺,那就坚持到底吧!
上一节,我们刚完成了前端页面的一些数据库表的设计,其实我自己感觉好像设计的还是有点小问题,不过这也无妨吧。 因为我也是小白,有些时候的试错!可以让我们更好更深刻的理解一下东西?不是吗?
关于ORM数据库
关于ORM数据库的介绍,之前我也再这提到过,
https://www.jianshu.com/p/bad5a001116c。
为了更完整的记录,我重新的把部分的一些文字黏贴过来!
关于ORM一些说明
关于ORM(Object Relational Mapping,对象关系映射)在python中其实存在几个,主要有的还有SQLAlchemy,不过其实今天咋们的猪脚peewee的内核其实也是基于SQLAlchemy,所以可能应该是更加高效!因为还没做进行具体的测试和数据对比,所以现在还是猜测!
后期我也会继续实践一下关于SQLAlchemy在bottle中的使用!
理论上相关ORM应该具备的能力有:
(1)对象关系映射(数据类型映射,类映射,关系映射)
(2)CURD操作
(3)缓存优化
ORM一些优点:
(1)屏蔽数据库操作细节,开发者不需要通过SQL进行和数据库进行交互,提高开发效率
(2)便捷数据库迁移
(3)缓存技术提高数据库操作效率。
我们也再此项目中继续使用这个ORM库进行处理!
但是这里我们遇到的一个问题的就是,peewee一般是先写好MODEL在进行执行生成数据库,那么我们现在是先由了数据表 再根据数据表生成的模型是否可行的呢?
查阅一些官方文档:
http://docs.peewee-orm.com/en/latest/
## Working with existing databases

If you already have a database, you can autogenerate peewee models using [pwiz, a model generator](http://docs.peewee-orm.com/en/latest/peewee/playhouse.html#pwiz). For instance, if I have a postgresql database named *charles_blog*, I might run:


python -m pwiz -e postgresql charles_blog > blog_models.py
这里有一段是这样描述的,大概意思就是说:
假如你已经有了数据库,你可以通过使用一个模型生成器pwiz来自动生成peewee模型。bir,如果我拥有一个名字叫做charles_blog的postgresql数据库,我可以这样执行:
python -m pwiz -e postgresql charles_blog > blog_models.py
我且试一试看看是否可行!
$ python -m pwiz -e postgresql charles_blog > blog_models.py
Traceback (most recent call last):
  File "C:\Users\Administrator\AppData\Roaming\Python\Python35\site-packages\peewee.py", line 2457, in connect
    self._state.set_connection(self._connect())
  File "C:\Users\Administrator\AppData\Roaming\Python\Python35\site-packages\peewee.py", line 2959, in _connect
    conn = psycopg2.connect(database=self.database, **self.connect_params)
  File "D:\Python35-32\lib\site-packages\psycopg2\__init__.py", line 164, in connect
    conn = _connect(dsn, connection_factory=connection_factory, async=async)
psycopg2.OperationalError: fe_sendauth: no password supplied
铛铛铛!!!可惜不行!!!我猜那肯定是不行的!!
因为我还没安装:peewee
可惜我再安装了 再执行也还是不行?
这个又点玄乎了,那这个到底是怎么执行的呢?
按上面的语气
python -m pwiz -e postgresql charles_blog > blog_models.py
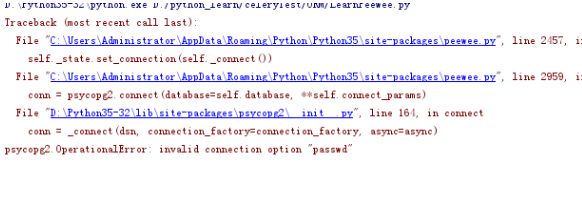
错误的信息和之前使用的时候也遇到过:
总结了一下错误的问题,应该是因为没有连接到数据库而引起的。
尝试新的命令:
python -m pwiz -e mysql -H localhost -p 5432 -u root -P 123456 xmly_code > xmcode.py
结果:
$ python -m pwiz -e mysql -H localhost -p 5432 -u root -P 123456 xmly_code > xmcode.py
Password:
Traceback (most recent call last):
  File "D:\Python35-32\lib\site-packages\pymysql3-0.5-py3.5.egg\pymysql\connections.py", line 676, in _connect
  File "D:\Python35-32\lib\site-packages\pymysql3-0.5-py3.5.egg\pymysql\connections.py", line 803, in _get_server_information
  File "D:\Python35-32\lib\site-packages\pymysql3-0.5-py3.5.egg\pymysql\connections.py", line 200, in __init__
  File "D:\Python35-32\lib\site-packages\pymysql3-0.5-py3.5.egg\pymysql\connections.py", line 204, in __recv_packet
  File "D:\Python35-32\lib\socket.py", line 575, in readinto
    return self._sock.recv_into(b)
ConnectionResetError: [WinError 10054] 远程主机强迫关闭了一个现有的连接。
问题原因是我不是用mysql啦!!!
尝试新的命令:
python -m pwiz -e postgresql -H localhost -p 5432 -u postgres -P 123456 xmly_code > xmcode.py
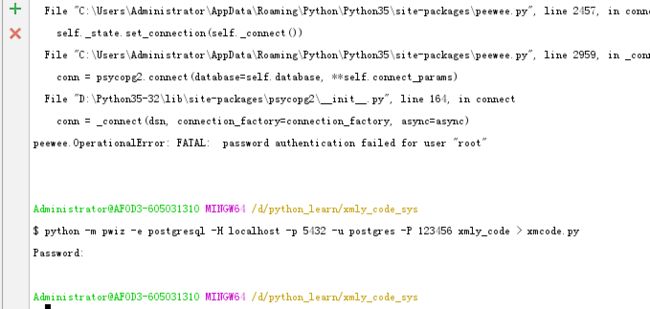
结果:
Administrator@AFOD3-605031310 MINGW64 /d/python_learn/xmly_code_sys
$ python -m pwiz -e postgresql -H localhost -p 5432 -u postgres -P 123456 xmly_code > xmcode.py
Password:

Administrator@AFOD3-605031310 MINGW64 /d/python_learn/xmly_code_sys
$
嗯嗯成功了!而且输出了对应的model
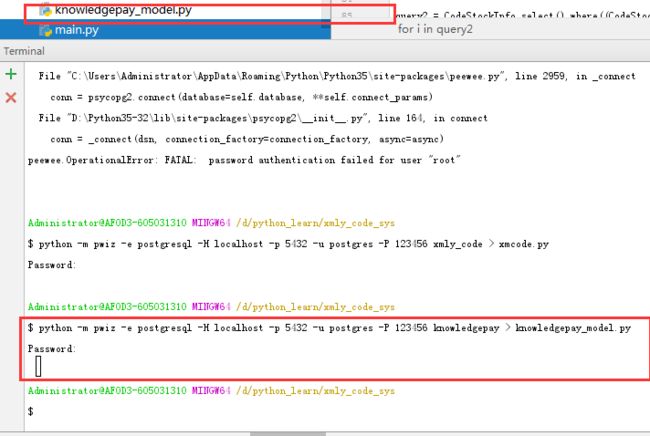
执行:
python -m pwiz -e postgresql -H localhost -p 5432 -u postgres -P 123456 knowledgepay> knowledgepay_model.py
结果:
knowledgepay_model.py的文件内容:
from peewee import *

database = PostgresqlDatabase('knowledgepay', **{'host': 'localhost', 'user': 'postgres', 'port': 5432, 'password': '123456'})

class UnknownField(object):
    def __init__(self, *_, **__): pass

class BaseModel(Model):
    class Meta:
        database = database

class Activity(BaseModel):
    activity_describe = TextField(null=True)
    activity = TextField(column_name='activity_id', index=True)
    activity_name = TextField()
    add_time = DateTimeField(index=True)
    course_code = TextField(column_name='course_code_id', index=True)
    course_img_cover = TextField()
    expiry_date = DateTimeField(index=True, null=True)
    is_enable = IntegerField(index=True, null=True)

    class Meta:
        table_name = 'activity'

class Announcement(BaseModel):
    announcement_describe = TextField(null=True)
    announcement = TextField(column_name='announcement_id', index=True)
    announcement_name = TextField()
    is_enable = IntegerField(index=True, null=True)

    class Meta:
        table_name = 'announcement'

class Course(BaseModel):
    add_time = TextField(null=True)
    all_num_count = IntegerField(null=True)
    author = TextField(null=True)
    course_classify_code = TextField(index=True, null=True)
    course_code = TextField(column_name='course_code_id', null=True)
    describe_detailed = TextField()
    describe_simple = IntegerField(null=True)
    has_learn_num = IntegerField(null=True)
    has_updata_num_count = IntegerField(null=True)
    img_cover = TextField()
    is_down = IntegerField(null=True)
    is_flee = IntegerField(null=True)
    is_sell = IntegerField(null=True)
    is_vip_flee = IntegerField(null=True)
    name = TextField(index=True)
    price = IntegerField()
    state = IntegerField(null=True)
    title = TextField()
    type = IntegerField(index=True, null=True)
    up_time = DateTimeField(null=True)

    class Meta:
        table_name = 'course'

class CourseClassify(BaseModel):
    add_time = DateTimeField()
    course_classify_code = TextField(index=True)
    course_code = DateTimeField(column_name='course_code_id', index=True, null=True)
    describe = TextField()
    icon_url = TextField(null=True)
    is_enable = IntegerField(index=True, null=True)

    class Meta:
        table_name = 'course_classify'

class CourseContent(BaseModel):
    add_time = DateTimeField()
    buy_describe = TextField(null=True)
    code = TextField(index=True, null=True)
    content_detailed = TextField(null=True)
    content_file_url = TextField(null=True)
    content_index = IntegerField(null=True)
    course_code = IntegerField(column_name='course_code_id', index=True, null=True)
    expiry_date = DateTimeField(index=True, null=True)
    is_enable = IntegerField(null=True)
    is_flee = TextField(null=True)
    title = TextField(null=True)
    visit_count = IntegerField(null=True)

    class Meta:
        table_name = 'course_content'

class CourseOrder(BaseModel):
    add_time = DateTimeField()
    course_code = TextField(column_name='course_code_id', index=True)
    course_name = TextField(null=True)
    is_pay = IntegerField(index=True, null=True)
    order = TextField(column_name='order_id', index=True)
    pay_state_describe = IntegerField(null=True)
    pay_time = DateTimeField(null=True)
    pay_type = TextField(null=True)
    phone_num = TextField(index=True, null=True)

    class Meta:
        table_name = 'course_order'

class UserInfo(BaseModel):
    e_mail = TextField(null=True)
    gender = TextField(null=True)
    head_cover = TextField(null=True)
    is_activate = IntegerField(null=True)
    is_vip = IntegerField(null=True)
    nick_name = TextField()
    pass_word = TextField()
    phone_num = TextField(index=True)
    register_time = DateTimeField(null=True)
    wx_access_token = TextField(null=True)

    class Meta:
        table_name = 'user_info'
ORM数据一些简单实例的操作示例
既然我们已经有脸连接数据库的相关的MODEL,那么接下来我自己简单的练习一下对应的DRM一些操作咯。
通过create添加一条用户信息记录
数据库中的现状:
# 新增行
obj1 = UserInfo.create(e_mail='[email protected]', phone_num='18565382222',pass_word='AAAA',nick_name='小钟同学')
# 把数据对象转成字典
u = model_to_dict(obj1)
print(u)
print('通过create()方法添加数据,它会返回一个模型实例:--->', u)
结果打印:
{'phone_num': '18565382222', 'head_cover': None, 'id': 1, 'is_vip': None, 'wx_access_token': None, 'register_time': None, 'nick_name': '小钟同学', 'pass_word': 'AAAA', 'e_mail': '[email protected]', 'gender': None, 'is_activate': None}
通过create()方法添加数据,它会返回一个模型实例:---> {'phone_num': '18565382222', 'head_cover': None, 'id': 1, 'is_vip': None, 'wx_access_token': None, 'register_time': None, 'nick_name': '小钟同学', 'pass_word': 'AAAA', 'e_mail': '[email protected]', 'gender': None, 'is_activate': None}
数据库结果:
通过save添加一条用户信息记录
代码:
u = UserInfo(e_mail='[email protected]', phone_num='18565382222', pass_word='AAAA-2', nick_name='小钟同学-22')
u.save()
# 把数据对象转成字典
u = model_to_dict(u)
print('通过create()方法添加数据,它会返回一个模型实例:--->', u)
打印:
通过create()方法添加数据,它会返回一个模型实例:---> {'id': 2, 'phone_num': '18565382222', 'e_mail': '[email protected]', 'wx_access_token': None, 'pass_word': 'AAAA-2', 'is_activate': None, 'nick_name': '小钟同学-22', 'head_cover': None, 'is_vip': None, 'register_time': None, 'gender': None}
数据库结果:
通过insert_many进行批量添加用户信息记录
代码:
data = \
    [
        {'e_mail': '[email protected]', 'phone_num': '10000000', 'pass_word': '5555555', 'nick_name': 'AAAA001'},
        {'e_mail': '[email protected]', 'phone_num': '10000000', 'pass_word': '5555555', 'nick_name': 'AAAA002'},
        {'e_mail': '[email protected]', 'phone_num': '10000000', 'pass_word': '5555555', 'nick_name': 'AAAA003'},
        {'e_mail': '[email protected]', 'phone_num': '10000000', 'pass_word': '5555555', 'nick_name': 'AAAA004'}

    ]
us = UserInfo.insert_many(data)  # 插入了多个
print(us)
for i in us:
    print(i)
打印:
(15,)
(16,)
(17,)
(18,)
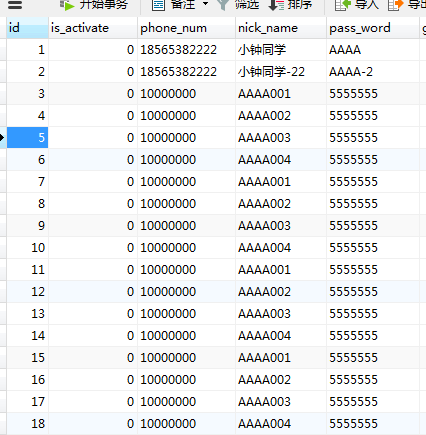
数据库结果 (因为我运行了多次 插入多次):
结束
更多的API示例可以查阅文档即可!
以上笔记纯属个人学习实践总结,有兴趣的同学可以加群一起学习讨论


