Spring Bean生命周期详解
Spring Bean生命周期详解
概念
Spring beans 是那些形成Spring应用的主干的java对象。它们被Spring IOC容器初始化,装配,和管理。
Bean 定义
一个Spring Bean 的定义包含容器必知的所有配置元数据,包括如何创建一个bean,它的生命周期详情及它的依赖。
配置元数据
这里有三种重要的方法给Spring 容器提供配置元数据。
- XML配置文件。
- 基于注解的配置。
- 基于java的配置。
Spring基于xml注入bean的方式
- Set方法注入;
- 构造器注入:①通过index设置参数的位置;②通过type设置参数类型;
- 静态工厂注入;
- 实例工厂;
bean的作用域
Spring框架支持以下五种bean的作用域:
- singleton : bean在每个Spring ioc 容器中只有一个实例。
- prototype:一个bean的定义可以有多个实例。
- request:每次http请求都会创建一个bean,该作用域仅在基于web的Spring ApplicationContext情形下有效。
- session:在一个HTTP Session中,一个bean定义对应一个实例。该作用域仅在基于web的Spring ApplicationContext情形下有效。
- global-session:在一个全局的HTTP Session中,一个bean定义对应一个实例。该作用域仅在基于web的Spring ApplicationContext情形下有效。
bean的装配
概念
bean 装配是指在Spring 容器中把bean组装到一起,前提是容器需要知道bean的依赖关系,并通过依赖注入来把它们装配到一起。
自动装配
在Spring框架中,在配置文件中设定bean的依赖关系是一个很好的机制,Spring 容器能够自动装配相互合作的bean,这意味着容器不需要和配置,能通过Bean工厂自动处理bean之间的协作。这意味着 Spring可以通过向Bean Factory中注入的方式自动搞定bean之间的依赖关系。自动装配可以设置在每个bean上,也可以设定在特定的bean上。
@Autowired注解自动装配
在使用@Autowired注解之前需要在Spring配置文件进行配置,
在启动spring IoC时,容器自动装载了一个AutowiredAnnotationBeanPostProcessor后置处理器,**当容器扫描到@Autowied、@Resource或@Inject时,就会在IoC容器自动查找需要的bean,并装配给该对象的属性。**在使用@Autowired时,首先在容器中查询对应类型的bean:(先通过Bytype,然后通过Byname)
- 如果查询结果刚好为一个,就将该bean装配给@Autowired指定的数据;
- 如果查询的结果不止一个,那么@Autowired会根据名称来查找;
- 如果上述查找的结果为空,那么会抛出异常。解决方法时,使用required=false。
Bean的生命周期
理论概念
Bean,就是由 IOC 容器初始化、装配及管理的对象。
在IOC容器启动之后,并不会马上就实例化相应的bean,此时容器仅仅拥有所有对象的BeanDefinition(BeanDefinition:是容器依赖某些工具加载的XML配置信息进行解析和分析,并将分析后的信息编组为相应的BeanDefinition)。只有当getBean()调用时才是有可能触发Bean实例化阶段的活动。
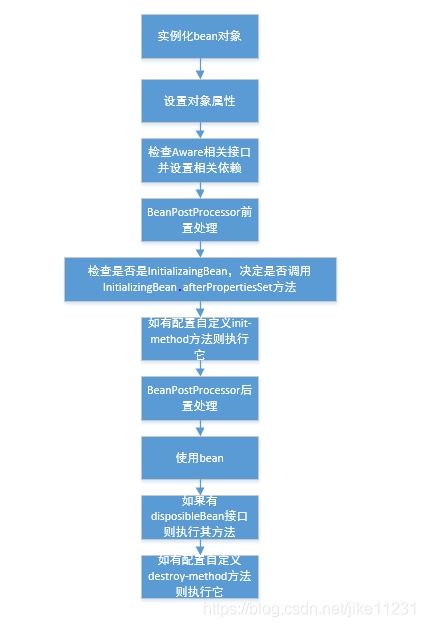
生命周期可以简述为以下九步:
1:实例化bean对象(通过构造方法或者工厂方法,也就是我们常说的new)
2:设置对象属性(setter等)(依赖注入,也就是IOC注入)
3:如果Bean实现了BeanNameAware接口,调用Bean的setBeanName()方法传递Bean的ID(和下面的一条均属于检查Aware接口)
4:如果Bean实现了BeanFactoryAware接口(获取当前bean factory这也可以调用容器),工厂调用setBeanFactory()方法传入工厂自身
5:将Bean实例传递给Bean的前置处理器的postProcessBeforeInitialization(Object bean, String beanname)方法
6:调用Bean的初始化方法
7:将Bean实例传递给Bean的后置处理器的postProcessAfterInitialization(Object bean, String beanname)方法
8:使用Bean
9:容器关闭之前,调用Bean的销毁方法
相关接口作用
BeanNameAware接口作用
可以获取容器中bean的名称,为了让自身Bean能够感知到,就是获取到自身在Spring容器中的id或name属性
BeanPostProcessor接口作用
在Bean对象在实例化和依赖注入完毕后,在显示调用初始化方法的前后添加我们自己的逻辑。即对创建出来的bean进行验证或者proxy,然后得到包装的bean。注意是Bean实例化完毕后及依赖注入完成后触发的。

bean的后置处理器BeanPostProcessor接口中两个方法:
postProcessBeforeInitialization:实例化、依赖注入完毕,在调用显示的初始化之前完成一些定制的初始化任务
postProcessAfterInitialization:实例化、依赖注入、初始化完毕时执行
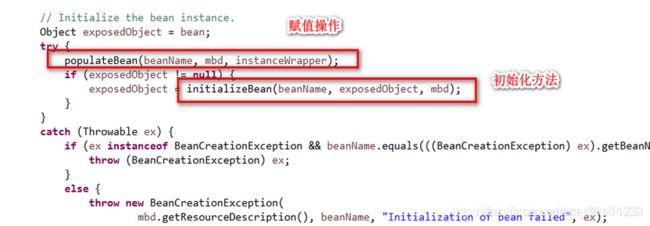
BeanPostProcessor原理
1.populateBean(beanName, mbd, instanceWrapper);//给bean进行属性赋值
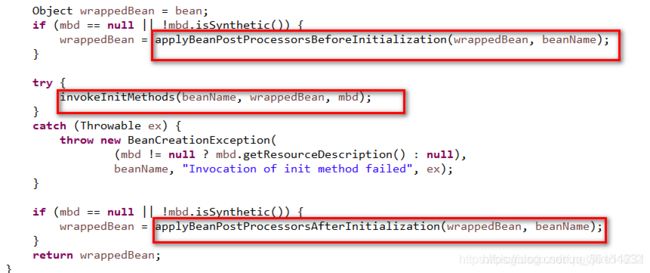
2.调用initializeBean方法,执行后置处理器和指定的初始化方法。(详细过程见下面源码)
3.后置处理器BeanPostProcessor执行过程是,遍历得到容器中所有的BeanPostProcessor;挨个执行beforeInitialization,一但返回null,跳出for循环,不会执行后面的BeanPostProcessor.postProcessorsBeforeInitialization
BeanPostProcessor原理图示解释
原理步骤1
原理步骤2
原理步骤3

代码验证
BeanLife流程文件
package spring.beanlife.code;

import org.springframework.beans.BeansException;
import org.springframework.beans.factory.*;
import org.springframework.context.*;
import org.springframework.context.annotation.ImportAware;
import org.springframework.core.env.Environment;
import org.springframework.core.io.Resource;
import org.springframework.core.io.ResourceLoader;
import org.springframework.core.type.AnnotationMetadata;

import javax.annotation.PostConstruct;
import javax.annotation.PreDestroy;
import java.util.Arrays;

/**
 * @author: krest
 * @date: 2021/4/25 08:52
 * @description:  BeanLife流程详解
 *
 */
public class IocBeanLifeService implements InitializingBean, DisposableBean, ApplicationContextAware,
        ApplicationEventPublisherAware, BeanClassLoaderAware, BeanFactoryAware,
        BeanNameAware, EnvironmentAware, ImportAware, ResourceLoaderAware {

    /**
     *  Bean的基本属性
     */
    private String name;
    private String sex;

    /**
     * Get方法
     * @return Bean的名称
     */
    public String getName() {
        return name;
    }

    /**
     * Set方法,为Bean添加属性,从Xml文件中获取得到Bean的文件配置信息
     * @param name
     */
    public void setName(String name) {
        System.out.println("【步骤2】执行Bean的set方法,设置name属性值:" + name);
        this.name = name;
    }
    public void setSex(String sex) {
        System.out.println("【步骤2】执行Bean的set方法,设置sex属性值:" + sex);
        this.sex = sex;
    }

    @Override
    public String toString() {
        return "IocBeanLifeService{" +
                "name='" + name + '\'' +
                ", sex='" + sex + '\'' +
                '}';
    }

    public IocBeanLifeService(){
        System.out.println("【步骤1】执行Bean的无参构造函数");
    }

    /**
     *  实现被继承的BeanNameAware的方法,为Bean添加名称
     */

    @Override
    public void setBeanName(String s) {
        System.out.println("【步骤3】执行BeanNameAware中setBeanName方法,beanName值:"
                + s);
    }

    /**
     *  通过类加载器,得到加载这个Bean的类加载器
     * @param classLoader
     */
    @Override
    public void setBeanClassLoader(ClassLoader classLoader) {
        System.out.println("【步骤4】执行BeanClassLoaderAware中setBeanClassLoader,ClassLoader的name = " + classLoader.getClass().getName());
    }


    /**
     * 检查BeanFactory是否已经包含了这个Bean
     * @param beanFactory
     * @throws BeansException
     */
    @Override
    public void setBeanFactory(BeanFactory beanFactory) throws BeansException {
        System.out.println("【步骤5】执行BeanFactoryAware中setBeanFactory,beanFactory中是否包含IocBeanLifeService:" + beanFactory.containsBean("iocBeanLifeService"));
    }

    /**
     * 为Bean设置基本属性 environment
     * @param environment
     */
    @Override
    public void setEnvironment(Environment environment) {
        System.out.println("【步骤6】执行EnvironmentAware的setEnvironment方法");
    }

    /**
     * 设置类加载器需要加载的资源文件
     * @param resourceLoader
     */
    @Override
    public void setResourceLoader(ResourceLoader resourceLoader) {
        Resource resource = resourceLoader.getResource("classpath:applicationContext.xml");
        System.out.println("【步骤7】执行ResourceLoaderAware的setResourceLoader方法,Resource File Name="
                + resource.getFilename());
    }

    /**
     * Bean 初始化之前的一个操作,属于Spring事件机制,作为事件的发布者
     * 发布者会调用 ApplicationEventPublisher的publishEvent 方法对某一事件进行发布。
     * @param applicationEventPublisher
     */
    @Override
    public void setApplicationEventPublisher(ApplicationEventPublisher applicationEventPublisher) {
        System.out.println("【步骤8】执行ApplicationEventPublisherAware中setApplicationEventPublisher方法");
    }

    @Override
    public void setApplicationContext(ApplicationContext applicationContext) throws BeansException {
        System.out.println("【步骤9】执行ApplicationContextAware的setApplicationContext方法,Bean Definition Names="
                + Arrays.toString(applicationContext.getBeanDefinitionNames()));
    }

    @PostConstruct
    public void initPostConstruct(){
        System.out.println("【步骤11】执行PostConstruct注解标注的方法");
    }

    /**
     * 属性注入之后Bean的操作
     * @throws Exception
     */
    @Override
    public void afterPropertiesSet() throws Exception {
        System.out.println("【步骤12】执行InitializingBean的afterPropertiesSet方法");

    }

    /**
     * 对Bean进行初始化
     * @throws Exception
     */
    public void initMethod() throws Exception {
        System.out.println("【步骤13】执行配置的init-method");
    }


    @PreDestroy
    public void preDestroy(){
        System.out.println("【步骤15】执行preDestroy注解标注的方法");
    }


    @Override
    public void destroy() throws Exception {
        System.out.println("【步骤16】执行DisposableBean接口的destroy方法");
    }


    /**
     *   通过的destroy-method属性指定的销毁方法
     */
    public void destroyMethod() throws Exception {
        System.out.println("【步骤17】执行配置的destroy-method");
    }

    @Override
    public void setImportMetadata(AnnotationMetadata annotationMetadata) {
        System.out.println("执行setImportMetadata");
    }
}
继承BeanPostProcessor文件
/**
 * @author: krest
 * @date: 2021/4/25 08:52
 * @description: 继承BeanPostProcessor,实现对Bean初始化前后的后置处理,主要针对Bean的初始化进行操作
 */

public class CustomerBeanPostProcessor implements BeanPostProcessor {

    @Override
    public Object postProcessBeforeInitialization(Object bean, String beanName) throws BeansException {
        System.out.println("【步骤10】执行BeanPostProcessor中postProcessBeforeInitialization方法,beanName=" + beanName);
        return bean;
    }

    @Override
    public Object postProcessAfterInitialization(Object bean, String beanName) throws BeansException {
        System.out.println("【步骤14】执行BeanPostProcessor的postProcessAfterInitialization方法,beanName=" + beanName+
                ";如果有Aop,那么同时执行AOP功能,最终对象为代理对象");
        return bean;
    }
}
XMl文件添加Bean属性信息
<beans xmlns="http://www.springframework.org/schema/beans"
       xmlns:xsi="http://www.w3.org/2001/XMLSchema-instance"
       xsi:schemaLocation="http://www.springframework.org/schema/beans
       http://www.springframework.org/schema/beans/spring-beans.xsd">

    <bean name="iocBeanLifeService" class="spring.beanlife.code.IocBeanLifeService" init-method="initMethod" destroy-method="destroyMethod">
        <property name="name" value="BeanLifeServiceTest">property>
        <property name="sex" value="man">property>
    bean>

    <bean class="org.springframework.context.annotation.CommonAnnotationBeanPostProcessor" />
    <bean class="spring.beanlife.code.CustomerBeanPostProcessor"/>
beans>
主要测试程序
package spring.beanlife.code;

import org.springframework.context.support.ClassPathXmlApplicationContext;

/**
 * @author: krest
 * @date: 2021/4/25 08:52
 * @description:
 */
public class test {
    public static void main(String[] args) {
        // 通过Xml的方式向Spring容器中添加一个自定义的B而安文件
        ClassPathXmlApplicationContext context =new ClassPathXmlApplicationContext("applicationContext.xml");
        System.out.println("Spring容器初始化完毕========================");

        System.out.println("从容器中获取Bean");
        IocBeanLifeService service = context.getBean("iocBeanLifeService", IocBeanLifeService.class);

        System.out.println(service.toString());

        System.out.println("Spring容器准备关闭==========================");
        context.close();
        System.out.println("Spring容器完成关闭===========================");
    }
}
运行结果
【步骤1】执行Bean的无参构造函数
【步骤2】执行Bean的set方法,设置name属性值:BeanLifeServiceTest
【步骤2】执行Bean的set方法,设置sex属性值:man
【步骤3】执行BeanNameAware中setBeanName方法,beanName值:iocBeanLifeService
【步骤4】执行BeanClassLoaderAware中setBeanClassLoader,ClassLoader的name = sun.misc.Launcher$AppClassLoader
【步骤5】执行BeanFactoryAware中setBeanFactory,beanFactory中是否包含IocBeanLifeService:true
【步骤6】执行EnvironmentAware的setEnvironment方法
【步骤7】执行ResourceLoaderAware的setResourceLoader方法,Resource File Name=applicationContext.xml
【步骤8】执行ApplicationEventPublisherAware中setApplicationEventPublisher方法
【步骤9】执行ApplicationContextAware的setApplicationContext方法,Bean Definition Names=[iocBeanLifeService, org.springframework.context.annotation.CommonAnnotationBeanPostProcessor#0, spring.beanlife.code.CustomerBeanPostProcessor#0]
【步骤10】执行BeanPostProcessor中postProcessBeforeInitialization方法,beanName=iocBeanLifeService
【步骤11】执行PostConstruct注解标注的方法
【步骤12】执行InitializingBean的afterPropertiesSet方法
【步骤13】执行配置的init-method
【步骤14】执行BeanPostProcessor的postProcessAfterInitialization方法,beanName=iocBeanLifeService;如果有Aop,那么同时执行AOP功能,最终对象为代理对象
Spring容器初始化完毕========================
从容器中获取Bean
IocBeanLifeService{name='BeanLifeServiceTest', sex='man'}
Spring容器准备关闭==========================
【步骤15】执行preDestroy注解标注的方法
【步骤16】执行DisposableBean接口的destroy方法
【步骤17】执行配置的destroy-method
Spring容器完成关闭===========================

Process finished with exit code 0