参考资料
官方文档 https://docs.gitlab.com/ce/
安装说明 https://about.gitlab.com/install
安装
官方企业版安装文档 https://about.gitlab.com/install/#centos-7?version=ee
官方社区版安装文档 https://about.gitlab.com/install/#centos-7?version=ce
清华大学镜像站 https://mirror.tuna.tsinghua.edu.cn/help/gitlab-ce/
参照上述官方文档即可安装,其中需要注意以下地方。
- 如果没有开启firewalld可以不用执行命令行中关于firewalld的指令
- 如果你想使用其他邮件系统发送邮件通知可以不用安装postfix
- 注意在执行
sudo EXTERNAL_URL="https://gitlab.example.com" yum install -y gitlab-ee安装时替换地址https://gitlab.example.com如果你这里使用https,系统会自动给你配置一个证书,也可以使用http。当然你可以安装完毕之后通过修改配置文件/etc/gitlab/gitlab.rb修改 - 注意选择版本ee企业版,ce社区版
以下为centos7 ce社区版,使用清华大学的镜像的安装示例
- 安装依赖包
yum install -y curl policycoreutils-python openssh-server openssh-clients
systemctl enable sshd
systemctl start sshd
- 添加清华大学的gitlab-ce镜像 https://mirror.tuna.tsinghua.edu.cn/help/gitlab-ce/
新建 /etc/yum.repos.d/gitlab-ce.repo,内容为
[gitlab-ce]
name=Gitlab CE Repository
baseurl=https://mirrors.tuna.tsinghua.edu.cn/gitlab-ce/yum/el$releasever/
gpgcheck=0
enabled=1
- 安装gitlab-ce
yum makecache
EXTERNAL_URL="http://code.cainiaolexue.com:8090" yum install -y gitlab-ce
服务配置
官方文档 https://docs.gitlab.com/omnibus/README.html#installation-and-configuration-using-omnibus-package
注意:
- 在gitlab的服务架构中,unicorn是ruby的http server,nginx只是unicorn的反向代理。
- 配置文件地址
/etc/gitlab/gitlab.rb,配置修改之后执行gitlab-ctl reconfigure使配置生效到各个服务的配置中去。 - 以下为我主要调整的配置项。(因为存在端口占用冲突的情况,主要是修改各种端口)
external_url 'http://code.cainiaolexue.com:8090'

# 优化unicorn服务
unicorn['worker_processes'] = 2

# 调整时区
gitlab_rails['time_zone'] = 'Asia/Shanghai'

gitlab_rails['gitlab_email_enabled'] = true
gitlab_rails['gitlab_email_from'] = '[email protected]'
gitlab_rails['gitlab_email_display_name'] = '源码管理系统'
gitlab_rails['gitlab_email_reply_to'] = '[email protected]'
gitlab_rails['gitlab_email_subject_suffix'] = ''

# 配置邮箱 https://docs.gitlab.com/omnibus/settings/smtp.html

gitlab_rails['smtp_enable'] = true
gitlab_rails['smtp_address'] = "smtp.ym.163.com"
gitlab_rails['smtp_port'] = 994
gitlab_rails['smtp_user_name'] = "[email protected]"
gitlab_rails['smtp_password'] = "smtp password"
gitlab_rails['smtp_domain'] = "cainiaolexue.com"
gitlab_rails['smtp_authentication'] = "login"
gitlab_rails['smtp_enable_starttls_auto'] = true
gitlab_rails['smtp_tls'] = true
gitlab_rails['smtp_openssl_verify_mode'] = 'peer'

# If your SMTP server does not like the default 'From: gitlab@localhost' you
# can change the 'From' with this setting.
gitlab_rails['gitlab_email_from'] = '[email protected]'
gitlab_rails['gitlab_email_reply_to'] = '[email protected]'
查看配置
[root@web37 ~]# grep -v "#" /etc/gitlab/gitlab.rb  | grep -v "^$"
external_url 'http://code.cainiaolexue.com:80090'
unicorn['worker_processes'] = 2
gitlab_rails['time_zone'] = 'Asia/Shanghai'
gitlab_rails['gitlab_email_enabled'] = true
gitlab_rails['gitlab_email_from'] = '[email protected]'
gitlab_rails['gitlab_email_display_name'] = '源码管理系统'
gitlab_rails['gitlab_email_reply_to'] = '[email protected]'
gitlab_rails['gitlab_email_subject_suffix'] = ''
gitlab_rails['smtp_enable'] = true
gitlab_rails['smtp_address'] = "smtp.ym.163.com"
gitlab_rails['smtp_port'] = 994
gitlab_rails['smtp_user_name'] = "[email protected]"
gitlab_rails['smtp_password'] = ""
gitlab_rails['smtp_domain'] = "cainiaolexue.com"
gitlab_rails['smtp_authentication'] = "login"
gitlab_rails['smtp_enable_starttls_auto'] = true
gitlab_rails['smtp_tls'] = true
[root@web37 ~]#
因为我的服务器上有另外一个nginx,所以我使用了8090端口作为gitlab的访问,也可以在之前的nginx上使用反向代理。
server {
        listen 80;
        server_name code.cainiaolexue.com;
        access_log  /data/weblog/code_access.log  main;
        error_log  /data/weblog/code_error.log;
        location / {
                proxy_redirect off;
                proxy_set_header Host $host;
                proxy_set_header X-Real-IP $remote_addr;
                proxy_set_header X-Forwarded-For $proxy_add_x_forwarded_for;
                proxy_pass http://127.0.0.1:8090;
        }
}
GitLab常用命令
gitlab-ctl start        # 启动所有 gitlab 组件
gitlab-ctl stop         # 停止所有 gitlab 组件
gitlab-ctl restart      # 重启所有 gitlab 组件
gitlab-ctl status       # 查看服务状态
gitlab-ctl reconfigure  # 重新配置服务使配置文件写入到各个服务中
gitlab-ctl tail         # 查看日志
gitlab-ctl show-config  # 显示配置信息
vim /etc/gitlab/gitlab.rb  # 修改默认的配置文件
gitlab-rake gitlab:check SANITIZE=true --trace  # 检查gitlab
汉化包
网址 https://gitlab.com/xhang/gitlab
- 查看gitlab版本 (一定要下载对应版本的汉化文件)
[root@zhangxiu-test gitlab-rails]# rpm -q gitlab-ce
gitlab-ce-11.9.8-ce.0.el7.x86_64
# 或者
[root@zhangxiu-test gitlab-rails]# cat /opt/gitlab/embedded/service/gitlab-rails/VERSION
11.9.8
- 下载并使用中文包
# 使用 wget
wget https://gitlab.com/xhang/gitlab/-/archive/11-9-stable-zh/gitlab-11-9-stable-zh.tar.gz -O /gitlab-11-9-stable-zh.tar.gz

# 或者使用 git clone 然后选择对应的版本分支
git clone https://gitlab.com/xhang/gitlab.git
git branch -r
git branch

# 查看汉化包版本
cat VERSION

# 备份文件gitlab无法使用(注意此处cp 前的\ 是因为我的cp命令使用了别名 alias)
[root@zhangxiu-test gitlab]# alias
alias cp='cp -i'
alias egrep='egrep --color=auto'
alias fgrep='fgrep --color=auto'
alias grep='grep --color=auto'
alias l.='ls -d .* --color=auto'
alias ll='ls -l --color=auto'
alias ls='ls --color=auto'
alias mv='mv -i'
alias rm='rm -i'
alias which='alias | /usr/bin/which --tty-only --read-alias --show-dot --show-tilde'

\cp -fr ./* /opt/gitlab/embedded/service/gitlab-rails/
gitlab-ctl reconfigure
gitlab-ctl restart
# 语言包文件位置
cat /opt/gitlab/embedded/service/gitlab-rails/locale/zh_CN/gitlab.po
备份与恢复
# 备份
gitlab-rake gitlab:backup:create
# 恢复(把备份的文件放在备份目录下,然后执行恢复)
gitlab-ctl stop unicorn
gitlab-ctl stop sidekiq
gitlab-rake gitlab:backup:restore BACKUP=1556156510_2019_04_25_11.9.8

# 注意备份gitlab密钥文件,不然用户无法访问
/etc/gitlab/gitlab-secrets.json
gitlab使用 管理员设置
- 用户 用户组 项目设置
用户组中的用户会生效到用户组下属的所有项目中

- 广播消息发送

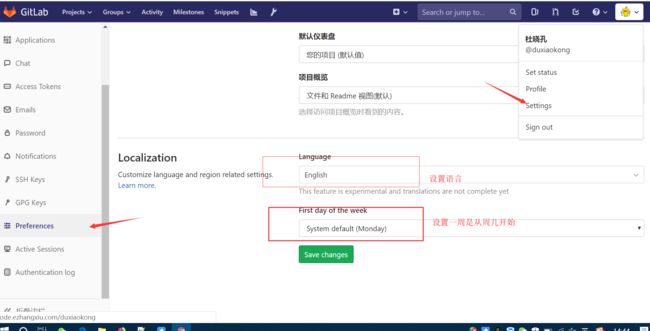
gitlab使用 个人基础信息设置
- 设置语言,每周星期几开始
- 设置access tokens访问令牌
此令牌可以用于jenkins的触发自动部署等

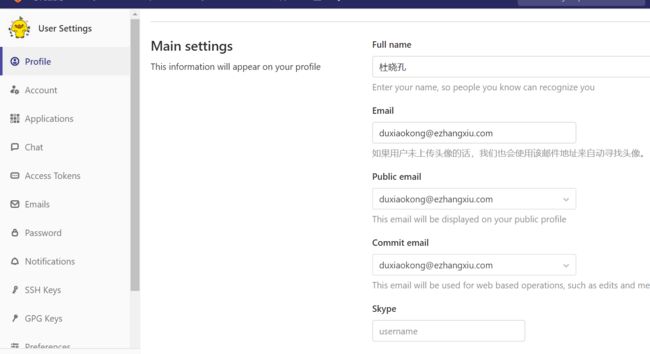
- 设置邮箱姓名等基础信息
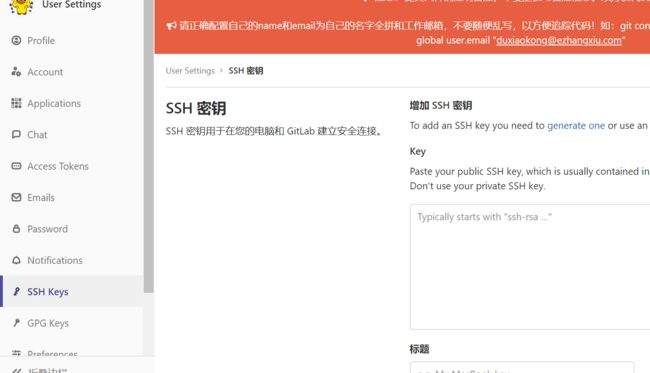
- 设置 ssh 密钥
添加ssh公钥到gitlab,用来获取代码。
常见问题
- 服务没有启动
[root@zhangxiu-test gitlab]# gitlab-ctl start
fail: alertmanager: runsv not running
fail: gitaly: runsv not running
fail: gitlab-monitor: runsv not running
fail: gitlab-workhorse: runsv not running
fail: logrotate: runsv not running
fail: nginx: runsv not running
fail: node-exporter: runsv not running
fail: postgres-exporter: runsv not running
fail: postgresql: runsv not running
fail: prometheus: runsv not running
fail: redis: runsv not running
fail: redis-exporter: runsv not running
fail: sidekiq: runsv not running
fail: unicorn: runsv not running
需要手动启动一下gitlab服务
systemctl start gitlab-runsvdir.service
- 新安装服务的管理员账号为 [email protected],首次进入系统需要设置密码
- admin设置500 gitlab 500 errors in the admin area
Started PATCH "/admin/application_settings" for 58.135.84.38 at 2019-04-24 18:09:58 +0800
Processing by Admin::ApplicationSettingsController#update as HTML
  Parameters: {"utf8"=>"✓", "authenticity_token"=>"[FILTERED]", "application_setting"=>{"max_pages_size"=>"100", "pages_domain_verification_enabled"=>"1"}}
Completed 500 Internal Server Error in 34ms (ActiveRecord: 12.3ms)

OpenSSL::Cipher::CipherError ():

lib/gitlab/crypto_helper.rb:27:in `aes256_gcm_decrypt'
app/models/concerns/token_authenticatable_strategies/encrypted.rb:45:in `get_token'
app/models/concerns/token_authenticatable_strategies/base.rb:27:in `ensure_token'
app/models/concerns/token_authenticatable_strategies/encrypted.rb:32:in `ensure_token'
参照 https://stackoverflow.com/questions/54128023/gitlab-500-errors-in-the-admin-area
gitlab-rails console
ApplicationSetting.current.reset_runners_registration_token!
- 添加了公钥到gitlab无法获取代码
注意gitlab ssh端口的开发,防火墙,iptables,/etc/hosts.allow 配置 等