相对布局android:visibility,Android最强布局——ConstraintLayout约束布局
Android最强布局——ConstraintLayout约束布局
Android最强布局——ConstraintLayout约束布局
首先,现附上官方文档:ConstraintLayout官方文档
约束布局ConstraintLayout 是一个ViewGroup,可以在Api9以上的Android系统使用它,它的出现主要是为了解决布局嵌套过多的问题,以灵活的方式定位和调整小部件。从 Android Studio 2.3 起,官方的模板默认使用 ConstraintLayout。
然而,ConstraintLayout的出现就是为了解决布局嵌套的问题。在开发过程中经常能遇到一些复杂的UI,可能会出现布局嵌套过多的问题,嵌套得越多,设备绘制视图所需的时间和计算功耗也就越多。
在使用过程中,ConstraintLayout 可以看做是一个更强大的 RelativeLayout,它提供了更多的 API 来约束控件的相对关系,更容易满足复杂的页面布局。
相对定位:
a控件的xx位于b控件的xx
layout_constraintLeft_toLeftOf a控件的左边位于b控件的右边
layout_constraintLeft_toRightOf
layout_constraintRight_toLeftOf
layout_constraintRight_toRightOf
layout_constraintTop_toTopOf
layout_constraintTop_toBottomOf
layout_constraintBottom_toTopOf
layout_constraintBottom_toBottomOf
layout_constraintBaseline_toBaselineOf
文本对齐:两个TextView的高度不一致,但是又希望他们文本对齐
layout_constraintStart_toEndOf
layout_constraintStart_toStartOf
layout_constraintEnd_toStartOf
layout_constraintEnd_toEndOf
居中:
控件上下左右居中显示:
app:layout_constraintLeft_toLeftOf="parent”
app:layout_constraintRight_toRightOf=“parent”
app:layout_constraintTop_toTopOf=“parent”
app:layout_constraintBottom_toBottomOf=“parent”
居中偏移(bias)
在上述居中的情况下,可以设置偏移量
(0-1)0表示最左,1表示最右
layout_constraintHorizontal_bias 水平偏移
layout_constraintVertical_bias 垂直偏移
圆形定位(角度定位)
可以让一个控件以另一个控件的中心为中心点,来设置其相对与该中心点的距离和角度
app:layout_constraintCircle 需要看齐的参照物,图中 B 就是把 A 当做参照物进行约束的
app:layout_constraintCircleAngle 要旋转的角度,最上方 0 度,默认就是 0 度,顺时针开始算。
app:layout_constraintCircleRadius 两个控件中心点的距离
边距:
1.控件必须在布局里约束一个相对位置
2.margin只能大于等于0
android:layout_marginStart
android:layout_marginEnd
android:layout_marginLeft
android:layout_marginTop
android:layout_marginRight
android:layout_marginBottom
goneMargin
goneMargin主要用于约束的控件可见性被设置为gone的时候使用的margin值,属性如下:
layout_goneMarginStart
layout_goneMarginEnd
layout_goneMarginLeft
layout_goneMarginTop
layout_goneMarginRight
layout_goneMarginBottom
尺寸约束:
1.使用指定的尺寸
2.使用wrap_content,让控件自己计算大小
当控件的高度或宽度为wrap_content时,可以使用下列属性来控制最大、最小的高度或宽度:
android:minWidth 最小的宽度
android:minHeight 最小的高度
android:maxWidth 最大的宽度
android:maxHeight 最大的高度
注意!当ConstraintLayout为1.1版本以下时,使用这些属性需要加上强制约束,如下所示:
app:constrainedWidth=”true”
app:constrainedHeight=”true”
3.使用 0dp (MATCH_CONSTRAINT)
官方不推荐在ConstraintLayout中使用match_parent,可以设置 0dp
宽高比
当宽或高至少有一个尺寸被设置为0dp时,app:layout_constraintDimensionRatio=“1:1”
设置控件宽高比
约束链
能够在水平或垂直方向控件之间相互约束而组成的一条链就是约束链,约束链是由开头的控件进行属性控制的。没错就是跟着大哥走
app:layout_constraintHorizontal_chainStyle=“xxx”
packed:控件紧挨在一起。还可以通过bias属性设置偏移量。
spread:均与分布控件。
spread_inside:均与分布控件,但是两边控件贴边。
app:layout_constraintHorizontal_weight=“x”
app:layout_constraintVertical_weight=“x”
当宽度设为0dp,就可以使用水平权重。
当长度设为0dp,就可以使用垂直权重
辅助工具
Group可以把多个控件归为一组,方便隐藏或显示一组控件
android:id="@+id/group"
android:layout_width=“wrap_content”
android:layout_height=“wrap_content”
android:visibility=“invisible” 隐藏但存在在 gone 隐藏不存在
app:constraint_referenced_ids=“TextView1,TextView3” />
Guideline 是约束布局中一个特殊的辅助布局类,可以创建水平或者垂直的参考线,其他的控件可以根据这个参考线来进行布局,它本质是不可见的控件。
参考线的位置属性:
orientation:vertical/horizontal
layout_constraintGuide_begin 指定距离左/上边开始的固定位置
layout_constraintGuide_end 指定距离右/下边开始的固定位置
layout_constraintGuide_percent 指定位于布局中所在的百分比
constraint_referenced_ids 引用多个控件,看作一个整体来添加一个与另外一个控件限制最大宽/高的约束。
通过 app:barrierDirection 属性来决定 Barrier 的方向
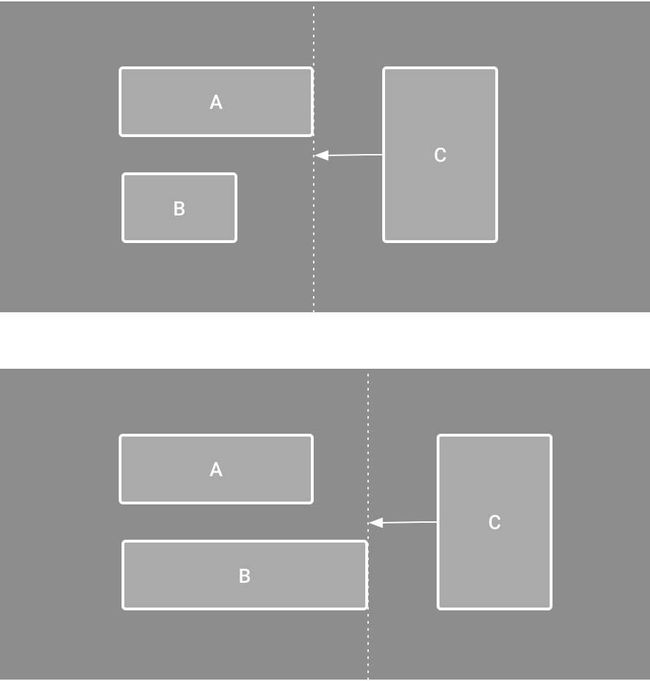
设有3个控件ABC,C在AB的右边,但是AB的宽是不固定的,这个时候C无论约束在A的右边或者B的右边都不对。当出现这种情况可以用Barrier来解决。Barrier可以在多个控件的一侧建立一个屏障
android:id="@+id/barrier"
android:layout_width="wrap_content"
android:layout_height="wrap_content"
app:barrierDirection="right"
app:constraint_referenced_ids="TextView1,TextView2" />
app:barrierDirection为屏障所在的位置,可设置的值有:bottom、end、left、right、start、top
app:constraint_referenced_ids为屏障引用的控件,可设置多个(用“,”隔开)
Android最强布局——ConstraintLayout约束布局相关教程
Android | 面试必问的 Handler,你确定不看看?
Android | 面试必问的 Handler,你确定不看看? 在 Android 中,Handler 是贯穿于整个应用的消息机制, 在面试中出现的概率为:100% 在这篇文章里,我将带你梳理 Handler 的使用攻略 设计原理。追求简单易懂又不失深度,如果能帮上忙,请务必点赞加关注! 在
flex布局,居中对齐,垂直对齐,对齐。。。
flex布局,居中对齐,垂直对齐,对齐。。。 flex的基本内容 解释: 1.红色是主要知识点,橘色是细节内容,图片是样例 2.具体内容在代码里面哟 后面有简单的总结^ * ^~~* !DOCTYPE htmlhtmlheadmeta charset=utf-8 /titleFlex布局/titlescript src=js/vue.js t
flex弹性布局align-items: ;属性为什么没有发挥效果的原因
flex弹性布局align-items: ;属性为什么没有发挥效果的原因 分享一下flex弹性布局的使用,常使用:display: flex; flex-direction: ; justify-content: ; align-items: ; flex-wrap: ;等属性值 !DOCTYPE htmlhtml lang=enhead meta charset=UTF-8 meta name=
Android NDK 报错:undefined reference to ‘main‘(invalid c
Android NDK 报错:undefined reference to ‘main‘(invalid character)解决办法 好久没写博客了,现在更习惯用脑图记录知识点,记一些关键字即可,快速又成体系。 不过分享的初心还是要保持,不能总是索取而不贡献,现在雷同的内容太多了,还是需要一些较
Android 之 JNI配置过程
Android 之 JNI配置过程 这里暂时我只是记录一下我的JNI配置过程(网上有很多,我这只是众多方法中的一种,可能有些教程比较简单,记得选择自己适合的~) JNI配置过程 该配置过程我主要参考的是Android Studio第一个JNI开发入门(整理一)(测试很多次,在我
Android O(8)以上应用保活看这篇文章就够了-最简单而又免费的
Android O(8)以上应用保活看这篇文章就够了-最简单而又免费的保活方法 图片为证 图1 程序自动拉活 图2 打不开的进程页面 文章目录 图片为证 保活思路 拉活权限 完整代码 保活思路 传统的套路咱就不再累赘(详情可看这里),这里分享一个流氓做法,具体看下
Android Studio GC overhead limit exceeded 问题的解决
Android Studio GC overhead limit exceeded 问题的解决 最近编译老项目。也没多老。去年才编译过的项目。 但是每次编译之后,代码没有错误,就是提示 GC overhead limit exceeded 有些时候也会给你提示下面的内容 而且还有一种情况,就是你直接编译Debug版本
Android目录解析
Android目录解析 安卓项目目录如上图所示 .gradle // 项目gradle的编译文件.idea // 编辑器配置文件 app //整个app的相关文件facelibrary // 第三方人脸库library //第三方工具库 build.gradle //整个项目的配置文件settings.gradle //引入第三方库配置文件
