YOLOX源码解析--全网最详细,建议收藏!
YOLOX源码解析
大家好,我是【豆干花生】,这次我带来了YOLOX源码解析,与你分享~
参考文献:
https://blog.csdn.net/u011622208/article/details/119146813
https://blog.csdn.net/sinat_33486980/article/details/119560250
文章目录
- YOLOX源码解析
-
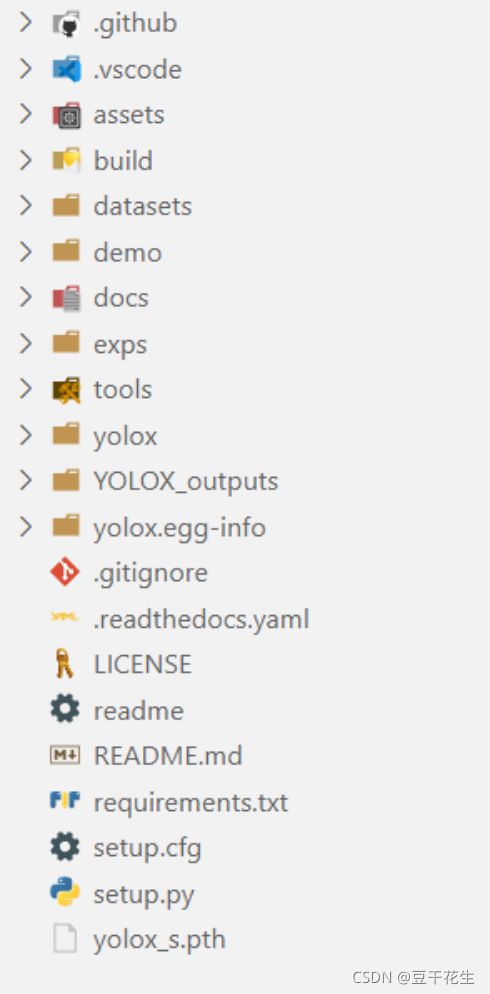
- 一.整体代码结构,每个py模块的含义
-
- 1.build
- 2.datasets
- 3.demo
- 4.docs
- 5.exps
- 6.tools
- 7.yolox(重点看!)
- 8.YOLOX_outputs
- 9.yolox.egg-info
- 10.单独文件
- 二.具体函数的含义,相关函数的联系和框架
-
- 1.data文件夹
-
- 1.1文件夹结构
- 1.2 Strong data augmentation
-
- Mosaic数据增强方法
- mixup
- code
- 2.models文件夹
-
- 2.1文件夹结构
- 2.2Anchor-free
-
- Multi positives
- SimOTA标签分配
- 2.3Backbone
-
- YOLOPAFPN
- Darknet 53
- loss函数
- 2.4网络需要调用的模块
-
- Focus
- CSPlayer
- 2.5YOLOXHead
- 三.yolox的可迁移操作
一.整体代码结构,每个py模块的含义
1.build
包含的都是yolox文件夹里的很多文件,可能是之前的一些版本吧。
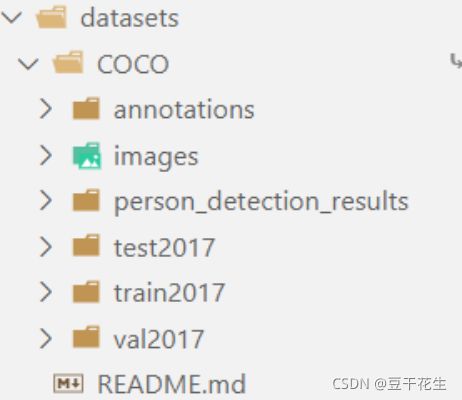
2.datasets
数据集,使用coco2017
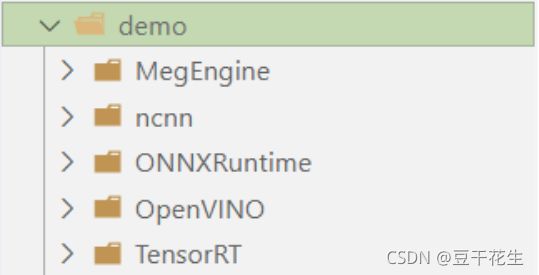
3.demo
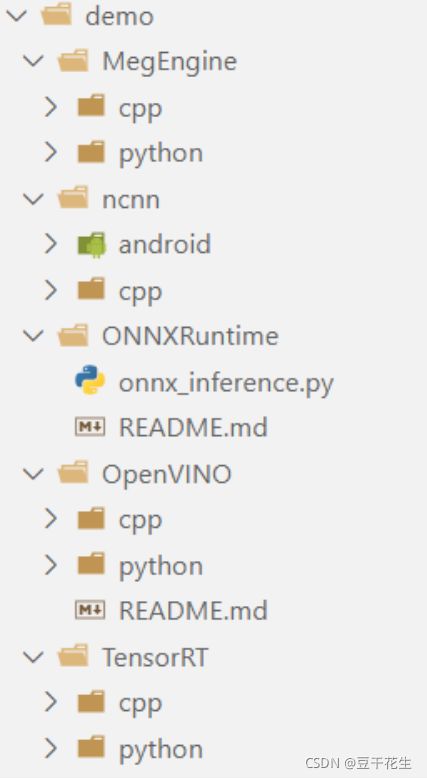
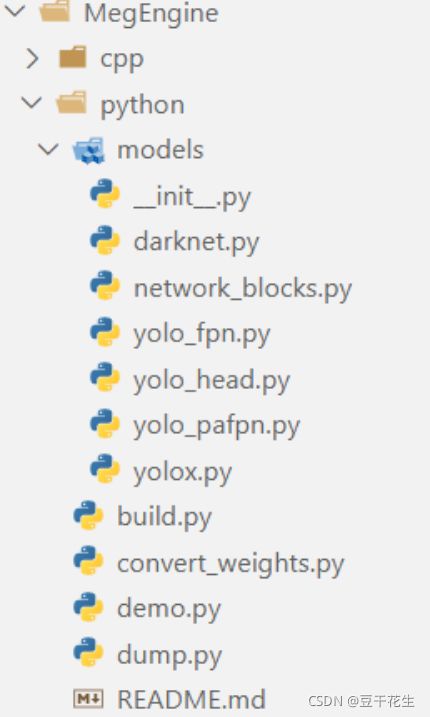
样例,分别基于 MegEngine、ONNX、TensorRT、openvino 和 ncnn的部署
可以看到每种部署,包含c++、android、python中的某种实现。
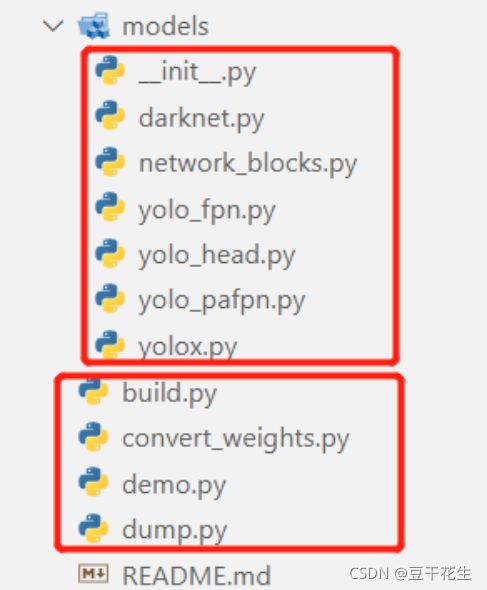
这里我们看MegEngine中的python版本:
4.docs
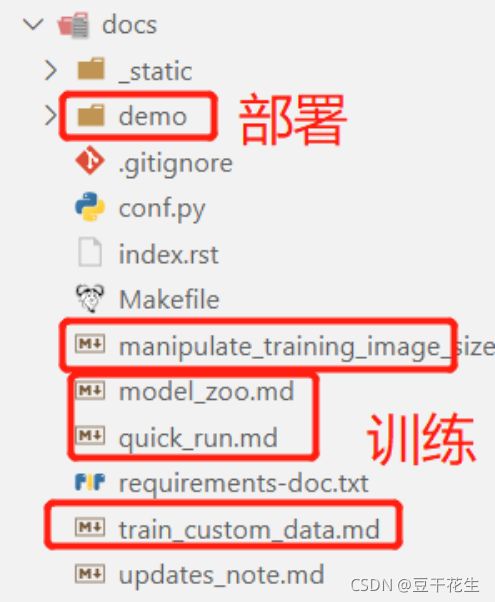
应该是所有的readme文件。
manipulate_training_image_size.md介绍了如何在对自己的数据进行训练时控制图像大小。
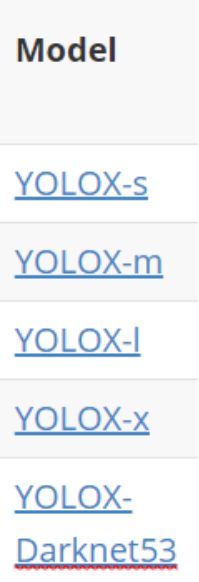
modle_zoo.md介绍了各种标准模型。
quick_run.md介绍了代码的使用操作
train_custom_data.md介绍如何使用YOLOX训练您自己的自定义数据。我们以VOC数据集上微调YOLOX-S模型为例,给出了更清晰的指导。
updates_note.md讲了对代码的更新。比如:*支持图像缓存以加快培训速度,这需要较大的系统RAM。*消除对apex的依赖,支持torch放大器培训。优化预处理以加快训练速度用新的HSV aug替换旧的扭曲增强,以实现更快的训练和更好的性能。
5.exps
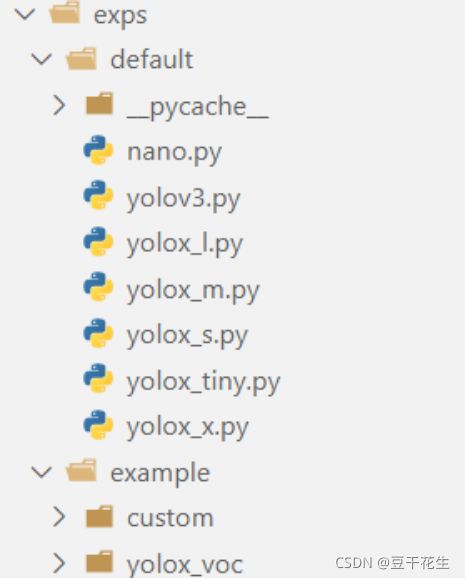
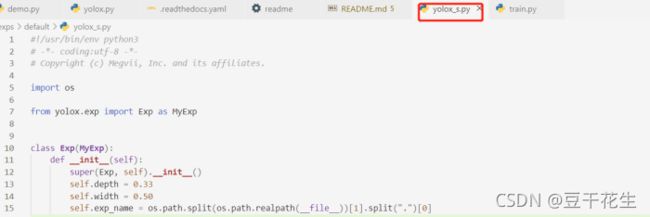
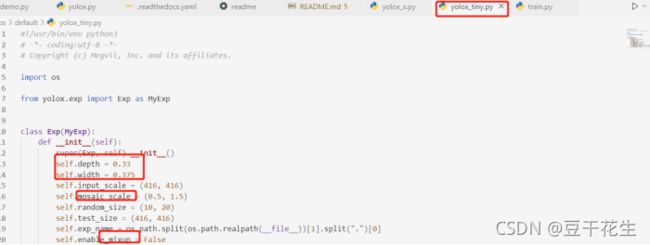
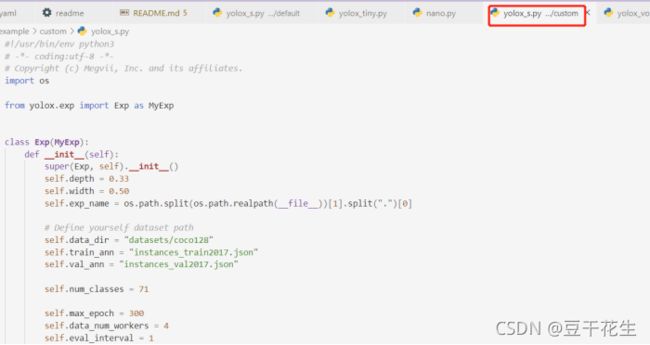
介绍了对不同标准模型进行使用的配置文件
包括各种输入参数、模块方法选择
example文件中写了具体的配置示例:
6.tools
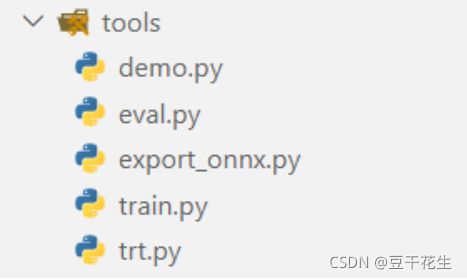
一些训练用的通用文件。
7.yolox(重点看!)
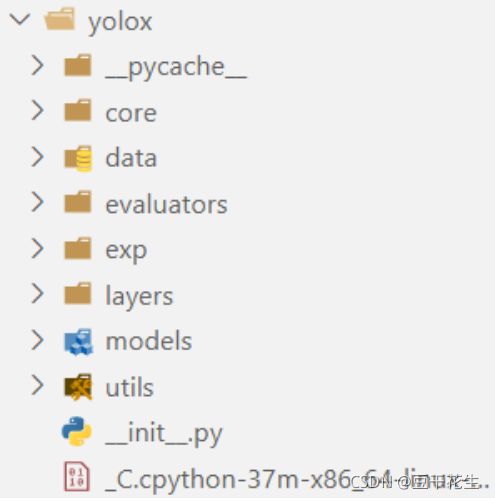
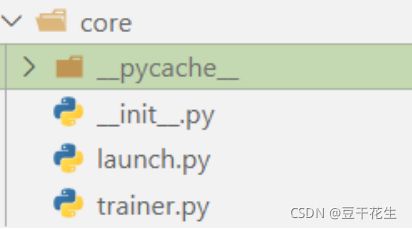
core一些加载文件
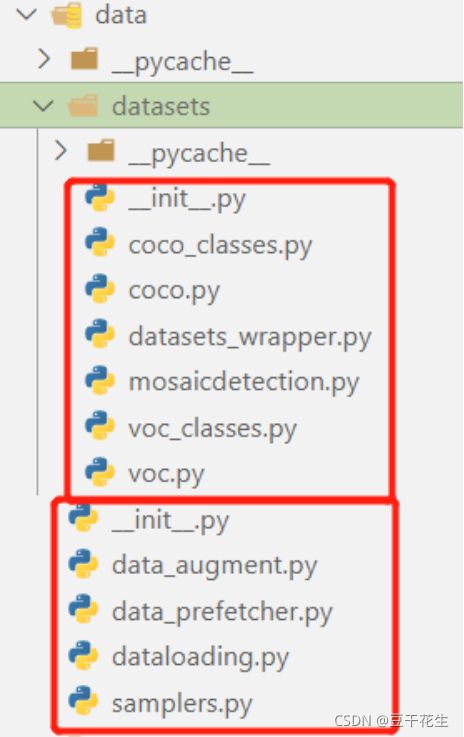
data数据处理,一些数据处理操作
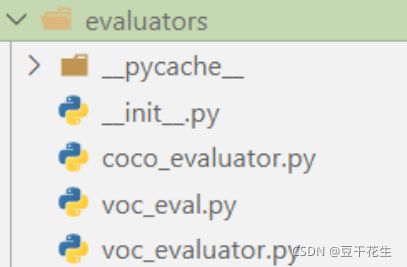
evaluator进行评估、评测吧,训练的时候要用
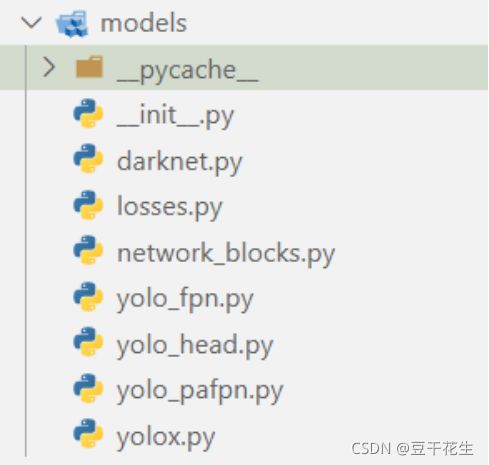
model模型代码,模型主体。
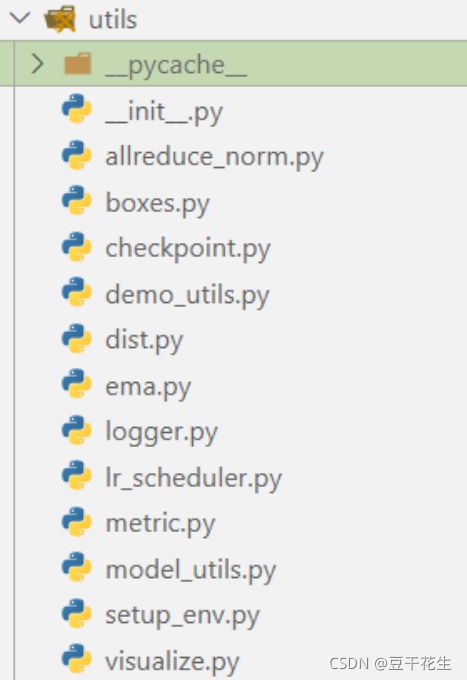
util是一些工具。
8.YOLOX_outputs
训练输出的结果。进行可视化的一些操作。
9.yolox.egg-info
一些配置和初始化文件。依赖库。
10.单独文件
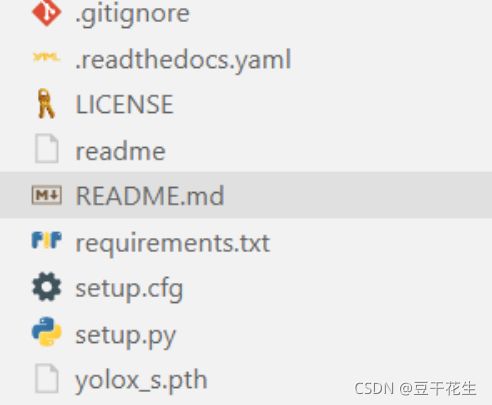
一些说明和配置文件
二.具体函数的含义,相关函数的联系和框架
重点看yolox文件夹下一些模块:
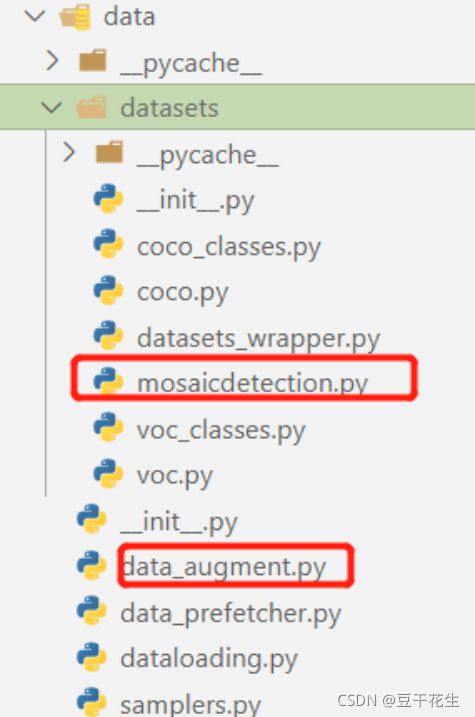
datasets文件夹下的mosaicdetection.py,data_augment.py
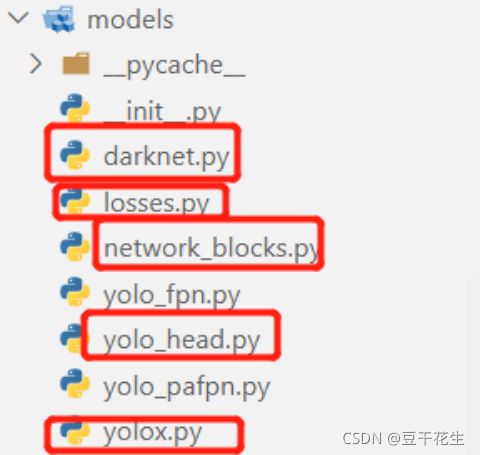
models文件夹下的darknet.py,losses.py,network_blocks.py,yolo_head.py,yolox.py
1.data文件夹
1.1文件夹结构
coco_classes.py是coco数据集的类别,coco.py是coco数据集的初始化、进行数据读取。voc_classes.py是voc数据集的类别,voc.py是voc数据集的初始化、进行数据读取。
datasets_wrapper.py将处理后的数据集,进行整理和封装
mosaicdetection.py进行马赛克操作,实现数据增强
data_augment.py模块进行相关数据处理,包含hsv等一些数据增强方法
data_prefetcher.py加快pytorch的数据加载
dataloading.py该模块进行数据加载,获取数据集的文件
samplers.py该模块进行抽样,批取样器,将从另一个取样器生成(马赛克,索引)元组的小批
init.py是一些依赖库
1.2 Strong data augmentation
添加了Mosaic与Mixup两种数据增广以提升YOLOX的性能。Mosaic是U版YOLOv3中引入的一种有效增广策略,后来被广泛应用于YOLOv4、YOLOv5等检测器中。MixUp早期是为图像分类设计后在BoF中进行修改用于目标检测训练。通过这种额外的数据增广,基线模型取得了42.0%AP指标。注:由于采用了更强的数据增广,我们发现ImageNet预训练将毫无意义,因此,所有模型我们均从头开始训练。
Mosaic数据增强方法
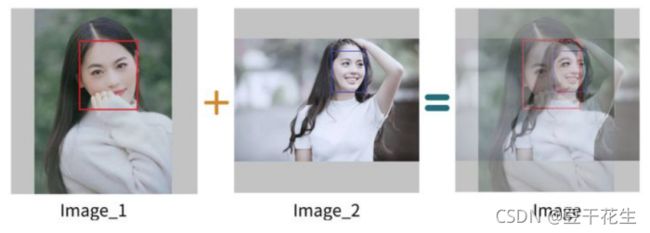
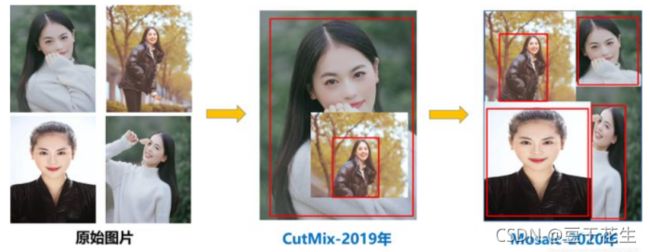
mosaic数据增强则利用了四张图片,对四张图片进行拼接,每一张图片都有其对应的框框,将四张图片拼接之后就获得一张新的图片,同时也获得这张图片对应的框框,然后我们将这样一张新的图片传入到神经网络当中去学习,相当于一下子传入四张图片进行学习了。论文中说这极大丰富了检测物体的背景!且在标准化BN计算的时候一下子会计算四张图片的数据!如下图所示:
mixup
最开始用于图像分类中的。这里我们直接给出效果图。
code
代码部分在Mosaicdetection.py中
- 首先获得4张图片,进行
Mosaic增强 - 然后再随机选一张进行
mixup增强
#进行马赛克操作,实现数据增强
def get_mosaic_coordinate(mosaic_image, mosaic_index, xc, yc, w, h, input_h, input_w):
    # TODO update doc
    #四个参数对四张图进行拼接
    # index0 to top left part of image
    if mosaic_index == 0:
        x1, y1, x2, y2 = max(xc - w, 0), max(yc - h, 0), xc, yc
        small_coord = w - (x2 - x1), h - (y2 - y1), w, h
    # index1 to top right part of image
    elif mosaic_index == 1:
        x1, y1, x2, y2 = xc, max(yc - h, 0), min(xc + w, input_w * 2), yc
        small_coord = 0, h - (y2 - y1), min(w, x2 - x1), h
    # index2 to bottom left part of image
    elif mosaic_index == 2:
        x1, y1, x2, y2 = max(xc - w, 0), yc, xc, min(input_h * 2, yc + h)
        small_coord = w - (x2 - x1), 0, w, min(y2 - y1, h)
    # index3 to bottom right part of image
    elif mosaic_index == 3:
        x1, y1, x2, y2 = xc, yc, min(xc + w, input_w * 2), min(input_h * 2, yc + h)  # noqa
        small_coord = 0, 0, min(w, x2 - x1), min(y2 - y1, h)
    return (x1, y1, x2, y2), small_coord
def __getitem__(self, idx):
        #该py文件的主体,调用其他方法,输出结果
        if self.enable_mosaic and random.random() < self.mosaic_prob:
            mosaic_labels = []
            input_dim = self._dataset.input_dim
            input_h, input_w = input_dim[0], input_dim[1]

            # yc, xc = s, s  # mosaic center x, y。mosaic方法的中心点
            yc = int(random.uniform(0.5 * input_h, 1.5 * input_h))
            xc = int(random.uniform(0.5 * input_w, 1.5 * input_w))

            # 3 additional image indices,三个增加的图片指数
            indices = [idx] + [random.randint(0, len(self._dataset) - 1) for _ in range(3)]

            for i_mosaic, index in enumerate(indices):
                img, _labels, _, img_id = self._dataset.pull_item(index)
                h0, w0 = img.shape[:2]  # orig hw
                scale = min(1. * input_h / h0, 1. * input_w / w0)
                img = cv2.resize(
                    img, (int(w0 * scale), int(h0 * scale)), interpolation=cv2.INTER_LINEAR
                )
                # generate output mosaic image,生成结果图片
                (h, w, c) = img.shape[:3]
                if i_mosaic == 0:
                    mosaic_img = np.full((input_h * 2, input_w * 2, c), 114, dtype=np.uint8)

                # suffix l means large image, while s means small image in mosaic aug.对不同图片进行缩放处理
                (l_x1, l_y1, l_x2, l_y2), (s_x1, s_y1, s_x2, s_y2) = get_mosaic_coordinate(
                    mosaic_img, i_mosaic, xc, yc, w, h, input_h, input_w
                )

                mosaic_img[l_y1:l_y2, l_x1:l_x2] = img[s_y1:s_y2, s_x1:s_x2]
                padw, padh = l_x1 - s_x1, l_y1 - s_y1

                labels = _labels.copy()
                # Normalized xywh to pixel xyxy format,对xywh参数进行归一化
                if _labels.size > 0:
                    labels[:, 0] = scale * _labels[:, 0] + padw
                    labels[:, 1] = scale * _labels[:, 1] + padh
                    labels[:, 2] = scale * _labels[:, 2] + padw
                    labels[:, 3] = scale * _labels[:, 3] + padh
                mosaic_labels.append(labels)

            if len(mosaic_labels):
                mosaic_labels = np.concatenate(mosaic_labels, 0)
                np.clip(mosaic_labels[:, 0], 0, 2 * input_w, out=mosaic_labels[:, 0])
                np.clip(mosaic_labels[:, 1], 0, 2 * input_h, out=mosaic_labels[:, 1])
                np.clip(mosaic_labels[:, 2], 0, 2 * input_w, out=mosaic_labels[:, 2])
                np.clip(mosaic_labels[:, 3], 0, 2 * input_h, out=mosaic_labels[:, 3])

            mosaic_img, mosaic_labels = random_perspective(
                mosaic_img,
                mosaic_labels,
                degrees=self.degrees,
                translate=self.translate,
                scale=self.scale,
                shear=self.shear,
                perspective=self.perspective,
                border=[-input_h // 2, -input_w // 2],
            )  # border to remove

            # -----------------------------------------------------------------
            # CopyPaste: https://arxiv.org/abs/2012.07177
            # -----------------------------------------------------------------
            if (
                self.enable_mixup
                and not len(mosaic_labels) == 0
                and random.random() < self.mixup_prob
            ):
                mosaic_img, mosaic_labels = self.mixup(mosaic_img, mosaic_labels, self.input_dim)
            mix_img, padded_labels = self.preproc(mosaic_img, mosaic_labels, self.input_dim)
            img_info = (mix_img.shape[1], mix_img.shape[0])

            # -----------------------------------------------------------------
            # img_info and img_id are not used for training.
            # They are also hard to be specified on a mosaic image.
            # -----------------------------------------------------------------
            return mix_img, padded_labels, img_info, img_id
    def mixup(self, origin_img, origin_labels, input_dim):
        #mixup操作
        jit_factor = random.uniform(*self.mixup_scale)
        FLIP = random.uniform(0, 1) > 0.5
        cp_labels = []
        while len(cp_labels) == 0:
            cp_index = random.randint(0, self.__len__() - 1)
            cp_labels = self._dataset.load_anno(cp_index)
        img, cp_labels, _, _ = self._dataset.pull_item(cp_index)

        if len(img.shape) == 3:
            cp_img = np.ones((input_dim[0], input_dim[1], 3), dtype=np.uint8) * 114
        else:
            cp_img = np.ones(input_dim, dtype=np.uint8) * 114

        cp_scale_ratio = min(input_dim[0] / img.shape[0], input_dim[1] / img.shape[1])
        resized_img = cv2.resize(
            img,
            (int(img.shape[1] * cp_scale_ratio), int(img.shape[0] * cp_scale_ratio)),
            interpolation=cv2.INTER_LINEAR,
        )

        cp_img[
            : int(img.shape[0] * cp_scale_ratio), : int(img.shape[1] * cp_scale_ratio)
        ] = resized_img

        cp_img = cv2.resize(
            cp_img,
            (int(cp_img.shape[1] * jit_factor), int(cp_img.shape[0] * jit_factor)),
        )
        cp_scale_ratio *= jit_factor

        if FLIP:
            cp_img = cp_img[:, ::-1, :]

        origin_h, origin_w = cp_img.shape[:2]
        target_h, target_w = origin_img.shape[:2]
        padded_img = np.zeros(
            (max(origin_h, target_h), max(origin_w, target_w), 3), dtype=np.uint8
        )
        padded_img[:origin_h, :origin_w] = cp_img

        x_offset, y_offset = 0, 0
        if padded_img.shape[0] > target_h:
            y_offset = random.randint(0, padded_img.shape[0] - target_h - 1)
        if padded_img.shape[1] > target_w:
            x_offset = random.randint(0, padded_img.shape[1] - target_w - 1)
        padded_cropped_img = padded_img[
            y_offset: y_offset + target_h, x_offset: x_offset + target_w
        ]

        cp_bboxes_origin_np = adjust_box_anns(
            cp_labels[:, :4].copy(), cp_scale_ratio, 0, 0, origin_w, origin_h
        )
        if FLIP:
            cp_bboxes_origin_np[:, 0::2] = (
                origin_w - cp_bboxes_origin_np[:, 0::2][:, ::-1]
            )
        cp_bboxes_transformed_np = cp_bboxes_origin_np.copy()
        cp_bboxes_transformed_np[:, 0::2] = np.clip(
            cp_bboxes_transformed_np[:, 0::2] - x_offset, 0, target_w
        )
        cp_bboxes_transformed_np[:, 1::2] = np.clip(
            cp_bboxes_transformed_np[:, 1::2] - y_offset, 0, target_h
        )
        keep_list = box_candidates(cp_bboxes_origin_np.T, cp_bboxes_transformed_np.T, 5)

        if keep_list.sum() >= 1.0:
            cls_labels = cp_labels[keep_list, 4:5].copy()
            box_labels = cp_bboxes_transformed_np[keep_list]
            labels = np.hstack((box_labels, cls_labels))
            origin_labels = np.vstack((origin_labels, labels))
            origin_img = origin_img.astype(np.float32)
            #mixup操作
            origin_img = 0.5 * origin_img + 0.5 * padded_cropped_img.astype(np.float32)

        return origin_img.astype(np.uint8), origin_labels
2.models文件夹
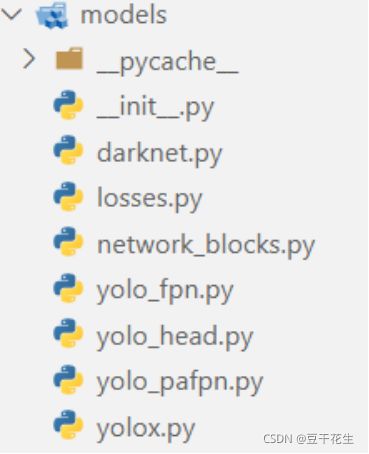
2.1文件夹结构
init.py一些依赖包,导入模块和函数
darknet.py主干网络Darknet53
losses.pyloss函数使用了IOUloss,计算交并比
network_blocks.py网络需要调用的模块使用silu激活函数
yolo_fpn.pyYOLOFPN模块。Darknet 53是此模型的默认主干。调用Darknet 53作为主干网络
yolo_head.py本模块有三个操作:decoupled head,Multi positives,SimOTA
yolo_pafpn.py另一个主干网络,backbone-YOLOPAFPN。PA指的是PANet的结构,FPN指的是特征金字塔结构。
yolox.py,YOLOX模型模块。调用之前的主干网络和组件,模块列表由create_yolov3_modules函数定义。网络在训练期间从三个YOLO层返回损耗值,以及测试期间的检测结果。
2.2Anchor-free
代码:yolo_head.py
YOLOv4、YOLOv5均采用了YOLOv3原始的anchor设置。然而anchor机制存在诸多问题:(1) 为获得最优检测性能,需要在训练之前进行聚类分析以确定最佳anchor集合,这些anchor集合存在数据相关性,泛化性能较差;(2) anchor机制提升了检测头的复杂度。
Anchor-free检测器在过去两年得到了长足发展并取得了与anchor检测器相当的性能。将YOLO转换为anchor-free形式非常简单,我们将每个位置的预测从3下降为1并直接预测四个值:即两个offset以及高宽。参考FCOS,我们将每个目标的中心定位正样本并预定义一个尺度范围以便于对每个目标指派FPN水平。这种改进可以降低检测器的参数量于GFLOPs进而取得更快更优的性能:42.9%AP。
Multi positives
为确保与YOLOv3的一致性,前述anchor-free版本仅仅对每个目标赋予一个正样本,而忽视了其他高质量预测。参考FCOS,我们简单的赋予中心3×3区域为正样本。此时模型性能提升到45.0%,超过了当前最佳U版YOLOv3的44.3%。
对8400个yolo块的中心点,看是否在不同scale的中心区域,如果在,则将该点的pred暂时认定为正样本
 #Multi positives计算。
    #对之前的初选框,进行进一步的挑选


    #get_in_boxes_info
    #计算每个anchor的中心(格子的中心点),是否位于gtbox内,以及anchor是否位于gtbox的半径范围内(2.5*stride),
    #最终返回的是候选区域,也就是与gtbox较为接近的anchor
    def get_in_boxes_info(
        self,
        gt_bboxes_per_image,
        expanded_strides,
        x_shifts,
        y_shifts,
        total_num_anchors,
        num_gt,
    ):
        expanded_strides_per_image = expanded_strides[0]
        x_shifts_per_image = x_shifts[0] * expanded_strides_per_image
        y_shifts_per_image = y_shifts[0] * expanded_strides_per_image
        x_centers_per_image = (
            (x_shifts_per_image + 0.5 * expanded_strides_per_image)
            .unsqueeze(0)
            .repeat(num_gt, 1)
        )  # [n_anchor] -> [n_gt, n_anchor]
        y_centers_per_image = (
            (y_shifts_per_image + 0.5 * expanded_strides_per_image)
            .unsqueeze(0)
            .repeat(num_gt, 1)
        )

        #Multi positives
        #anchor-free版本仅仅对每个目标赋予一个正样本,而忽视了其他高质量预测。
        #对8400个yolo块的中心点,看是否在不同scale的中心区域,如果在,则将该点的pred暂时认定为正样本
        gt_bboxes_per_image_l = (
            (gt_bboxes_per_image[:, 0] - 0.5 * gt_bboxes_per_image[:, 2])
            .unsqueeze(1)
            .repeat(1, total_num_anchors)
        )
        gt_bboxes_per_image_r = (
            (gt_bboxes_per_image[:, 0] + 0.5 * gt_bboxes_per_image[:, 2])
            .unsqueeze(1)
            .repeat(1, total_num_anchors)
        )
        gt_bboxes_per_image_t = (
            (gt_bboxes_per_image[:, 1] - 0.5 * gt_bboxes_per_image[:, 3])
            .unsqueeze(1)
            .repeat(1, total_num_anchors)
        )
        gt_bboxes_per_image_b = (
            (gt_bboxes_per_image[:, 1] + 0.5 * gt_bboxes_per_image[:, 3])
            .unsqueeze(1)
            .repeat(1, total_num_anchors)
        )

        b_l = x_centers_per_image - gt_bboxes_per_image_l
        b_r = gt_bboxes_per_image_r - x_centers_per_image
        b_t = y_centers_per_image - gt_bboxes_per_image_t
        b_b = gt_bboxes_per_image_b - y_centers_per_image
        bbox_deltas = torch.stack([b_l, b_t, b_r, b_b], 2)

        is_in_boxes = bbox_deltas.min(dim=-1).values > 0.0
        is_in_boxes_all = is_in_boxes.sum(dim=0) > 0
        # in fixed center

        center_radius = 2.5

        gt_bboxes_per_image_l = (gt_bboxes_per_image[:, 0]).unsqueeze(1).repeat(
            1, total_num_anchors
        ) - center_radius * expanded_strides_per_image.unsqueeze(0)
        gt_bboxes_per_image_r = (gt_bboxes_per_image[:, 0]).unsqueeze(1).repeat(
            1, total_num_anchors
        ) + center_radius * expanded_strides_per_image.unsqueeze(0)
        gt_bboxes_per_image_t = (gt_bboxes_per_image[:, 1]).unsqueeze(1).repeat(
            1, total_num_anchors
        ) - center_radius * expanded_strides_per_image.unsqueeze(0)
        gt_bboxes_per_image_b = (gt_bboxes_per_image[:, 1]).unsqueeze(1).repeat(
            1, total_num_anchors
        ) + center_radius * expanded_strides_per_image.unsqueeze(0)

        # 对8400个yolo块的中心点,看是否在不同scale的中心区域
        c_l = x_centers_per_image - gt_bboxes_per_image_l
        c_r = gt_bboxes_per_image_r - x_centers_per_image
        c_t = y_centers_per_image - gt_bboxes_per_image_t
        c_b = gt_bboxes_per_image_b - y_centers_per_image
        center_deltas = torch.stack([c_l, c_t, c_r, c_b], 2)
        is_in_centers = center_deltas.min(dim=-1).values > 0.0
        is_in_centers_all = is_in_centers.sum(dim=0) > 0

        # in boxes and in centers
        is_in_boxes_anchor = is_in_boxes_all | is_in_centers_all

        is_in_boxes_and_center = (
            is_in_boxes[:, is_in_boxes_anchor] & is_in_centers[:, is_in_boxes_anchor]
        )
        return is_in_boxes_anchor, is_in_boxes_and_center
SimOTA标签分配
OTA(Optimal Transport Assignment),在目标检测中,有时候经常会出现一些模棱两可的anchor,如图3,即某一个anchor,按照正样本匹配规则,会匹配到两个gt,而retinanet这样基于IoU分配是会把anchor分配给IoU最大的gt,而OTA作者认为,将模糊的anchor分配给任何gt或背景都会对其他gt的梯度造成不利影响,因此,对模糊anchor样本的分配是特殊的,除了局部视图之外还需要其他信息。因此,更好的分配策略应该摆脱对每个gt对象进行最优分配的惯例,而转向全局最优的思想,换句话说,为图像中的所有gt对象找到全局的高置信度分配。
最优运输问题优化会带来25%的额外训练耗时。因此,我们将其简化为动态top-k策略以得到一个近似解(SimOTA)。SimOTA不仅可以降低训练时间,同时可以避免额外的超参问题。SimOTA的引入可以将模型的性能从45.0%提升到47.3%,大幅超越U版YOLOv的44.3%。
1.首先进行筛选 anchor的中心在 box & 在 box 的中心一定区域
2.进行 simota 标签分配
3.OTA分配的时候,cost是一个 n_gt × m_anchor 的矩阵。
个人想法:1. 为m个anchor,每个match一个gt; 2. 通过OTA方法进行分配,为m中的m2个anchor分配目标gt,这样可以节省计算量
#引入SimOTA
        #最优运输问题优化会带来25%的额外训练耗时。
        # 因此,我们将其简化为动态top-k策略以得到一个近似解(SimOTA)。
        # SimOTA不仅可以降低训练时间,同时可以避免额外的超参问题。


        # 1. 首先进行筛选 anchor的中心在 box & 在 box 的中心一定区域
        fg_mask, is_in_boxes_and_center = self.get_in_boxes_info(
            gt_bboxes_per_image,
            expanded_strides,
            x_shifts,
            y_shifts,
            total_num_anchors,
            num_gt,
        )

        bboxes_preds_per_image = bboxes_preds_per_image[fg_mask]
        cls_preds_ = cls_preds[batch_idx][fg_mask]
        obj_preds_ = obj_preds[batch_idx][fg_mask]
        num_in_boxes_anchor = bboxes_preds_per_image.shape[0]

        if mode == "cpu":
            gt_bboxes_per_image = gt_bboxes_per_image.cpu()
            bboxes_preds_per_image = bboxes_preds_per_image.cpu()

        #bboxes_iou
        #计算gtbox和经过第一步筛选出来的anchor索引对应的网络预测结果的IOU,取log作为iou_loss。
        #然后计算gt和pred_cls的cls_loss,最后将cls_loss和iou_loss作为cost,计算dynamic_k。
        pair_wise_ious = bboxes_iou(gt_bboxes_per_image, bboxes_preds_per_image, False)

        gt_cls_per_image = (
            F.one_hot(gt_classes.to(torch.int64), self.num_classes)
            .float()
            .unsqueeze(1)
            .repeat(1, num_in_boxes_anchor, 1)
        )
        pair_wise_ious_loss = -torch.log(pair_wise_ious + 1e-8)

        if mode == "cpu":
            cls_preds_, obj_preds_ = cls_preds_.cpu(), obj_preds_.cpu()

        with torch.cuda.amp.autocast(enabled=False):
            cls_preds_ = (
                cls_preds_.float().unsqueeze(0).repeat(num_gt, 1, 1).sigmoid_()
                * obj_preds_.unsqueeze(0).repeat(num_gt, 1, 1).sigmoid_()
            )
            pair_wise_cls_loss = F.binary_cross_entropy(
                cls_preds_.sqrt_(), gt_cls_per_image, reduction="none"
            ).sum(-1)
        del cls_preds_

        cost = (
            pair_wise_cls_loss
            + 3.0 * pair_wise_ious_loss
            + 100000.0 * (~is_in_boxes_and_center)
        )


        # 2. 进行 simota 标签分配
        #OTA分配的时候,cost是一个 n_gt × m_anchor 的矩阵。
        # 个人想法:1. 为m个anchor,每个match一个gt; 2. 通过OTA方法进行分配,为m中的m2个anchor分配目标gt,这样可以节省计算量
        (
            num_fg,
            gt_matched_classes,
            pred_ious_this_matching,
            matched_gt_inds,
        ) = self.dynamic_k_matching(cost, pair_wise_ious, gt_classes, num_gt, fg_mask)
        del pair_wise_cls_loss, cost, pair_wise_ious, pair_wise_ious_loss

        if mode == "cpu":
            gt_matched_classes = gt_matched_classes.cuda()
            fg_mask = fg_mask.cuda()
            pred_ious_this_matching = pred_ious_this_matching.cuda()
            matched_gt_inds = matched_gt_inds.cuda()

        return (
            gt_matched_classes,
            fg_mask,
            pred_ious_this_matching,
            matched_gt_inds,
            num_fg,
        )
    #使用IOU确定dynamic_k,取与每个gt的最大的10个IOU
    #为每个gt取cost排名最小的前dynamic_k个anchor作为正样本,其余为负样本。
    def dynamic_k_matching(self, cost, pair_wise_ious, gt_classes, num_gt, fg_mask):
        # Dynamic K
        # ---------------------------------------------------------------
        matching_matrix = torch.zeros_like(cost)

        ious_in_boxes_matrix = pair_wise_ious
        n_candidate_k = min(10, ious_in_boxes_matrix.size(1))
        topk_ious, _ = torch.topk(ious_in_boxes_matrix, n_candidate_k, dim=1)
        dynamic_ks = torch.clamp(topk_ious.sum(1).int(), min=1)
        for gt_idx in range(num_gt):
            _, pos_idx = torch.topk(
                cost[gt_idx], k=dynamic_ks[gt_idx].item(), largest=False
            )
            matching_matrix[gt_idx][pos_idx] = 1.0

        del topk_ious, dynamic_ks, pos_idx

        anchor_matching_gt = matching_matrix.sum(0)
        if (anchor_matching_gt > 1).sum() > 0:
            _, cost_argmin = torch.min(cost[:, anchor_matching_gt > 1], dim=0)
            matching_matrix[:, anchor_matching_gt > 1] *= 0.0
            matching_matrix[cost_argmin, anchor_matching_gt > 1] = 1.0
        fg_mask_inboxes = matching_matrix.sum(0) > 0.0
        num_fg = fg_mask_inboxes.sum().item()

        fg_mask[fg_mask.clone()] = fg_mask_inboxes

        matched_gt_inds = matching_matrix[:, fg_mask_inboxes].argmax(0)
        gt_matched_classes = gt_classes[matched_gt_inds]

        pred_ious_this_matching = (matching_matrix * pair_wise_ious).sum(0)[
            fg_mask_inboxes
        ]
        return num_fg, gt_matched_classes, pred_ious_this_matching, matched_gt_inds
2.3Backbone
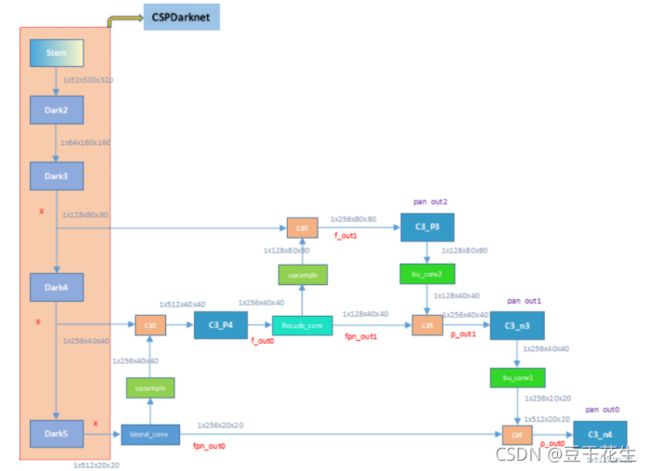
yolox的模型是YOLOPAFPN,它来自于yolov3,其主干网络是Darknet 53。
YOLOPAFPN
代码:yolo_pafpn.py
使用yolov3的模型,YOLOPAFPN,主干网络是Darknet 53
PA指的是PANet的结构,FPN指的是特征金字塔结构。
Path Aggregation Network (PANet)整体上可以看做是在Mask RCNN上做多处改进,充分利用了特征融合,比如引入bottom-up path augmentation结构,充分利用网络浅特征进行分割;引入adaptive feature pooling使得提取到的ROI特征更加丰富;引入fully-connected fusion,通过融合一个前背景二分类支路的输出得到更加精确的分割结果。整体而言对于目标检测和分割系列算法有不少启发
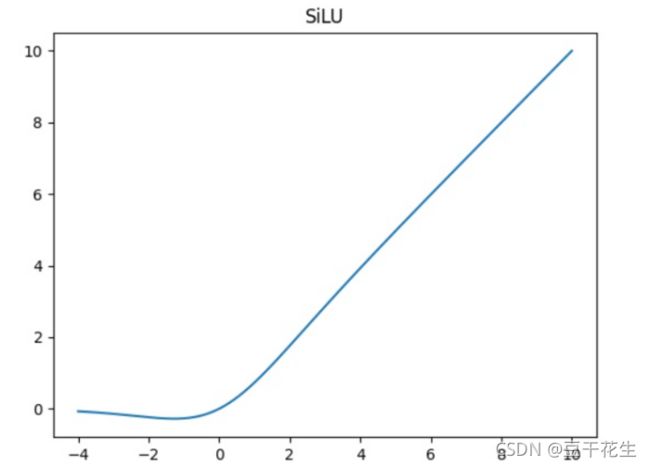
这里使用了silu激活函数,silu (x)=x∗ sigmoid(x)
#使用yolov3的模型,YOLOPAFPN,主干网络是Darknet 53
#PA指的是PANet的结构,FPN指的是特征金字塔结构。

class YOLOPAFPN(nn.Module):
    """
    YOLOv3 model. Darknet 53 is the default backbone of this model.
    """

    def __init__(
        self,
        depth=1.0,
        width=1.0,
        in_features=("dark3", "dark4", "dark5"),
        in_channels=[256, 512, 1024],
        depthwise=False,
        act="silu",
    ):
        super().__init__()
        self.backbone = CSPDarknet(depth, width, depthwise=depthwise, act=act)
        self.in_features = in_features
        self.in_channels = in_channels
        Conv = DWConv if depthwise else BaseConv

        self.upsample = nn.Upsample(scale_factor=2, mode="nearest")
        self.lateral_conv0 = BaseConv(
            int(in_channels[2] * width), int(in_channels[1] * width), 1, 1, act=act
        )
        self.C3_p4 = CSPLayer(
            int(2 * in_channels[1] * width),
            int(in_channels[1] * width),
            round(3 * depth),
            False,
            depthwise=depthwise,
            act=act,
        )  # cat张量拼接,可以使检测网络同时利用到所提取的浅层特征与深层特征

        self.reduce_conv1 = BaseConv(
            int(in_channels[1] * width), int(in_channels[0] * width), 1, 1, act=act
        )
        self.C3_p3 = CSPLayer(
            int(2 * in_channels[0] * width),
            int(in_channels[0] * width),
            round(3 * depth),
            False,
            depthwise=depthwise,
            act=act,
        )

        # bottom-up conv
        self.bu_conv2 = Conv(
            int(in_channels[0] * width), int(in_channels[0] * width), 3, 2, act=act
        )
        self.C3_n3 = CSPLayer(
            int(2 * in_channels[0] * width),
            int(in_channels[1] * width),
            round(3 * depth),
            False,
            depthwise=depthwise,
            act=act,
        )

        # bottom-up conv
        self.bu_conv1 = Conv(
            int(in_channels[1] * width), int(in_channels[1] * width), 3, 2, act=act
        )
        self.C3_n4 = CSPLayer(
            int(2 * in_channels[1] * width),
            int(in_channels[2] * width),
            round(3 * depth),
            False,
            depthwise=depthwise,
            act=act,
        )
Darknet 53
代码:darknet.py
主干网络Darknet53
Darknet是最经典的一个深层网络,结合Resnet的特点在保证对特征进行超强表达的同时又避免了网络过深带来的梯度问题,主要有Darknet19和Darknet53,当然,如果你觉得这还不够深,在你条件允许的情况下你也可以延伸到99,199,999,…。
Darknet53只有52层卷积,原因是原本的Darknet53还包括一层输出层,前52层用于特征提取,最后一层进行最终输出。这里就根据自己实际需求再定义一层或多层对前52层提取到的特征进行融合和输出。代码很简单,53行代码尽然就把经典的深度网络模型Darknet53写出来了
#主干网络Darknet53
class Darknet(nn.Module):
    # number of blocks from dark2 to dark5.
    depth2blocks = {21: [1, 2, 2, 1], 53: [2, 8, 8, 4]}

    def __init__(
        self,
        depth,
        in_channels=3,
        stem_out_channels=32,
        out_features=("dark3", "dark4", "dark5"),
    ):
        """
        Args:
            depth (int): depth of darknet used in model, usually use [21, 53] for this param.
            in_channels (int): number of input channels, for example, use 3 for RGB image.
            stem_out_channels (int): number of output chanels of darknet stem.
                It decides channels of darknet layer2 to layer5.
            out_features (Tuple[str]): desired output layer name.
        """
        super().__init__()
        assert out_features, "please provide output features of Darknet"
        self.out_features = out_features
        self.stem = nn.Sequential(
            BaseConv(in_channels, stem_out_channels, ksize=3, stride=1, act="lrelu"),
            *self.make_group_layer(stem_out_channels, num_blocks=1, stride=2),
        )
        in_channels = stem_out_channels * 2  # 64

        num_blocks = Darknet.depth2blocks[depth]
        # create darknet with `stem_out_channels` and `num_blocks` layers.
        # to make model structure more clear, we don't use `for` statement in python.
        self.dark2 = nn.Sequential(
            *self.make_group_layer(in_channels, num_blocks[0], stride=2)
        )
        in_channels *= 2  # 128
        self.dark3 = nn.Sequential(
            *self.make_group_layer(in_channels, num_blocks[1], stride=2)
        )
        in_channels *= 2  # 256
        self.dark4 = nn.Sequential(
            *self.make_group_layer(in_channels, num_blocks[2], stride=2)
        )
        in_channels *= 2  # 512

        self.dark5 = nn.Sequential(
            *self.make_group_layer(in_channels, num_blocks[3], stride=2),
            *self.make_spp_block([in_channels, in_channels * 2], in_channels * 2),
        )
CSPDarknet,是darknet的核心
#主干网络,本模块的核心
class CSPDarknet(nn.Module):
    def __init__(
        self,
        dep_mul,
        wid_mul,
        out_features=("dark3", "dark4", "dark5"),
        depthwise=False,
        act="silu",
    ):
        super().__init__()
        assert out_features, "please provide output features of Darknet"
        self.out_features = out_features
        Conv = DWConv if depthwise else BaseConv

        base_channels = int(wid_mul * 64)  # 64
        base_depth = max(round(dep_mul * 3), 1)  # 3

        # stem
        #位于网络backbone(干)的一开始,紧接着数据层,称为stem(茎)
        #Focus操作的作用:只是用于减少FLOPS和加速,不用来增加mAP。还有就是用来减少层数,1个Focus层可以替代3个yolo3或yolo4里面的层。
        self.stem = Focus(3, base_channels, ksize=3, act=act)

        # dark2
        self.dark2 = nn.Sequential(
            Conv(base_channels, base_channels * 2, 3, 2, act=act),
            CSPLayer(
                base_channels * 2,
                base_channels * 2,
                n=base_depth,
                depthwise=depthwise,
                act=act,
            ),
        )

        # dark3
        self.dark3 = nn.Sequential(
            Conv(base_channels * 2, base_channels * 4, 3, 2, act=act),
            CSPLayer(
                base_channels * 4,
                base_channels * 4,
                n=base_depth * 3,
                depthwise=depthwise,
                act=act,
            ),
        )

        # dark4
        self.dark4 = nn.Sequential(
            Conv(base_channels * 4, base_channels * 8, 3, 2, act=act),
            CSPLayer(
                base_channels * 8,
                base_channels * 8,
                n=base_depth * 3,
                depthwise=depthwise,
                act=act,
            ),
        )

        # dark5
        self.dark5 = nn.Sequential(
            Conv(base_channels * 8, base_channels * 16, 3, 2, act=act),
            SPPBottleneck(base_channels * 16, base_channels * 16, activation=act),
            CSPLayer(
                base_channels * 16,
                base_channels * 16,
                n=base_depth,
                shortcut=False,
                depthwise=depthwise,
                act=act,
            ),
        )
loss函数
代码:losses.py
使用了IOUloss,计算交并比
#使用了IOUloss,计算交并比
class IOUloss(nn.Module):
    def __init__(self, reduction="none", loss_type="iou"):
        super(IOUloss, self).__init__()
        self.reduction = reduction
        self.loss_type = loss_type

    def forward(self, pred, target):
        assert pred.shape[0] == target.shape[0]

        pred = pred.view(-1, 4)
        target = target.view(-1, 4)
        tl = torch.max(
            (pred[:, :2] - pred[:, 2:] / 2), (target[:, :2] - target[:, 2:] / 2)
        )
        br = torch.min(
            (pred[:, :2] + pred[:, 2:] / 2), (target[:, :2] + target[:, 2:] / 2)
        )

        area_p = torch.prod(pred[:, 2:], 1)
        area_g = torch.prod(target[:, 2:], 1)

        en = (tl < br).type(tl.type()).prod(dim=1)
        area_i = torch.prod(br - tl, 1) * en
        iou = (area_i) / (area_p + area_g - area_i + 1e-16)

        if self.loss_type == "iou":
            loss = 1 - iou ** 2
        elif self.loss_type == "giou":
            c_tl = torch.min(
                (pred[:, :2] - pred[:, 2:] / 2), (target[:, :2] - target[:, 2:] / 2)
            )
            c_br = torch.max(
                (pred[:, :2] + pred[:, 2:] / 2), (target[:, :2] + target[:, 2:] / 2)
            )
            area_c = torch.prod(c_br - c_tl, 1)
            giou = iou - (area_c - area_i) / area_c.clamp(1e-16)
            loss = 1 - giou.clamp(min=-1.0, max=1.0)

        if self.reduction == "mean":
            loss = loss.mean()
        elif self.reduction == "sum":
            loss = loss.sum()

        return loss
2.4网络需要调用的模块
Focus
代码:network_blocks.py
将宽高信息聚焦到通道空间,通俗理解就是SpaceToDepth,也就是将空间信息转换到通道信息。这里引用一下别人的理解:
1、“Focus的作用无非是使图片在下采样的过程中,不带来信息丢失的情况下,将W、H的信息集中到通道上,再使用3 × 3的卷积对其进行特征提取,使得特征提取得更加的充分。虽然增加了一点点的计算量,但是为后续的特征提取保留了更完整的图片下采样信息”。
2、“Focus模块在v5中是图片进入backbone前,对图片进行切片操作,具体操作是在一张图片中每隔一个像素拿到一个值,类似于邻近下采样,这样就拿到了四张图片,四张图片互补,长的差不多,但是没有信息丢失,这样一来,将W、H信息就集中到了通道空间,输入通道扩充了4倍,即拼接起来的图片相对于原先的RGB三通道模式变成了12个通道,最后将得到的新图片再经过卷积操作,最终得到了没有信息丢失情况下的二倍下采样特征图”。
位于网络backbone(干)的一开始,紧接着数据层,称为stem(茎)
Focus操作的作用:只是用于减少FLOPS和加速,不用来增加mAP。还有就是用来减少层数,1个Focus层可以替代3个yolo3或yolo4里面的层。
FLOPS 注意全部大写 是floating point of per second的缩写,意指每秒浮点运算次数。用来衡量硬件的性能。
FLOPs 是floating point of operations的缩写,是浮点运算次数,可以用来衡量算法/模型复杂度。
#位于网络backbone(干)的一开始,紧接着数据层,称为stem(茎)
#Focus操作的作用:只是用于减少FLOPS和加速,不用来增加mAP。还有就是用来减少层数,1个Focus层可以替代3个yolo3或yolo4里面的层。
class Focus(nn.Module):
    """Focus width and height information into channel space."""

    def __init__(self, in_channels, out_channels, ksize=1, stride=1, act="silu"):
        super().__init__()
        self.conv = BaseConv(in_channels * 4, out_channels, ksize, stride, act=act)

    def forward(self, x):
        # shape of x (b,c,w,h) -> y(b,4c,w/2,h/2)
        patch_top_left = x[..., ::2, ::2]
        patch_top_right = x[..., ::2, 1::2]
        patch_bot_left = x[..., 1::2, ::2]
        patch_bot_right = x[..., 1::2, 1::2]
        x = torch.cat(
            (
                patch_top_left,
                patch_bot_left,
                patch_top_right,
                patch_bot_right,
            ),
            dim=1,
        )
        return self.conv(x)
CSPlayer
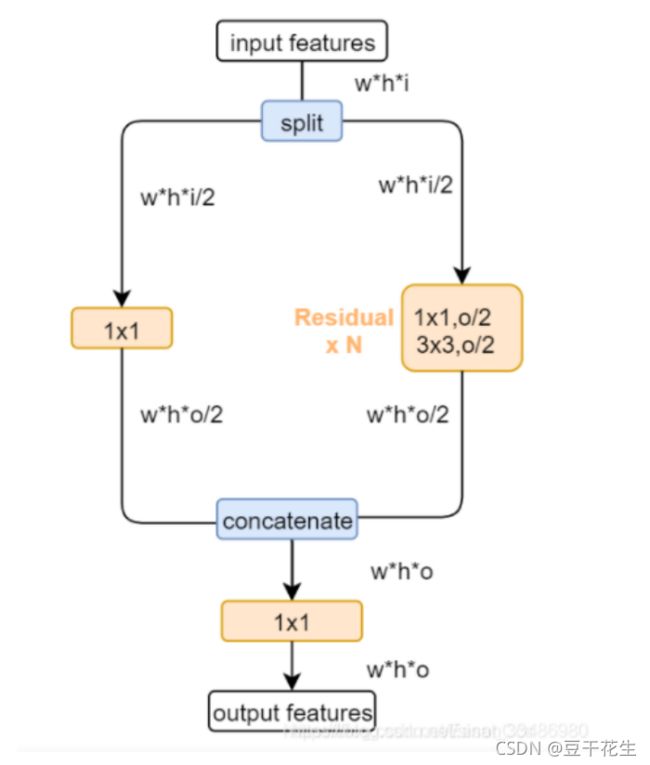
相关论文提出Cross Stage Partial(CSP)结构,其初衷是减少计算量并且增强梯度的表现。主要思想是:在输入block之前,将输入分为两个部分,其中一部分通过block进行计算,另一部分直接通过一个shortcut进行concatenate。
作者在论文阐述了CSP结构的优点:
(1)加强CNN的学习能力;(2)减少计算瓶颈,现在的网络大多计算代价昂贵,不利于工业的落地;(3)减少内存消耗。
CSPlayer在yolo v4中就已经使用,其论文中的原理如下图:
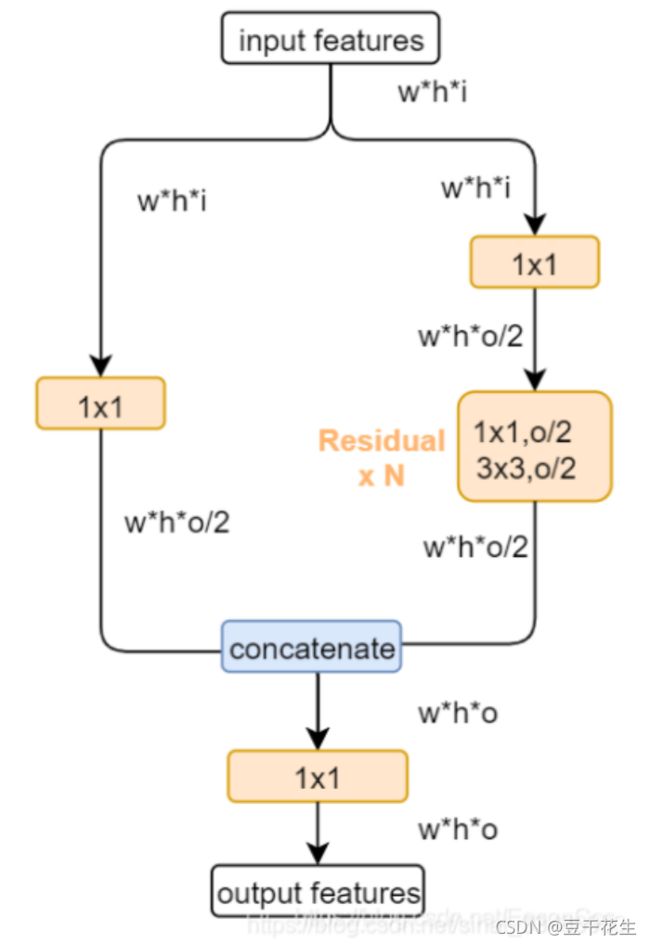
也就是将输入的特征图,按通道一分为二,分别经过两个分支,最后合并通道。而实际在pytorch的实现中,都是下面这种版本:
**输入通道先按原通达走两个分支,再在各自分支中将输出通道减半(1x1卷积通道降维),最后再合并通道。**代码如下所示:
class CSPLayer(nn.Module):
    """C3 in yolov5, CSP Bottleneck with 3 convolutions"""

    def __init__(
        self,
        in_channels,
        out_channels,
        n=1,
        shortcut=True,
        expansion=0.5,
        depthwise=False,
        act="silu",
    ):
        """
        Args:
            in_channels (int): input channels.
            out_channels (int): output channels.
            n (int): number of Bottlenecks. Default value: 1.
        """
        # ch_in, ch_out, number, shortcut, groups, expansion
        super().__init__()
        hidden_channels = int(out_channels * expansion)  # hidden channels
        self.conv1 = BaseConv(in_channels, hidden_channels, 1, stride=1, act=act)
        self.conv2 = BaseConv(in_channels, hidden_channels, 1, stride=1, act=act)
        self.conv3 = BaseConv(2 * hidden_channels, out_channels, 1, stride=1, act=act)
        module_list = [
            Bottleneck(
                hidden_channels, hidden_channels, shortcut, 1.0, depthwise, act=act
            )
            for _ in range(n)
        ]
        self.m = nn.Sequential(*module_list)

    def forward(self, x):
        x_1 = self.conv1(x)
        x_2 = self.conv2(x)
        x_1 = self.m(x_1)
        x = torch.cat((x_1, x_2), dim=1)
        return self.conv3(x)
2.5YOLOXHead
代码:yolo_head.py
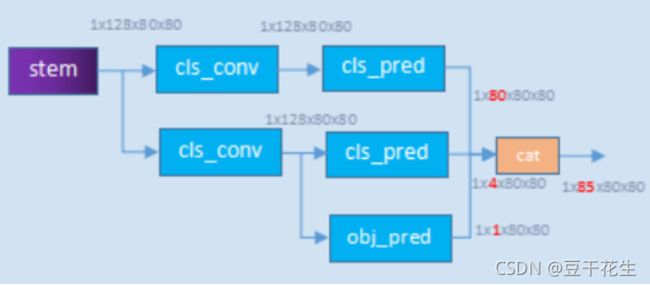
YOLO模型的cls,obj和reg都是在同一个卷积层来预测,但其实其它的one-stage检测模型其实都采用decoupled head(这个其实是从RetinaNet开始的,后面的FCOS和ATSS都沿用),即将分类和回归任务分开来预测,因为这个两个任务其实是有冲突的。论文中做的第一个改进就是将YOLO改成了decoupled head,对于输入的FPN特征,首先通过1x1卷积将特征维度降低到256,然后分成两个并行的分支,每个分支包含2个3x3卷积,其中分类分支预测cls,而回归分支预测reg和obj(图中显示的是IoU分支,但实际上从代码来看和原始YOLO一样都是obj,不过按YOLO的本意其实obj里面也包含了定位准确性)。
def forward(self, xin, labels=None, imgs=None):
        outputs = []
        origin_preds = []
        x_shifts = []
        y_shifts = []
        expanded_strides = []

        #decoupled head检测头的主干部分
        #网络的输入为:1×3×640×640
        #yolo的输出为:[1/8, 1/16, 1/32]stride, 分别的输出尺寸为:80×80,40 ×40,20×20
        #这里对3个分支,每个分支有两个解耦头;同时回归分支,再解耦为box + object 两个输出

        for k, (cls_conv, reg_conv, stride_this_level, x) in enumerate(
            zip(self.cls_convs, self.reg_convs, self.strides, xin)
        ):
            x = self.stems[k](x)
            cls_x = x
            reg_x = x

            cls_feat = cls_conv(cls_x)
            cls_output = self.cls_preds[k](cls_feat)

            reg_feat = reg_conv(reg_x)
            reg_output = self.reg_preds[k](reg_feat)
            obj_output = self.obj_preds[k](reg_feat)

            if self.training:
                output = torch.cat([reg_output, obj_output, cls_output], 1)
                output, grid = self.get_output_and_grid(
                    output, k, stride_this_level, xin[0].type()
                )
                x_shifts.append(grid[:, :, 0])
                y_shifts.append(grid[:, :, 1])
                expanded_strides.append(
                    torch.zeros(1, grid.shape[1])
                    .fill_(stride_this_level)
                    .type_as(xin[0])
                )
                if self.use_l1:
                    batch_size = reg_output.shape[0]
                    hsize, wsize = reg_output.shape[-2:]
                    reg_output = reg_output.view(
                        batch_size, self.n_anchors, 4, hsize, wsize
                    )
                    reg_output = reg_output.permute(0, 1, 3, 4, 2).reshape(
                        batch_size, -1, 4
                    )
                    origin_preds.append(reg_output.clone())

            else:
                output = torch.cat(
                    [reg_output, obj_output.sigmoid(), cls_output.sigmoid()], 1
                )

            outputs.append(output)

        if self.training:
            return self.get_losses(
                imgs,
                x_shifts,
                y_shifts,
                expanded_strides,
                labels,
                torch.cat(outputs, 1),
                origin_preds,
                dtype=xin[0].dtype,
            )
        else:
            self.hw = [x.shape[-2:] for x in outputs]
            # [batch, n_anchors_all, 85]
            outputs = torch.cat(
                [x.flatten(start_dim=2) for x in outputs], dim=2
            ).permute(0, 2, 1)
            if self.decode_in_inference:
                return self.decode_outputs(outputs, dtype=xin[0].type())
            else:
                return outputs
三.yolox的可迁移操作
个人理解:
yolo系列对于算法主干等的改进越来越少,更加重视数据增强、数据预处理。
yolox的数据增强的mosaic、mixup可以迁移到别的算法。
decouple head可以进一步考虑,但是是针对于yolo head的改进
OTA、multi positives带来的anchor free,很有效的减少了建议框的数量,减少了参数的数量、算法的复杂度,可以进行迁移。
码字不易,都看到这里了不如点个赞哦~
我是【豆干花生】,你的点赞+收藏+关注,就是我坚持下去的最大动力~
![]()
亲爱的朋友,这里是我新成立的公众号,欢迎关注!
公众号内容包括但不限于人工智能、图像处理、信号处理等等~之后还将推出更多优秀博文,敬请期待! 关注起来,让我们一起成长!
