安装和配置git
[root@k8s-node2 ~]# yum install git -y
[root@k8s-node2 ~]# git --version
git version 1.8.3.1

git config --global user.name "lcx"
git config --global user.email "[email protected]"
git config --global color.ui   "true"
创建版本库
git init
git仓库添加文件
git add .  #添加文件到缓冲区
git commit -m 'ad three file'
git 修改文件名称并提交
git mv file1 file4
git commit -m 'change file name'
git的文件对比
git diff file3   #本地目录和缓冲去文件对比
git diff --cached file3   #缓冲区文件和仓库文件对比
 image
image image
image
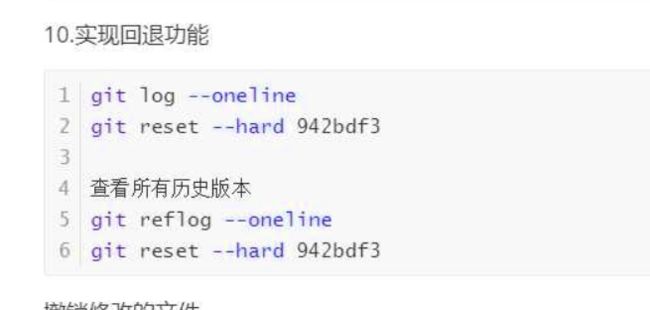
实现回退功能
 image
image
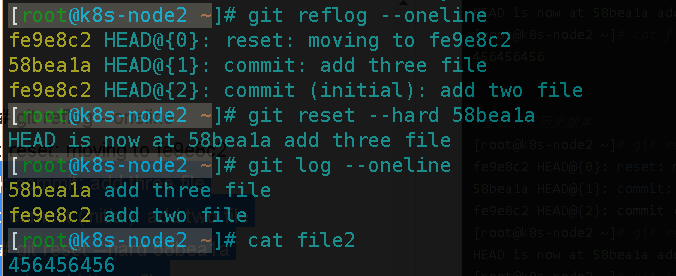
[root@k8s-node2 ~]# git log --oneline
58bea1a add three file
fe9e8c2 add two file
[root@k8s-node2 ~]# cat file2
456456456
8888888
[root@k8s-node2 ~]# git reset --hard 58bea1a
HEAD is now at 58bea1a add three file
[root@k8s-node2 ~]# cat file2
456456456

#查看所有历史版本
[root@k8s-node2 ~]# git reflog --oneline
fe9e8c2 HEAD@{0}: reset: moving to fe9e8c2
58bea1a HEAD@{1}: commit: add three file
fe9e8c2 HEAD@{2}: commit (initial): add two file

[root@k8s-node2 ~]# git reset --hard 58bea1a
 image
image
撤回
[root@k8s-node2 ~]# echo 8888888 > file2
[root@k8s-node2 ~]# git diff  file2
diff --git a/file2 b/file2
index 7d7a948..80f456a 100644
--- a/file2
+++ b/file2
@@ -1 +1 @@
-456456456
+8888888
[root@k8s-node2 ~]# git checkout file2
[root@k8s-node2 ~]# git diff  file2
[root@k8s-node2 ~]# cat file2
456456456
撤销修改的文件
提交到缓冲区的文件撤回
git reset HEAD file2

未add到缓冲区的文件撤回
git checkout -- file2
git分支管理
#查看分支
git branch    ----> * master

#增加一个新分支
git branch dev01

#切换分支
git checkout dev01

#合并分支
git merge master

#在开发分支上合并主分支
git  merge master -m '注释'

#切回主分支
git checkout master

#在主分支次合并开发分支
git merge dev01 -m '注释'
git标签管理
标签就是给commit起一个别名,容易记忆
#添加标签
git log --oneline
git tag v1.2    ----> 给当前版本打标签
git tag -a v1.0 -m '注释,优化了修复了什么'

#删除标签
git tag -d v1.2

[root@k8s-node2 demo]# git log --oneline
b8e21cc add test.txt
9d5ab15 add test.txt
382f080 add test.txt
ff6047d add file6 file7
b693580 add file6 file7
58bea1a add three file
fe9e8c2 add two file
[root@k8s-node2 demo]# git tag
[root@k8s-node2 demo]# git tag v1.2
[root@k8s-node2 demo]# git tag
v1.2
[root@k8s-node2 demo]# git show v1.2
commit b8e21cc519dfd918ee880831e37585afcdf73410
Author: oldqiang <[email protected]>
Date:   Mon Sep 23 12:03:35 2019 +0800

    add test.txt

diff --git a/demo/test.txt b/demo/test.txt
index 69f66d3..d99f9f0 100644
--- a/demo/test.txt
+++ b/demo/test.txt
@@ -1,3 +1,3 @@
 11111
-aaaaa
+22222
 33333
[root@k8s-node2 demo]# git tag -a v1.0 -m 'v1.0 add 后裔' fe9e8c2
[root@k8s-node2 demo]# git tag
v1.0
v1.2
[root@k8s-node2 demo]# git show v1.0
tag v1.0
Tagger: oldqiang <[email protected]>
Date:   Mon Sep 23 12:18:45 2019 +0800

v1.0 add 后裔

commit fe9e8c25cfb61eb63da6681dc09d054cd5739243
Author: oldqiang <[email protected]>
Date:   Mon Sep 23 10:44:54 2019 +0800

    add two file

diff --git a/file1 b/file1
new file mode 100644
index 0000000..5721413
--- /dev/null
+++ b/file1
@@ -0,0 +1 @@
+423
扩展
Git 打补丁-- patch 和 diff 的使用
diff
patch 打补丁,创建补丁,卸载补丁
git克隆 码云网站复制项目链接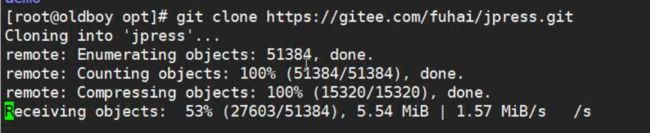 image
image
git远程仓库gitee
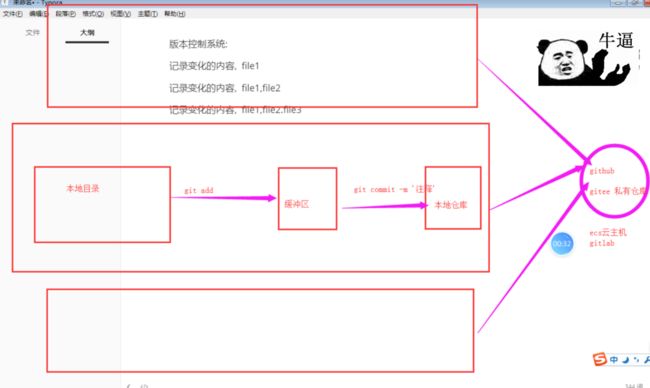
image.png
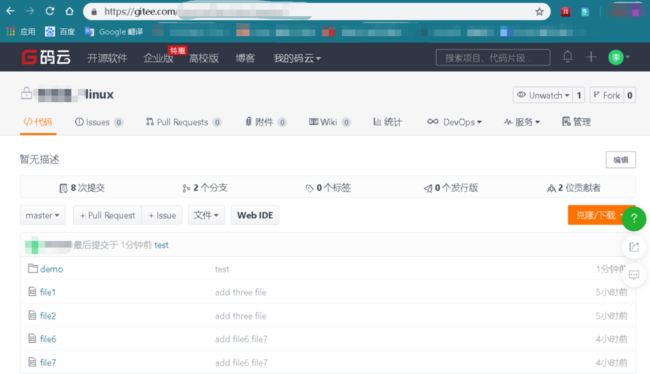
image.png
ssh-keygen -t rsa
cat /root/.ssh/id_rsa.pub
cd /root/demo/
ll
git remote add origin [email protected]:linuxcx/linux.git
git push -u origin master
gitlab安装
#上传gitlab-ce-11.9.11-ce.0.el7.x86_64.rpm到当前目录

echo "192.168.37.202  mirrors.aliyun.com" >>/etc/hosts
curl -o /etc/yum.repos.d/CentOS-Base.repo http://mirrors.aliyun.com/repo/Centos-7.repo
yum localinstall gitlab-ce-11.9.11-ce.0.el7.x86_64.rpm -y

vim  /etc/gitlab/gitlab.rb
#设置访问url和关闭prometheus
external_url 'http://http://gitlablcx.com'
prometheus_monitoring['enable'] = false

#配置gitlab通过smtp发送邮件
[root@k8s-node2 demo]# vim /etc/gitlab/gitlab.rb
gitlab_rails['gitlab_email_enabled'] = true
gitlab_rails['gitlab_email_from'] = '[email protected]'
gitlab_rails['gitlab_email_display_name'] = 'linux_gitlab'

gitlab_rails['smtp_enable'] = true
gitlab_rails['smtp_address'] = "smtp.qq.com"
gitlab_rails['smtp_port'] = 465
gitlab_rails['smtp_user_name'] = "245684979"
gitlab_rails['smtp_password'] = "lvlina.199625"
gitlab_rails['smtp_domain'] = "qq.com"
gitlab_rails['smtp_authentication'] = "login"
gitlab_rails['smtp_enable_starttls_auto'] = true
gitlab_rails['smtp_tls'] = true

#重新配置
gitlab-ctl reconfigure
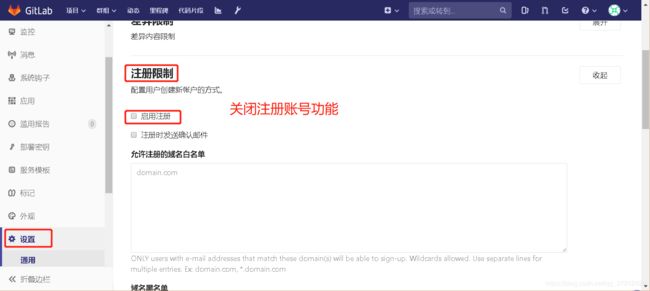
gitlab汉化
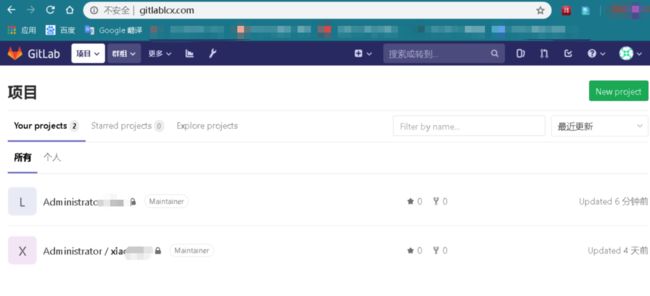
image.png
#下载汉化包
https://gitlab.com/xhang/gitlab

gitlab-ctl stop
tar xf gitlab-11-9-stable-zh.tar.gz
\cp -a gitlab-11-9-stable-zh/* /opt/gitlab/embedded/service/gitlab-rails/
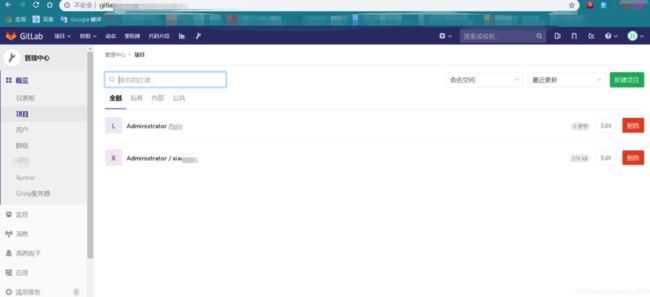
image.png
gitlab-用户-用户组-项目之间的关系
先创建用户组,在基于用户组创建项目,最后创建用户,编辑用户组,添加成员,注意权限
image
gitlab备份和恢复
#备份
gitlab-rake gitlab:backup:create

#恢复
gitlab-ctl stop
gitlab-rake gitlab:backuip:restore BACKUP=1510472027_2019_09_23_9.4.5
gitlab-ctl start

vim /etc/gitlab/gitlab.rb
gitlab_rails['manage_backup_path'] = true
gitlab_rails['backup_path'] = "/var/opt/gitlab/backups"
gitlab_rails['backup_keep_time'] = 604800

#迁移云主机
先备份,云主机安装相同版本,恢复

#更新配置
gitlab-ctl reconfigure
gitlab版本升级
gitlab升级,要小版本跨 10--->11--->12
扩展内容:
1.安装svn服务器,将svn中的数据迁移到git仓库
git-svn
git clone svnsvn是一个中心化的版本控制工具,git是分布式的,每个人都可以有完整的代码仓库
2.找回
gitlab的root密码