作者:Jack Wu
Latex
目前,TexLive是最活跃的编译包,同时是首选的中文支持环境(国人维护的基于MikTex的Ctex目前已不维护)。
概念区别
说兼容问题之前,关于ctex和texlive有一些基本概念要搞清楚。
Texlive是一个latex语言的编译环境, Ctex只是一个中文版套装!
- Latex的编译环境主要有以下几个:
- Texlive(主要用于Linux,Windows)
- MikTex(主要用于Windows)
- MaxTex(主要用于Mac)
- Ctex是专门针对中文的国人整理的一个套装,用的是MikTex的编译环境,还包含了WinEdt编辑器,GsView等软件。
- Ctex package又是另一个概念!在我们需要写中文latex文档时,就需要用到ctex这个宏包,所以此ctex又非彼ctex。
Ref: https://levylv.github.io/2017/some-questions-about-ctex-and-texlive.html
Ubuntu 2018.04 安装 TexLive 2019
Ubuntu 安装源已经打包了 TEX Live。对于大部分的用户,源里面的 TEX Live 安装简单,稳定性通常也足够,所以可以直接安装[1]。为了避免宏包依赖问题,推荐安装完整版(如果磁盘空间足够):
sudo apt-get install texlive-full
然而,源里面的 TEX Live 相比于「纯净版」,也有一些缺点:
- 相比于几乎每日都有更新的 CTAN,源里面的 TEX Live 更新较慢,频率接近每月一次,对于宏包开发者和有特殊需要的 TEX 用户是远远不够的
- 不使用 TEX Live 自带的包管理器,也就不能通过
tlmgr安装、管理和更新宏包
推荐从官方安装「纯净版」TEX Live 的方法,完整安装需要6G空间。
Pre-install: download, cleanup
rm -rf /usr/local/texlive/2019
rm -rf ~/.texlive2019
sudo apt install perl
Running the installer
可以使用国内镜像。
If you are downloading over the network, by default a nearby CTAN mirror is automatically chosen. If you have problems, it is good to choose a specific mirror and then run install-tl --location http://mirror.example.org/ctan/path/systems/texlive/tlnet instead of relying on the automatic redirection.
cd /your/download/directory
sudo ./install-tl
[... messages omitted ...]
Enter command: i
[... when done, see below for post-install ...]
Post-install: setting PATH
PATH=/usr/local/texlive/2019/bin/x86_64-linux:$PATH
Post-install: setting the default paper size
The default is to configure the programs for the A4 paper size. To make the default be 8.5x11 letter-size paper, you can use the ‘o’ menu option before i(nstalling), or run tlmgr paper letter after installation (and after setting your PATH).
Ref: https://www.tug.org/texlive/quickinstall.html
Ref: https://stone-zeng.github.io/2018-05-13-install-texlive-ubuntu/
TeXMaker
正规入门首选。
安装完需要配置对应命令的路径,如:
xelatex -synctex=1 -interaction=nonstopmode %.tex
改成
/usr/local/texlive/2019/bin/x86_64-linux/xelatex -synctex=1 -interaction=nonstopmode %.tex

Install Lyx with existing TexLive
如下方式安装与配置,使用Lyx时仍然有些问题。Lyx再包装一层WYSIWYW,使用自己安装的TexLive依赖问题不好解决。
sudo apt install lyx --no-install-recommends-
add TeXLive PATH to Lyx->Preferences->Paths->PATH prefix。
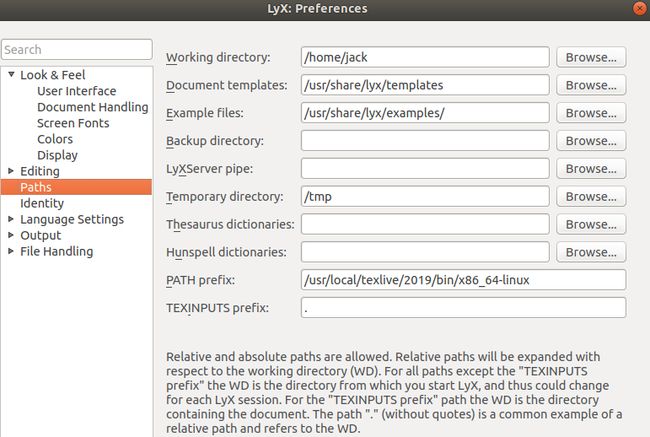 1558938591721.png
 Run LyX->Tools->Reconfigure
TexLive中文支持
Texlive下要支持中文,最简单的方法就是满足下面三个条件
- UTF-8编码的tex文件
\usepackage{ctex}- Xelatex编译文件
简单明了,这也是一个通用的方法,在任何编译环境下,都可以使用此方法支持中文。注意,有的时候在用这个方法编译从ctex那边移植过来的文件时,可能会遇到中文字体问题,大概率是因为模板里用了windows下的字体,而linux下没有这些字体,需要安装。
Ref: https://levylv.github.io/2017/some-questions-about-ctex-and-texlive.html