拆分数据库
扩展服务器
拆分静态资源至独立服务器
一、拆分数据库
- 拆分数据库的原因:
单台服务器运行LNMP架构,会导致网站访问缓慢。 - 拆分数据库能解决什么问题
① 缓解web网站的压力
② 增强数据库读写性能
③ 提高用户的访问速度 - 数据库拆分的环境规划
需要一台web服务器(172.16.1.7)一台mariadb(db01)服务器(172.16.1.51),web服务器的应用环境需要运行Nginx+PHP,mariadb服务器的应用环境需要运行MySQL。 - 数据库拆分步骤
① web01服务器操作如下:
## 首先备份web01上的数据库:oldxu.com作为数据库的密码
[root@web01 ~]# mysqldump -uroot -p'oldxu.com' --all-databases > mysql-all.sql

## 将172.16.1.7 上的数据推送至172.16.1.51
[root@web01 ~]# scp mysql-all.sql [email protected]:/tmp
② db01服务器操作如下:
## 登录172.16.1.51 恢复数据
[root@db01 ~]# yum install mariadb mariadb-server -y
[root@db01 ~]# systemctl enable mariadb
[root@db01 ~]# systemctl start mariadb

## 读取sql文件至数据库中
[root@db01 ~]# mysql -uroot < /tmp/mysql-all.sql
[root@db01 ~]# systemctl restart mariadb

## 配置一个远程用户,允许其他服务器能通过远程的方式连接
MariaDB [(none)]> grant all privileges on *.* to 'all'@'%' identified by 'oldxu.com';
MariaDB [(none)]> flush privileges;

## 将 172.16.1.7 程序连接本地的数据库,修改为远程的数据库    ( 应用割接 )
[root@web01 ~]# systemctl disable mariadb
[root@web01 ~]# systemctl stop mariadb
③ 在web01服务器修改代码连接新数据库环境
## 修改wordprocess产品代码连接数据库的配置文件
[root@web01~]# cd /code/wordpress
### 修改数据库用户名
[root@web01 wordpress]# find ./ -type f  | xargs grep "oldxu.com"
./wp-config.php:define( 'DB_PASSWORD', 'oldxu.com' );
/** WordPress数据库的名称 */
define( 'DB_NAME', 'wordpress' );
/** MySQL数据库用户名 */
define( 'DB_USER', 'all' );
/** MySQL数据库密码 */
define( 'DB_PASSWORD', 'oldxu.com' )
/** MySQL主机 */
define( 'DB_HOST', '172.16.1.51' );
[root@web01/code/wordpress]# vim ./wp-config.php
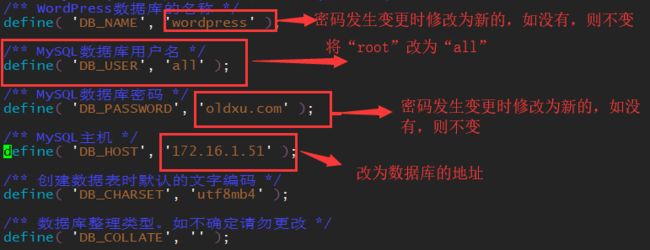
image.png
1)修改wecenter产品代码连接数据库的配置文件
[root@web01~]# cd /code/zh
[root@web01 zh]# find ./ -type f  | xargs grep "oldxu.com"
./system/config/database.php:  'password' => 'oldxu.com',
与修改WordPress同理
2)修改edusoho产品代码连接数据库的配置文件
[root@web01~]# cd /code/edusoho
[root@web01 edusoho]# find ./ -type f  | xargs grep "oldxu.com"
./app/config/parameters.yml

清理缓存
[root@web01 edusoho]# rm -rf /code/edusoho/app/cache/*
二、扩展服务器
- (1)从原有的模板机克隆一台172.16.1.8(web02)服务器
- (2)在172.16.1.8上安装Nginx和PHP
① 安装Nginx
[root@web02~]# cat /etc/yum.repos.d/nginx.repo
[nginx-stable]
name=nginx stable repo
baseurl=http://nginx.org/packages/centos/$releasever/$basearch/
gpgcheck=1
enabled=1
gpgkey=https://nginx.org/keys/nginx_signing.key

使用yum进行安装
 [root@web02~]# yum install nginx -y
② 安装PHP
[root@web02 ~]# cat /etc/yum.repos.d/php.repo
[webtatic-php]
name = php Repository
baseurl = http://us-east.repo.webtatic.com/yum/el7/x86_64/
gpgcheck = 0

使用yum安装
[root@web02 ~]# yum -y install nginx php71w php71w-cli php71w-common php71w-devel php71w-embedded php71w-gd php71w-mcrypt php71w-mbstring php71w-pdo php71w-xml php71w-fpm php71w-mysqlnd php71w-opcache php71w-pecl-memcached php71w-pecl-redis php71w-pecl-mongodb
③ 启动nginx和php-fpm
[root@web02 ~]# systemctl start nginx php-fpm
[root@web02 ~]# systemctl enable nginx ph-fpm
- (3)使web02与web01的配置一致
a.创建用户和用户组(web02服务器)
[root@web02 ~]# groupadd -g 666 www
[root@web02 ~]# useradd -u666 -g666 www

b.切到172.16.1.7 上执行如下操作
[root@web01 ~]# rsync -avz --delete  /etc/nginx [email protected]:/etc/
[root@web01 ~]# rsync -avz --delete  /etc/php.ini [email protected]:/etc/
[root@web01 ~]# rsync -avz --delete  /etc/php-fpm.d [email protected]:/etc/

c.打包代码
[root@web01 ~]# tar czf code.tar.gz /code

d.拷贝代码
[root@web01 ~]# scp code.tar.gz [email protected]:/tmp

e.回到172.16.1.8  然后解包授权重启服务,并加入开机自启
[root@web02 ~]# tar xf /tmp/code.tar.gz -C /
[root@web02 ~]# systemctl restart nginx php-fpm
[root@web02 ~]# systemctl enable nginx php-fpm
三、拆分静态资源至独立服务器
① 准备172.16.1.31 nfs存储服务器
1) 安装
[root@nfs ~]# yum install nfs-utils -y

2) 配置
[root@nfs ~]# cat /etc/exports
/data/blog 172.16.1.0/24(rw,sync,all_squash,anonuid=666,anongid=666)
/data/edu 172.16.1.0/24(rw,sync,all_squash,anonuid=666,anongid=666)
/data/zh 172.16.1.0/24(rw,sync,all_squash,anonuid=666,anongid=666)

3) 初始化环境
[root@nfs ~]# mkdir -p /data/{blog,zh,edu}
[root@nfs ~]# groupadd -g 666 www
[root@nfs ~]# useradd -u666 -g666 www
[root@nfs ~]# chown -R www.www /data/

4) 启动
[root@nfs ~]# systemctl enable nfs
[root@nfs ~]# systemctl restart nfs
② 找到web存储的图片所在的路径 http://blog.oldxu.com/wp-content/uploads/2019/09/tt.jpeg
wordpress
[root@web01 wp-content]# mv uploads/ uploads_bak
[root@web01 wp-content]# scp -rp uploads_bak/* [email protected]:/data/blog/
[root@web01 wp-content]# mkdir uploads
wecenter
[root@web01 uploads]# mv article/ article_bak
[root@web01 uploads]# scp -rp article_bak/* [email protected]:/data/blog/
[root@web01 uploads]# mkdir article
③ 在 172.16.1.7 172.16.1.8 .... 应用服务器上进行挂载
挂载WordPress
[root@web01 wp-content]# mount -t nfs 172.16.1.31:/data/blog /code/wordpress/wp-content/uploads
[root@web02 wp-content]# mount -t nfs 172.16.1.31:/data/blog /code/wordpress/wp-content/uploads

挂载wecenter
[root@web01uploads]# mount -t nfs 172.16.1.31:/data/blog /code/zh/uploads/article
[root@web02uploads]# mount -t nfs 172.16.1.31:/data/blog /code/zh/uploads/article
④ 加入开机自启
[root@web01~]# cat /etc/fstab
172.16.1.31:/data/zh       /code/zh/uploads/article              nfs     defaults        0    0
172.16.1.31:/data/blog    /code/wordpress/wp-content/uploads     nfs     defaults        0    0

[root@web02~]# cat /etc/fstab
172.16.1.31:/data/zh       /code/zh/uploads/article              nfs     defaults        0    0
172.16.1.31:/data/blog    /code/wordpress/wp-content/uploads     nfs     defaults        0    0