SpringBootWeb模块的默认规则研究
文章目录
-
- 1、配置文件的加载位置
- 2、静态资源映射规则
-
- 2.1、第一种映射规则
-
- 2.1.1、官方文档介绍
- 2.1.2、源码分析
- 2.2、第二种映射规则
-
- 2.2.1、官方文档介绍
- 2.2.2、源码分析
- 2.3、欢迎页映射规则
-
- 2.3.1、官方文档介绍
- 2.3.2、源码分析
- 3、templates文件夹
-
- 3.1、静态页面
- 3.2、动态页面
- 4、错误页面处理(Error Handling)
-
- 4.1官方文档介绍
- 4.2、源码分析
- 5、WebMvcConfigurer配置讲解
-
- 5.1、Spring官方API与文档介绍
- 5.2、addInterceptors:拦截器
- 5.2、addViewControllers:页面跳转
- 5.3、addResourceHandlers:静态资源
- 5.4、configureDefaultServletHandling:默认静态资源处理器
- 5.5、configureViewResolvers:视图解析器
- 5.6、addCorsMappings:跨域
- 5.7、configureMessageConverters:信息转换器
研究的SpringBoot版本:2.4.0
个人网站:点击进入,里面有博客部分,样式更美观,比这里看得舒服一些
1、配置文件的加载位置
SpringBoot启动会扫描以下位置的applicaiton.properties或者application.yml文件作为SpringBoot的默认配置文件
- file:./config/
- file:./
- classpath:/config/
- classpath:/
以上是按照优先级从高到低的顺序,所有位置的文件都会被加载,互补配置,高优先级配置内容会覆盖低优先级配置内容
Tip:可以输出以下 java.class.path 看一下当前项目的类路径
我们也可以通过配置 spring.config.location 来改变默认位置
项目打包好以后,我们可以使用命令行参数的形式,启动项目的时候来指定配置文件的新位置;指定配置文件和默认加载的这些配置文件共同起作用形成互补配置
eg:java -jar example-0.0.1-SNAPSHOT.jar --spring.config.location=D:/application.yml
源码可以参考一下org.springframework.boot.context.config.ConfigFileApplicationListener类(2.4.0版本之前)
@Deprecated
public class ConfigFileApplicationListener implements EnvironmentPostProcessor, SmartApplicationListener, Ordered {
   // Note the order is from least to most specific (last one wins)
   private static final String DEFAULT_SEARCH_LOCATIONS = "classpath:/,classpath:/config/,file:./,file:./config/*/,file:./config/";

   private static final String DEFAULT_NAMES = "application";
可以通过阅读一下此类的注释了解一下该类的作用
/**
* {@link EnvironmentPostProcessor} that configures the context environment by loading
* properties from well known file locations. By default properties will be loaded from
* 'application.properties' and/or 'application.yml' files in the following locations:
*
* - file:./config/
* - file:./config/{@literal *}/
* - file:./
* - classpath:config/
* - classpath:
*
* The list is ordered by precedence (properties defined in locations higher in the list
* override those defined in lower locations).
*
* Alternative search locations and names can be specified using
* {@link #setSearchLocations(String)} and {@link #setSearchNames(String)}.
*
* Additional files will also be loaded based on active profiles. For example if a 'web'
* profile is active 'application-web.properties' and 'application-web.yml' will be
* considered.
*
* The 'spring.config.name' property can be used to specify an alternative name to load
* and the 'spring.config.location' property can be used to specify alternative search
* locations or specific files.
*
*
* @since 1.0.0
* @deprecated since 2.4.0 in favor of {@link ConfigDataEnvironmentPostProcessor}
*/
得到以下几条信息
- 它通过加载来配置上下文环境来自已知文件位置的属性。
- 默认情况下,将从
"classpath:/,classpath:/config/,file:./,file:./config/*/,file:./config/"扫描加载配置文件 - 列表按优先级排序(在列表中较高位置定义的属性覆盖在较低位置定义的值)
- 支持多环境配置,多环境配置文件格式:
application-{profile}.properties/yml在主配置文件中用spring.profiles.active激活 - 可以使用命令行参数的形式,启动项目的时候来指定配置文件的新位置
- 自SpringBoot2.4.0版本起已弃用,取而代之的是
ConfigDataEnvironmentPostProcessor类
可以看到与我们之前一开始总结的结论一样
2、静态资源映射规则
在SpringBoot里,SpringMVC的相关配置都在 WebMvcAutoConfiguration 里面,而这个自动配置类里有这样一段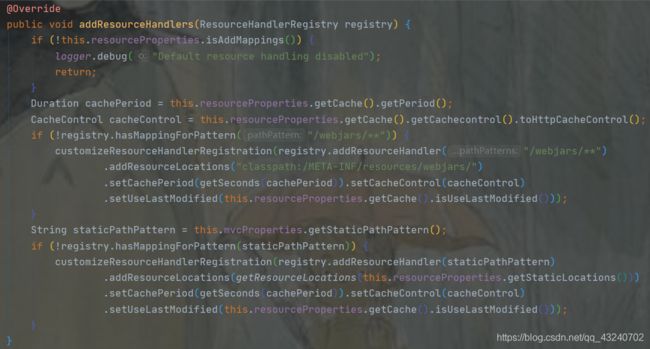
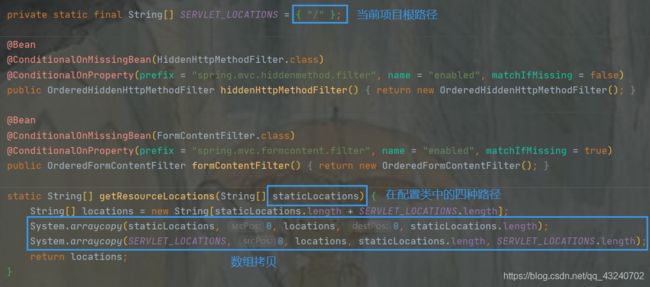
根据以上代码内容,我们可以看到两种映射规则!
2.1、第一种映射规则
2.1.1、官方文档介绍
By default, Spring Boot serves static content from a directory called /static (or /public or /resources or /META-INF/resources) in the classpath or from the root of the ServletContext. It uses the ResourceHttpRequestHandler from Spring MVC so that you can modify that behavior by adding your own WebMvcConfigurer and overriding the addResourceHandlers method.
默认情况下,Spring Boot从类路径中的 /static 目录(或 /public 或 /resources或 /META-INF / resources)或ServletContext的根目录中提供静态内容
它使用Spring MVC中的ResourceHttpRequestHandler,以便您可以通过添加自己的WebMvcConfigurer并重写addResourceHandlers方法来修改该行为
By default, resources are mapped on /**, but you can tune that with the spring.mvc.static-path-pattern property. For instance, relocating all resources to /resources/** can be achieved as follows:spring.mvc.static-path-pattern=/resources/**
默认情况下,资源映射在 /** 上,但是您可以使用 spring.mvc.static-path-pattern属性对其进行调整
例如,将所有资源重定位到 /resources/ ,可以如下实现:spring.mvc.static-path-pattern=/resources/
2.1.2、源码分析
String staticPathPattern = this.mvcProperties.getStaticPathPattern();
if (!registry.hasMappingForPattern(staticPathPattern)) {
   customizeResourceHandlerRegistration(registry.addResourceHandler(staticPathPattern)
         .addResourceLocations(getResourceLocations(this.resourceProperties.getStaticLocations()))
         .setCachePeriod(getSeconds(cachePeriod)).setCacheControl(cacheControl)
         .setUseLastModified(this.resourceProperties.getCache().isUseLastModified()));
}
访问当前项目配置的staticPathPattern路径下的所有资源
都去getResourceLocations(this.resourceProperties.getStaticLocations)找
那 staticPathPattern 与 getResourceLocations(this.resourceProperties.getStaticLocations) 指的又是什么呢?
所以:/**访问当前项目下的任何资源,都去以下四个路径下寻找资源,优先级由高到低
-
classpath:/META-INF/resources/
-
classpath:/resources/
-
classpath:/static/
-
classpath:/public/
-
/:当前项目的根路径
这几个文件夹我们就称为静态资源文件夹,你把你的静态资源只要保存在这几个文件夹里面,人家访问的时候呢,只要没有人处理,都会在这几个文件夹里面找资源
例如:访问 localhost:8080/a.css,会默认去找这几个文件夹中的a.css返回
2.2、第二种映射规则
2.2.1、官方文档介绍
In addition to the “standard” static resource locations mentioned earlier, a special case is made for Webjars content. Any resources with a path in /webjars/** are served from jar files if they are packaged in the Webjars format.
除了前面提到的“标准”静态资源位置,Webjar内容也有特殊情况
如果 jar 文件以 Webjars 格式打包,则从jar文件提供带有 /webjars/** 路径的所有资源
Tip:如果您的应用程序打包为jar,则不要使用 src / main / webapp 目录
尽管此目录是一个通用标准,但它仅与 war 打包一起使用,并且如果生成jar,大多数构建工具都将其忽略
2.2.2、源码分析
if (!registry.hasMappingForPattern("/webjars/**")) {
				customizeResourceHandlerRegistration(registry.addResourceHandler("/webjars/**")
						.addResourceLocations("classpath:/META-INF/resources/webjars/")
						.setCachePeriod(getSeconds(cachePeriod)).setCacheControl(cacheControl)
						.setUseLastModified(this.resourceProperties.getCache().isUseLastModified()));
			}
访问/webjars/**下面的所有资源都去classpath:/META-INF/resources/webjars/找资源
webjars:以jar包的方式引入静态资源 https://www.webjars.org/
里面将我们常用的前端框架例如JQuery,Bootstrap等,以Maven依赖的方式交给我们
我们只需要将它的Maven坐标引入项目中即可使用
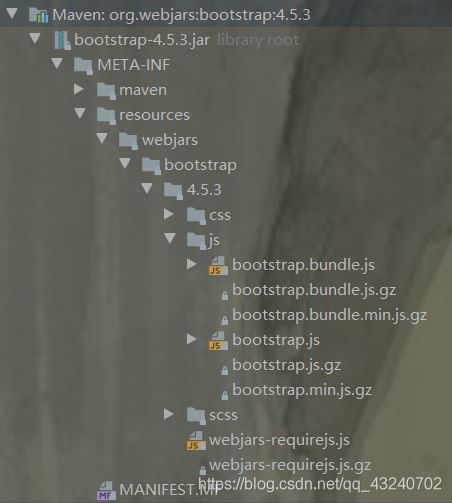
根据上述的映射规则,如果我们发送localhost:8080/webjars/bootstrap/4.5.3/js/bootstrap.js
则这个资源会去哪找呢?
就会去找到这个jar包的类路径下/META-INF/resources/webjars//bootstrap/4.5.3/js/bootstrap.js资源!
2.3、欢迎页映射规则
2.3.1、官方文档介绍
Spring Boot supports both static and templated welcome pages. It first looks for an index.html file in the configured static content locations. If one is not found, it then looks for an index template. If either is found, it is automatically used as the welcome page of the application.
Spring Boot同时支持静态和模板化欢迎页面。它首先在配置的静态内容位置中查找index.html文件。如果没有找到索引模板,则查找索引模板。如果找到任何一个,它将自动用作应用程序的欢迎页面
2.3.2、源码分析
HandlerMapping是SpringMvc的底层注解,它来保存每一个请求对应谁来处理
private Optional<Resource> getWelcomePage() {
			String[] locations = getResourceLocations(this.resourceProperties.getStaticLocations());
			return Arrays.stream(locations).map(this::getIndexHtml).filter(this::isReadable).findFirst();
		}

private Resource getIndexHtml(String location) {
			return this.resourceLoader.getResource(location + "index.html");
		}
getWelcomePage()的返回对应由 this.mvcProperties.getStaticPathPattern()来处理
即所有静态资源文件夹下的index.html,都被/**映射,即localhost:8080 -> 找index页面
3、templates文件夹
SpringBoot里面没有我们之前常规web开发的 WebContent(WebApp),它只有src目录(正常的maven结构)
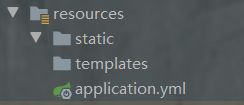
在src/main/resources下面有两个文件夹,static和templates。springboot默认static中放静态页面,而templates中放动态页面
3.1、静态页面
这里我们直接在static(或者讲过的任何一个静态资源文件夹)放一个example.html,然后直接输入http://localhost:8080/example.html便能成功访问
或者也可以通过controller控制器跳转:
@Controller
public class ExampleController {
    @GetMapping("/example")
    public String sayHello() {
        return "example.html";
    }
}
然后输入http://localhost:8080/example就可以成功访问!
这两种请求的方式当我们的 DispatcherServlet 在进行处理的时候,差别为根据九大组件之一的 HandlerMapping 返回的请求处理的执行链 HandlerExecutionChain 中的处理器 Handler 不同
前者直接输入URL请求静态资源的方式
它最后会在真正调用处理方法中调用 HttpMessageConverter 的 Write() 方法将客户端浏览器请求的内容以 Byte[] 写回,并返回一个空的 ModelAndView,具体实现类为ResourceRegionHttpMessageConverter
后者通过控制器controller访问
这种方式在真正调用处理方法后返回的 ModelAndView 不为空,其内包含了视图与数据,在最后在 doDispatch() 方法中调用 processDispatchResult() 处理调度结果时候,调用 ModelAndView 中的视图 View 的 render() 方法根据逻辑视图地址去往真正的页面,具体为执行请求转发,转发给另外一个 DispatcherServlet 的实例处理转发的请求,请求路径为 /example.html,随后处理的逻辑就与前者直接输入URL请求静态资源的方式一样了
3.2、动态页面
动态页面需要先请求服务器,访问后台应用程序,然后再转向到页面,比如访问JSP。spring boot建议不要使用JSP,默认使用Thymeleaf模板引擎来做动态页面
在pom文件中添加Thymeleaf的场景启动器
<dependency>
    <groupId>org.springframework.bootgroupId>
    <artifactId>spring-boot-starter-thymeleafartifactId>
dependency>
我们先在tempates文件夹中也新建一个example.html但内容不同,然后先试一下直接访问该页面
输入http://localhost:8080/example.html,结果显然访问的是静态资源文件夹里面的那个example.html
然后我们现在再试一下用controller跳转
无法访问到example.html了,直接报错
因为:静态页面的return默认是跳转到/static/index.html,当在pom.xml中引入了thymeleaf组件,动态跳转会覆盖默认的静态跳转,默认就会跳转到/templates/index.html,注意看两者return代码也有区别,动态没有html后缀。
去ThymeleafProperties里看一下Thymeleaf的默认规则
@ConfigurationProperties(prefix = "spring.thymeleaf")
public class ThymeleafProperties {

   private static final Charset DEFAULT_ENCODING = StandardCharsets.UTF_8;

   public static final String DEFAULT_PREFIX = "classpath:/templates/";

   public static final String DEFAULT_SUFFIX = ".html";
有一个默认的前缀 classpath:/templates/ 与一个默认的后缀.html,即只要我们把 html 页面放到我们的类路径下的templates里面,就能帮我们自动渲染了
按照规则修改一下我们的代码
@Controller
public class ExampleController {
    @GetMapping("/example")
    public String sayHello() {
        return "example";
    }
}
我们以前写返回example,springmvc给我们拼串得jsp页面,现在我们引入thymeleaf之后,现在我们发送example请求,然后我们要去example页面,这个页面在哪里呢?照thymeleaf拼串规则,会去classpath:/templates/文件夹里面找到example,再给你拼一个html后缀,返回
如果在使用动态页面时还想跳转到/static/index.html,可以使用重定向return “redirect:/example.html”
return "redirect:/example.html";
4、错误页面处理(Error Handling)
4.1官方文档介绍
If you want to display a custom HTML error page for a given status code, you can add a file to an /error directory. Error pages can either be static HTML (that is, added under any of the static resource directories) or be built by using templates. The name of the file should be the exact status code or a series mask.
如果要显示给定状态代码的自定义HTML错误页面,可以将文件添加到 /error 目录
错误页面可以是静态HTML(即添加到任何静态资源目录下),也可以使用模板来构建
文件名应为确切的状态代码或系列掩码
例如,要将404映射到静态HTML文件,您的目录结构应该如下所示:
src/
 +- main/
     +- java/
     |   +
     +- resources/
         +- public/
             +- error/
             |   +- 404.html
             +-
要使用Thymeleaf模板映射所有5xx错误,您的目录结构应该如下所示:
src/
 +- main/
     +- java/
     |   +
     +- resources/
         +- templates/
             +- error/
             |   +- 5xx.html
             +-
对于更复杂的映射,您还可以添加实现ErrorViewResolver接口的bean,如下面的示例所示
public class MyErrorViewResolver implements ErrorViewResolver {
    @Override
    public ModelAndView resolveErrorView(HttpServletRequest request,
            HttpStatus status, Map<String, Object> model) {
        // 根据请求或者状态码选择性的返回一个ModelAndView
        return ...
    }
}
4.2、源码分析
原理都可以参照SpringBoot的自动配置,在Web的自动配置模块中有一个叫ErrorMvcAutoConfiguration的自动配置类
与Web模块的错误页面怎么处理的自动配置规则全部封装在这个自动配置类里面
主要给容器中添加了以下几个重要组件
- DefaultErrorAttributes
- BasicErrorController
- ErrorPageCustomizer
- DefaultErrorViewResolver
一旦系统出现4XX或者5XX的错误,ErrorPageCustomizer 就会生效(定制错误的相应规则)
	@Bean
	public ErrorPageCustomizer errorPageCustomizer(DispatcherServletPath dispatcherServletPath) {
		return new ErrorPageCustomizer(this.serverProperties, dispatcherServletPath);
	}
而 ErrorPageCustomizer 的唯一方法(作用)就是来注册错误页面的响应规则的
@Override
public void registerErrorPages(ErrorPageRegistry errorPageRegistry) {
   ErrorPage errorPage = new ErrorPage(
         this.dispatcherServletPath.getRelativePath(this.properties.getError().getPath()));
   errorPageRegistry.addErrorPages(errorPage);
}
主要有一个 getPath(),点进去发现就是从配置文件中取出的 error.path:/error 的值,默认为/error
/**
	 * Path of the error controller.
	 */
	@Value("${error.path:/error}")
	private String path = "/error";
即系统出现错误后就来到/error请求进行处理,此时第二个重要组件 BasicErrorController 就要干活了,注册代码如下:
@Bean
@ConditionalOnMissingBean(value = ErrorController.class, search = SearchStrategy.CURRENT)
public BasicErrorController basicErrorController(ErrorAttributes errorAttributes,
      ObjectProvider<ErrorViewResolver> errorViewResolvers) {
   return new BasicErrorController(errorAttributes, this.serverProperties.getError(),
         errorViewResolvers.orderedStream().collect(Collectors.toList()));
}

@Controller
@RequestMapping("${server.error.path:${error.path:/error}}")
public class BasicErrorController extends AbstractErrorController {
它就是一个contoller,它来从配置文件中取出 server.error.path:${error.path:/error} 的值(:的意思为前面取不出用后面)
所以它就是默认来处理 /error 请求的controller,它是怎么处理的呢?类中有下面两种请求的处理方式
@RequestMapping(produces = MediaType.TEXT_HTML_VALUE)
public ModelAndView errorHtml(HttpServletRequest request, HttpServletResponse response) {
   HttpStatus status = getStatus(request);
   Map<String, Object> model = Collections
         .unmodifiableMap(getErrorAttributes(request, getErrorAttributeOptions(request, MediaType.TEXT_HTML)));
   response.setStatus(status.value());
   ModelAndView modelAndView = resolveErrorView(request, response, status, model);
   return (modelAndView != null) ? modelAndView : new ModelAndView("error", model);
}

@RequestMapping
public ResponseEntity<Map<String, Object>> error(HttpServletRequest request) {
   HttpStatus status = getStatus(request);
   if (status == HttpStatus.NO_CONTENT) {
      return new ResponseEntity<>(status);
   }
   Map<String, Object> body = getErrorAttributes(request, getErrorAttributeOptions(request, MediaType.ALL));
   return new ResponseEntity<>(body, status);
}
第一种处理方式会产生 TEXT_HTML_VALUE = "text/html" 类型的数据,第二种返回 ResponseEntity 类型数据(与 @ResponseBody 相比,不仅可以返回json结果,还可以定义返回的 HttpHeaders 和 HttpStatus )
浏览器发送请求的时候,我们在控制台可以看到它优先接收 text/html 类型的数据
而其它客户端(例如Postman)发送请求的时候,它没有说它要优先接收 text/html 类型的数据
所以,发生错误时,浏览器发送的请求会使用第一个方法处理,其它客户端会使用第二个方法处理
以第一个方法为例,浏览器发生错误去那个页面呢?代码会通过 resolveErrorView() 方法解析生成一个 ModelAndView 对象并返回,我们都知道 ModelAndView 包含了页面地址与页面内容(模型数据)
protected ModelAndView resolveErrorView(HttpServletRequest request, HttpServletResponse response, HttpStatus status,
      Map<String, Object> model) {
   for (ErrorViewResolver resolver : this.errorViewResolvers) {
      ModelAndView modelAndView = resolver.resolveErrorView(request, status, model);
      if (modelAndView != null) {
         return modelAndView;
      }
   }
   return null;
}
它拿到所有的异常视图解析器 ErrorViewResolver 挨个尝试得到 ModelAndView,主要是使用 Springboot 缺省实现的一个错误视图解析器 ErrorViewResolver:DefaultErrorViewResolver 来解析的,这也是 ErrorMvcAutoConfiguration 注入的4个重要组件中第三个
注入代码:
@Bean
@ConditionalOnBean(DispatcherServlet.class)
@ConditionalOnMissingBean(ErrorViewResolver.class)
DefaultErrorViewResolver conventionErrorViewResolver() {
   return new DefaultErrorViewResolver(this.applicationContext, this.resources);
}
DefaultErrorViewResolver 主要代码与解释:
public class DefaultErrorViewResolver implements ErrorViewResolver, Ordered {

   private static final Map<Series, String> SERIES_VIEWS;

   static {		//客户端错误用4xx来表示,服务端错误用5xx来表示
      Map<Series, String> views = new EnumMap<>(Series.class);
      views.put(Series.CLIENT_ERROR, "4xx");
      views.put(Series.SERVER_ERROR, "5xx");
      SERIES_VIEWS = Collections.unmodifiableMap(views);
   }

    	@Override
	public ModelAndView resolveErrorView(HttpServletRequest request, HttpStatus status, Map<String, Object> model){
        //调用esolve方法通过具体状态码的值(例如404)得到modelAndView
		ModelAndView modelAndView = resolve(String.valueOf(status.value()), model);
        //若上一步得不到,就通过状态码的系列来获取(例如404为4xx系列错误)
		if (modelAndView == null && SERIES_VIEWS.containsKey(status.series())) {
			modelAndView = resolve(SERIES_VIEWS.get(status.series()), model);
		}
		return modelAndView;
	}

	private ModelAndView resolve(String viewName, Map<String, Object> model) {
        //默认SpringBoot可以去到一个页面:error/状态码
		String errorViewName = "error/" + viewName;		//viewName即传入的SERIES_VIEWS.get(status.series())状态码

        //如果模板引擎可以解析这个页面地址,就用模板引擎来解析
        TemplateAvailabilityProvider provider = this.templateAvailabilityProviders.getProvider(errorViewName,
				this.applicationContext);
		if (provider != null) {
            //模板引擎解析返回上述的:error/状态码
			return new ModelAndView(errorViewName, model);
		}
        //如果模板引擎不可用,调用下述方法返回ModelAndView
		return resolveResource(errorViewName, model);
	}

	private ModelAndView resolveResource(String viewName, Map<String, Object> model) {
        //遍历静态资源文件夹
		for (String location : this.resources.getStaticLocations()) {
			try {
				Resource resource = this.applicationContext.getResource(location);
                //在静态资源文件夹中找  error/状态码.html
				resource = resource.createRelative(viewName + ".html");
                //如果找到了就返回
                if (resource.exists())
					return new ModelAndView(new HtmlResourceView(resource), model);
			}
			catch (Exception ex) {
			}
		}
        //找不到返回null
		return null;
	}
}
所以根据 DefaultErrorViewResolver 解析流程,结论就是:
- 有模板引擎的情况下,将错误页面放在
templates/error/即可 - 没有模板引擎的情况下,将错误页面放在
静态资源文件夹/error/即可 - 我们可以使用4xx,5xx作为页面的文件名来匹配这种类型所有的错误,精确优先(因为代码执行顺序优先)
那页面能获得的信息都有哪些呢?我们回过头来看看我们的处理方法 errorHtml()
	@RequestMapping(produces = MediaType.TEXT_HTML_VALUE)
	public ModelAndView errorHtml(HttpServletRequest request, HttpServletResponse response) {
		HttpStatus status = getStatus(request);
		Map<String, Object> model = Collections
				.unmodifiableMap(getErrorAttributes(request, getErrorAttributeOptions(request, MediaType.TEXT_HTML)));
		response.setStatus(status.value());
        //解析错误页面时候传入的模型中的数据model是在上面调用的getErrorAttributes()方法得到的
		ModelAndView modelAndView = resolveErrorView(request, response, status, model);
		return (modelAndView != null) ? modelAndView : new ModelAndView("error", model);
	}
可以清楚的看到解析错误页面时候传入的模型中的数据model是在上面调用的getErrorAttributes()方法得到的,而getErrorAttributes()方法就是调用本类的 ErrorAttributes 引用属性对象的 getErrorAttributes() 方法
private final ErrorAttributes errorAttributes;

protected Map<String, Object> getErrorAttributes(HttpServletRequest request, ErrorAttributeOptions options) {
   WebRequest webRequest = new ServletWebRequest(request);
   return this.errorAttributes.getErrorAttributes(webRequest, options);
}
ErrorAttributes为一个接口,只有一个默认的实现即为:DefaultErrorAttributes,它的作用就是帮我们在页面共享信息
这也是ErrorMvcAutoConfiguration 注入的4个重要组件中最后一个
DefaultErrorAttributes 中的 getErrorAttributes() 方法:
@Override
public Map<String, Object> getErrorAttributes(WebRequest webRequest, ErrorAttributeOptions options) {
   Map<String, Object> errorAttributes = getErrorAttributes(webRequest, options.isIncluded(Include.STACK_TRACE));
   if (Boolean.TRUE.equals(this.includeException)) {
      options = options.including(Include.EXCEPTION);
   }
   if (!options.isIncluded(Include.EXCEPTION)) {
      errorAttributes.remove("exception");
   }
   if (!options.isIncluded(Include.STACK_TRACE)) {
      errorAttributes.remove("trace");
   }
   if (!options.isIncluded(Include.MESSAGE) && errorAttributes.get("message") != null) {
      errorAttributes.put("message", "");
   }
   if (!options.isIncluded(Include.BINDING_ERRORS)) {
      errorAttributes.remove("errors");
   }
   return errorAttributes;
}
前前后后主要会链式调用下面一些方法将指定内容暴露在请求域中,供我们在错误页面共享!
@Override
@Deprecated
public Map<String, Object> getErrorAttributes(WebRequest webRequest, boolean includeStackTrace) {
   Map<String, Object> errorAttributes = new LinkedHashMap<>();
   errorAttributes.put("timestamp", new Date());
   addStatus(errorAttributes, webRequest);
   addErrorDetails(errorAttributes, webRequest, includeStackTrace);
   addPath(errorAttributes, webRequest);
   return errorAttributes;
}

private void addStatus(Map<String, Object> errorAttributes, RequestAttributes requestAttributes) {
   Integer status = getAttribute(requestAttributes, RequestDispatcher.ERROR_STATUS_CODE);
   if (status == null) {
      errorAttributes.put("status", 999);
      errorAttributes.put("error", "None");
      return;
   }
   errorAttributes.put("status", status);
   try {
      errorAttributes.put("error", HttpStatus.valueOf(status).getReasonPhrase());
   }
   catch (Exception ex) {
      // Unable to obtain a reason
      errorAttributes.put("error", "Http Status " + status);
   }
}
private void addErrorDetails(Map<String, Object> errorAttributes, WebRequest webRequest,
                             boolean includeStackTrace) {
    Throwable error = getError(webRequest);
    if (error != null) {
        while (error instanceof ServletException && error.getCause() != null) {
            error = error.getCause();
        }
        errorAttributes.put("exception", error.getClass().getName());
        if (includeStackTrace) {
            addStackTrace(errorAttributes, error);
        }
    }
    addErrorMessage(errorAttributes, webRequest, error);
}

private void addBindingResultErrorMessage(Map<String, Object> errorAttributes, BindingResult result) {
		errorAttributes.put("message", "Validation failed for object='" + result.getObjectName() + "'. "
				+ "Error count: " + result.getErrorCount());
		errorAttributes.put("errors", result.getAllErrors());
	}
从上述代码可以看到我们页面能获取的信息(有模板引擎情况下):
- timestamp:时间戳
- status:状态码
- error:错误提示
- exception:异常对象
- message:异常消息
- errors:JSR303数据校验的错误
若我们没有配置错误页面(即在静态资源路径与templates文件夹下都没有页面),errorHtml()方法返回的ModelAndView为空,即下述代码最后一段逻辑,它就会默认返回一个 error 视图
@RequestMapping(produces = MediaType.TEXT_HTML_VALUE)
public ModelAndView errorHtml(HttpServletRequest request, HttpServletResponse response) {
   HttpStatus status = getStatus(request);
   Map<String, Object> model = Collections
         .unmodifiableMap(getErrorAttributes(request, getErrorAttributeOptions(request, MediaType.TEXT_HTML)));
   response.setStatus(status.value());
   ModelAndView modelAndView = resolveErrorView(request, response, status, model);
   return (modelAndView != null) ? modelAndView : new ModelAndView("error", model);
}
而error视图又是什么呢?在ErrorMvcAutoConfiguration里面有配置,注入了一个名字为error的视图组件
@Configuration(proxyBeanMethods = false)
@ConditionalOnProperty(prefix = "server.error.whitelabel", name = "enabled", matchIfMissing = true)
@Conditional(ErrorTemplateMissingCondition.class)
protected static class WhitelabelErrorViewConfiguration {

   private final StaticView defaultErrorView = new StaticView();

   @Bean(name = "error")
   @ConditionalOnMissingBean(name = "error")
   public View defaultErrorView() {
      return this.defaultErrorView;
   }
   // If the user adds @EnableWebMvc then the bean name view resolver from
   // WebMvcAutoConfiguration disappears, so add it back in to avoid disappointment.
   @Bean
   @ConditionalOnMissingBean
   public BeanNameViewResolver beanNameViewResolver() {
      BeanNameViewResolver resolver = new BeanNameViewResolver();
      resolver.setOrder(Ordered.LOWEST_PRECEDENCE - 10);
      return resolver;
   }
}
它返回了this.defaultErrorView,即 new StaticView()
private static class StaticView implements View {
private static final MediaType TEXT_HTML_UTF8 = new MediaType("text", "html", StandardCharsets.UTF_8);
private static final Log logger = LogFactory.getLog(StaticView.class);
@Override
public void render(Map<String, ?> model, HttpServletRequest request, HttpServletResponse response)
throws Exception {
if (response.isCommitted()) {
String message = getMessage(model);
logger.error(message);
return;
}
response.setContentType(TEXT_HTML_UTF8.toString());
StringBuilder builder = new StringBuilder();
Object timestamp = model.get("timestamp");
Object message = model.get("message");
Object trace = model.get("trace");
if (response.getContentType() == null) {
response.setContentType(getContentType());
}
builder.append("Whitelabel Error Page
").append(
"This application has no explicit mapping for /error, so you are seeing this as a fallback.
")
.append("").append(timestamp).append("")
.append("There was an unexpected error (type=").append(htmlEscape(model.get("error")))
.append(", status=").append(htmlEscape(model.get("status"))).append(").");
if (message != null) {
builder.append("").append(htmlEscape(message)).append("");
}
if (trace != null) {
builder.append("").append(htmlEscape(trace)).append("");
}
builder.append("");
response.getWriter().append(builder.toString());
}
其内的 render() 方法在被调用的时候,通过 StringBuilder 与 response 的状态定制出了默认的相应错误页面的信息!
5、WebMvcConfigurer配置讲解
5.1、Spring官方API与文档介绍
可以看出:WebMvcConfigurer 配置类其实是Spring内部的一种配置方式,采用 JavaBean 的形式来代替传统的 xml 配置文件形式进行针对框架个性化定制
文档介绍
If you want to keep those Spring Boot MVC customizations and make more MVC customizations (interceptors, formatters, view controllers, and other features), you can add your own @Configuration class of type WebMvcConfigurer but without@EnableWebMvc.
如果您想保留那些 Spring Boot MVC 自定义,并进行更多的 MVC 自定义(拦截器、格式化器、视图控制器和其他特性),您可以添加自己的类型为WebMvcConfigurer的@Configuration类,但不添加@EnableWebMvc
If you want to take complete control of Spring MVC, you can add your own @Configuration annotated with @EnableWebMvc, or alternatively add your own @Configuration-annotated DelegatingWebMvcConfiguration as described in the Javadoc of @EnableWebMvc.
如果您想完全控制Spring MVC,可以添加您自己的带有@EnableWebMvc注释的@Configuration,或者添加您自己的带有@Configuration注释的DelegatingWebMvcConfiguration,如@EnableWebMvc的Javadoc中所描述的那样.
常用方法
 /* 拦截器配置 */
default void addInterceptors(InterceptorRegistry registry) {}

/*静态资源处理*/
default void addResourceHandlers(ResourceHandlerRegistry registry) {}

/** 解决跨域问题 **/
default void addCorsMappings(CorsRegistry registry) {}

/* 视图跳转控制器 */
default void addViewControllers(ViewControllerRegistry registry) {}

/*这里配置视图解析器*/
default void configureViewResolvers(ViewResolverRegistry registry) {}

/* 配置内容裁决的一些选项*/
default void configureContentNegotiation(ContentNegotiationConfigurer configurer) {}

/* 默认静态资源处理器 */
default void configureDefaultServletHandling(DefaultServletHandlerConfigurer configurer) {}
5.2、addInterceptors:拦截器
- addInterceptor:需要一个实现HandlerInterceptor接口的拦截器实例
public InterceptorRegistration addInterceptor(HandlerInterceptor interceptor) {
		InterceptorRegistration registration = new InterceptorRegistration(interceptor);
		this.registrations.add(registration);
		return registration;
	}
- addPathPatterns:设置拦截器的过滤规则
public InterceptorRegistration addPathPatterns(String... patterns) {
   return addPathPatterns(Arrays.asList(patterns));
}
- excludePathPatterns:用于设置不需要拦截的过滤规则
public InterceptorRegistration excludePathPatterns(String... patterns) {
   return excludePathPatterns(Arrays.asList(patterns));
}
- 拦截器主要用途:进行用户登录的拦截,访问日志(记录访客的ip,来源),在线统计人数,字符集转换,身份验证等
@Override
public void addInterceptors(InterceptorRegistry registry) {

    registry.addInterceptor(new LoginHandlerInterceptor())
            .addPathPatterns("/**")
            .excludePathPatterns("/toAdminLoginPage","/","/toUserLoginPage")
            .excludePathPatterns("/adminLogin","/userLogin")
            .excludePathPatterns("/backstage/**","/commons/**","/forestage/**","/index/**","/login/**","/mine/**")
            .excludePathPatterns("/insertFeedback","/insertSubscribe");
}
5.2、addViewControllers:页面跳转
以前写SpringMVC的时候,如果需要访问一个页面,必须要写Controller类,然后再写一个方法跳转到页面,其实重写WebMvcConfigurer中的 addViewControllers() 方法即可达到效果了
@Override
    public void addViewControllers(ViewControllerRegistry registry) {
        registry.addViewController("/toLogin").setViewName("login");
        registry.addViewController("/index.html").setViewName("index");
    }
5.3、addResourceHandlers:静态资源
比如,我们想自定义静态资源映射目录的话,只需重写 addResourceHandlers() 方法即可
- addResoureHandler:对外暴露的访问路径
- addResourceLocations:内部文件放置的路径
@Configuration
public class MyWebMvcConfig implements WebMvcConfigurer {
    @Override
    public void addResourceHandlers(ResourceHandlerRegistry registry) {
        registry.addResourceHandler("/my/**").addResourceLocations("classpath:/my/");
    }
}
5.4、configureDefaultServletHandling:默认静态资源处理器
@Override
public void configureDefaultServletHandling(DefaultServletHandlerConfigurer configurer) {
        configurer.enable();
}
看一下configurer.enable()方法的源码:
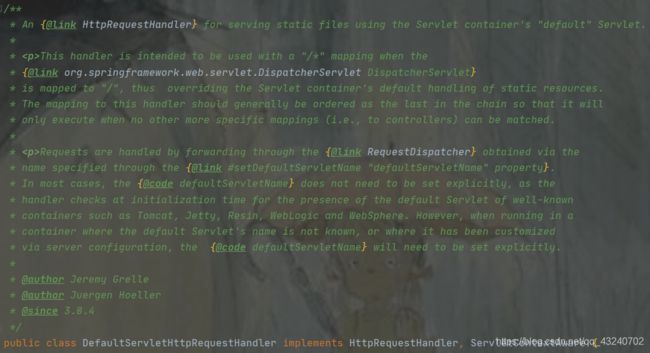
此时会注册一个默认的Handler:DefaultServletHttpRequestHandler,该类的作用如下图
根据Spring官方的解释,该类用来处理静态文件的 ”default“ Servlet,它会尝试映射 /*。当DispatcherServelt映射 / 时,从而覆盖Servlet容器对静态资源的默认处理,到该处理程序的映射通常应作为链中的最后一个进行排序,以便它只在没有其他更具体的映射(即到控制器)匹配的情况下执行
请求通过 RequestDispatcher 转发来处理通过 setDefaultServletName 指定的名称。
在大多数情况下,defaultServletName 不需要显式设置,如处理程序在初始化时检查是否存在已知的默认Servlet容器,如Tomcat、Jetty、Resin、WebLogic和WebSphere。但是,当在一个容器中运行时,如果默认Servlet的名称未知,或者已经通过服务器配置对其进行了自定义,则需要显式地设置 defaultServletName
其内处理请求的方法代码如下
@Override
public void handleRequest(HttpServletRequest request, HttpServletResponse response)
      throws ServletException, IOException {

   Assert.state(this.servletContext != null, "No ServletContext set");
   RequestDispatcher rd = this.servletContext.getNamedDispatcher(this.defaultServletName);
   if (rd == null) {
      throw new IllegalStateException("A RequestDispatcher could not be located for the default servlet '" +
            this.defaultServletName + "'");
   }
   rd.forward(request, response);
}
即根据 this.defaultServletName 尝试来获取转发器,若能获取到就进行请求的转发,获取不到就报错
而 this.defaultServletName 即为当前应用上下文:this.servletContext 或者我们传入的 defaultServletName
public void enable() {
   enable(null);
}
/**
 * Enable forwarding to the "default" Servlet identified by the given name.
 * This is useful when the default Servlet cannot be autodetected,
 * for example when it has been manually configured.
 * @see DefaultServletHttpRequestHandler
 */
public void enable(@Nullable String defaultServletName) {
   this.handler = new DefaultServletHttpRequestHandler();
   if (defaultServletName != null) {
      this.handler.setDefaultServletName(defaultServletName);
   }
   this.handler.setServletContext(this.servletContext);
}
5.5、configureViewResolvers:视图解析器
用来配置视图解析器的,该方法的参数 ViewResolverRegistry 是一个注册器,用来注册你想自定义的视图解析器等
@Bean
public InternalResourceViewResolver getMyViewResolver()
{
	InternalResourceViewResolver internalResourceViewResolver = new InternalResourceViewResolver();
	//请求视图文件的前缀地址
	internalResourceViewResolver.setPrefix("/WEB-INF/jsp/");
	//请求视图文件的后缀
	internalResourceViewResolver.setSuffix(".jsp");
	return internalResourceViewResolver;
}

//视图配置
@Override
public void configureViewResolvers(ViewResolverRegistry registry) {
	super.configureViewResolvers(registry);
	registry.viewResolver(getMyViewResolver());
}
5.6、addCorsMappings:跨域
官方文档
Cross-origin resource sharing](https://en.wikipedia.org/wiki/Cross-origin_resource_sharing) (CORS) is a W3C specification implemented by most browsers that lets you specify in a flexible way what kind of cross-domain requests are authorized., instead of using some less secure and less powerful approaches such as IFRAME or JSONP.
跨源资源共享(CORS)是由大多数浏览器实现的W3C规范,它允许您以灵活的方式指定授权哪种类型的跨域请求。,而不是使用IFRAME或JSONP等安全性较低、功能较弱的方法
As of version 4.2, Spring MVC supports CORS. Using controller method CORS configuration with @CrossOrigin annotations in your Spring Boot application does not require any specific configuration. Global CORS configuration can be defined by registering a WebMvcConfigurer bean with a customized addCorsMappings(CorsRegistry) method, as shown in the following example:
从4.2版本开始,Spring MVC支持CORS
在Spring Boot应用程序中使用带有@CrossOrigin批注的控制器方法CORS配置不需要任何特定的配置
可以通过使用自定义的addCorsMappings(CorsRegistry)方法注册WebMvcConfigurer bean来定义全局CORS配置,如以下示例所示:
@Configuration(proxyBeanMethods = false)
public class MyConfiguration {
    @Bean
    public WebMvcConfigurer corsConfigurer() {
        return new WebMvcConfigurer() {
            @Override
            public void addCorsMappings(CorsRegistry registry) {
                registry.addMapping("/api/**");
            }
        };
    }
}
自己的例子:
@Override
public void addCorsMappings(CorsRegistry registry) {
registry.addMapping("/**")// 允许跨域访问的路径
            .allowedOrigins("*")// 允许跨域访问的源
            .allowedMethods("POST", "GET", "PUT", "OPTIONS", "DELETE")// 允许请求方法
            .maxAge(168000)// 预检间隔时间
            .allowedHeaders("*")// 允许头部设置
            .allowCredentials(true);  // 是否发送cookie
}
但是interceptor和addCorsMappings一起的话addCorsMappings机会失效,应该是顺序问题,interceptor覆盖了
5.7、configureMessageConverters:信息转换器
 // 消息内容转换配置   配置fastJson返回json转换
@Override
public void configureMessageConverters(List<HttpMessageConverter<?>> converters) {
    //创建fastJson消息转换器
    FastJsonHttpMessageConverter fastConverter = new FastJsonHttpMessageConverter();
    //创建配置类
    FastJsonConfig fastJsonConfig = new FastJsonConfig();
    //修改配置返回内容的过滤
    fastJsonConfig.setSerializerFeatures(
            SerializerFeature.DisableCircularReferenceDetect,
            SerializerFeature.WriteMapNullValue,
            SerializerFeature.WriteNullStringAsEmpty
    );
    fastConverter.setFastJsonConfig(fastJsonConfig);
    //将fastjson添加到视图消息转换器列表内
    converters.add(fastConverter);
}


