ClassPathXmlApplicationContext源码(一) - 初始化应用上下文、解析资源路径
文章目录
- 本文概述
- 使用示例
- 主要功能
- 源码阅读
- super(parent)
-
- this()
- setParent(parent)
- setConfigLocations
-
- getEnvironment()
- resolveRequiredPlaceholders(path)
- 链接
本文概述
上文已经通过 初始化项目步骤 介绍了项目的基本情况,本将详细介绍ClassPathXmlApplicationContext的功能,初始化,解析路径字符串两个部分。
使用示例
这是一个独立的应用程序上下文,将普通路径解释为类路径资源名,并从中获取上下文定义文件。
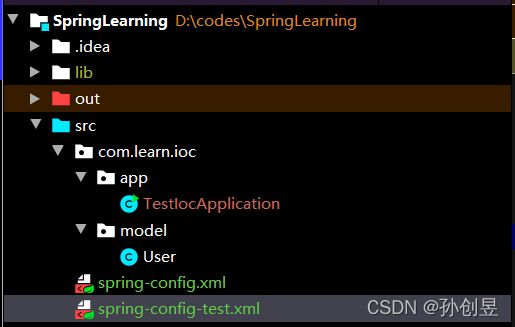
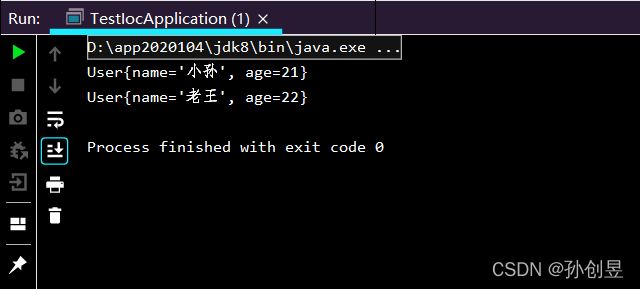
如下图,我们可以通过xml文件定义一个Bean,并且通过getBean()方法获取对象。
目录结构:

xml文件:
1. spring-config.xml

<beans xmlns="http://www.springframework.org/schema/beans"
       xmlns:xsi="http://www.w3.org/2001/XMLSchema-instance"
       xsi:schemaLocation="http://www.springframework.org/schema/beans http://www.springframework.org/schema/beans/spring-beans.xsd">
    <import resource="spring-config-test.xml">import>
    <bean id="user" class="com.learn.ioc.model.User">
        <property name="name" value="小孙"/>
        <property name="age" value="21"/>
    bean>
beans>

2.spring-config-test.xml

<beans xmlns="http://www.springframework.org/schema/beans"
       xmlns:xsi="http://www.w3.org/2001/XMLSchema-instance"
       xsi:schemaLocation="http://www.springframework.org/schema/beans http://www.springframework.org/schema/beans/spring-beans.xsd">

    <bean id="user-test" class="com.learn.ioc.model.User" >
        <property name="name" value="老王"/>
        <property name="age" value="22"/>
    bean>
    <alias name="user-test" alias="user-test-plus"/>

beans>
调用方法:
package com.learn.ioc.app;

import com.learn.ioc.model.User;
import org.springframework.context.ApplicationContext;
import org.springframework.context.support.ClassPathXmlApplicationContext;

public class TestIocApplication {
    public static void main(String[] args) {
        ApplicationContext applicationContext = new ClassPathXmlApplicationContext("spring-config.xml");

        User user = applicationContext.getBean("user",User.class);
        System.out.println(user.toString());

        User userTest = applicationContext.getBean("user-test",User.class);
        System.out.println(userTest.toString());
    }
}
主要功能
蓝实线表示继承,绿实线表示接口实现。ClassPathXmlApplicationContext主要实现了以下接口:
Lifecycle接口:定义启动/停止生命周期控制方法的公共接口,典型的用例是控制异步处理。
AutoCloseable接口:一个可以持有资源(例如文件句柄或套接字句柄)的对象,直到它关闭。 对象的close()方法在退出 try-with-resources块时被自动调用,该对象已经在资源规范头文件中声明了。这种结构确保了及时的释放,避免了可能发生的资源耗尽异常和错误。
BeanFactory接口:这是实现Spring Bean容器的根接口, 是应用程序组件的中央注册中心,并且集中了应用程序组件的配置。
MessageSource接口:使用了策略模式,定义了解析消息的接口,支持这类消息的参数化和国际化。
ApplicationEventPublisher接口:应用事件发布。
EnvironmentCapable接口:表明组件包含并公开一个Environment接口。
ResourceLoader接口:使用了策略模式,定义了加载资源的接口。
Aware接口:标记接口,表明这个Bean可以通过一个回调方法被框架对象的Spring容器通知。子接口BeanNameAware,由希望在BeanFactory中知道自己的BeanName的Bean实现。

源码阅读
首先了解下构造函数有哪些:
    */
public class ClassPathXmlApplicationContext extends AbstractXmlApplicationContext {
	@Nullable
	private Resource[] configResources;

	public ClassPathXmlApplicationContext() {
	}

	public ClassPathXmlApplicationContext(ApplicationContext parent) {
		super(parent);
	}

	/*
	 从XML文件中加载信息,创建新的上下文。
	 */
	public ClassPathXmlApplicationContext(String configLocation) throws BeansException {
		this(new String[] {configLocation}, true, null);
	}

	/*
	 从多个XML文件中加载信息,创建新的上下文。
	 */
	public ClassPathXmlApplicationContext(String... configLocations) throws BeansException {
		this(configLocations, true, null);
	}

	/**
	  创建指定parent的上下文。
	 */
	public ClassPathXmlApplicationContext(String[] configLocations, @Nullable ApplicationContext parent)
			throws BeansException {
		this(configLocations, true, parent);
	}

	/**
	 从xml文件中加载上下文,refresh决定是否自动刷新上下文。
	 */
	public ClassPathXmlApplicationContext(String[] configLocations, boolean refresh) throws BeansException {
		this(configLocations, refresh, null);
	}

	/**
	 略
	 */
	public ClassPathXmlApplicationContext(
			String[] configLocations, boolean refresh, @Nullable ApplicationContext parent)
			throws BeansException {

		super(parent);
		setConfigLocations(configLocations);
		if (refresh) {
			refresh();
		}
	}


	/**
	  从xml文件中加载配置,自动刷新。加载制定类的相对路径下的资源。
	 */
	public ClassPathXmlApplicationContext(String path, Class<?> clazz) throws BeansException {
		this(new String[] {path}, clazz);
	}

	/**
	 * 同上,文件有多个
	 */
	public ClassPathXmlApplicationContext(String[] paths, Class<?> clazz) throws BeansException {
		this(paths, clazz, null);
	}

	/**
	 * 同上,多一个parent
	 */
	public ClassPathXmlApplicationContext(String[] paths, Class<?> clazz, @Nullable ApplicationContext parent)
			throws BeansException {

		super(parent);
		Assert.notNull(paths, "Path array must not be null");
		Assert.notNull(clazz, "Class argument must not be null");
		this.configResources = new Resource[paths.length];
		for (int i = 0; i < paths.length; i++) {
			this.configResources[i] = new ClassPathResource(paths[i], clazz);
		}
		refresh();
	}


	@Override
	@Nullable
	protected Resource[] getConfigResources() {
		return this.configResources;
	}

}
其中核心是下面这段,下文也将绕其展开。
	public ClassPathXmlApplicationContext(
			String[] configLocations, boolean refresh, @Nullable ApplicationContext parent)
			throws BeansException {

		super(parent);
		setConfigLocations(configLocations);
		if (refresh) {
			refresh();
		}
	}
super(parent)
通过已有的ApplicationContext创建上下文,根进代码,super(parent)调用到了这个函数
	public AbstractApplicationContext(@Nullable ApplicationContext parent) {
		this();
		setParent(parent);
	}
this()
其中this函数如下,创建一个新的应用上下文。
	public AbstractApplicationContext() {
		this.resourcePatternResolver = getResourcePatternResolver();
	}
setParent(parent)
赋值,如果parent不空就将父环境的活动配置文件、默认配置文件和属性源追加到子环境。
	public void setParent(@Nullable ApplicationContext parent) {
		this.parent = parent;
		if (parent != null) {
			Environment parentEnvironment = parent.getEnvironment();
			if (parentEnvironment instanceof ConfigurableEnvironment) {
				getEnvironment().merge((ConfigurableEnvironment) parentEnvironment);
			}
		}
	}
@Override
	public void merge(ConfigurableEnvironment parent) {
		for (PropertySource<?> ps : parent.getPropertySources()) {
			if (!this.propertySources.contains(ps.getName())) {   // 属性源
				this.propertySources.addLast(ps);
			}
		}
		String[] parentActiveProfiles = parent.getActiveProfiles();
		if (!ObjectUtils.isEmpty(parentActiveProfiles)) {  // 活动配置文件
			synchronized (this.activeProfiles) {
				Collections.addAll(this.activeProfiles, parentActiveProfiles);
			}
		}
		String[] parentDefaultProfiles = parent.getDefaultProfiles();
		if (!ObjectUtils.isEmpty(parentDefaultProfiles)) {  // 默认配置文件
			synchronized (this.defaultProfiles) {
				this.defaultProfiles.remove(RESERVED_DEFAULT_PROFILE_NAME);
				Collections.addAll(this.defaultProfiles, parentDefaultProfiles);
			}
		}
	}
setConfigLocations
给应用上下文设置配置的位置。
	public void setConfigLocations(@Nullable String... locations) {
		if (locations != null) {
			Assert.noNullElements(locations, "Config locations must not be null");
			this.configLocations = new String[locations.length];
			for (int i = 0; i < locations.length; i++) {  //逐一解析路径,必要时用相应的环境属性值替换占位符,并且配置config locations
				this.configLocations[i] = resolvePath(locations[i]).trim();
			}
		}
		else {
			this.configLocations = null;
		}
	}
这里getEnironment()就涉及到了创建环境变量相关的操作了。
	protected String resolvePath(String path) {
		return getEnvironment().resolveRequiredPlaceholders(path);
	}
getEnvironment()
获取环境变量
	public ConfigurableEnvironment getEnvironment() {
		if (this.environment == null) {
			this.environment = createEnvironment();
		}
		return this.environment;
	}
然后可以看到创建环境变量的代码,创建了StandardEnvironment类。
	protected ConfigurableEnvironment createEnvironment() {
		return new StandardEnvironment();
	}
方法就会往资源列表中添加JVM系统属性源名称、系统属性源名称。
	@Override
	protected void customizePropertySources(MutablePropertySources propertySources) {
		propertySources.addLast(
				new PropertiesPropertySource(SYSTEM_PROPERTIES_PROPERTY_SOURCE_NAME, getSystemProperties()));
		propertySources.addLast(
				new SystemEnvironmentPropertySource(SYSTEM_ENVIRONMENT_PROPERTY_SOURCE_NAME, getSystemEnvironment()));
	}
resolveRequiredPlaceholders(path)
该方法作用是把${…} 占位符替换为特定的值。
	@Override
	public String resolveRequiredPlaceholders(String text) throws IllegalArgumentException {
		return this.propertyResolver.resolveRequiredPlaceholders(text);
	}
接着
	@Override
	public String resolveRequiredPlaceholders(String text) throws IllegalArgumentException {
		if (this.strictHelper == null) {
			this.strictHelper = createPlaceholderHelper(false);
		}
		return doResolvePlaceholders(text, this.strictHelper);
	}
接着
	private String doResolvePlaceholders(String text, PropertyPlaceholderHelper helper) {
		return helper.replacePlaceholders(text, this::getPropertyAsRawString);
	}
接着
	public String replacePlaceholders(String value, PlaceholderResolver placeholderResolver) {
		Assert.notNull(value, "'value' must not be null");
		return parseStringValue(value, placeholderResolver, null);
	}
真正的解析过程
protected String parseStringValue(
			String value, PlaceholderResolver placeholderResolver, @Nullable Set<String> visitedPlaceholders) {

		int startIndex = value.indexOf(this.placeholderPrefix);
		if (startIndex == -1) {
			return value;
		}

		StringBuilder result = new StringBuilder(value);
		while (startIndex != -1) {
			//findPlaceholderEndIndex方法是找最后一个结束符(“}”)
			int endIndex = findPlaceholderEndIndex(result, startIndex);
			if (endIndex != -1) {
				//new String placeholder = 第一个placeholderPrefix"${"和最后一个placeholderSuffix"}"
				String placeholder = result.substring(startIndex + this.placeholderPrefix.length(), endIndex);
				String originalPlaceholder = placeholder;
				if (visitedPlaceholders == null) {
					//存放遇到过的占位符
					visitedPlaceholders = new HashSet<>(4);
				}
				if (!visitedPlaceholders.add(originalPlaceholder)) {
					// 循环替换引用
					throw new IllegalArgumentException(
							"Circular placeholder reference '" + originalPlaceholder + "' in property definitions");
				}
				// Recursive invocation, parsing placeholders contained in the placeholder key.
				placeholder = parseStringValue(placeholder, placeholderResolver, visitedPlaceholders);
				// 递归调用,通过propertySource.getProperty(key)获取这个占位符的真实值,否则返回null
				String propVal = placeholderResolver.resolvePlaceholder(placeholder);
				//形如 A:a,如果用“A:a”没从propertySource中获取到值,就拿A再去查一次
				if (propVal == null && this.valueSeparator != null) {
					int separatorIndex = placeholder.indexOf(this.valueSeparator);
					if (separatorIndex != -1) {
						String actualPlaceholder = placeholder.substring(0, separatorIndex);
						String defaultValue = placeholder.substring(separatorIndex + this.valueSeparator.length());
						propVal = placeholderResolver.resolvePlaceholder(actualPlaceholder);
						if (propVal == null) {
							propVal = defaultValue;
						}
					}
				}
				//如果从propertySource中获取到值,就直接替换到"${}"
				if (propVal != null) {
					// 递归调用,解析先前解析的占位符值中包含的占位符
					propVal = parseStringValue(propVal, placeholderResolver, visitedPlaceholders);
					result.replace(startIndex, endIndex + this.placeholderSuffix.length(), propVal);
					if (logger.isTraceEnabled()) {
						logger.trace("Resolved placeholder '" + placeholder + "'");
					}
					startIndex = result.indexOf(this.placeholderPrefix, startIndex + propVal.length());
				}
				else if (this.ignoreUnresolvablePlaceholders) {
					startIndex = result.indexOf(this.placeholderPrefix, endIndex + this.placeholderSuffix.length());
				}
				else {
					//找不到,抛异常
					throw new IllegalArgumentException("Could not resolve placeholder '" +
							placeholder + "'" + " in value \"" + value + "\"");
				}
				visitedPlaceholders.remove(originalPlaceholder);
			}
			else {
				startIndex = -1;
			}
		}
		return result.toString();
	}
至此,setConfigLocations阶段结束,此时configLocations数组已经存下了解析后的资源路径。
链接
ClassPathXmlApplicationContext源码(二) - BeanFactory的初始化、加载、注册过程
