一、theos 安装
1、安装签名工具ldid
首先先确保安装了Homebrew 。如未安装,可通过下面指令安装
$ /usr/bin/ruby -e "$(curl -fsSL https://raw.githubusercontent.com/Homebrew/install/master/install)"
使用Homebrew安装ldid
brew install ldid
2、修改环境变量
1)编辑用户的配置文件
vim ~/.bash_profile
2)在.bash_profile文件后面加入以下2行
export THEOS=~/theos
export PATH=$THEOS/bin:$PATH
提示
export THEOS=~/theos配置 theos 的主路径,将来下载到哪个地方,下面 2.2 我们可以看到
export PATH=$THEOS/bin:$PATH的目的是为了在任何路径下都可以找到~/theos/bin下面的命令,如下面用到的nic.pl
$PATH就是引用环境变量的值
3)让.bash_profile配置的环境变量立即生效(或者重新打开终端)
source ~/.bash_profile
注意
可能不起作用,原因是 mac下采用zsh代替bash,而zsh加载的是 ~/.zshrc文件,而 ‘.zshrc’ 文件中并没有定义任务环境变量。
解决办法,在~/.zshrc文件最后,增加一行:source ~/.bash_profile。这样加载/.zshrc的同时也能加载/.bash_profile文件
查看系统有几个shell:cat /etc/shells。切换到zsh:chsh -s /bin/zsh。查看默认shell:echo $SHELL
3、下载theos
建议在$PATH目录下载代码(也就是上一步配置的~/theos目录)
git clone --recursive https://github.com/theos/theos.git $THEOS
二、theos 的使用
1、新建tweak项目
1)cd到一个存放项目代码的文件(比如桌面),使用nic.pl新建
$ cd ~/Desktop
$ nic.pl
2)选择 iphone/tweak
3)填写项目信息
- Project Name:项目名称
- Package Name:项目id(随便写)
- Author/Maintainer Name:作者名称,直接敲回车按默认做法就行(默认是mac上的用户名)
- [iphone/tweak] MobileSubstrate Bundle filter:需要修改的APP的Bundle Identifier(如豆瓣:com.douban.frodo),可以通过Cycript查看APP的Bundle Identifier
- [iphone/tweak] List of applications to terminate upon installation:直接敲回车按默认做法就行
2、编辑Makefile
1)在前面加入环境变量,写清楚通过哪个IP和端口访问手机
# 调试设备的IP地址和端口
export THEOS_DEVICE_IP=127.0.0.1
export THEOS_DEVICE_PORT=10010

TARGET := iphone:clang:latest:7.0
INSTALL_TARGET_PROCESSES = SpringBoard

# 引入常用的一般模板
include $(THEOS)/makefiles/common.mk

# 工程名称
TWEAK_NAME = douban_tweak

# sdk中的framework
douban_tweak_FRAMEWORKS = UIKit, Foundation
douban_tweak_FILES = Tweak.x
douban_tweak_CFLAGS = -fobjc-arc

include $(THEOS_MAKE_PATH)/tweak.mk
2)环境变量配置
如果不希望每个项目的Makefile都编写IP和端口环境变量,也可以添加到用户配置文件中。如上文中的THEOS文件目录配置。编辑完毕后,$ source ~/.bash_profile让配置生效(或者重启终端)
$ vim ~/.bash_profile
export THEOS=~/theos
export PATH=$THEOS/bin:$PATH
export THEOS_DEVICE_IP=127.0.0.1
export THEOS_DEVICE_PORT=10010
$ source ~/.bash_profile
3、编写代码
打开 Tweak.x 并编写,目的是在“豆瓣”登录页面,添加弹框和一个红色视图
// 需要引入对应的库
#import

// 需要定义一下需要hook的类,避免找不到“self”
@interface FRDNormalLoginViewController : UIViewController

@end

%hook FRDNormalLoginViewController

- (void)viewDidLoad {
    %orig;

        // 添加弹框
      UIAlertController *alert = [UIAlertController alertControllerWithTitle:@"我是标题" message:@"Hook测试内容" preferredStyle:UIAlertControllerStyleAlert];
    [alert addAction:[UIAlertAction actionWithTitle:@"确定" style:UIAlertActionStyleCancel handler:nil]];
    [self presentViewController:alert animated:YES completion:nil];

    // 添加红色view
    UIView *view = [[UIView alloc] init];
      view.frame = CGRectMake(100, 100, 100, 100);
      view.backgroundColor = [UIColor redColor];
      [[self view] addSubview:view];
}

%end
4、编译-打包-安装
1)编译
make
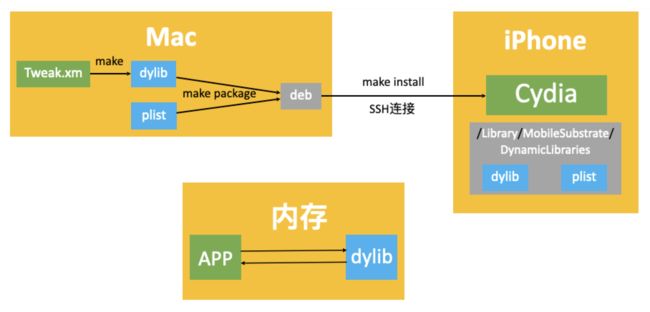
该步骤,主要是将Tweak代码编译成动态库(*.dylib),编译的过程中可能会有错误,有错误不用怕,根据错误提示信息修改下就好了,也可以完成搜搜。可能会出现以下错误:
- 错误1:
Building for iOS, but linking in .tbd file (/opt/theos/vendor/lib/CydiaSubstrate.framework/CydiaSubstrate.tbd) built for iOS Simulator, file '/opt/theos/vendor/lib/CydiaSubstrate.framework/CydiaSubstrate.tbd' for architecture arm64
解决方案:把/opt/theos/vendor/lib/CydiaSubstrate.framework/CydiaSubstrate.tbd文件用文本打开,用Sublime Text3,删除archs后面的两项(, i386, x86_64),就可以编译成功了。
参考链接:https://www.jianshu.com/p/060be025eb13
- 错误2:
cannot find interface declaration for 'UIView'
解决方案:需要引入 UIKit,如 #import
参考链接:https://www.jianshu.com/p/6fa6dd6276f7
- 错误3:
receiver type 'MMTableView' for instance message is a forward declaration
解决方案:
// 需要定义一下需要hook的类,避免找不到“self”
@interface FRDNormalLoginViewController : UIViewController

@end
参考链接:https://www.jianshu.com/p/899faeb834eb
- 错误4:
Undefined symbols for architecture armv7: "_OBJC_CLASS_$_UIAlertAction", referenced from:
解决方案:在 Makefile文件中添加 douban_tweak_FRAMEWORKS = UIKit, Foundation
参考链接:https://iosre.com/t/theos-make/8193
2)打包成deb
make package
make package 是将dylib打包为deb文件
- 错误1:
exec of lzma -c0 failed at /Users/yinyongzhen/theos/bin/dm.pl line 11
解决方案,安装一下 xz 及可,brew install xz
参考链接:https://stackoverflow.com/questions/53500472/open2-exec-of-lzma-c0-failed-a-internal-package-error-2-while-building-in-theo
3)安装(默认会自动重启SpringBoard)
make install
将deb文件传送到手机上,通过Cydia安装deb。注意连接的地址和端口号是否正确,及plist文件中的bundlId是否正确。
插件将会安装在/Library/MobileSubstrate/DynamicLibraries文件夹中。 *.dylib :编译后的Tweak代码;*.plist:存放着需要hook的APP ID。
当打开app时,Cydia Substrate (Cydia已自动安装的插件)会让APP去加载对应的dylib;修改APP内存中的代码逻辑,去执行dylib中的函数代码。所以theos的tweak并不会对APP原来的可执行文件进行修改,仅仅是修改内存中的代码逻辑。
三、theos拓展学习
1、theos- tweak的开发过程
2、theos资料查询
- 目录结构:https://github.com/theos/theos/wiki/Structure
- 环境变量:http://iphonedevwiki.net/index.php/Theos
- Logos语法:http://iphonedevwiki.net/index.php/Logos
- %hook、%end:hook一个类的开始和结束
- %log:打印方法调用详情。可以通过
Xcode -> Window -> Devices and Simulators查看日志 - HBDebugLog:根NSLog类似
- %new:添加一个新的方法
- %c(className) :生成一个
Class对象,比如%c(NSObject),类似于NSStringFromClass()、objc_getClass() - %orig:函数原来的代码逻辑
- %ctor:在加载动态库时调用
- %dtor:在程序退出时调用
- logify.pl:可以将一个头文件快速转换成已经包含打印信息的xm文件。
logify.pl xx.h > xx.xm
- 如果有额外的资源文件,比如图片,放在项目中的
layout文件夹中,对应着手机的根路径/
