- Charts
-
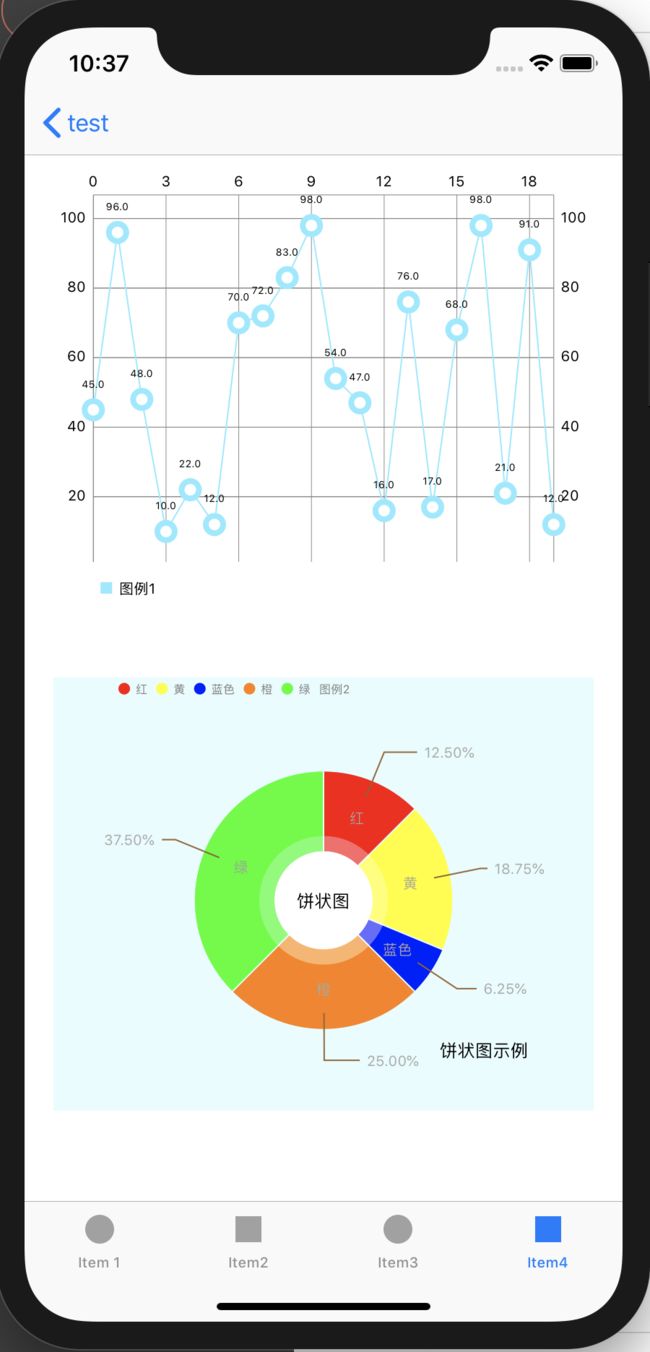
界面展示
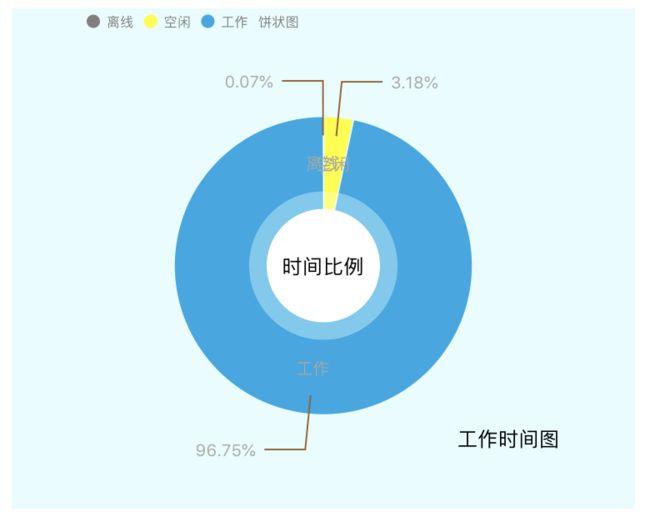
1. 使用pod将Charts导入项目中
2. 步骤
(1)新建视图:在故事版中拖入1个ViewController视图
(2)创建视图对应的控制器MyChartsViewController.swift
(3)视图和控制器绑定
2. 具体实现
(1)MyChartsViewController.swift
//
//  MyChartsViewController.swift
//  JackUChat
//
//  Created by 徐云 on 2019/1/16.
//  Copyright © 2019 Liy. All rights reserved.
//

import UIKit
import Charts

class MyChartsViewController: UIViewController {

    override func viewDidLoad() {
        super.viewDidLoad()

        // Do any additional setup after loading the view.

        drawLineChartView()

        drawPieChartView()
    }


    // MARK: - 折线图
    //折线图
    var chartView: LineChartView!

    func drawLineChartView() {
        //创建折线图组件对象并添加到页面视图
        chartView = LineChartView()
        chartView.frame = CGRect(x: 20, y: 100, width: self.view.bounds.width - 40,height: 300)
        self.view.addSubview(chartView)

        //生成20条随机数据
        var dataEntries = [ChartDataEntry]()
        for i in 0..<20 {
            let y = arc4random()%100
            let entry = ChartDataEntry.init(x: Double(i), y: Double(y))
            dataEntries.append(entry)
        }
        //这20条数据作为1根折线里的所有数据
        let chartDataSet = LineChartDataSet(values: dataEntries, label: "图例1")
        //目前折线图只包括1根折线
        let chartData = LineChartData(dataSets: [chartDataSet])

        //设置折现图数据
        chartView.data = chartData

    }


    // MARK: - 饼状图

    //懒加载:创建饼状图组件对象
    lazy var pieChartView: PieChartView = {
        let _pieChartView = PieChartView.init(frame: CGRect.init(x: 20, y: 450, width: self.view.bounds.width - 40, height: 300));
        _pieChartView.backgroundColor = UIColor.init(red: 230/255.0, green: 253/255.0, blue: 253/255.0, alpha: 1.0);
        _pieChartView.setExtraOffsets(left: 40, top: 10, right: 40, bottom: 30);//设置这块饼的位置
        _pieChartView.chartDescription?.text = "饼状图示例";//描述文字
        _pieChartView.chartDescription?.font = UIFont.systemFont(ofSize: 12.0);//字体
        _pieChartView.chartDescription?.textColor = UIColor.black;//颜色

        _pieChartView.usePercentValuesEnabled = true;//转化为百分比
        _pieChartView.dragDecelerationEnabled = false;//关闭拖拽效果
        _pieChartView.drawEntryLabelsEnabled = true;//显示区块文本
        _pieChartView.entryLabelFont = UIFont.systemFont(ofSize: 10);//区块文本的字体
        _pieChartView.entryLabelColor = UIColor.white;
        _pieChartView.drawSlicesUnderHoleEnabled = true;


        _pieChartView.drawHoleEnabled = true;//这个饼是空心的
        _pieChartView.holeRadiusPercent = 0.382//空心半径黄金比例
        _pieChartView.holeColor = UIColor.white;//空心颜色设置为白色
        _pieChartView.transparentCircleRadiusPercent = 0.5;//半透明空心半径

        _pieChartView.drawCenterTextEnabled = true;//显示中心文本
        _pieChartView.centerText = "饼状图";//设置中心文本,你也可以设置富文本`centerAttributedText`

        //图例样式设置
        _pieChartView.legend.maxSizePercent = 1;//图例的占比
        _pieChartView.legend.form = .circle//图示:原、方、线
        _pieChartView.legend.formSize = 8;//图示大小
        _pieChartView.legend.formToTextSpace = 4;//文本间隔
        _pieChartView.legend.font = UIFont.systemFont(ofSize: 8);
        _pieChartView.legend.textColor = UIColor.gray;
        _pieChartView.legend.horizontalAlignment = .left;
        _pieChartView.legend.verticalAlignment = .top;

        _pieChartView.animate(xAxisDuration: 1.0, yAxisDuration: 1.0, easingOption: .easeInBack);

        return _pieChartView;

    }()

    func drawPieChartView() {
        //添加饼状图组件对象到页面视图
        self.view.addSubview(pieChartView)//注意:缺少这段代码无法显示图表

        //生成数据
        let titles = ["红","黄","蓝色","橙","绿"];
        let yData = [20,30,10,40,60];
        var yVals = [PieChartDataEntry]();
        for i in 0...titles.count-1 {
            let entry = PieChartDataEntry.init(value: Double(yData[i]), label: titles[I]);
            yVals.append(entry);
        }
        let dataSet = PieChartDataSet.init(values: yVals, label: "图例2");
        dataSet.colors = [UIColor.red,UIColor.yellow,UIColor.blue,UIColor.orange,UIColor.green];
        //设置名称和数据的位置,都在内就会没有折线
        dataSet.xValuePosition = .insideSlice;
        dataSet.yValuePosition = .outsideSlice;
        dataSet.sliceSpace = 1;//相邻块的距离
        dataSet.selectionShift = 6.66;//选中放大半径
        //指示折线样式
        dataSet.valueLinePart1OffsetPercentage = 0.8 //折线中第一段起始位置相对于区块的偏移量, 数值越大, 折线距离区块越远
        dataSet.valueLinePart1Length = 0.8 //折线中第一段长度占比
        dataSet.valueLinePart2Length = 0.4 //折线中第二段长度最大占比
        dataSet.valueLineWidth = 1 //折线的粗细
        dataSet.valueLineColor = UIColor.brown //折线颜色

        let data = PieChartData.init(dataSets: [dataSet]);
        data.setValueFormatter(VDChartAxisValueFormatter.init());//格式化值(添加个%)
        data.setValueFont(UIFont.systemFont(ofSize: 10.0));
        data.setValueTextColor(UIColor.lightGray);
        pieChartView.data = data;

    }

    class VDChartAxisValueFormatter: IValueFormatter {
        func stringForValue(_ value: Double, entry: ChartDataEntry, dataSetIndex: Int, viewPortHandler: ViewPortHandler?) -> String {
            return String.init(format: "%.2f%%", value);
        }

    }


    /*
    // MARK: - Navigation

    // In a storyboard-based application, you will often want to do a little preparation before navigation
    override func prepare(for segue: UIStoryboardSegue, sender: Any?) {
        // Get the new view controller using segue.destination.
        // Pass the selected object to the new view controller.
    }
    */

}
备注:Charts的基本使用可参考使用Charts实现图表-基础
3. 网络数据获取与解析显示
(1) 网络数据
{
  "code": "0",
  "msg": "success",
  "data": {
    "state": [
      "离线",
      "空闲",
      "工作"
    ],
    "work_time": [
      "917",
      "159494",
      "1411684"
    ]
  }
}
(2)数据解析与显示:TimeViewController.swift
//
//  TimeViewController.swift
//  JackUChat
//
//  Created by 李艳 on 2019/3/13.
//  Copyright © 2019 Liy. All rights reserved.
//

import UIKit
import Alamofire
import SwiftyJSON
import Charts

class TimeViewController: UIViewController {

    var keys:[String] = []
    var values:[Double] = []

    override func viewDidLoad() {
        super.viewDidLoad()

        // Do any additional setup after loading the view.

        self.view.addSubview(pieChartView)//注意:缺少这段代码无法显示图表

        getTimesByAlomafire()


    }

    // MARK: - 饼状图

    //懒加载:创建饼状图组件对象
    lazy var pieChartView: PieChartView = {
        let _pieChartView = PieChartView.init(frame: CGRect.init(x: 20, y: 250, width: self.view.bounds.width - 40, height: 300));
        _pieChartView.backgroundColor = UIColor.init(red: 230/255.0, green: 253/255.0, blue: 253/255.0, alpha: 1.0);
        _pieChartView.setExtraOffsets(left: 40, top: 10, right: 40, bottom: 30);//设置这块饼的位置
        _pieChartView.chartDescription?.text = "工作时间图";//描述文字
        _pieChartView.chartDescription?.font = UIFont.systemFont(ofSize: 12.0);//字体
        _pieChartView.chartDescription?.textColor = UIColor.black;//颜色

        _pieChartView.usePercentValuesEnabled = true;//转化为百分比
        _pieChartView.dragDecelerationEnabled = false;//关闭拖拽效果
        _pieChartView.drawEntryLabelsEnabled = true;//显示区块文本
        _pieChartView.entryLabelFont = UIFont.systemFont(ofSize: 10);//区块文本的字体
        _pieChartView.entryLabelColor = UIColor.white;
        _pieChartView.drawSlicesUnderHoleEnabled = true;


        _pieChartView.drawHoleEnabled = true;//这个饼是空心的
        _pieChartView.holeRadiusPercent = 0.382//空心半径黄金比例
        _pieChartView.holeColor = UIColor.white;//空心颜色设置为白色
        _pieChartView.transparentCircleRadiusPercent = 0.5;//半透明空心半径

        _pieChartView.drawCenterTextEnabled = true;//显示中心文本
        _pieChartView.centerText = "时间比例";//设置中心文本,你也可以设置富文本`centerAttributedText`

        //图例样式设置
        _pieChartView.legend.maxSizePercent = 1;//图例的占比
        _pieChartView.legend.form = .circle//图示:原、方、线
        _pieChartView.legend.formSize = 8;//图示大小
        _pieChartView.legend.formToTextSpace = 4;//文本间隔
        _pieChartView.legend.font = UIFont.systemFont(ofSize: 8);
        _pieChartView.legend.textColor = UIColor.gray;
        _pieChartView.legend.horizontalAlignment = .left;
        _pieChartView.legend.verticalAlignment = .top;

        _pieChartView.animate(xAxisDuration: 1.0, yAxisDuration: 1.0, easingOption: .easeInBack);

        return _pieChartView;

    }()

    func drawPieChartView(dataPoints:[String],values:[Double]) {
        //self.view.addSubview(pieChartView1)//添加饼状图组件对象到页面视图(注意:缺少这段代码无法显示图表)

        //生成数据
        //let dataPoints = ["离线","空闲","工作"];
        //let values = [917,44558,1355020];
        var yVals = [PieChartDataEntry]();
        for i in 0...dataPoints.count-1 {
            let entry = PieChartDataEntry.init(value: Double(values[i]), label: dataPoints[I]);
            yVals.append(entry);
        }
        let dataSet = PieChartDataSet.init(values: yVals, label: "饼状图");
        dataSet.colors = [UIColor.gray,UIColor.yellow,UIColor.jackColor];
        //设置名称和数据的位置,都在内就没有折线
        dataSet.xValuePosition = .insideSlice;
        dataSet.yValuePosition = .outsideSlice;
        dataSet.sliceSpace = 1;//相邻块的距离
        dataSet.selectionShift = 6.66;//选中放大半径
        //指示折线样式
        dataSet.valueLinePart1OffsetPercentage = 0.8 //折线中第一段起始位置相对于区块的偏移量, 数值越大, 折线距离区块越远
        dataSet.valueLinePart1Length = 0.8 //折线中第一段长度占比
        dataSet.valueLinePart2Length = 0.4 //折线中第二段长度最大占比
        dataSet.valueLineWidth = 1 //折线的粗细
        dataSet.valueLineColor = UIColor.brown //折线颜色

        let data = PieChartData.init(dataSets: [dataSet]);
        data.setValueFormatter(VDChartAxisValueFormatter.init());//格式化值(添加个%)
        data.setValueFont(UIFont.systemFont(ofSize: 10.0));
        data.setValueTextColor(UIColor.lightGray);
        pieChartView.data = data;

    }

    class VDChartAxisValueFormatter: IValueFormatter {
        func stringForValue(_ value: Double, entry: ChartDataEntry, dataSetIndex: Int, viewPortHandler: ViewPortHandler?) -> String {
            return String.init(format: "%.2f%%", value);
        }

    }


    func getTimesByAlomafire() {
        AlamofireHelper.shareInstance.requestData(.get, url: "machine/state", parameters: params) { (result) in
            let jsonDictory = JSON(result as Any)
            let code = jsonDictory["code"].string
            let msg = jsonDictory["msg"].string
            if(code == "0"){
                print("成功:"+code!+","+msg!)
                if (jsonDictory["data"].array?.count == 0){
                    return
                }
                let stateList = jsonDictory["data"]["state"]
                let timeList = jsonDictory["data"]["work_time"]//String数组
                for index in 0...stateList.count - 1{
                    let key = "\(stateList[index])"
                    self.keys.append(key)
                }
                for index in 0...timeList.count - 1{
                    print("time:",timeList[index].description)
                    let a:String = timeList[index].string!
                    let b:Double = Double(a)!
                    self.values.append(b)

                }
                //异步获取数据,需在主线程中更新
                OperationQueue.main.addOperation {
                    self.drawPieChartView(dataPoints: self.keys, values: self.values)
                }

            }else{
                print("失败")
            }

        }

    }


    /*
    // MARK: - Navigation

    // In a storyboard-based application, you will often want to do a little preparation before navigation
    override func prepare(for segue: UIStoryboardSegue, sender: Any?) {
        // Get the new view controller using segue.destination.
        // Pass the selected object to the new view controller.
    }
    */


}
(3) 效果展示

