前言
webpack5正式发布已经大半年了,一直囔囔着要去看看这次更新带来了哪些新特性,但是因为实在是太(xue)忙(bu)了(dong),所以一直没有去实践。但作为一名热爱学习的切图仔,让我不学那是不可能的,所以,今天就和大家来看看webpack5都给我们带来了哪些惊喜。
先放出demo地址:https://github.com/CBDxin/webpack5-demo,看完文章后有兴趣的同学可以去瞧瞧。
变更
1. 持久化缓存
在webpack<=4中,我们可以通过cache-loader、设置babel-loader option.cacheDirectory、使用 hard-source-webpack-plugin等手段来将编译的结果写入到磁盘中。而在webpack5中,webpack默认会把编译的结果缓存到内存中,同时可以通过添加以下配置,将编译结果缓存到文件系统中:
module.exports = {
    ...,
    cache: {
        type: 'filesystem',//将缓存类型设置为文件系统,默认为memory
        buildDependencies: {
            config: [__filename],  // 当构建依赖的config文件(通过 require 依赖)内容发生变化时,缓存失效
        },
        ...,
    },
}
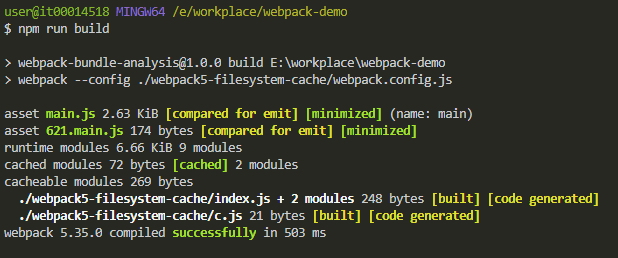
filesystem模式首次打包效果:
filesystem模式二次打包效果:
缓存将默认存储在 node_modules/.cache/webpack(当使用 node_modules 时)或 .yarn/.cache/webpack(当使用 Yarn PnP 时)中。
ps:
- 直接通过调用compiler 实例的 run 方法执行构建时,构建缓存最终可能不会生成缓存文件,需要手动调用
compiler.close()来输出缓存文件。 - webpack5的持久化缓存和cnpm的安装包名之间有冲突,导致webpack5假死, 无法生成缓存文件
2. 对资源模块提供了内置支持
webpack5允许应用使用资源文件(图片,字体等)而不需要配置额外的loader。
-
asset/resource发送一个单独的文件并导出 URL。之前通过使用 file-loader 实现。 -
asset/inline导出一个资源的 data URI。之前通过使用 url-loader 实现。 -
asset/source导出资源的源代码。之前通过使用 raw-loader 实现。 -
asset在导出一个 data URI 和发送一个单独的文件之间自动选择。之前通过使用 url-loader,并且配置资源体积限制实现。
module.export = {
  ...,
  module: {
        rules: [
            {
                test: /\.png$/,
                type: "asset/resource", //对应file-loader
            },
            {
                test: /\.svg$/,
                type: "asset/inline", //对应url-loader 大小
3. 内置 WebAssembly 编译能力
Webpack5 提供了 WebAssembly 构建能力,我们只需添加如下配置:
module.exports = {
    ...,
    experiments: {
        asyncWebAssembly: true,
    },
    module: {
        rules: [
            {
                test: /\.wasm$/,
                type: "webassembly/async",
            },
        ],
    },
}
便可以在应用中使用wasm文件,举个例子,我们有个提供加法运算的wasm文件sum.wasm,我们可以这样在项目中使用它:
import { sum } from "./sum.wasm";
console.log(sum(1, 2));
3. 原生Web Worker 支持
以前若我们想要使用web worker,那么我们需要worker-loader或 worker-plugin 来协助我们:
//配置worker-loader
module.exports = {
    ...,
    module: {
        rules: [
            {
                test: /\.worker\.js$/,
                use: { loader: "worker-loader" },
            },
        ],
    },
}
import Worker from './wasted.time.worker.js';
//在主线程中使用web worker
const worker = new Worker();
worker.onmessage = e => {
  console.log(e.data.value);
};
webpack5提供了原生的web worker支持,我们可以不依赖loader或plugin,直接使用web worker的能力:
const worker = new Worker(new URL("./wasted.time.worker.js", import.meta.url), {
    name: "wastedTime",
    /* webpackEntryOptions: { filename: "workers/[name].js" } */
});
worker.onmessage = e => {
    console.log(e.data.value);
};
5. 更友好的 Long Term Cache 支持性
长效缓存特性减少了由于模块变更导致的文件 hash 值的改变而导致文件缓存失效的情况,使得应用可以充分利用浏览器缓存。
5.1 确定的moduleId 和 chunkId
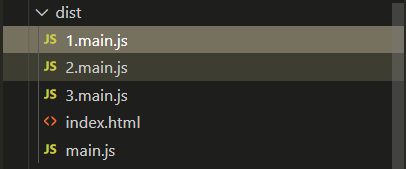
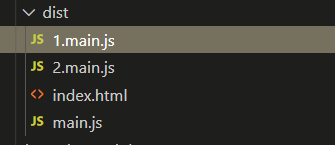
webpack5之前的版本的 moduleId 和 chunkId 默认是自增的,没有从entry打包的chunk都会以1、2、3、4...的递增形式的文件命名方式进行命名。在我们对chunk进行增删操作时,很容易就导致浏览器缓存的失效。
webpack5为了确保moduleId,chunkId 的确定性, 增加了如下配置(此配置在生产模式下是默认开启):
optimization.moduleIds = 'deterministic'
optimization.chunkIds = 'deterministic'
添加上面的配置后,webpack会通过确定的 hash 生成算法为 module 和 chunk 分配 3-5 位数字 id。这样的话,即使我们对chunk有增删的操作,但是由于 moduleId 和 chunkId 确定了,浏览器缓存便不会失效。
在开发模式下,可以使用以下配置来生成更友好的id:
optimization.moduleIds = 'named'
optimization.chunkIds = 'named'
5.2 真实的content hash
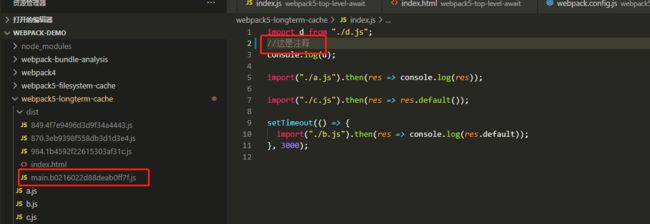
当使用 [contenthash] 时,Webpack 5 将使用真正的文件内容哈希值。也就是说当进行了修改注释或者修改变量名等代码逻辑是没有影响的操作是,文件内容的变更不会导致 contenthash 变化。
6. 优化资源打包策略
prepack 能够在编译的时候,将一些无副作用的函数的结果提前计算出来:
webpack5内置了这种能力,能够让你的应用在生产环境下得到极致的优化:
//入口文件
(function () {
    function hello() {
        return "hello";
    }
    function world() {
        return "world";
    }
    global.s = hello() + " " + world();
})();
打包结果:
7. 更强大的tree shaking
tree-shaking能够帮助我们在打包的时候剔除无用的代码。webpack5开启tree-shaking的条件与之前一样,需要使用ES6模块化,并开启production环境。
//1.js
export const useful = "useful";
export const useless = "useless";


//2.js
import * as one from "./1.js";
export { one };

//index.js
import * as two from "./2.js";
console.log(two.one.useful);
webpack4的打包结果还是会把useless变量打包进来:
webpack5分析模块的 export 和 import 的依赖关系,去掉未被使用的模块,同时结合prepack能力,打包出来的结果十分简洁:
8. Top Level Await
Webpack5 支持 Top Level Await。简单来说就是可以在顶层的 async 函数外部使用 await 字段。
举个例子,我们有这么个异步函数a:
function a() {
    return new Promise(function (resolve, reject) {
        setTimeout(() => {
            resolve("done");
        }, 2000);
    });
}
在之前如果我们想在最顶层使用await的方式调用它,我们需要在调用它的外层包裹一个async匿名函数:
(async () => {
  const res = await a();
  console.log(res);
})()
而在webpack5中通过添加以下配置后:
module.exports = {
    experiments: {
        topLevelAwait: true,
    },
};
我们就能拜托外层匿名函数的限制,直接调用即可:
const res = await a();
console.log(res);
ps:该特性只能在ESM中使用。
9. 移除了 Node.js Polyfills
webpack <= 4 的版本中提供了许多 Node.js 核心模块的 polyfills,一旦某个模块引用了任何一个核心模块(如 cypto 模块),webpack 就会自动引用这些 polyfills。这会导致应用体积增大,尽管这些polyfills大多是用不上的。
正常打包的bundle大小:
引入cypto后:
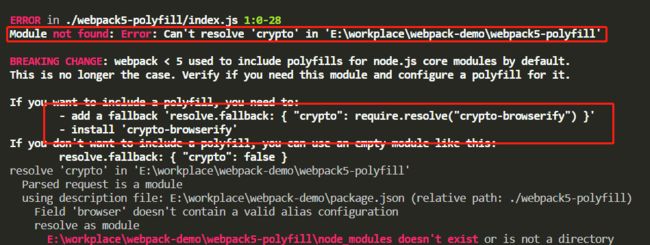
webpack 5 开始不再自动填充这些 polyfills,如果你在webpack5中使用到了polyfill:
你的应用将会报错,如果你确实是要是要这些模块,控制台中也给你提供了解决的方案,按照控制台的提示去安装对应的包和添加对应的配置就可以了。
新特性:
Module Federation 模块联邦
模块联邦是什么
动机
多个独立的构建可以组成一个应用程序,这些独立的构建之间不应该存在依赖关系,因此可以单独开发和部>署它们。
这通常被称作微前端,但并不仅限于此。
这是webpack官网中对该功能的动机的解释,简单来说就是允许一个应用中动态地去加载和引入另一个应用的代码。
怎么使用模块联邦
我们现在有两个应用 host 和 remote,其中 remote 提供了一个组件 Component ,接下来我们将通过模块联邦让 host 能够使用 Component 。
ps:
host和remote只是为了让大家更好理解,在当前例子中 ,remote负责提供被消费的代码,host负责消费remote提供的代码。但实际使用中,一个应用既可以为其他应该提供消费的代码,同时也可以消费其他应用的代码
host代码:
// /src/index.js
import("./bootstrap");
// /src/bootstrap.js
import React from "react";
import ReactDOM from "react-dom";
import App from "./App";
ReactDOM.render(Host
);
export default App;
host配置:
...
const { ModuleFederationPlugin } = require("webpack").container;

module.exports = {
    ...,
    plugins: [
        new ModuleFederationPlugin({
            name: "host",
            remotes: {
                remote: "remote@http://localhost:9001/remoteEntry.js",
            },
            shared: ["react", "react-dom"],
        }),
    ],
};
remote代码:
// /src/index.js
import("./bootstrap");
// /src/bootstrap.js
import React from "react";
import ReactDOM from "react-dom";
import App from "./App";
ReactDOM.render(Remote
remote配置:
...
const { ModuleFederationPlugin } = require("webpack").container;

module.exports = {
    ...,
    plugins: [
        new ModuleFederationPlugin({
            name: "remote",
            library: { type: "var", name: "remote" },
            filename: "remoteEntry.js",
            exposes: {
                "./Component": "./src/Component",
            },
            shared: ["react", "react-dom"],
        }),
    ],
};
host中成功引入了remote的组件:
不知道大家看到代码有没有很好奇为什么需要通过index.js 去动态加载 bootstrap.js,如果我们把bootstrap这一层去掉会不会有啥问题呢?我们来把host的entry直接设置为"./src/bootstrap"试试看:
这是为什么呢?我们先按下不表,接着往下看。
host 究竟是怎么去消费 remote 的
正确配置下的host的js文件加载顺序如下:
我们先看看最早加载的main.js做了些什么:
(() => {
    // webpackBootstrap
    var __webpack_modules__ = {
        "./src/index.js": (__unused_webpack_module, __unused_webpack_exports, __webpack_require__) => {
            __webpack_require__
                .e(/*! import() */ "src_bootstrap_js")
                .then(
                    __webpack_require__.bind(__webpack_require__, /*! ./bootstrap */ "./src/bootstrap.js")
                );
        },
        //external "remote@http://localhost:9001/remoteEntry.js"
        "webpack/container/reference/remote": (
            module,
            __unused_webpack_exports,
            __webpack_require__
        ) => {
            "use strict";
            var __webpack_error__ = new Error();
            module.exports = new Promise((resolve, reject) => {
                if (typeof remote !== "undefined") return resolve();
                __webpack_require__.l(
                    "http://localhost:9001/remoteEntry.js",
                    event => {
                        if (typeof remote !== "undefined") return resolve();
                        var errorType = event && (event.type === "load" ? "missing" : event.type);
                        var realSrc = event && event.target && event.target.src;
                        __webpack_error__.message =
                            "Loading script failed.\n(" + errorType + ": " + realSrc + ")";
                        __webpack_error__.name = "ScriptExternalLoadError";
                        __webpack_error__.type = errorType;
                        __webpack_error__.request = realSrc;
                        reject(__webpack_error__);
                    },
                    "remote"
                );
            }).then(() => remote);
        },
    };

    var __webpack_module_cache__ = {};
    function __webpack_require__(moduleId) {...}

    ...//webpack runtime

    var __webpack_exports__ = __webpack_require__("./src/index.js");
})();
main.js执行 webpack_require("./src/index.js")去加载index.js,index.js通过webpack_require.e动态加载bootstrap.js。咋一看好像和webpack4没啥区别,但其实webpack_require.e已经面目全非了。
    (() => {
        __webpack_require__.f = {}; // This file contains only the entry chunk. // The chunk loading function for additional chunks
        __webpack_require__.e = chunkId => {
            return Promise.all(
                Object.keys(__webpack_require__.f).reduce((promises, key) => {
                    __webpack_require__.f[key](chunkId, promises);
                    return promises;
                }, [])
            );
        };
    })();
webpack_require.e会去遍历执行webpack_require.f上的所有属性,每个属性都是返回promise对象的函数,再通过promise.all使得当所有的属性的状态都为resolve时,webpack_require.e的状态才会resolve。
那么,webpack_require.f都有哪些属性呢?
__webpack_require__.f.remotes = (chunkId, promises) => {}
__webpack_require__.f.consumes = (chunkId, promises) => {}
__webpack_require__.f.j = (chunkId, promises) => {}
-
consumes:用于处理共享文件; -
j:原有的webpack_require.e函数; -
remotes:用于加载remote提供的组件;
我们重点来看看__webpack_require__.f.remotes:
(() => {
        var chunkMapping = {
            webpack_container_remote_remote_Component: ["webpack/container/remote/remote/Component"],
        };
        var idToExternalAndNameMapping = {
            "webpack/container/remote/remote/Component": [
                "default",
                "./Component",
                "webpack/container/reference/remote",
            ],
        };
        __webpack_require__.f.remotes = (chunkId, promises) => {
            if (__webpack_require__.o(chunkMapping, chunkId)) {
                chunkMapping[chunkId].forEach(id => {
                    var getScope = __webpack_require__.R;
                    if (!getScope) getScope = [];
                    var data = idToExternalAndNameMapping[id];
                    ...,
                    var handleFunction = (fn, arg1, arg2, d, next, first) => {
                        try {
                            var promise = fn(arg1, arg2);
                            if (promise && promise.then) {
                                var p = promise.then(result => next(result, d), onError);
                                if (first) promises.push((data.p = p));
                                else return p;
                            } else {
                                return next(promise, d, first);
                            }
                        } catch (error) {
                            onError(error);
                        }
                    };
                    var onExternal = (external, _, first) =>
                        external
                            ? handleFunction(__webpack_require__.I, data[0], 0, external, onInitialized, first)
                            : onError();
                    var onInitialized = (_, external, first) =>
                        handleFunction(external.get, data[1], getScope, 0, onFactory, first);
                    var onFactory = factory => {
                        data.p = 1;
                        __webpack_modules__[id] = module => {
                            module.exports = factory();
                        };
                    };
                    handleFunction(__webpack_require__, data[2], 0, 0, onExternal, 1);
                });
            }
        };
    })();
__webpack_require__.f.remotes主要做了四件事:
__webpack_require__("webpack/container/reference/remote", 0);__webpack_require__.I("default", getScope);external.get("./Component", getScope);onFactory(//external.get("./Component", getScop)的结果)
第一步实际上是去加载了remote的remoteEntry.js,那么我们先来看看remoteEntry.js的内容:
var remote;
(() => {
    // webpackBootstrap
    var __webpack_modules__ = {
        //!*** container entry ***!
        "webpack/container/entry/remote": (__unused_webpack_module, exports, __webpack_require__) => {
            var moduleMap = {
                "./Component": () => {
                    return Promise.all([
                        __webpack_require__.e("webpack_sharing_consume_default_react_react-_024c"),
                        __webpack_require__.e("src_Component_js"),
                    ]).then(() => () => __webpack_require__(/*! ./src/Component */ "./src/Component.js"));
                },
            };
            var get = (module, getScope) => {
                __webpack_require__.R = getScope;
                getScope = __webpack_require__.o(moduleMap, module)
                    ? moduleMap[module]()
                    : Promise.resolve().then(() => {
                            throw new Error('Module "' + module + '" does not exist in container.');
                      });
                __webpack_require__.R = undefined;
                return getScope;
            };
            var init = (shareScope, initScope) => {
                if (!__webpack_require__.S) return;
                var oldScope = __webpack_require__.S["default"];
                var name = "default";
                if (oldScope && oldScope !== shareScope)
                    throw new Error(
                        "Container initialization failed as it has already been initialized with a different share scope"
                    );
                __webpack_require__.S[name] = shareScope;
                return __webpack_require__.I(name, initScope);
            };

            // This exports getters to disallow modifications
            __webpack_require__.d(exports, {
                get: () => get,
                init: () => init,
            });
        },
    };

    // The module cache
    var __webpack_module_cache__ = {};

    // The require function
    function __webpack_require__(moduleId) {...}
    //webpack runtime...

    var __webpack_exports__ = __webpack_require__("webpack/container/entry/remote");
    remote = __webpack_exports__;
})();
先来看看第一行和倒数第二行,remoteEntry.js声明了一个全局变量remote,并把__webpack_require__("webpack/container/entry/remote")的赋予它,
那我们再来看看"webpack/container/entry/remote",主要有三个部分组成:
-
moduleMap:remote中的exposes配置对应的模块集合; -
get:remote中的组件的getter,host可通过该函数获取远程组件; -
init:host可以通过该函数将shared依赖注入remote中;
其实init和get操作将会在__webpack_require__.f.remotes的2、3步中调用,而第四步onFactory(//external.get("./Component", getScop)的结果)便会把remote中暴露的./Component组件引入到host中。
至于为什么需要通过index.js 去动态加载 bootstrap.js,这是因为我们配置了shared。shared中配置的共享依赖react、react-dom需要我们在__webpack_require__.f.consumes中进行前置加载,不然无法正常引入。如果我们把shared配置清空,应用是可以正常运行的,但这么做的话共享依赖的特性便无法生效。
change logs:https://webpack.docschina.org/blog/2020-10-10-webpack-5-release/#so-what-does-the-release-mean
迁移指南:https://webpack.docschina.org/migrate/5/
