SpringBoot整合Redis实现缓存(自动缓存 + 手动aop缓存)
文章目录
- 一、新建SpringBoot项目
-
- 1.依赖
- 2.配置文件
- 3.sql和实体类
- 4.统一返回Result
- 二、连接测试
-
- 1.controller
- 2.service
- 3.mapper
- 4.swagger3启动测试
- 三、Redis缓存(*)
-
- 1.redis缓存策略
- 2.@Cacheable自动缓存
- 3.RedisTemplate手动缓存
-
- 3.1 Cache注解和缓存逻辑
- 3.2 配置类RedisConfig2
- 3.3 Redis工具类编写
- 3.4 测试
- 四、RedisTemplate部分源码
-
- 1.redis缓存自动配置
- 2.数据序列化
demo地址:https://gitee.com/pdh_gitee/redis-cache-demo.git。
本地必须有Redis,这是前提,本次所有demo均是在windows上测试。在spring boot项目中,通常采用使用自动缓存策略即可,也可以使用RedisTemplate类操作redis,可配置redis(当然,这样很麻烦,除非有特别的业务需求)。
使用redis缓存的时候:使用@Cacheable自动缓存,就需要关闭RedisTemplate手动缓存的配置信息(包括缓存方法上的注解,配置类上的@Configuration注解等),反之亦然。
一、新建SpringBoot项目
新建SpringBoot项目,【点击我查看如何快速搭建SpringBoot项目】。
1.依赖
导入redis、swagger3、lombok、mp、web等依赖。
<dependency>
    <groupId>org.springframework.bootgroupId>
    <artifactId>spring-boot-starter-data-redisartifactId>
dependency>


<dependency>
    <groupId>io.springfoxgroupId>
    <artifactId>springfox-boot-starterartifactId>
    <version>3.0.0version>
dependency>


<dependency>
    <groupId>com.baomidougroupId>
    <artifactId>mybatis-plus-boot-starterartifactId>
    <version>3.4.3version>
dependency>


<dependency>
    <groupId>org.springframework.bootgroupId>
    <artifactId>spring-boot-starter-webartifactId>
dependency>


<dependency>
    <groupId>mysqlgroupId>
    <artifactId>mysql-connector-javaartifactId>
    <scope>runtimescope>
dependency>


<dependency>
    <groupId>org.projectlombokgroupId>
    <artifactId>lombokartifactId>
    <optional>trueoptional>
dependency>
2.配置文件
application.yml
debug: true # Viewing Automatic Configuration

server:
  port: 8082

spring:
  redis:
    host: localhost
    port: 6379

  datasource:
    driver-class-name: com.mysql.cj.jdbc.Driver
    url: jdbc:mysql://localhost:3306/test
    username: root
    password: # you root password

mybatis-plus:
  mapper-locations: classpath*:com/pdh/mapper/*.xml
  global-config:
    db-config:
      table-prefix:
  configuration:
    # log of sql
    log-impl: org.apache.ibatis.logging.stdout.StdOutImpl
    # hump
    map-underscore-to-camel-case: true
3.sql和实体类
执行sql脚本即可(存放在demo的sql包下)
CREATE TABLE `user_db`  (
  `id` int(4) NOT NULL AUTO_INCREMENT,
  `username` varchar(32) CHARACTER SET utf8 COLLATE utf8_general_ci NOT NULL,
  PRIMARY KEY (`id`) USING BTREE
) ENGINE = InnoDB AUTO_INCREMENT = 8 CHARACTER SET = utf8 COLLATE = utf8_general_ci ROW_FORMAT = Dynamic;

INSERT INTO `user_db` VALUES (1, '张三');
INSERT INTO `user_db` VALUES (2, '李四');
INSERT INTO `user_db` VALUES (3, '王二');
INSERT INTO `user_db` VALUES (4, '麻子');
INSERT INTO `user_db` VALUES (5, '王三');
INSERT INTO `user_db` VALUES (6, '李三');
INSERT INTO `user_db` VALUES (7, 'hh');
User
package com.pdh.entity;

import com.alibaba.fastjson.JSON;
import com.baomidou.mybatisplus.annotation.TableName;
import lombok.AllArgsConstructor;
import lombok.Data;
import lombok.NoArgsConstructor;
import nonapi.io.github.classgraph.json.Id;
import org.apache.commons.lang3.StringUtils;

import java.io.Serializable;

/**
 *@Author: 彭_德华
 *@Date: 2021-10-26 11:24
 */
@Data
@AllArgsConstructor
@NoArgsConstructor
@TableName("user_db")
public class User implements Serializable {
    @Id
    private Integer id;

    private String username;
}
4.统一返回Result
所有请求统一返回结果
package com.pdh.entity;

import lombok.AllArgsConstructor;
import lombok.Data;

import java.io.Serializable;

/**
 * @Author: 彭_德华
 * @Date: 2021-10-26 15:27
 * 结果统一封装
 */
@Data
@AllArgsConstructor
public class Result implements Serializable {

    private boolean success;

    private int code;

    private String msg;

    private Object data;


    /**
     * success方法,标识成功
     * @param data
     * @return
     */
    public static Result success(Object data){
        return new Result(true,200,"success",data);
    }

    /**
     * fail方法,标识失败
     * @param code
     * @param msg
     * @return
     */
    public static Result fail(int code, String msg){
        return new Result(false,code,msg,null);
    }
}
二、连接测试
通过swagger3测试接口,接口收到请求后访问持久层获取到mysql中的数据。访问步骤:浏览器-》controller接口-》service-》mapper-》mysql,访问到数据后在逐一返回。
1.controller
UserController
@RequestMapping("/user")
@RestController
public class UserController {
    @Autowired
    private UserService userService;

    @GetMapping("/get/{id}")
    public User get(@PathVariable("id") Integer id){
        return userService.get(id);
    }

    @PostMapping("/insert")
    public boolean insert(@RequestBody User user){
        return userService.insert(user);
    }

    @DeleteMapping("/delete/{id}")
    public boolean delete(@PathVariable("id") Integer id){
        return userService.delete(id);
    }

}
2.service
UserService
@Service
public class UserService {

    @Resource
    private UserMapper userMapper;

    public User get(Integer id){
        LambdaQueryWrapper<User> wrapper = new LambdaQueryWrapper<>();
        wrapper.eq(User::getId,id);
        User user = userMapper.selectOne(wrapper);
        return user;
    }

    public boolean insert(User user){
        int line = userMapper.insert(user);
        if(line > 0)
            return true;
        return false;
    }

    public boolean delete(Integer id){
        LambdaQueryWrapper<User> wrapper = new LambdaQueryWrapper<>();
        wrapper.eq(User::getId,id);
        int line = userMapper.delete(wrapper);
        if(line > 0)
            return true;
        return false;
    }

}
3.mapper
UserMapper
package com.pdh.mapper;

import com.baomidou.mybatisplus.core.mapper.BaseMapper;
import com.pdh.entity.User;

/**
 * @Author: 彭_德华
 * @Date: 2021-10-26 13:17
 */
public interface UserMapper extends BaseMapper<User> {
}
4.swagger3启动测试
数据库连接正确,启动项目。
访问:http://localhost:8082/swagger-ui/index.html(端口application自定)。
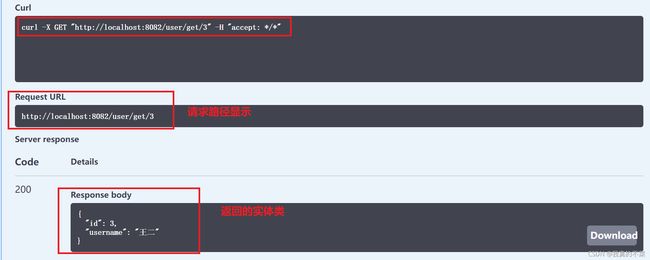
进入测试页面,测试get接口,得到如下响应(与数据表数据对应,操作成功)。
三、Redis缓存(*)
使用Redis缓存的最大好处无非就两点:提升系统响应速度 和 降低数据库交互压力。redis的数据缓存到内存中,访问速度特别快。看一下使用redis缓存和不使用redis缓存(以下分析只考虑数据缓存到redis和数据库中):
有redis做缓存
第一次访问某一数据的时候(每一次访问都会查询redis),redis里面没有指定数据,就会访问数据库获取到数据,返回后把第一次获取到的数据回填到redis中,在过期时间内再次访问该数据的时候,就直接返回,不会再访问数据库。在对数据请求非常多的时候,采用这种策略是必须的。
直接与数据库交互
每一次访问都是直接请求数据库,当请求量很大的时候,数据库的压力就非常大,直接导致系统响应变慢。
1.redis缓存策略
缓存策略选择很多,我使用过的有两种:
(1)使用@EnableCaching+@Cacheable实现自动缓存,(2)使用RedisTemplate手动缓存(注解+aop)。
在刚开始接触缓存的时候,第一种@EnableCaching+@Cacheable实现自动缓存肯定简单很多,但是,对程序开发有一定接触的帅b都知道,自动配置的redis缓存灵活些不高,无法定制自己的redis缓存需求。
而对于 使用RedisTemplate手动缓存(注解+aop) 来说,我们就获得了redis缓存的绝对控制权,缓存的逻辑由我们自己实现。这使得我们在实际开发过程中,就灵活许多,可以配置很多信息,比如log输出、缓存时间更新、为不同方法设置不同的缓存过期时间、自定义key格式、… … 等等。
下面写出两种方式的使用示例(后在分析一下源码)。
2.@Cacheable自动缓存
@Cacheable标注在需要缓存的 方法或类 上,@EnableCaching表示开启自动缓存(可以放在启动类、配置类上)。
编写配置类RedisConfig1,自动生成的key的形式是: cacheNames::params。但是为了很清晰的看出缓存的key是那个方法、什么参数的值,那就需要自定义key的生成形式,即重写CachingConfigurerSupport类的keyGenerator()方法:
- CachingConfigurerSupport 类提高了很多定制redis缓存配置的功能,具体怎么实现,这个还得继续查看官方手册~ 【点击我跳转到springboot集成redis的细节】里面提到设置过期时间这个问题,好像只能是使用RedisTemplate才能实现。
- RedisConfig的更多设置,参考【https://blog.csdn.net/weixin_40623736/article/details/98097708】
package com.pdh.config;

import org.springframework.cache.annotation.Cacheable;
import org.springframework.cache.annotation.CachingConfigurerSupport;
import org.springframework.cache.annotation.EnableCaching;
import org.springframework.cache.interceptor.KeyGenerator;
import org.springframework.context.annotation.Bean;
import org.springframework.context.annotation.Configuration;
import org.springframework.data.redis.connection.RedisConnectionFactory;
import org.springframework.data.redis.core.RedisTemplate;
import org.springframework.data.redis.serializer.Jackson2JsonRedisSerializer;
import org.springframework.data.redis.serializer.StringRedisSerializer;

import java.lang.reflect.Method;
import java.util.Arrays;

/**
 * @Author: 彭_德华
 * @Date: 2021-10-27 16:32
 */
@EnableCaching
@Configuration
public class RedisConfig1 extends CachingConfigurerSupport {

    @Bean
    public RedisTemplate<Object, Object> redisTemplate(RedisConnectionFactory factory) {
        RedisTemplate<Object, Object> redisTemplate = new RedisTemplate<>();
        redisTemplate.setConnectionFactory(factory);
        Jackson2JsonRedisSerializer jackson2JsonRedisSerializer = new Jackson2JsonRedisSerializer(Object.class);
        redisTemplate.setValueSerializer(jackson2JsonRedisSerializer);
        redisTemplate.setKeySerializer(new StringRedisSerializer());
        // 还可以设置其他信息

        return redisTemplate;
    }

    /**
     * 自定义key生成策略
     *
     * @return
     */
    @Bean
    @Override
    public KeyGenerator keyGenerator() {
        return new KeyGenerator() {
            public Object generate(Object target, Method method, Object... objects) {
                StringBuilder sb = new StringBuilder();
                Cacheable annotation = method.getAnnotation(Cacheable.class);
                String[] cacheNames = annotation.cacheNames();
                for (String elem : cacheNames) {
                    sb.append(elem + ".");
                }
                sb.deleteCharAt(sb.length() - 1); // 删除掉 cacheNames 中的最后一个点(.)

                sb.append("::").append(target.getClass()
                        .getSimpleName()).append("::")
                        .append(method.getName()).append("::")
                        .append(Arrays.toString(objects));

                return sb.toString();
            }
        };
    }
}
之后,以UserController的get方法为例进行缓存测试:
@GetMapping("/get/{id}")
@Cacheable(cacheNames = {"get"})
public Result get(@PathVariable("id") Integer id){
    return userService.get(id);
}
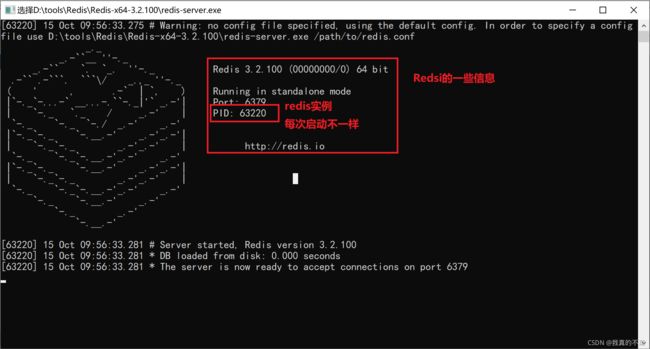
之后启动项目,启动redis服务
访问 http://localhost:8082/swagger-ui/index.html(这里使用swagger默认配置),测试get接口,测试同一个id两次。查看控制台,第一次走数据库获取,第二次直接从redis获取了。
redis数据如图:
过期时间设置可在application.yml中配置(只能设置所有的,需要设置不同key不同有效期,就得使用另一种缓存策略)
spring:
  # cache setting
  cache:
    redis:
      time-to-live: 60000 # 60s
3.RedisTemplate手动缓存
RedisTemplate手动缓存,即使用RedisTemplate实现类操作。
可以直接在正常的业务逻辑中添加缓存逻辑代码,让人诟病的就是 每次有缓存的需求的时候都需要写一遍缓存逻辑,且最大的问题是要改动原有的业务逻辑,这就显得不合适了。
那你是不是学习了aop和注解?用起来。如果你印象不深刻也没有关系,【点击我快速学习AOP原理】,【点击我快速学习注解原理】。
配合 AOP+注解 就很容易实现RedisTemplate手动缓存。重点是缓存策略可以自己定制,快开始吧等不及了!
3.1 Cache注解和缓存逻辑
Cacahe注解
package com.pdh.cache;

import java.lang.annotation.*;

/**
 * @Author: 彭_德华
 * @Date: 2021-10-26 15:24
 * 自定义注解类Cache
 */
@Target(ElementType.METHOD)
@Retention(RetentionPolicy.RUNTIME)
@Documented
public @interface Cache {

    /**
     * 过期时间,默认60s
     * @return
     */
    long expire() default 1 * 60 * 1000;

    /**
     * 缓存标识name
     * @return
     */
    String name() default "";

}
缓存逻辑
使用aop捕获被@Cache标注的注解,实现环绕通知操作(缓存逻辑),下面是我直接copy我项目的代码:
package com.pdh.cache;

import com.alibaba.fastjson.JSON;
import com.pdh.entity.Result;
import com.pdh.utils.RedisUtils;
import lombok.extern.slf4j.Slf4j;
import org.apache.commons.codec.digest.DigestUtils;
import org.apache.commons.lang3.StringUtils;
import org.aspectj.lang.ProceedingJoinPoint;
import org.aspectj.lang.Signature;
import org.aspectj.lang.annotation.Around;
import org.aspectj.lang.annotation.Pointcut;
import org.springframework.beans.factory.annotation.Autowired;
import org.springframework.stereotype.Component;
import org.aspectj.lang.annotation.Aspect;

import java.lang.reflect.Method;
import java.util.concurrent.TimeUnit;


/**
 * @Author: 彭_德华
 * @Date: 2021-10-26 15:27
 */
@Component
@Aspect
@Slf4j
public class CacheAspect {

    @Autowired
    private RedisUtils redisUtils; // json数据

    /**
     * aop切点
     * 拦截被指定注解修饰的方法
     */
    @Pointcut("@annotation(com.pdh.cache.Cache)")
    public void cache() {
    }

    /**
     * 缓存操作
     *
     * @param pjp
     * @return
     */
    @Around("cache()")
    public Object toCache(ProceedingJoinPoint pjp) {

        try {
            // 思路: 设置存储的格式,获取即可

            Signature signature = pjp.getSignature();
            // 类名
            String className = pjp.getTarget().getClass().getSimpleName();
            // 方法名
            String methodName = signature.getName();

            // 参数处理
            Object[] args = pjp.getArgs();
            Class[] parameterTypes = new Class[args.length];
            String params = "";
            for (int i = 0; i < args.length; i++) {
                if (args[i] != null) {
                    parameterTypes[i] = args[i].getClass();
                    params += JSON.toJSONString(args[i]);
                }
            }
            if (StringUtils.isNotEmpty(params)) {
                //加密 以防出现key过长以及字符转义获取不到的情况
                params = DigestUtils.md5Hex(params);
            }

            // 获取controller中对应的方法
            Method method = signature.getDeclaringType().getMethod(methodName, parameterTypes);

            // 获取Cache注解
            Cache annotation = method.getAnnotation(Cache.class);
            long expire = annotation.expire();
            String name = annotation.name();

            // 访问redis(先尝试获取,没有则访问数据库)
            String redisKey = name + "::" + className + "::" + methodName + "::" + params;
            String redisValue = redisUtils.get(redisKey);
            if (StringUtils.isNotEmpty(redisValue)) {
                // 不为空返回数据
                Result result = JSON.parseObject(redisValue, Result.class);
                log.info("数据从redis缓存中获取,key: {}", redisKey);
                return result; // 跳出方法
            }
            Object proceed = pjp.proceed();
            redisUtils.set(redisKey, JSON.toJSONString(proceed), expire, TimeUnit.MILLISECONDS);
            log.info("数据存入redis缓存,key: {}", redisKey);
            return proceed;
        } catch (Throwable throwable) {
            throwable.printStackTrace();
        }
        return Result.fail(999, "系统错误");
    }

}
3.2 配置类RedisConfig2
对于key的过期时间,如果有用户有设置时间,优先使用设置的时间。
package com.pdh.config;

import org.springframework.context.annotation.Bean;
import org.springframework.context.annotation.Configuration;
import org.springframework.data.redis.connection.RedisConnectionFactory;
import org.springframework.data.redis.core.RedisTemplate;
import org.springframework.data.redis.serializer.Jackson2JsonRedisSerializer;
import org.springframework.data.redis.serializer.StringRedisSerializer;

/**
 * @Author: 彭_德华
 * @Date: 2021-10-26 11:15
 *  redis配置类(不进行配置就使用默认的配置)
 */
@Configuration
public class RedisConfig2 {

    @Bean
    public RedisTemplate<Object,Object> redisTemplate(RedisConnectionFactory factory){
        RedisTemplate<Object,Object> redisTemplate = new RedisTemplate<>();

        // 设置连接工厂类
        redisTemplate.setConnectionFactory(factory);

        // 设置k-v的序列化方式
        // Jackson2JsonRedisSerializer 实现了 RedisSerializer接口
        Jackson2JsonRedisSerializer jackson2JsonRedisSerializer = new Jackson2JsonRedisSerializer(Object.class);
        redisTemplate.setValueSerializer(jackson2JsonRedisSerializer);
        redisTemplate.setKeySerializer(new StringRedisSerializer());

        // 还可设置很多的配置 ... ... (未设置就使用默认配置)

        return redisTemplate;
    }

}
3.3 Redis工具类编写
对于redis的 增、删、查 操作,提供统一的接口,便于管理的同时简化代码的复杂度。当需要对不同数据做出不同缓存的时候,代码就显得非常的简洁
@Service
public class RedisUtils {
    @Autowired
    private RedisTemplate<String,String> redisTemplate;

    /**
     * 写入缓存+过期时间
     * @param key
     * @param value
     * @param expireTime
     * @param timeUnit
     * @return
     */
    public boolean set( String key, String value, Long expireTime , TimeUnit timeUnit){
        ValueOperations<String, String> operations = redisTemplate.opsForValue();
        operations.set(key,value);
        redisTemplate.expire(key,expireTime,timeUnit);
        return true;
    }

    /**
     * 通过key获取value
     * @param key
     * @return
     */
    public String get(String key){
        ValueOperations<String, String> operations = redisTemplate.opsForValue();
        return operations.get(key);
    }

    /**
     * 批量删除 k-v
     * @param keys
     * @return
     */
    public boolean remove(final String... keys){
        for(String key : keys){
            if(redisTemplate.hasKey(key)){ //key存在就删除
                redisTemplate.delete(key);
            }
        }
        return true;
    }

}
3.4 测试
先把RedisConfig1配置类的注解全部关闭,再把UserController中方法上的@Cacheable注解去掉。(忘记的话可能会报错… …)
使用 注解+aop 实现缓存的好处上面已经提到,那么这里就需要给之前编写的controller方法做上标记(加上注解)。在get()方法上加 @Cache(name = "get method"):
@GetMapping("/get/{id}")
@Cache(name = "get method")
public Result get(@PathVariable("id") Integer id){
    return userService.get(id);
}
之后启动项目,启动redis,访问 http://localhost:8082/swagger-ui/index.html(这里使用swagger默认配置),测试get接口,测试同一个id两次:
测试可以发现,两次获取id=6的数据,在mybatis-plus打印的sql语句中,只执行了一次sql,而第二次是从redis缓存里面获取到了数据(过期时间是我们所设置的,默认时间也是存在)。
四、RedisTemplate部分源码
1.redis缓存自动配置
RedisAutoConfiguration类实现了redisTemplate和stringRedisTemplate的自动注入,直接获取就能使用。

**@ConditionalOnMissingBean注解的表示:如果Spring容器中有了RedisTemplate对象,这个自动配置的RedisTemplate不会实例化。因此我们可以直接自己写个配置类,配置RedisTemplate。**另外还有很多配置信息都可以自动化配置(如序列化策略、连接工厂等)。
在自行编写的RedisConfig配置类中,有关RedisTmpelate实例对象,在什么泛型这一块(即RedisTemplate
// 1.RedisConfig
RedisTemplate<Integer,Integer> redisTemplate = new RedisTemplate<>();
// 2.注入
@Autowired
RedisTemplate<String,String> redisTemplate;
在我的测试当中,并没有出现任何的异常,它确实正常执行了业务逻辑。而原因我认为是Java类型擦除的作用(并未确定,仅是个人认为)【点击我快速学习类型擦除】。
2.数据序列化
为什么要序列化?
Serializable序列化,是将Java对象转换成字节流的过程。JAVA中,一切皆对象,而将对象的状态信息转为可存储信息或能够传输的形式必须要序列化。【详细请移步这里】
如何设置序列化策略?
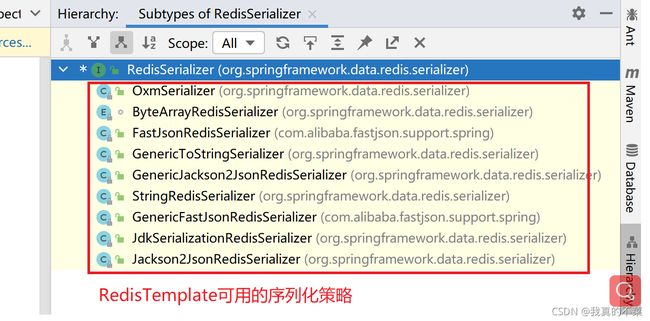
RedisSerializer是redis数据的序列化接口,它提供了以下几种数据序列化策略:
具体的用途这里不赘述,有业务需求的时候,直接去查询开发者手册选择对应的序列化策略即可。
设置序列化策略的话,就需要挤掉IoC容器中默认的RedisTemplate实体类,自行配置RedisTemplate(编写RedisConfig配置类,就如同上面使用的示例一般)。


