如何在Windows和Linux之间共享文件
We’ve previously covered various ways to share files between nearby computers, but sharing between Windows and Linux can be a little more complex. This article will show you how to map shares across both operating systems for seamless file sharing.
我们之前已经介绍了在附近的计算机之间共享文件的各种方法,但是Windows和Linux之间的共享可能稍微复杂一些。 本文将向您展示如何在两个操作系统之间映射共享以实现无缝文件共享。
There are two parts to this guide. In the first part, we’ll create a shared folder on Windows, and then configure Linux to access that share. In the second part, we’ll create a shared folder on Linux and configure Windows to access the share. Depending on your situation, you’ll want to follow the appropriate set of instructions. If, for some reason, you want to set up shared folders on both systems, you can do that, too. We’re using Windows 10 and Ubuntu for our examples, but we’ve made the instructions adaptable to pretty much any version of Windows or Linux.
本指南分为两部分。 在第一部分中,我们将在Windows上创建一个共享文件夹,然后将Linux配置为访问该共享。 在第二部分中,我们将在Linux上创建一个共享文件夹,并将Windows配置为访问该共享。 根据您的情况,您需要遵循适当的说明。 如果出于某种原因要在两个系统上都设置共享文件夹,也可以这样做。 我们在示例中使用Windows 10和Ubuntu,但是我们使说明适用于几乎所有版本的Windows或Linux。
选项一:在Windows上创建共享并从Linux访问它 (Option One: Create a Share on Windows and Access It From Linux)
To make this work, we’ll be taking three steps. First, we’ll make sure sharing is enabled on Windows. Once it is, we’ll share the actual folder. And then, we’ll look at how to access that folder from a Linux system.
为使这项工作有效,我们将采取三个步骤。 首先,我们将确保Windows上启用了共享。 一旦完成,我们将共享实际的文件夹。 然后,我们将研究如何从Linux系统访问该文件夹。
第一步:确保在Windows中启用了共享 (Step One: Make Sure Sharing is Enabled in Windows)
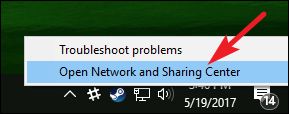
To set up a shared folder on Windows for Linux to access, start by making sure your network settings are configured to allow the connection from the other computer by opening the Network and Sharing Center. The easiest way to do this is to right-click the network icon in your system tray and choose “Open Network and Sharing Center.”
要在Windows上设置供Linux访问的共享文件夹,请先打开网络和共享中心,以确保将网络设置配置为允许来自另一台计算机的连接。 最简单的方法是右键单击系统任务栏中的网络图标,然后选择“打开网络和共享中心”。
In the Network and Sharing Center window, click on “Change advanced sharing settings.”
在“网络和共享中心”窗口中,单击“更改高级共享设置”。
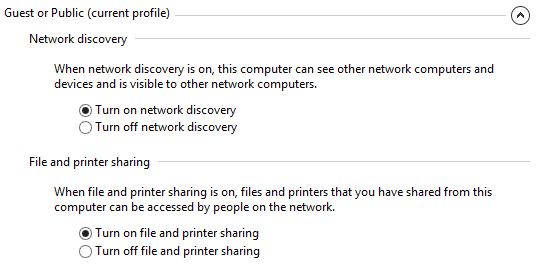
For your current profile, make sure the following two settings are enabled:
对于当前的配置文件,请确保启用以下两个设置:
- Turn on network discovery 开启网络发现
- Turn on file and printer sharing 打开文件和打印机共享
When you’re done, click “Save Changes.”
完成后,点击“保存更改”。
第二步:共享文件夹 (Step Two: Share the Folder)
Now that sharing is enabled, we can create the shared folder for the Linux machine to see. There are no limitations to what you can share (you could theoretically share your entire hard drive), but here, we’ll just be sharing a folder named “Share” that is located on our Desktop.
现在启用了共享,我们可以创建共享文件夹供Linux计算机查看。 共享的内容没有限制(理论上可以共享整个硬盘),但是在这里,我们将共享位于桌面上的名为“ Share”的文件夹。
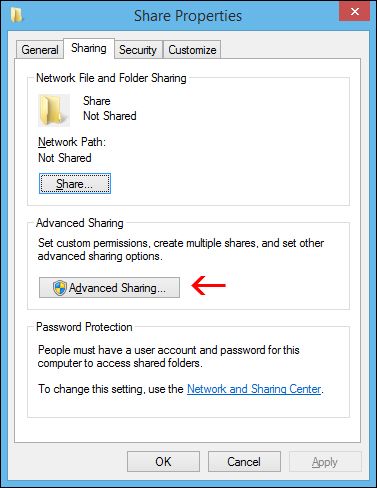
Right-click the folder you want to share over the network, and then click “Properties.” On the “Sharing” tab of the properties window, click the “Advanced Sharing” button.
用鼠标右键单击要在网络上共享的文件夹,然后单击“属性”。 在属性窗口的“共享”选项卡上,单击“高级共享”按钮。
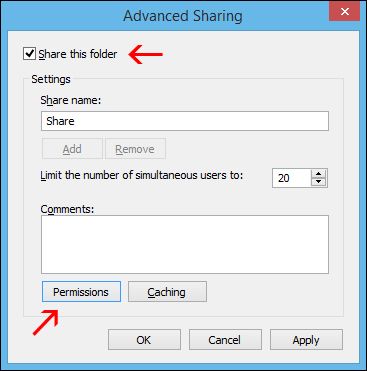
In the “Advanced Sharing” window that opens, enable the “Share this folder” option, and then click the “Permissions” button.
在打开的“高级共享”窗口中,启用“共享此文件夹”选项,然后单击“权限”按钮。
In the permissions window, you can restrict access to the folder to certain accounts. To let any user have access to your folder, just give the “Full Control” permission to the “Everyone” user. This allows anyone to read and write changes to files in the shared folder. If you would rather restrict access to certain accounts, just remove the Everyone user, add the users you want, and then assign them appropriate permissions.
在权限窗口中,可以将对文件夹的访问限制为某些帐户。 要允许任何用户访问您的文件夹,只需将“完全控制”权限授予“每个人”用户。 这样,任何人都可以读取和写入对共享文件夹中文件的更改。 如果您想限制对某些帐户的访问,只需删除“所有人”用户,添加所需的用户,然后为其分配适当的权限。
Note: These user accounts are on the Windows computer, not Linux.
注意:这些用户帐户在Windows计算机上,而不在Linux上。
When you’re done setting up users and permissions, click “OK” to close the permissions window and then click “OK” again to close the “Advanced Sharing” window.
完成设置用户和权限后,单击“确定”关闭权限窗口,然后再次单击“确定”关闭“高级共享”窗口。
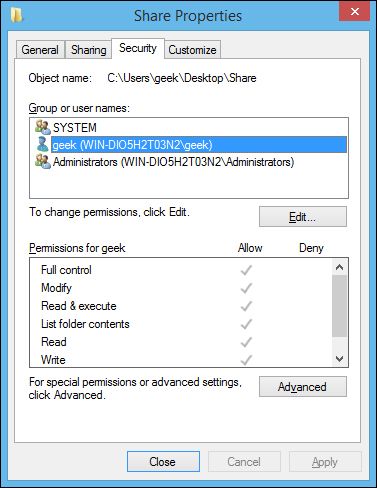
Back in the main properties window, switch over to the “Security” tab.
返回主属性窗口,切换到“安全性”选项卡。
For the Linux user to have access to the shared folder, you need to configure the same permissions here that you configured in the sharing settings. If the two settings don’t match, the most restrictive settings will take effect. If your desired user already has their security permissions set up (such as the geek user in our example) then you’re good to go. You can close the window and move on to the next step.
为了使Linux用户能够访问共享文件夹,您需要在此处配置与共享设置中配置的相同的权限。 如果两个设置不匹配,则限制性最强的设置将生效。 如果您已经设置了所需的用户的安全权限(例如本例中的geek用户),那么您就很好了。 您可以关闭窗口并继续下一步。
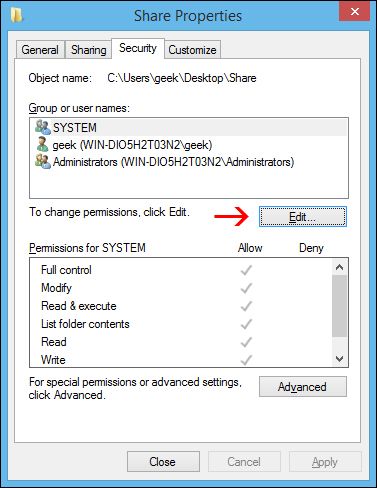
If you do need to add a user, such as “Everyone,” click the “Edit” button.
如果确实需要添加用户,例如“每个人”,请单击“编辑”按钮。
In the permissions window that opens, click the “Add” button to enter the new user’s details.
在打开的权限窗口中,单击“添加”按钮以输入新用户的详细信息。
Click “OK” on all the open windows, and your folder should now be shared with the network.
在所有打开的窗口上单击“确定”,您的文件夹现在应该与网络共享。
第三步:从Linux访问Windows共享 (Step Three: Access the Windows Share from Linux)
You should be able to mount the shared folder by using the GUI in Linux, but it’s also very easy to do with the command line. We’re going to use terminal for our examples not only because it’s quicker, but because it will work across many different distributions.
您应该能够使用Linux中的GUI挂载共享文件夹,但是使用命令行也非常容易。 我们将使用terminal作为示例,不仅因为它更快,而且因为它可以在许多不同的发行版中工作。
First, you’ll need the cifs-utils package in order to mount SMB shares. Just type the following command at the terminal:
首先,您需要cifs-utils软件包才能挂载SMB共享。 只需在终端上键入以下命令:
sudo apt-get install cifs-utilsAfter that, just make a directory, and then mount the share to it. In this example, we will create the folder on our Desktop for easy access. Use these commands to create and mount the folder:
之后,只需创建一个目录,然后将共享安装到该目录即可。 在此示例中,我们将在桌面上创建文件夹以便于访问。 使用以下命令创建和安装文件夹:
mkdir ~/Desktop/Windows-Sharesudo mount.cifs //WindowsPC/Share /home/geek/Desktop/Windows-Share -o user=geek
As you can see in the screenshot, we were prompted for the root password of the Linux machine, and then for the password of the “geek” account on Windows. After running that command, we are now able to see the contents of the Windows share and add data to it.
如您在屏幕快照中所见,系统提示您输入Linux机器的根密码,然后输入Windows上“ geek”帐户的密码。 运行该命令后,我们现在可以查看Windows共享的内容并向其中添加数据。
In case you need help understanding the mount command, here’s a breakdown:
如果您需要帮助来了解mount命令,请按以下步骤进行操作:
sudo mount.cifs: This is just the mount command, set to mount a CIFS (SMB) share.
sudo mount.cifs:这只是mount命令,设置为装入CIFS(SMB)共享。
WindowsPC: This is the name of the Windows computer. Type “This PC” into the Start menu on Windows, right click it, and go to Properties to see your computer name.
WindowsPC:这是Windows计算机的名称。 在Windows的“开始”菜单中键入“ This PC”,右键单击它,然后转到“属性”以查看您的计算机名称。
//Windows-PC/Share: This is the full path to the shared folder.
// Windows-PC / Share:这是共享文件夹的完整路径。
/home/geek/Desktop/Windows-Share: This is where we’d like the share to be mounted on the Linux system.
/ home / geek / Desktop / Windows-Share:这是我们希望在Linux系统上挂载共享的位置。
-o user=geek: This is the Windows username that we are using to access the shared folder.
-o user = geek:这是我们用来访问共享文件夹的Windows用户名。
选项二:在Linux上创建共享并从Windows访问它 (Option Two: Create a Share on Linux and Access It from Windows)
Creating a share on Linux and then accessing it from Windows is actually a bit easier than the other way around. First, we’ll create the shared folder on the Linux system. Then, we’ll look at how to access it from a Windows PC.
在Linux上创建共享然后从Windows访问它实际上比其他方法要容易一些。 首先,我们将在Linux系统上创建共享文件夹。 然后,我们将研究如何从Windows PC访问它。
第一步:在Linux上创建共享 (Step One: Create the Share on Linux)
To set up a shared folder on a Linux that Windows to access, start with installing Samba (software that provides access to SMB/CIFS protocols used by Windows). At the terminal, use the following command:
要在Windows可以访问Linux上设置共享文件夹,请先安装Samba(可访问Windows使用的SMB / CIFS协议的软件)。 在终端上,使用以下命令:
sudo apt-get install sambaAfter Samba installs, configure a username and password that will be used to access the share:
Samba安装后,配置用于访问共享的用户名和密码:
smbpasswd -a geekNote: In this example, we are using ‘geek’ since we already have a Linux user with that name, but you can choose any name you’d like.
注意:在此示例中,由于我们已经有一个使用该名称Linux用户,因此我们使用“ geek”,但是您可以选择任意名称。
Create the directory that you’d like to share out to your Windows computer. We’re just going to put a folder on our Desktop.
创建您要共享到Windows计算机的目录。 我们将要在桌面上放置一个文件夹。
mkdir ~/Desktop/ShareNow, use your favorite editor to configure the smb.conf file. We’re using Vi here.
现在,使用您喜欢的编辑器来配置smb.conf文件。 我们在这里使用Vi。
sudo vi /etc/samba/smb.confScroll down to the end of the file and add these lines:
向下滚动到文件末尾并添加以下行:
[] path = /home// available = yesvalid users =read only = nobrowsable = yespublic = yeswritable = yes
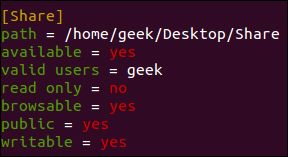
Obviously, you’ll need to replace some of the values with your personal settings. It should look something like this:
显然,您需要用您的个人设置替换一些值。 它看起来应该像这样:
Save the file and close your editor. Now, you just need to restart the SMB service for the changes to take effect.
保存文件并关闭编辑器。 现在,您只需要重新启动SMB服务即可使更改生效。
sudo service smbd restartYour shared folder should now be accessible from a Windows PC.
现在应该可以从Windows PC访问共享文件夹。
第二步:从Windows访问Linux共享 (Step Two: Access the Linux Share from Windows)
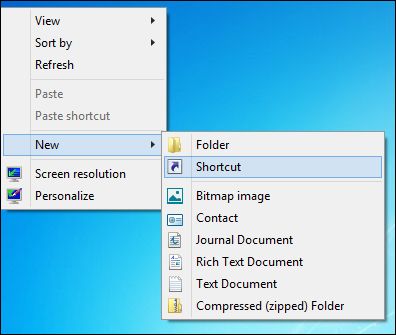
Now, let’s add the Linux share to our Windows Desktop. Right-click somewhere on your Desktop and select New > Shortcut.
现在,让我们将Linux共享添加到我们的Windows桌面中。 右键单击桌面上的某个位置,然后选择“新建”>“快捷方式”。
Type in the network location of the shared folder, with this syntax:
使用以下语法输入共享文件夹的网络位置:
\\IP-ADDRESS\SHARE-NAMENote: If you need the IP of your Linux computer, just use the ifconfig command at the terminal.
注意:如果需要Linux计算机的IP,只需在终端上使用ifconfig命令。
In the shortcut wizard on the Windows PC, click Next, choose a name for the Shortcut, and then click Finish. You should end up with a Shortcut on your Desktop that goes right to the Linux share.
在Windows PC上的快捷方式向导中,单击“下一步”,为快捷方式选择一个名称,然后单击“完成”。 您应该最终在桌面上找到与Linux共享直接匹配的快捷方式。
翻译自: https://www.howtogeek.com/176471/how-to-share-files-between-windows-and-linux/

