从零开始pytorch手写字母识别
因为研一的人工智能大作业-手写字母识别,在学习之余,综合一些文章和代码实现了本文,针对数据集Chars74K dataset。
数据集介绍:
(1)、数据集来源于Chars74K dataset,本项目选用数据集EnglishFnt中的一部分。Chars74K dataset网址链接 http://www.ee.surrey.ac.uk/CVSSP/demos/chars74k/;
(2)、A-Z共26种英文字母,每种字母对应一个文件夹(Sample011对应字母A, Sample012对应字母B,…, Sample036对应字母Z);
(3)、Sample011到Sample036每个文件夹下相同字母不同字体的图片约1000张,PNG格式;
(4)、本项目数据集请从以下链接下载:
https://pan.baidu.com/s/1HEsbvusyYCni7MVGKUk4bA, 提取码:dhix
要求:
1.每种字母当成一类,利用卷积神经元网络构建26类分类器;
2.每个类别中随机选择80%作为训练数据集,剩余20%作为测试数据集。采用训练集进行模型训练,采用测试集进行模型测试,并给出测试集准确率结果。
Bonus:
1、Bonus文件夹下为手写A-Z的字母图片。请将之前训练好的分类器迁移学习到Bonus数据集上,重新构建分类器,Bonus数据集中随机选择80%作为训练数据集,剩余20%作为测试数据集,并给出测试集准确率结果。
2、将Bonus文件夹下的图片当作未标注类别的数据,联合之前的标注图片,采用半监督学习的方法构建分类器。
其它。
前置知识体系
目前学习的稍微的前置知识
-
安装虚拟环境
-
安装pytorch
-
…等一系列前置工作
-
python 基础语法
- 函数
- 类
- pandas库等
-
卷积神经网络基础 —可见机器学习 -吴恩达-yyq
- 卷积
- 池化
- 全连接
-
pytorch 的基础使用
-
关于pytorch 对于数据的预处理
-
关于pytroch cnn网络的构建
pytorch步骤
一、前言
在我们要用pytorch构建自己的深度学习模型的时候,基本上都是下面这个流程步骤,写在这里让一些新手童鞋学习的时候有一个大局感觉,无论是从自己写,还是阅读他人代码,按照这个步骤思想(默念4大步骤,
- 找数据定义、
- 找model定义、(找损失函数、优化器定义),
- 主循环代码逻辑,
- 直接去找对应的代码块,会简单很多。
二、基本步骤思想
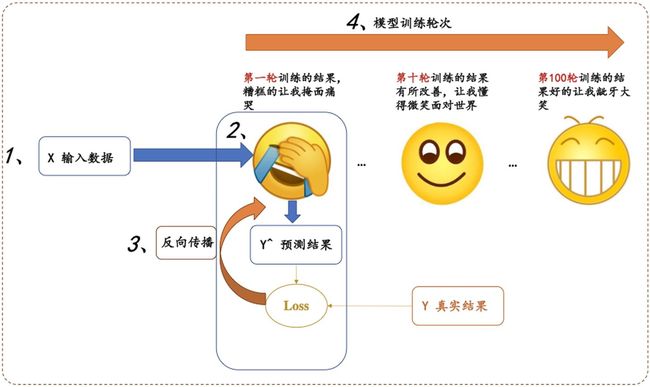
所有的深度学习模型过程都可以形式化如下图:
分为四大步骤:
1、输入处理模块 (X 输入数据,变成网络能够处理的Tensor类型)
- 进行预处理 input - dataset - dataloader
2、模型构建模块 (主要负责从输入的数据,得到预测的y^, 这就是我们经常说的前向过程)
3、定义代价函数和优化器模块 (注意,前向过程只会得到模型预测的结果,并不会自动求导和更新,是由这个模块进行处理)
4、构建训练过程 (迭代训练过程,就是上图表情包的训练迭代过程)
这几个模块分别与上图的数字标号1,2,3,4进行一一对应!
三、实例讲解
知道了上面的宏观思想之后,后面给出每个模块稍微具体一点的解释和具体一个例子,再帮助大家熟悉对应的代码!
1.数据处理
对于数据处理,最为简单的⽅式就是将数据组织成为⼀个 。但许多训练需要⽤到mini-batch,直 接组织成Tensor不便于我们操作。pytorch为我们提供了Dataset和Dataloader两个类来方便的构建。
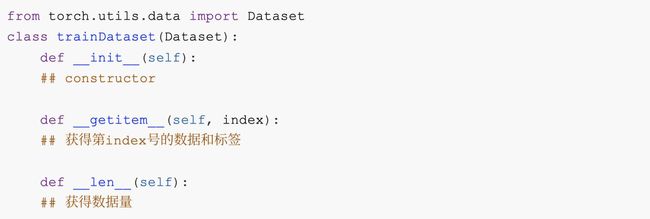
torch.utils.data.Dataset
继承Dataset 类需要override 以下⽅法:
torch.utils.data.DataLoader
torch.utils.data.DataLoader(dataset, batch_size=1, shuffle=False)
DataLoader Batch。如果选择shuffle = True,每⼀个epoch 后,mini-Batch batch_size 常⻅的使⽤⽅法如下:
2. 模型构建
所有的模型都需要继承torch.nn.Module , 需要实现以下⽅法:
其中forward() ⽅法是前向传播的过程。在实现模型时,我们不需要考虑反向传播。
3. 定义代价函数和优化器
这部分根据⾃⼰的需求去参照doc
4、构建训练过程
pytorch的训练循环⼤致如下:
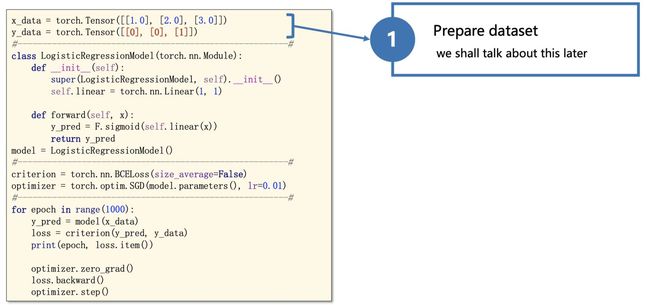
下面再用一个简单例子,来巩固一下:
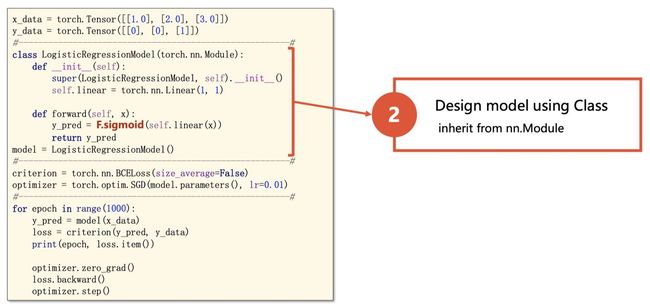 slides来自https://www.bilibili.com/video/BV1Y7411d7Ys?from=search&seid=3765076366663992699
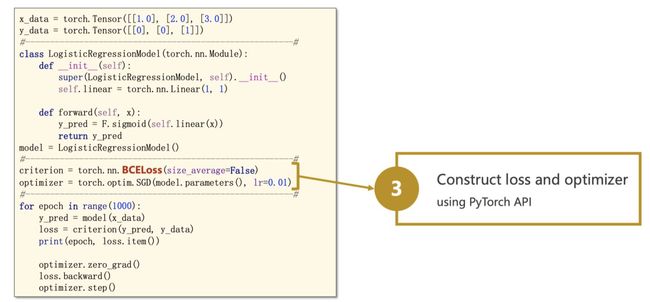 slides来自https://www.bilibili.com/video/BV1Y7411d7Ys?from=search&seid=3765076366663992699
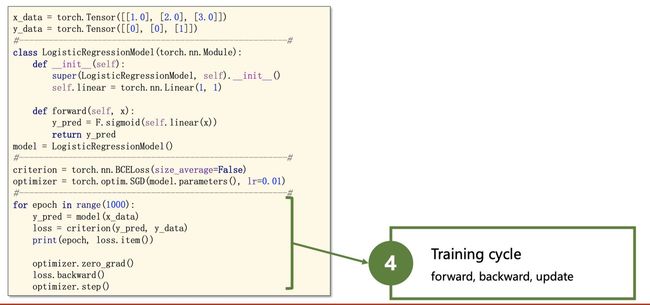 slides来自https://www.bilibili.com/video/BV1Y7411d7Ys?from=search&seid=3765076366663992699
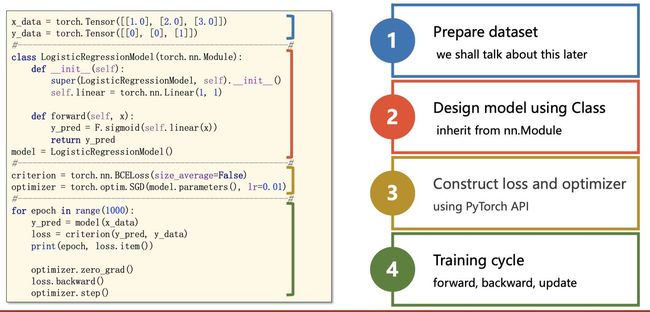 slides来自https://www.bilibili.com/video/BV1Y7411d7Ys?from=search&seid=3765076366663992699
数据集预处理
文件处理
针对文件夹中都是图片的数据集处理
例如 : data文件夹内包含26个文件夹,分别包含a,b,c,d…各种相关图片
利用这些图片做出自己的数据集
-
./data/A/a_0.jpg
-
./data/A/a_1.jpg
-
./data/A/a_2.jpg
-
…
-
./data/B/b_0.jpg
-
./data/B/b_1.jpg
-
…
生成train.txt和test.txt 如下图 地址与标签相对应
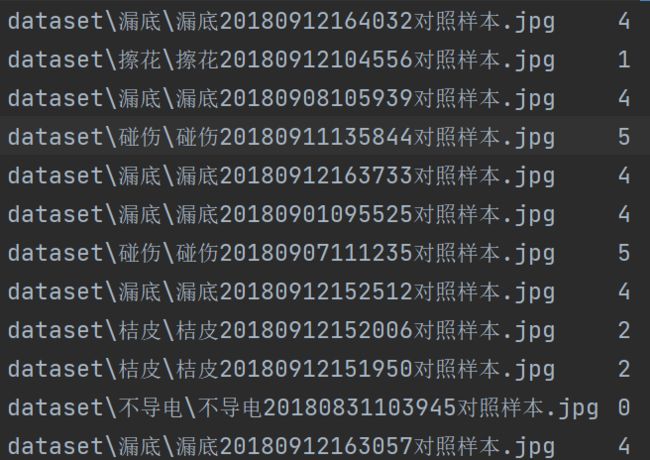
!!!!!
自己踩得坑,自己解决,数据集预处理问题,先获取总的数据,打乱,在获取训练集和测试集
import os
import random

'''
处理文件夹中的图片,并自动分类

'''

# 定义训练集和数据集比例
# 训练集 0.8
# 测试集 0.2
train_ratio = 0.8
test_ratio = 1 - train_ratio

# 定义文件路径
root_path = "./data"
DataList = []

# 定义训练列表
trainData_list = []
# 定义测试列表
testData_list = []

# 为什么flag=-1 因为第一轮for循环获取了root路径下的文件夹,并没有获取文件
flag = -1
for root, dirs, files in os.walk(root_path):
    # 每轮扫描获得路径和文件列表
    # 获取该轮文件的长度
    # root 也会随之改变
    length = files.__len__()
    for i in range(0, length):
        img_path = os.path.join(root, files[i]) + "\t" + str(flag) + "\n"
        DataList.append(img_path)
    flag = flag + 1;
#打乱数据集
random.shuffle(DataList)
length = len(DataList)
print(length)
print(DataList)

for i in range(0, int(length * train_ratio)):
    trainData_list.append(DataList[i])
for i in range(int(length * train_ratio), length):
    testData_list.append(DataList[i])

# 对列表打乱次序


with open("./res/train.txt", "w", encoding="utf-8") as f:
    for data in trainData_list:
        f.write(data)

with open("./res/test.txt", "w", encoding="utf-8") as f:
    for data in testData_list:
        f.write(data)
主要使用的函数 os.walk(rootdata)
读取rootdata=./data
for root,dirs,files in os.walk(root_path):
第一轮 :
- root = ./data
- dirs = [sample011…sample038 ]
- files = [] #因为data目录下没有文件
第二轮 :
- root = ./data/Sample011
- dirs = [] #因为Sample011里面没有文件夹
- files = [ a.jpg…a100.jpg ]
第三轮
- root = ./data/Sample012
- dirs = [] #因为Sample012里面没有文件夹
- files = [ b.jpg…b100.jpg ]
…
DataSet
DataSet需要被继承
- 实现 __ init __(self)
- 构造器 提前生成一些数据或者获取一些数据
- 比如 imgPaths列表 [ [imagesPath,label],[imagesPath,label],[imagesPath,label]… ]
- train.txt文件路径
- 构造器 提前生成一些数据或者获取一些数据
- 实现 __ getitem __ (self, index)
- 获取第index号的数据和标签
- 使用transforms 转化为–tensor
- 实现 __ len __(self)
- 获取数据的长度
其中用Dataset实现的类可以直接看作列表使用
[ [ x , y ],[ x , y ] ,[ x , y ], [ x , y ] … ]
- 获取 x y
- x,y = myDataset[0]
- x=myDataset[0] [0]
- y=myDataset[0] [1]
- 获取长度
- myDataset.__ len __
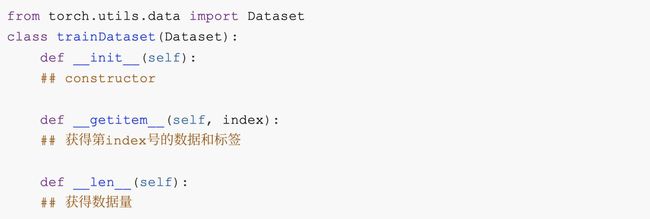
import torch
from torch.utils.data import Dataset
from torch.utils.data import DataLoader
import torchvision.transforms as transforms
from torch.utils.tensorboard import SummaryWriter
from PIL import Image
import numpy as np


# 数据归一化与标准化
# 图像标准化


class Mydataset(Dataset):

    def getImgInfo(self):
        imginfo = []
        with open(self.textpath, "r", encoding="utf-8") as f:
            img_str = f.readlines()
            # map( func , list[]) 相当于利用function对list中每个元素进行操作 返回值为函数结果
            # 这里返回的是一个列表
            # 参考:https://blog.csdn.net/qq_29666899/article/details/88623026
            # list()
            # lambda
            # list(     map(lambda x: x * x, [y for y in range(3)])    )
            imginfo = list(map(lambda x: x.strip().split("\t"), img_str))
        return imginfo

    # 构造器self相当于java-this
    # 其引用的为全局变量

    def __init__(self, textpath):
        # 文件路径
        self.textpath = textpath
        # 获取图片list(-list[data,label]----)集合
        self.imgInfo = self.getImgInfo()
        # 定义transforms
        # 需要输入 PIL img -> tensor -> ..
        self.tf = transforms.Compose([
            transforms.ToTensor(),
            transforms.Normalize(
                mean=[0.5, 0.5, 0.5],  # 取决于数据集
                std=[0.5, 0.5, 0.5]
            )
        ])

    # 获取第 index 的 数据 标签
    def __getitem__(self, index):
        img_path, label = self.imgInfo[index]
        img = Image.open(img_path)
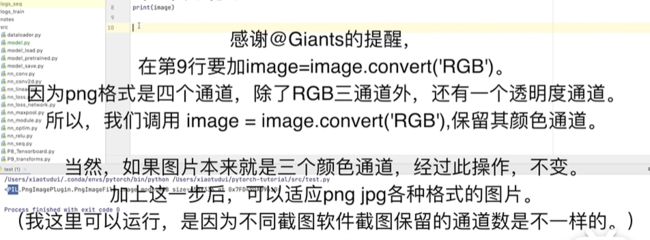
        img = img.convert('RGB')
        data = self.tf(img)
        lable = int(label)
        return data, lable

    def __len__(self):
        return len(self.imgInfo)


if __name__ == '__main__':
    # 一次传多少个照片
    batch_size = 10
    train_Dataset = Mydataset("./res/train.txt")
    test_Dataset = Mydataset("./res/test.txt")
    print(len(train_Dataset))
    print(len(test_Dataset))
知识点
- self 相当于java的this , self.data 为类中的全局变量
- transformer.Compose 注意使用的顺序
- PIL -> tensor ->…
DataLoader
 #使用DataLoader
    train_dataloader = DataLoader(dataset=train_Dataset, num_workers=4, pin_memory=True, batch_size=batch_size,
                        shuffle=True)
    test_dataloader = DataLoader(dataset=test_Dataset, num_workers=4, pin_memory=True, batch_size=batch_size,
                        shuffle=True)

    # 使用Tensorboard --查看每步存放的图片
    writer = SummaryWriter("logs")
    i=1
    #这里imgs.shape -> (10-照片个数,3-通道数,128-H,128-W)
    for data in train_dataloader:
        imgs,label=data
        print(imgs.shape)
        print(label)
        #这里是add_imges!!!!
        writer.add_images("test-dataloader",imgs,i)
        i+=i
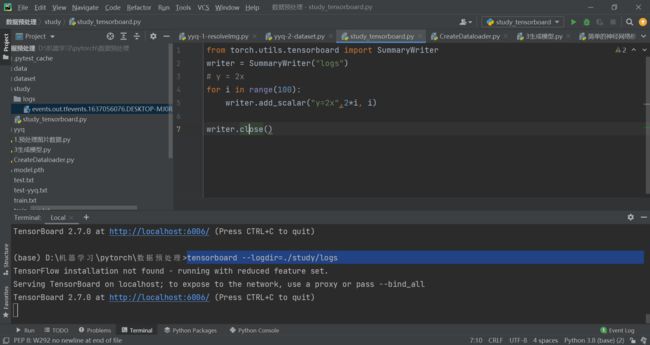
TensorBoard
–port 可以修改端口号
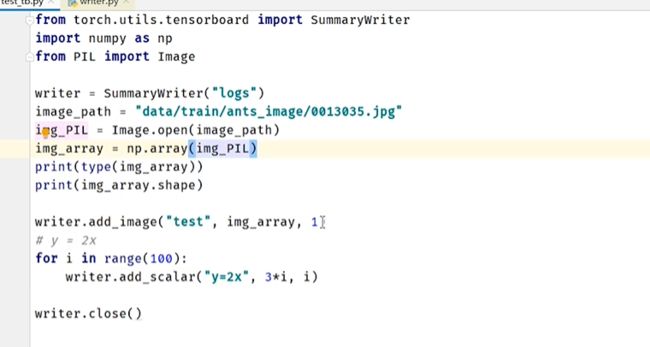
from torch.utils.tensorboard import SummaryWriter
from PIL import Image
import numpy as np
writer = SummaryWriter("logs")
imgepath=r"D:\机器学习\pytorch\数据预处理\dataset\不导电\不导电20180830131551对照样本.jpg"
img=Image.open(imgepath)
img=np.array(img)
#参数 tag名称 tensor ndarray
writer.add_image("test",img,2,dataformats="HWC")
# y = 2x
for i in range(100):
    writer.add_scalar("y=2x",2*i, i)

writer.close()
常用的语句
- writer = SummaryWriter(“logs”)
- logs代表文件夹
- writer.add_image(“test”,img,2,dataformats=“HWC”)
- tag 名称
- img 图片数据 需要是tensor narray 类型
- dataformats 需要是 hwc
- H 高度 w宽度 c 通道
- writer.add_scalar(“y=2x”,2*i, i)
- 画图嘛
- tag
- y
- x
- writer.close()
控制行执行指令
tensorboard --logdir=./study/logs --port=6000
DONE!
搭建卷积神经网络
预训练模型地址
C:\Users\yyq\.cache\torch\hub\checkpoints
可以手动下载放到那里即可
参考搭建网络-1
上图少写了两个全连接层
- 64@4×4 -Flatten-> 1024 -FC-> 64 -FC-> 10
所有的模型都需要继承torch.nn.Module , 需要实现以下⽅法:
其中forward() ⽅法是前向传播的过程。在实现模型时,我们不需要考虑反向传播。
这里使用到的Api
SequentialModulenn.Conv2dnn.MaxPool2dnn.Linear- SummaryWriter -from torch.utils.tensorboard import SummaryWriter
- 实现 3@ 32 * 32 分类-10卷积神经网络
import torch
from torch import nn
from torch.nn import Sequential
from torch.utils.tensorboard import SummaryWriter


class yyq_module(nn.Module):
    def __init__(self):
        super(yyq_module, self).__init__()
        self.module=Sequential(
            nn.Conv2d(in_channels=3, out_channels=32, kernel_size=5 , padding="same"),
            nn.MaxPool2d(kernel_size=2),
            nn.Conv2d(in_channels=32, out_channels=32, kernel_size=5, padding="same"),
            nn.MaxPool2d(kernel_size=2),
            nn.Conv2d(in_channels=32, out_channels=64, kernel_size=5, padding="same"),
            nn.MaxPool2d(kernel_size=2),
            nn.Flatten(),
            #隐藏层 两个线性层 即全连接层
            nn.Linear(in_features=1024,out_features=64),
            nn.Linear(in_features=64, out_features=10)
        )

    def forward(self,input):
        output=self.module(input)
        return output

#测试一下网络
module=yyq_module()
x=torch.zeros((64,3,32,32))
print(x.shape)
y=module(x)
print(module)
print(y.shape)

#利用SummaryWriter保存网络结构图
#logs文件夹
writer = SummaryWriter("./logs")
writer.add_graph(model=module, input_to_model=x)
writer.close()
参考搭建网络 -2
此模型用于字母识别-26
参考地址:https://www.cnblogs.com/Liu-xing-wu/p/14770473.html
但是输入的图片尺寸不同,所以做了修改 输入改为 128
网络结构
实现代码
import torch
from torch import nn
from torch.nn import Sequential
from torch.utils.tensorboard import SummaryWriter


class yyq_module(nn.Module):
    def __init__(self):
        super(yyq_module, self).__init__()
        self.module=Sequential(
            #3 * 128 * 128
            nn.Conv2d(in_channels=3, out_channels=16, kernel_size=5 , padding="same"),
            nn.BatchNorm2d(16),
            nn.ReLU(),
            nn.MaxPool2d(kernel_size=2),
            #16 * 64 * 64
            nn.Conv2d(in_channels=16, out_channels=32, kernel_size=5, padding="same"),
            nn.BatchNorm2d(32),
            nn.ReLU(),
            nn.MaxPool2d(kernel_size=2),
            #32 *32 *32
            nn.Conv2d(in_channels=32, out_channels=32, kernel_size=5, padding="same"),
            nn.BatchNorm2d(32),
            nn.ReLU(),
            nn.MaxPool2d(kernel_size=2),
            #32 * 16 * 16
            nn.Flatten(),
            # #隐藏层 两个线性层 即全连接层
            nn.Linear(in_features=8192,out_features=400),
            nn.Dropout(p=0.5),
            nn.ReLU(),
            nn.Linear(in_features=400, out_features=80),
            nn.ReLU(),
            nn.Linear(80, 26)
        )

    def forward(self,input):
        output = self.module(input)
        return output

#测试一下网络
module=yyq_module()
x=torch.zeros((64,3,128,128))
print(x.shape)
y=module(x)
print(module)
print(y.shape)
网络模型的修改
- 修改方法一 : 最后加一层全连接
- 修改方法二 :直接在最后一层修改
import torchvision.models
from torch import nn

vgg16_pre_false=torchvision.models.vgg16(pretrained=False)
print(vgg16_pre_false)
'''
    对网络的修改
'''
# 这里我们可以看出最后的输出为 1000
# 修改方法一 : 最后加一层全连接
# vgg16_pre_false.classifier.add_module("7",nn.Linear(in_features=1000, out_features=10))
# print(vgg16_pre_false)

#修改方法二 :直接在最后一层修改
vgg16_pre_false.classifier[6]=nn.Linear(in_features=4096,out_features=10)
print(vgg16_pre_false)
模型的保存和加载
保存模型
import torch
import torchvision
from torch import nn

vgg16 = torchvision.models.vgg16(pretrained=False)
# 保存方式1,模型结构+模型参数
torch.save(vgg16, "vgg16_method1.pth")

# 保存方式2,模型参数(官方推荐)
torch.save(vgg16.state_dict(), "vgg16_method2.pth")

# 陷阱
class Tudui(nn.Module):
    def __init__(self):
        super(Tudui, self).__init__()
        self.conv1 = nn.Conv2d(3, 64, kernel_size=3)

    def forward(self, x):
        x = self.conv1(x)
        return x

tudui = Tudui()
torch.save(tudui, "tudui_method1.pth")
加载模型
import torch
from model_save import *
# 方式1-》保存方式1,加载模型
# 坑是需要导入定义的模型那个类 from model_save import *
import torchvision
from torch import nn

model = torch.load("vgg16_method1.pth")
# print(model)

# 方式2,加载模型
vgg16 = torchvision.models.vgg16(pretrained=False)
vgg16.load_state_dict(torch.load("vgg16_method2.pth"))
# model = torch.load("vgg16_method2.pth")
# print(vgg16)

# 陷阱1
# class Tudui(nn.Module):
#     def __init__(self):
#         super(Tudui, self).__init__()
#         self.conv1 = nn.Conv2d(3, 64, kernel_size=3)
#
#     def forward(self, x):
#         x = self.conv1(x)
#         return x

model = torch.load('tudui_method1.pth')
print(model)
使用GPU
可以使用GPU的
- 网络模型
- 损失函数
- 数据(输入,标注)
- .cuda()
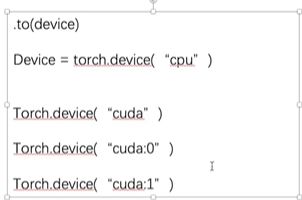
- .to(device)
方法一
if torch.cuda.is_is_available():

	module = module.cuda()
	lossFun = lossFun.cuda()
	imgs = imgs.cuda()
  tagerts = tagerts.cuda()
import torchvision
from torch.utils.data import DataLoader
from module import *
from torch.utils.tensorboard import SummaryWriter
import datetime
import time
start_time = time.time()
# 导入数据集
train_dataset = torchvision.datasets.CIFAR10("../study/data", train=True, transform=torchvision.transforms.ToTensor(),
                                       download=True)
test_dataset = torchvision.datasets.CIFAR10("../study/data", train=False, transform=torchvision.transforms.ToTensor(),
                                       download=True)
# 数据集长度
train_len=len(train_dataset)
test_len=len(test_dataset)

print("训练集数据集长度{}".format(len(train_dataset)))
print("测试集数据集长度{}".format(len(test_dataset)))

# 创建dataLoader
train_dataloader=DataLoader(train_dataset,batch_size=64, shuffle=True)
test_dataloader=DataLoader(test_dataset,batch_size=64, shuffle=True)

# 引入模型
module=yyq_module()
module = module.cuda()

# 定义损失函数
lossFun = torch.nn.CrossEntropyLoss()
lossFun = lossFun.cuda()
# 学习率
learning_rate=1e-2
# 定义优化器
optim = torch.optim.SGD(module.parameters(), lr=learning_rate)


# 训练轮数 每一轮是对整个数据集的一次遍历
epoch = 10
# 图像化 指定文件夹 ./yyq/logs
writer = SummaryWriter("./logs")
# 总的训练次数
total_train_num = 0
total_test_num = 0
for i in range(0,epoch):

    # 定义训练次数
    total_train_step = 0
    total_test_step = 0

    # 训练
    for data in train_dataloader:
        imgs, tagerts = data
        imgs = imgs.cuda()
        tagerts = tagerts.cuda()
        outputs = module(imgs)
        loss = lossFun(outputs,tagerts)

        # 优化器优化
        optim.zero_grad()
        loss.backward()
        optim.step()

        total_train_step = total_train_step+1
        total_train_num = total_train_num+1
        if total_train_step%100==0:
            print(str(time.time()-start_time)+"s")
            print("训练次数:{}, Loss:{}".format(total_train_step, loss))
            writer.add_scalar("train_loss", loss, total_train_num)
    # 训练集的总损失
    total_test_loss = 0
    # 预测正确次数
    total_accuracy = 0

    # 测试
    # 不需要梯度 不要更新参数
    with torch.no_grad():
        for data in test_dataloader:
            imgs, targets = data
            imgs = imgs.cuda()
            tagerts = tagerts.cuda()
            outputs = module(imgs)
            loss = lossFun(outputs, targets)

            # 总损失
            total_test_loss = total_test_loss+loss

            # 计算准确率
            accuracy = (outputs.argmax(1) == targets).sum()
            total_accuracy = total_accuracy + accuracy
            # 总测试次数
            total_test_num=total_test_num+1
            writer.add_scalar("test_loss", loss, total_test_num)

    print("整体测试集上AvgLoss: {}".format(total_test_loss / len(test_dataloader)))
    print("整体测试集上的Accuracy: {}%".format(100*total_accuracy / test_len))
    writer.add_scalar("test_accuracy", 100*total_accuracy / test_len, i)


writer.close()
torch.save(module, "module_{}_{}.pth".format(epoch, 20211117))
方法二
注意:
模型和损失函数可以直接to(device) 而不重新赋值,但是数据必须重新赋值
device = torch.device("cuda" if torch.cuda.is_available() else "cpu")
print("device:"+device.type)
# 引入模型
module=yyq_module()
module.to(device)

# 定义损失函数
lossFun = torch.nn.CrossEntropyLoss()
lossFun.to(device)
    # 训练
    for data in train_dataloader:
        imgs, tagerts = data
        imgs = imgs.to(device)
        tagerts = tagerts.to(device)
import torchvision
from torch.utils.data import DataLoader
from module import *
from torch.utils.tensorboard import SummaryWriter
import datetime
import time
start_time = time.time()
device = torch.device("cuda:0" if torch.cuda.is_available() else "cpu")
print("device:"+device.type)
# 导入数据集
train_dataset = torchvision.datasets.CIFAR10("../study/data", train=True, transform=torchvision.transforms.ToTensor(),
                                       download=True)
test_dataset = torchvision.datasets.CIFAR10("../study/data", train=False, transform=torchvision.transforms.ToTensor(),
                                       download=True)
# 数据集长度
train_len=len(train_dataset)
test_len=len(test_dataset)

print("训练集数据集长度{}".format(len(train_dataset)))
print("测试集数据集长度{}".format(len(test_dataset)))

# 创建dataLoader
train_dataloader=DataLoader(train_dataset,batch_size=64, shuffle=True)
test_dataloader=DataLoader(test_dataset,batch_size=64, shuffle=True)

# 引入模型
module=yyq_module()
module.to(device)

# 定义损失函数
lossFun = torch.nn.CrossEntropyLoss()
lossFun.to(device)
# 学习率
learning_rate=1e-2
# 定义优化器
optim = torch.optim.SGD(module.parameters(), lr=learning_rate)


# 训练轮数 每一轮是对整个数据集的一次遍历
epoch = 10
# 图像化 指定文件夹 ./yyq/logs
writer = SummaryWriter("./logs")
# 总的训练次数
total_train_num = 0
total_test_num = 0
for i in range(0,epoch):

    # 定义训练次数
    total_train_step = 0
    total_test_step = 0

    # 训练
    for data in train_dataloader:
        imgs, targets = data
        imgs = imgs.to(device)
        targets = targets.to(device)
        outputs = module(imgs)
        loss = lossFun(outputs, targets)

        # 优化器优化
        optim.zero_grad()
        loss.backward()
        optim.step()

        total_train_step = total_train_step+1
        total_train_num = total_train_num+1
        if total_train_step%100==0:
            print(str(time.time()-start_time)+"s")
            print("训练次数:{}, Loss:{}".format(total_train_step, loss))
            writer.add_scalar("train_loss", loss, total_train_num)
    # 训练集的总损失
    total_test_loss = 0
    # 预测正确次数
    total_accuracy = 0

    # 测试
    # 不需要梯度 不要更新参数
    with torch.no_grad():
        for data in test_dataloader:
            imgs, targets = data
            imgs = imgs.to(device)
            targets = targets.to(device)
            outputs = module(imgs)
            loss = lossFun(outputs, targets)

            # 总损失
            total_test_loss = total_test_loss+loss

            # 计算准确率
            accuracy = (outputs.argmax(1) == targets).sum()
            total_accuracy = total_accuracy + accuracy
            # 总测试次数
            total_test_num=total_test_num+1
            writer.add_scalar("test_loss", loss, total_test_num)

    print("整体测试集上AvgLoss: {}".format(total_test_loss / len(test_dataloader)))
    print("整体测试集上的Accuracy: {}%".format(100*total_accuracy / test_len))
    writer.add_scalar("test_accuracy", 100*total_accuracy / test_len, i)


writer.close()
torch.save(module, "module_{}_{}.pth".format(epoch, 20211117))
各种网络小问题
注意原来模型的输入Size
比如原来的图像尺寸128 * 128
self.tf = transforms.Compose([
            #尝试灰度化
            # transforms.Grayscale(num_output_channels=1),  # 彩色图像转灰度图像num_output_channels默认1
            transforms.Resize((224,224)),
            transforms.ToTensor(),
            transforms.Normalize(
                mean=[0.5, 0.5, 0.5],  # 取决于数据集
                std=[0.5, 0.5, 0.5]
            )
        ])
图片与模型通道数不同
比如:resnet默认输入尺寸为224X224,三维图片,但是想输入的数据集图片尺寸是32X32,以为图片
我们可以在处理尺寸大小时在预处理的地方将其resize为32X32,transforms.Resize(224)
然后在使用resnet之前用一次1X1网络修改图片通道,conv = nn.Conv2d(1, 3, kernel_size=1)即可传入
在
resnet之前加一个
优化器和loss函数-反向传播
损失函数
这部分根据⾃⼰的需求去参照doc
loss = nn.CrossEntropyLoss()

for data in dataloader:
    imgs,target=data
    output=module(imgs)
    result_loss=loss(output,target)
    result_loss.backward()
    #进行反向传播 算出每个参数的梯度 利用优化器去调整参数
    print(result_loss)
优化器的使用
#创建优化器
optimizer=SGD(module.parameters(), lr=0.01)
for epoch in range(10):

    for data in dataloader:
        imgs,target=data
        output=module(imgs)
        result_loss=loss(output, target)
        # 梯度值清零
        optimizer.zero_grad()
        # 计算出新的梯度值
        result_loss.backward()
        # 优化参数
        optimizer.step()
        print("epoch:" + str(epoch))
        print(result_loss)
添加优化器损失函数后的完整训练网络
#优化器
import torch
import torchvision
from torch import nn
from torch.nn import Sequential
from torch.optim import SGD
from torch.utils.data import DataLoader
from torch.utils.tensorboard import SummaryWriter

dataset = torchvision.datasets.CIFAR10("./data", train=False, transform=torchvision.transforms.ToTensor(),
                                       download=True)
dataloader=DataLoader(dataset,batch_size=64, shuffle=True)

class yyq_module(nn.Module):
    def __init__(self):
        super(yyq_module, self).__init__()
        self.module=Sequential(
            nn.Conv2d(in_channels=3, out_channels=32, kernel_size=5 , padding="same"),
            nn.MaxPool2d(kernel_size=2),
            nn.Conv2d(in_channels=32, out_channels=32, kernel_size=5, padding="same"),
            nn.MaxPool2d(kernel_size=2),
            nn.Conv2d(in_channels=32, out_channels=64, kernel_size=5, padding="same"),
            nn.MaxPool2d(kernel_size=2),
            nn.Flatten(),
            #隐藏层 两个线性层 即全连接层
            nn.Linear(in_features=1024,out_features=64),
            nn.Linear(in_features=64, out_features=10)
        )

    def forward(self,input):
        output=self.module(input)
        return output
module = yyq_module()
loss = nn.CrossEntropyLoss()
optimizer=SGD(module.parameters(), lr=0.01)
for epoch in range(10):

    for data in dataloader:
        imgs,target=data
        output=module(imgs)
        result_loss=loss(output, target)
        # 梯度值清零
        optimizer.zero_grad()
        # 计算出新的梯度值
        result_loss.backward()
        # 优化参数
        optimizer.step()
        print("epoch:" + str(epoch))
        print(result_loss)
实例 基于CIFAR10数据集的卷积神经网络
- 数据集 CIFAR10
模型代码
import torch
from torch import nn
from torch.nn import Sequential


class yyq_module(nn.Module):
    def __init__(self):
        super(yyq_module, self).__init__()
        self.module=Sequential(
            nn.Conv2d(in_channels=3, out_channels=32, kernel_size=5 , padding="same"),
            nn.MaxPool2d(kernel_size=2),
            nn.Conv2d(in_channels=32, out_channels=32, kernel_size=5, padding="same"),
            nn.MaxPool2d(kernel_size=2),
            nn.Conv2d(in_channels=32, out_channels=64, kernel_size=5, padding="same"),
            nn.MaxPool2d(kernel_size=2),
            nn.Flatten(),
            #隐藏层 两个线性层 即全连接层
            nn.Linear(in_features=1024,out_features=64),
            nn.Linear(in_features=64, out_features=10)
        )

    def forward(self,input):
        output=self.module(input)
        return output

if __name__ == '__main__':
    # 测试网络
    module=yyq_module()
    input=torch.zeros((64,3,32,32))
    output=module(input)
    print(output.shape)
训练代码-CPU
这里目前是使用cpu进行训练…
- 更新使用GPU代码在 搭建卷积神经网络 -使用GPU章节中
import torchvision
from torch.utils.data import DataLoader
from module import *
from torch.utils.tensorboard import SummaryWriter
import datetime
# 导入数据集
train_dataset = torchvision.datasets.CIFAR10("../study/data", train=True, transform=torchvision.transforms.ToTensor(),
                                       download=True)
test_dataset = torchvision.datasets.CIFAR10("../study/data", train=False, transform=torchvision.transforms.ToTensor(),
                                       download=True)
# 数据集长度
train_len=len(train_dataset)
test_len=len(test_dataset)

print("训练集数据集长度{}".format(len(train_dataset)))
print("测试集数据集长度{}".format(len(test_dataset)))

# 创建dataLoader
train_dataloader=DataLoader(train_dataset,batch_size=64, shuffle=True)
test_dataloader=DataLoader(test_dataset,batch_size=64, shuffle=True)

# 引入模型
module=yyq_module()

# 定义损失函数
lossFun = torch.nn.CrossEntropyLoss()

# 学习率
learning_rate=1e-2
# 定义优化器
optim = torch.optim.SGD(module.parameters(), lr=learning_rate)


# 训练轮数 每一轮是对整个数据集的一次遍历
epoch = 10
# 图像化 指定文件夹 ./yyq/logs
writer = SummaryWriter("./logs")
# 总的训练次数
total_train_num = 0
total_test_num = 0
for i in range(0,epoch):

    # 定义训练次数
    total_train_step = 0
    total_test_step = 0

    # 训练
    # module.train()
    for data in train_dataloader:
        imgs, tagerts = data
        outputs = module(imgs)
        loss = lossFun(outputs,tagerts)

        # 优化器优化
        optim.zero_grad()
        loss.backward()
        optim.step()

        total_train_step = total_train_step+1
        total_train_num = total_train_num+1
        if total_train_step%100==0:
            print("训练次数:{}, Loss:{}".format(total_train_step, loss))
            writer.add_scalar("train_loss", loss, total_train_num)
    # 训练集的总损失
    total_test_loss = 0
    # 预测正确次数
    total_accuracy = 0

    # 测试
    # 不需要梯度 不要更新参数
    # module.eval()
    with torch.no_grad():
        for data in test_dataloader:
            imgs, targets = data
            outputs = module(imgs)
            loss = lossFun(outputs, targets)

            # 总损失
            total_test_loss = total_test_loss+loss

            # 计算准确率
            accuracy = (outputs.argmax(1) == targets).sum()
            total_accuracy = total_accuracy + accuracy
            # 总测试次数
            total_test_num=total_test_num+1
            writer.add_scalar("test_loss", loss, total_test_num)

    print("整体测试集上AvgLoss: {}".format(total_test_loss / len(test_dataloader)))
    print("整体测试集上的Accuracy: {}%".format(100*total_accuracy / test_len))
    writer.add_scalar("test_accuracy", 100*total_accuracy / test_len, i)


writer.close()
torch.save(module, "module_{}_{}.pth".format(epoch, datetime.datetime.now()))
module.train()使用与否看模型中是否有–>官方文档
module.train()
This has any effect only on certain modules. See documentations of particular modules for details of their behaviors in training/evaluation mode, if they are affected, e.g. Dropout, BatchNorm, etc.

module.eval()
This has any effect only on certain modules. See documentations of particular modules for details of their behaviors in training/evaluation mode, if they are affected, e.g. Dropout, BatchNorm, etc.
测试模型
实例 手写字母识别
图像文件处理
import os
import random

'''
处理文件夹中的图片,并自动分类

'''

# 定义训练集和数据集比例
# 训练集 0.8
# 测试集 0.2
train_ratio = 0.8
test_ratio = 1 - train_ratio

# 定义文件路径
root_path = "./data"

# 定义训练列表
trainData_list = []
# 定义测试列表
testData_list = []

# 为什么flag=-1 因为第一轮for循环获取了root路径下的文件夹,并没有获取文件
flag = -1
for root, dirs, files in os.walk(root_path):
    print(flag)
    # 每轮扫描获得路径和文件列表
    # 获取该轮文件的长度
    # root 也会随之改变
    length = files.__len__()
    for i in range(0, int(length * train_ratio)):
        # 拼接 root路径和文件名 加上分隔符 和标签值
        img_path = os.path.join(root, files[i]) + "\t" + str(flag) + "\n"
        trainData_list.append(img_path)
    for i in range(int(length * train_ratio), length):
        img_path = os.path.join(root, files[i]) + "\t" + str(flag) + "\n"
        testData_list.append(img_path)
    flag = flag + 1;
print(trainData_list)

# 对列表打乱次序
random.shuffle(trainData_list)

with open("./res/train.txt", "w", encoding="utf-8") as f:
    for data in trainData_list:
        f.write(data)

with open("./res/test.txt", "w", encoding="utf-8") as f:
    for data in testData_list:
        f.write(data)
DataSetAndDataLoader
import torch
from torch.utils.data import Dataset
from torch.utils.data import DataLoader
import torchvision.transforms as transforms
from torch.utils.tensorboard import SummaryWriter
from PIL import Image
import numpy as np


# 数据归一化与标准化
# 图像标准化


class Mydataset(Dataset):

    def getImgInfo(self):
        imginfo = []
        with open(self.textpath, "r", encoding="utf-8") as f:
            img_str = f.readlines()
            # map( func , list[]) 相当于利用function对list中每个元素进行操作 返回值为函数结果
            # 这里返回的是一个列表
            # 参考:https://blog.csdn.net/qq_29666899/article/details/88623026
            # list()
            # lambda
            # list(     map(lambda x: x * x, [y for y in range(3)])    )
            imginfo = list(map(lambda x: x.strip().split("\t"), img_str))
        return imginfo

    # 构造器self相当于java-this
    # 其引用的为全局变量

    def __init__(self, textpath):
        # 文件路径
        self.textpath = textpath
        # 获取图片list(-list[data,label]----)集合
        self.imgInfo = self.getImgInfo()
        # 定义transforms
        # 需要输入 PIL img -> tensor -> ..
        self.tf = transforms.Compose([
            transforms.ToTensor(),
            transforms.Normalize(
                mean=[0.5, 0.5, 0.5],  # 取决于数据集
                std=[0.5, 0.5, 0.5]
            )
        ])

    # 获取第 index 的 数据 标签
    def __getitem__(self, index):
        img_path, label = self.imgInfo[index]
        img = Image.open(img_path)
        img = img.convert('RGB')
        data = self.tf(img)
        lable = int(label)
        return data, lable

    def __len__(self):
        return len(self.imgInfo)


if __name__ == '__main__':
    # 一次传多少个照片
    batch_size = 10
    train_Dataset = Mydataset("./res/train.txt")
    test_Dataset = Mydataset("./res/test.txt")
    print(len(train_Dataset))
    print(len(test_Dataset))
训练
from dataLoader import Mydataset
from torch.utils.data.dataloader import DataLoader
import torchvision.models as models
from torch.utils.tensorboard import SummaryWriter
import torch
import time
import os

os.environ["CUDA_VISIBLE_DEVICES"] = "0"
start_time = time.time()
# 设备
device = torch.device("cuda" if torch.cuda.is_available() else "cpu")
print("device use {}".format(device))

"""
    构建自己的数据集
"""
batchSize = 32
# dataset
trainDataSet = Mydataset(textpath="./res/train.txt")
testDataSet = Mydataset(textpath="./res/test.txt")
train_len = len(trainDataSet)
test_len = len(testDataSet)
print("训练集大小{}".format(train_len))
print("测试集大小{}".format(test_len))


# 导入dataLoader
trainDataLoader = DataLoader(dataset=trainDataSet, batch_size=batchSize, shuffle=True)
testDataLoader = DataLoader(dataset=testDataSet, batch_size=batchSize, shuffle=True)

"""
    创建网络-修改vgg16网络
"""
vgg16 = models.vgg16(pretrained=True, progress=True)
# vgg16 classifier多一层全连接 1000 - 26
vgg16.classifier.add_module("7", torch.nn.Linear(in_features=1000, out_features=26, bias=True))
# GPU
vgg16.to(device)
print("网络结构")
print(vgg16)

"""
    定义损失函数
"""
lossFun = torch.nn.CrossEntropyLoss()
lossFun.to(device)

"""
    定义优化器
"""
learning_rate = 1e-2
optim = torch.optim.SGD(params=vgg16.parameters(), lr=learning_rate)


"""
    训练
"""
# 训练轮数 每一轮是对整个数据集的一次遍历
epoch = 10
# 图像化 指定文件夹 ./logs
writer = SummaryWriter("./logs")
# 总的训练次数
total_train_num = 0
total_test_num = 0
for i in range(0, epoch):
    print("开始第{}轮-epoch".format(i+1))
    # 定义训练次数
    total_train_step = 0
    total_test_step = 0

    # 训练
    for data in trainDataLoader:
        imgs, tagerts = data
        imgs = imgs.to(device)
        tagerts = tagerts.to(device)
        outputs = vgg16(imgs)
        loss = lossFun(outputs, tagerts)

        # 优化器优化
        optim.zero_grad()
        loss.backward()
        optim.step()

        total_train_step = total_train_step + 1
        total_train_num = total_train_num + 1
        if total_train_step % 100 == 0:
            print("训练次数:{}/{}, Loss:{}".format(total_train_step*batchSize, train_len, loss))
            writer.add_scalar("train_loss", loss, total_train_num)
    # 训练集的总损失
    total_test_loss = 0
    # 预测正确次数
    total_accuracy = 0

    # 测试
    # 不需要梯度 不要更新参数
    with torch.no_grad():
        for data in testDataLoader:
            imgs, targets = data
            imgs = imgs.to(device)
            targets = targets.to(device)
            outputs = vgg16(imgs)
            loss = lossFun(outputs, targets)

            # 总损失
            total_test_loss = total_test_loss + loss

            # 计算准确率
            accuracy = (outputs.argmax(1) == targets).sum()
            total_accuracy = total_accuracy + accuracy
            # 总测试次数
            total_test_num = total_test_num + 1
            writer.add_scalar("test_loss", loss, total_test_num)

    print("整体测试集上AvgLoss: {}".format(total_test_loss / len(testDataLoader)))
    print("整体测试集上的Accuracy: {}%".format(100 * total_accuracy / test_len))
    writer.add_scalar("test_accuracy", 100 * total_accuracy / test_len, i+1)
    end_time = time.time()
    print("第{}轮-epoch-用时{:.2f}".format(i+1, end_time-start_time))
    start_time = end_time
    torch.save(vgg16.state_dict(), "vgg16_dict_module_{}.pth".format(i))

writer.close()
测试模型
import torch
import torchvision.models as models
from dataLoader import Mydataset
from torch.utils.data.dataloader import DataLoader
from module import yyq_module


"""
    加载数据
"""

testDataSet = Mydataset(textpath="./res/test.txt")
testDataLoader = DataLoader(dataset=testDataSet, batch_size=16, pin_memory=True)
test_len = len(testDataSet)

"""
    加载网络
"""

yyq = yyq_module()

# path = "yyq_dict_module_ep4_ac93.42.pth"
path = "./模型/yyq_dict_module_ep42_ac99.32.pth"


yyq.load_state_dict(torch.load(path),strict=False)

yyq.cuda()
print(yyq)


"""
    开始测试
"""
sum_acc = 0.0

yyq.eval()
with torch.no_grad():
    for data in testDataLoader:
        imgs, targets = data
        imgs = imgs.cuda()
        targets = targets.cuda()
        outputs = yyq(imgs)
        print(outputs.argmax(1))
        sum=(outputs.argmax(1) == targets).sum()
        sum_acc = sum_acc+sum
print("准确率:{:.4f}%".format(sum_acc/test_len*100))
import torch
import torchvision.models as models
from dataLoader import Mydataset
from torch.utils.data.dataloader import DataLoader


"""
    加载数据
"""

testDataSet = Mydataset(textpath="./res/test.txt")
testDataLoader = DataLoader(dataset=testDataSet, batch_size=16, pin_memory=True)
test_len = len(testDataSet)

"""
    加载网络
"""

vgg16 = models.vgg16(pretrained=False)
vgg16.classifier.add_module("7", torch.nn.Linear(in_features=1000, out_features=26, bias=True))
vgg16.load_state_dict(torch.load("vgg16_dict_module_0.pth"))
vgg16.cuda()
print(vgg16)

"""
    开始测试
"""
sum_acc = 0.0
vgg16.eval()
with torch.no_grad():
    for data in testDataLoader:
        imgs, targets = data
        imgs = imgs.cuda()
        targets = targets.cuda()
        outputs = vgg16(imgs)
        sum=(outputs.argmax(1) == targets).sum()
        sum_acc = sum_acc+sum
print("准确率:{:.2f}".format(sum_acc/test_len))
Bonus-1
bonus-1任务
-
任务1 -测试原先模型在该数据集的准确率
-
任务2 -迁移学习- 把之前训练好的模型 用在bonus数据集上,接着进行训练,查看训练后模型在bonus测试集的准确率
任务一
预处理
这里不用对数据集进行划分,只要输出一个文本文件包含测试所需要的全部信息就行了。
import os
import random

'''
处理文件夹中的图片,并自动分类

'''
# 定义文件路径
root_path = "./data"

# 定义测试列表
testData_list = []

# 为什么flag=-1 因为第一轮for循环获取了root路径下的文件夹,并没有获取文件
flag = -1
for root, dirs, files in os.walk(root_path):
    print(flag)
    # 每轮扫描获得路径和文件列表
    # 获取该轮文件的长度
    # root 也会随之改变
    length = files.__len__()
    for i in range(0, length):
        img_path = os.path.join(root, files[i]) + "\t" + str(flag) + "\n"
        testData_list.append(img_path)
    flag = flag + 1;


# 对列表打乱次序


with open("./res/test.txt", "w", encoding="utf-8") as f:
    for data in testData_list:
        f.write(data)
DataSetAndDataLoader
这里需要对dataSet修改,修改图片size
import torch
from torch.utils.data import Dataset
from torch.utils.data import DataLoader
import torchvision.transforms as transforms
from torch.utils.tensorboard import SummaryWriter
from PIL import Image
import numpy as np


# 数据归一化与标准化
# 图像标准化


class Mydataset(Dataset):

    def getImgInfo(self):
        imginfo = []
        with open(self.textpath, "r", encoding="utf-8") as f:
            img_str = f.readlines()
            # map( func , list[]) 相当于利用function对list中每个元素进行操作 返回值为函数结果
            # 这里返回的是一个列表
            # 参考:https://blog.csdn.net/qq_29666899/article/details/88623026
            # list()
            # lambda
            # list(     map(lambda x: x * x, [y for y in range(3)])    )
            imginfo = list(map(lambda x: x.strip().split("\t"), img_str))
        return imginfo

    # 构造器self相当于java-this
    # 其引用的为全局变量

    def __init__(self, textpath):
        # 文件路径
        self.textpath = textpath
        # 获取图片list(-list[data,label]----)集合
        self.imgInfo = self.getImgInfo()
        # 定义transforms
        # 需要输入 PIL img -> tensor -> ..
        self.tf = transforms.Compose([
            transforms.ToTensor(),
            transforms.Normalize(
                mean=[0.5, 0.5, 0.5],  # 取决于数据集
                std=[0.5, 0.5, 0.5]
            )
        ])

    # 获取第 index 的 数据 标签
    def __getitem__(self, index):
        img_path, label = self.imgInfo[index]
        img = Image.open(img_path)
        img = img.convert('RGB')
        data = self.tf(img)
        lable = int(label)
        return data, lable

    def __len__(self):
        return len(self.imgInfo)


if __name__ == '__main__':
    test_Dataset = Mydataset("./res/test.txt")
    print(len(test_Dataset))
测试模型准确率
找不到代码了
简述:
	1 加载数据集
	2 加载模型
	3 跑模型,并统计正确率
	4 输出正确率
任务二
与上面源数据集c处理方式雷同不在赘述
Bonus-2
目标: 利用半监督学习,联合源数据集和bonus数据集,训练一个新的模型
step 1:利用源数据集训练的模型,得到bonus数据集的标签
step 2: 联合两个数据集,重新训练模型
step-1 数据预处理
预处理,获取所有图片位置信息,但是假设label = -1

import os
import random

'''
处理文件夹中的图片,这里假设标签都是-1 创建未标记数据集

'''

# 定义文件路径
root_path = "../data"

# 定义测试列表
testData_list = []

# 为什么flag=-1 因为目前不知道label值
flag = -1
for root, dirs, files in os.walk(root_path):
    print(flag)
    # 每轮扫描获得路径和文件列表
    # 获取该轮文件的长度
    # root 也会随之改变
    length = files.__len__()
    for i in range(0, length):
        img_path = os.path.join(root, files[i]) + "\t" + str(flag) + "\n"
        testData_list.append(img_path)


# 对列表打乱次序


with open("res/alldata.txt", "w", encoding="utf-8") as f:
    for data in testData_list:
        f.write(data)
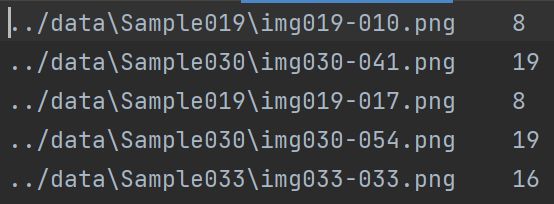
获取数据,利用源数据集训练的模型获取bonus数据集的标签, 并按比例划分为训练集和测试集
import torchvision.models as models
import torch
from torch.utils.data import DataLoader
from dataSet import Mydataset
from module import yyq_module
import random
device = torch.device("cuda" if torch.cuda.is_available() else "cpu")
"""
    通过半监督学习获取未标记的数据
    input : bounsdata
    output : img_path  -  label
"""
train_ratio =0.8
test_ratio = 1 - train_ratio
train_imgInfoList = []
test_imgInfoList = []

dataList = []
"""
step 1 : 读取数据
"""
batch_size = 32
textpath = "./res/alldata.txt"
allDataset = Mydataset(textpath=textpath)
allDataLoader = DataLoader(dataset=allDataset, batch_size=batch_size , pin_memory=True)
dataLength = len(allDataset)
print("数据集长度{}".format(dataLength))


"""
step 2 : 读取模型
"""
module_path = "../yyq_dict_module_ep47_ac99.39.pth"
yyq = yyq_module()
yyq.load_state_dict(torch.load(module_path))
yyq.to(device)
print("模型结构")
print(yyq)

"""
step 3 : 读取数据,并且创建新文件 输出文件的标签值
"""
yyq.eval()
with torch.no_grad():
    for data in allDataLoader:
        imgs , img_paths = data
        imgs = imgs.to(device)
        outputs = yyq(imgs)
        targets = outputs.argmax(1)
        lenth = len(targets)
        for i in range(0,lenth):
            imgInfo = img_paths[i] + "\t" + str(targets[i].item()) + "\n"
            dataList.append(imgInfo)
length = len(dataList)
print("datalist长度:{}".format(length))
random.shuffle(dataList)
for i in range(0, int( length * train_ratio)):
    train_imgInfoList.append(dataList[i])
for i in range(int( length * train_ratio), length):
    test_imgInfoList.append(dataList[i])

print(train_imgInfoList[0])
print(test_imgInfoList[0])
with open("DealRes/train.txt", "w", encoding="utf-8") as f:
    for data in train_imgInfoList:
        f.write(data)
with open("DealRes/test.txt", "w", encoding="utf-8") as f:
    for data in test_imgInfoList:
        f.write(data)
创建dataset,这里的dataset有所不同,他要获取 源数据集的train.txt和bonus数据集的train.txt
对两者进行加和。
import torch
from torch.utils.data import Dataset
from torch.utils.data import DataLoader
import torchvision.transforms as transforms
from torch.utils.tensorboard import SummaryWriter
from PIL import Image
import numpy as np

"""
 这里对数据处理:
 transforms.Resize((128,128)),
 transforms.ToTensor(),
"""


class Mydataset(Dataset):

    def getImgInfo(self):
        imginfo = []
        with open(self.textpath, "r", encoding="utf-8") as f:
            img_str = f.readlines()
            # map( func , list[]) 相当于利用function对list中每个元素进行操作 返回值为函数结果
            # 这里返回的是一个列表
            # 参考:https://blog.csdn.net/qq_29666899/article/details/88623026
            # list()
            # lambda
            # list(     map(lambda x: x * x, [y for y in range(3)])    )
            imginfo = list(map(lambda x: x.strip().split("\t"), img_str))
        return imginfo

    # 构造器self相当于java-this
    # 其引用的为全局变量

    def __init__(self, textpath):
        # 文件路径
        self.textpath = textpath
        # 获取图片list(-list[data,label]----)集合
        self.imgInfo = self.getImgInfo()
        # 定义transforms
        # 需要输入 PIL img -> tensor -> ..
        self.tf = transforms.Compose([
            transforms.Resize((128,128)),
            transforms.ToTensor(),
            transforms.Normalize(
                mean=[0.5, 0.5, 0.5],  # 取决于数据集
                std=[0.5, 0.5, 0.5]
            )
        ])

    # 获取第 index 的 数据 标签
    def __getitem__(self, index):
        img_path, label = self.imgInfo[index]
        img = Image.open(img_path)
        img = img.convert('RGB')
        data = self.tf(img)
        lable = int(label)
        return data, img_path

    def __len__(self):
        return len(self.imgInfo)


if __name__ == '__main__':
    test_Dataset = Mydataset("./res/alldata.txt")
    print(test_Dataset[0])
到这里对数据预处理已经结束。
step -2 训练模型
大同小异不在赘述
import torch
from torch.utils.data import Dataset
from torch.utils.data import DataLoader
import torchvision.transforms as transforms
from torch.utils.tensorboard import SummaryWriter
from PIL import Image
import numpy as np
from torch.utils.data.dataloader import DataLoader
import torchvision.models as models
from torch.utils.tensorboard import SummaryWriter
import torch
import time
import os
from module import yyq_module

"""
 这里对数据处理:
 transforms.Resize((128,128)),
 transforms.ToTensor(),
"""


class Mydataset(Dataset):

    def getImgInfo(self):
        imginfo = []
        with open(self.textpath, "r", encoding="utf-8") as f:
            img_str = f.readlines()
            # map( func , list[]) 相当于利用function对list中每个元素进行操作 返回值为函数结果
            # 这里返回的是一个列表
            # 参考:https://blog.csdn.net/qq_29666899/article/details/88623026
            # list()
            # lambda
            # list(     map(lambda x: x * x, [y for y in range(3)])    )
            imginfo = list(map(lambda x: x.strip().split("\t"), img_str))
        with open(self.dealedTextPath, "r", encoding="utf-8") as f:
            img_str = f.readlines()
            for str in img_str:
                img=str.split("\t")
                imginfo.append(img)
        return imginfo

    # 构造器self相当于java-this
    # 其引用的为全局变量

    def __init__(self, dealedTextPath, textpath):
        # 文件路径
        self.dealedTextPath = dealedTextPath
        self.textpath = textpath
        # 获取图片list(-list[data,label]----)集合
        self.imgInfo = self.getImgInfo()
        # 定义transforms
        # 需要输入 PIL img -> tensor -> ..
        self.tf = transforms.Compose([
            transforms.Resize((128,128)),
            transforms.ToTensor(),
            transforms.Normalize(
                mean=[0.5, 0.5, 0.5],  # 取决于数据集
                std=[0.5, 0.5, 0.5]
            )
        ])

    # 获取第 index 的 数据 标签
    def __getitem__(self, index):
        img_path, label = self.imgInfo[index]
        img = Image.open(img_path)
        img = img.convert('RGB')
        data = self.tf(img)
        lable = int(label)
        return data, lable

    def __len__(self):
        return len(self.imgInfo)


"""
    训练模型
"""


if __name__ == '__main__':

    os.environ["CUDA_VISIBLE_DEVICES"] = "0"
    start_time = time.time()
    # 设备
    device = torch.device("cuda" if torch.cuda.is_available() else "cpu")
    print("device use {}".format(device))

    """
        构建自己的数据集
    """
    batchSize = 32
    # dataset
    trainDataSet = Mydataset("./DealRes/train.txt","./project2/res/train.txt")
    testDataSet =  Mydataset("./DealRes/test.txt","./project2/res/test.txt")
    train_len = len(trainDataSet)
    test_len = len(testDataSet)
    print("训练集大小{}".format(train_len))
    print("测试集大小{}".format(test_len))

    # 导入dataLoader
    trainDataLoader = DataLoader(dataset=trainDataSet, batch_size=batchSize, shuffle=True)
    testDataLoader = DataLoader(dataset=testDataSet, batch_size=batchSize, shuffle=True)

    """
        创建网络-修改yyq网络
    """
    yyq = yyq_module()
    # GPU
    yyq.to(device)
    print("网络结构")
    print(yyq)

    """
        定义损失函数
    """
    lossFun = torch.nn.CrossEntropyLoss()
    lossFun.to(device)

    """
        定义优化器
    """
    learning_rate = 1e-2
    optim = torch.optim.SGD(params=yyq.parameters(), lr=learning_rate)

    """
        训练
    """
    # 训练轮数 每一轮是对整个数据集的一次遍历
    epoch = 50
    # 图像化 指定文件夹 ./logs
    writer = SummaryWriter("./logs")
    # 总的训练次数
    total_train_num = 0
    total_test_num = 0
    for i in range(0, epoch):
        print("开始第{}轮-epoch".format(i + 1))
        # 定义训练次数
        total_train_step = 0
        total_test_step = 0

        # 训练
        yyq.train()
        for data in trainDataLoader:
            imgs, tagerts = data
            imgs = imgs.to(device)
            tagerts = tagerts.to(device)
            outputs = yyq(imgs)
            loss = lossFun(outputs, tagerts)

            # 优化器优化
            optim.zero_grad()
            loss.backward()
            optim.step()

            total_train_step = total_train_step + 1
            total_train_num = total_train_num + 1
            if total_train_step % 100 == 0:
                print("训练次数:{}/{}, Loss:{}".format(total_train_step * batchSize, train_len, loss))
                writer.add_scalar("train_loss", loss, total_train_num)
        # 训练集的总损失
        total_test_loss = 0
        # 预测正确次数
        total_accuracy = 0

        # 测试
        # 不需要梯度 不要更新参数
        yyq.eval()
        with torch.no_grad():
            for data in testDataLoader:
                imgs, targets = data
                imgs = imgs.to(device)
                targets = targets.to(device)
                outputs = yyq(imgs)
                loss = lossFun(outputs, targets)

                # 总损失
                total_test_loss = total_test_loss + loss

                # 计算准确率
                accuracy = (outputs.argmax(1) == targets).sum()
                total_accuracy = total_accuracy + accuracy
                # 总测试次数
                total_test_num = total_test_num + 1
                writer.add_scalar("test_loss", loss, total_test_num)

        print("整体测试集上AvgLoss: {}".format(total_test_loss / len(testDataLoader)))
        print("整体测试集上的Accuracy: {}%".format(100 * total_accuracy / test_len))
        writer.add_scalar("test_accuracy", 100 * total_accuracy / test_len, i + 1)
        end_time = time.time()
        print("第{}轮-epoch-用时{:.2f}".format(i + 1, end_time - start_time))
        start_time = end_time
        # if (100 * total_accuracy / test_len)>99:
        # torch.save(yyq.state_dict(),
        #            "yyq_dict_module_ep{}_ac{:.2f}.pth".format(i, (100 * total_accuracy / test_len)))

    writer.close()
学习资料
最后附上一些可供学习的资料,强烈推荐土堆B站视频!
1.PyTorch 深度学习:60分钟快速入门(官网翻译)
“PyTorch 深度学习:60分钟快速入门”为PyTorch官网教程,网上已经有部分翻译作品,随着PyTorch1.0版本的公布,这个教程有较大的代码改动,本人对教程进行重新翻译,并测试运行了官方代码,制作成Jupyter Notebook文件(中文注释)在github予以公布。
本文内容较多,可以在线学习,如果需要本地调试,请到github下载:
https://github.com/fengdu78/Data-Science-Notes/tree/master/8.deep-learning/PyTorch_beginner
此教程为翻译官方地址:
https://pytorch.org/tutorials/beginner/deep_learning_60min_blitz.html
**作者:**Soumith Chintala
本教程的目标:
2.土堆github
https://github.com/xiaotudui/pytorch-tutorial/tree/master/src
3.PyTorch 中文手册(pytorch handbook)(github标星7900+)
资源地址:
https://github.com/zergtant/pytorch-handbook
这是一本开源的书籍,目标是帮助那些希望和使用PyTorch进行深度学习开发和研究的朋友快速入门。我试了一下里面的ipynb代码,非常全面,值得推荐。
资源目录:
第一章 :PyTorch入门
第一节 PyTorch 简介
第二节 PyTorch 环境搭建
第三节 PyTorch 深度学习:60分钟快速入门(官方)
张量
Autograd:自动求导
神经网络
训练一个分类器
选读:数据并行处理(多GPU)
4.相关资源介绍
第二章 : 基础
第一节 PyTorch 基础
张量自动求导神经网络包nn和优化器optm数据的加载和预处理
第二节 深度学习基础及数学原理
深度学习基础及数学原理
第三节 神经网络简介
神经网络简介
第四节 卷积神经网络
卷积神经网络
第五节 循环神经网络
循环神经网络
第三章 : 实践
第一节 logistic回归
logistic回归二元分类
第二节 CNN:MNIST数据集手写数字识别
CNN:MNIST数据集手写数字识别
第三节 RNN实例:通过Sin预测Cos
RNN实例:通过Sin预测Cos
第四章 : 提高
第一节 Fine-tuning
Fine-tuning
第二节 可视化
visdomtensorboardx可视化理解卷积神经网络
第三节 Fast.ai
Fast.ai
第五节 多GPU并行训练
多GPU并行计算
第五章 : 应用
第一节 Kaggle介绍
Kaggle介绍
第二节 结构化数据
第三节 计算机视觉
第四节 自然语言处理
4.Pytorch教程(github标星13600+)
资源地址:
https://github.com/yunjey/pytorch-tutorial
资源介绍:
这个资源为深度学习研究人员提供了学习PyTorch的教程代码大多数模型都使用少于30行代码实现。在开始本教程之前,建议先看完Pytorch官方教程。(大部分教程是PyTorch0.4实现的,代码与1.0+稍微有点不同,总体影响不大)
配置环境:
python 2.7或者3.5以上,pytorch 0.4
资源目录:
1.基础知识
- PyTorch基础知识
- 线性回归
- Logistic回归
- 前馈神经网络
2.中级
- 卷积神经网络
- 深度残差网络
- 递归神经网络
- 双向递归神经网络
- 语言模型(RNN-LM)
3.高级
- 生成性对抗网络
- 变分自动编码器
- 神经风格转移
- 图像字幕(CNN-RNN)
4.工具
- PyTorch中的TensorBoard

