Nginx学习笔记
文章目录
- Nginx的作用
- 学习Nginx之前需要了解的东西
-
- 正向代理
- 反向代理
- 负载均衡
- 动静分离
- Nginx的安装
- Nginx的常用命令
- Nginx的配置文件
- 反向代理的实现实例一
-
- 要实现的效果是
- 准备工作
- 访问的过程是
- nginx的请求转发配置(反向代理)
- 反向代理的实现实例二
-
- 要实现的效果
- 准备工作
- 负载均衡
-
- 实现效果
- 准备工作
- 在 nginx 的配置文件中进行负载均衡的配置
- nginx分配服务器策略
-
- 第一种 轮询(默认)
- 第二种 weight
- 第三种 ip_hash
- 第四种 fair(第三方)
- 动静分离配置
-
- 什么是动静分离?
- 准备工作
- 配置nginx.cof
- 高可用
-
- 什么是高可用
- 参考指令
- 停掉主服务器
Nginx的作用
Nginx 是高性能的 HTTP 和反向代理的服务器,处理高并发能力是十分强大的,能经受高负载的考验,有报告表明能支持高达 50,000 个并发连接数。
学习Nginx之前需要了解的东西
正向代理
假如说我们访问我们学校的内网 但是我们直接访问不到我们就需要一个代理服务
我们通过
1.配置代理服务器
2.通过访问代理服务器
3.代理服务器再去访问我们学校的内网
这样我们就能访问到我们学校的内网
正向代理的最大特点是
需要在客户端配置代理服务器进行指定网站访问

反向代理
反向代理是我们访问服务器的9001端口
然后服务器再去找tomcat的8001端口
这样对用户来说我们并不知道tomcat的端口
在我们使用的时候反向代理服务器和tomcat是一体的
反向代理的特点是
暴露的是代理服务器地址,隐藏了真实服务器 IP 地址。
负载均衡
增加服务器的数量,然后将请求分发到各个服务器上,将原先请求集中到单个服务器上的情况改为将请求分发到多个服务器上,将负载分发到不同的服务器,也就是我们所说的负载均衡
假如说有九百个请求到了nginx服务器 nginx服务器会给这三个端口每个端口三百个请求让他们一起干活 干的数量也一样

动静分离
我们之前学习的普通方式是这样的 动态资源和静态资源放在一起
为了减少tomcat的负担 nginx把动态资源和静态资源给分开了

Nginx的安装
https://segmentfault.com/a/1190000040125857
Nginx的常用命令
1、查看 nginx 版本号
./nginx -v
2、启动 nginx
./nginx
3、停止 nginx
./nginx -s stop
4、重新加载 nginx
./nginx -s reload
Nginx的配置文件
[root@localhost ~]# vi /usr/local/nginx/conf/nginx.conf
# 第一部分 全局块:配置服务器整体运行的配置指令
# 处理并发数,越大处理越多
worker_processes  1;

# 第二部分 events块:设置nginx服务器和用户的网络连接
events {
    # 支持最大连接数为1024
    worker_connections  1024;
}

# 第三部分 http块:代理、缓存、日志等
# http块中还分为2个块:
    # http全局块
        # http 全局块配置的指令包括文件引入
    # server块
        # 配置一个主机信息
http {
    # 设定mime类型,类型由mime.type文件定义
    include       mime.types;
    default_type  application/octet-stream;


    sendfile        on;

    keepalive_timeout  65;
    server {
        # 端口
        listen       80;
        # 域名
        server_name  localhost;
        # /目录下
        location / {
            # html文件
            root   html;
        }

}
反向代理的实现实例一
要实现的效果是
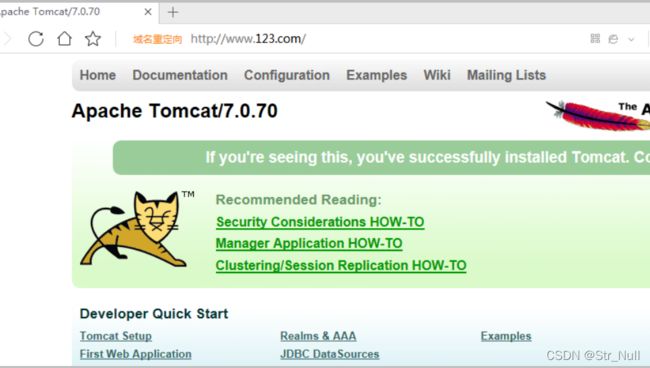
打开浏览器,在浏览器地址栏输入地址 www.123.com(我自己使用的是我购买配置好的域名),跳转到 liunx 系统 tomcat 主页面中
准备工作
在 liunx 系统安装 tomcat,使用默认端口 8080
* tomcat 安装文件放到 liunx 系统中,解压
* 进入 tomcat 的 bin 目录中,./startup.sh 启动 tomcat 服务器
对外开放访问的端口
firewall-cmd --add-port=8080/tcp --permanent
firewall-cmd –reload
查看已经开放的端口号
firewall-cmd --list-all
访问的过程是

浏览器通过域名访问到nginx 然后nginx再转发到tomcat中
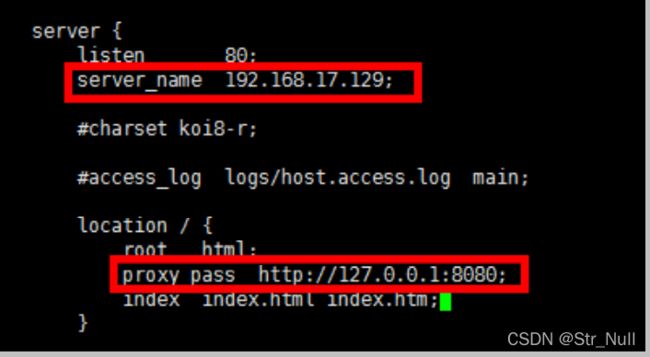
nginx的请求转发配置(反向代理)

监听本机的80端口 如果有访问就转发到107.0.0.1:8080 也就是tomcat的主页
结果
修改之后要重启nginx才能生效

反向代理的实现实例二
要实现的效果
使用 nginx 反向代理,根据访问的路径跳转到不同端口的服务中
nginx 监听端口为 9001
访问 http://192.168.17.129:9001/edu/ 直接跳转到 127.0.0.1:8080
访问 http:// 192.168.17.129:9001/vod/ 直接跳转到 127.0.0.1:8081
准备工作
(1)准备两个 tomcat 服务器,一个 8080 端口,一个 8081 端口
(2)创建文件夹和测试页面


参考指令:
# 创建2个文件
mkdir tomcat8080 tomcat8081
# 复制tomcat到2个文件中
cp apache-tomcat-7.0.70.tar.gz tomcat8080
cp apache-tomcat-7.0.70.tar.gz tomcat8081
# 关闭以前的tomcat
apache-tomcat-7.0.70/bin/shutdown.sh
# 进入第一个tomcat
cd tomcat8080
# 解压tomcat
tar -zxvf apache-tomcat-7.0.70.tar.gz
# 添加网页
mkdir /root/tomcat8080/apache-tomcat-7.0.70/webapps/aaa
vi /root/tomcat8080/apache-tomcat-7.0.70/webapps/aaa/aaa.html
this is 8080!!!
# 启动tomcat
apache-tomcat-7.0.70/bin/startup.sh
# 进入第二个tomcat
cd tomcat8081
# 解压文件
tar -zxvf apache-tomcat-7.0.70.tar.gz
# 修改端口
vi apache-tomcat-7.0.70/conf/server.xml
# 22行改为8015
# 71行改为8081
负载均衡
实现效果
(1)浏览器地址栏输入地址 http://192.168.17.129/edu/a.html,负载均衡效果,平均 8080和 8081 端口中
准备工作
(1)准备两台 tomcat 服务器,一台 8080,一台 8081
(2)在两台 tomcat 里面 webapps 目录中,创建名称是 edu 文件夹,在 edu 文件夹中创建页面 a.html,用于测试
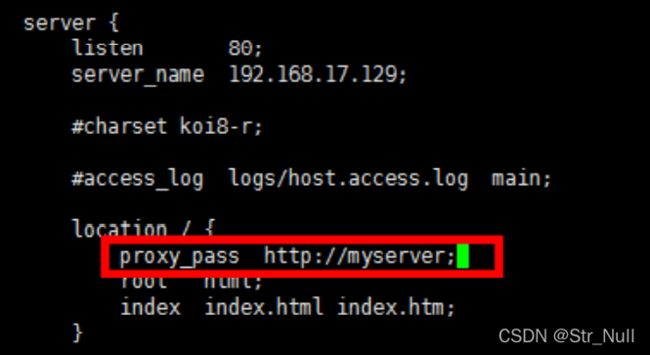
在 nginx 的配置文件中进行负载均衡的配置


这个的意思是如果我访问我的主机地址的话而且是用/开头 那么我就转发到myserver里面配置的那两个地址
参考指令
# 创建2个文件
mkdir tomcat8080 tomcat8081
# 复制tomcat到2个文件中
cp apache-tomcat-7.0.70.tar.gz tomcat8080
cp apache-tomcat-7.0.70.tar.gz tomcat8081
# 关闭以前的tomcat
apache-tomcat-7.0.70/bin/shutdown.sh
# 进入第一个tomcat
cd tomcat8080
# 解压tomcat
tar -zxvf apache-tomcat-7.0.70.tar.gz
# 添加网页
mkdir /root/tomcat8080/apache-tomcat-7.0.70/webapps/aaa
vi /root/tomcat8080/apache-tomcat-7.0.70/webapps/aaa/aaa.html
this is 8080!!!
# 启动tomcat
apache-tomcat-7.0.70/bin/startup.sh
# 进入第二个tomcat
cd tomcat8081
# 解压文件
tar -zxvf apache-tomcat-7.0.70.tar.gz
# 修改端口
vi apache-tomcat-7.0.70/conf/server.xml
# 22行改为8015
# 71行改为8081
nginx分配服务器策略
第一种 轮询(默认)
每个请求按时间顺序逐一分配到不同的后端服务器,如果后端服务器 down 掉,能自动剔除。
第二种 weight
weight 代表权重默认为 1,权重越高被分配的客户端越多
server 192.168.2.177:8080 weight=5
server  192.168.2.177:8081 weight=10
第三种 ip_hash
每个请求按访问 ip 的 hash 结果分配,这样每个访客固定访问一个后端服务器
upstream server_pool{
    ip_hash;
    server 192.168.5.21:8080;
    server 192.168.5.22:8081;
 }
第四种 fair(第三方)
按后端服务器的响应时间来分配请求,响应时间短的优先分配。
upstream server_pool{
    server 192.168.5.21:80;
    server 192.168.5.22:80;
    fair;
 }
动静分离配置
什么是动静分离?

通过 location 指定不同的后缀名实现不同的请求转发。通过 expires 参数设置,可以使浏览器缓存过期时间,减少与服务器之前的请求和流量。具体 Expires 定义:是给一个资源设定一个过期时间,也就是说无需去服务端验证,直接通过浏览器自身确认是否过期即可,所以不会产生额外的流量。此种方法非常适合不经常变动的资源。(如果经常更新的文件,不建议使用 Expires 来缓存),我这里设置 3d,表示在这 3 天之内访问这个 URL,发送一个请求,比对服务器该文件最后更新时间没有变化,则不会从服务器抓取,返回状态码 304,如果有修改,则直接从服务器重新下载,返回状态码 200。
简单来说是 动态的资源放到tomcat里面 静态的资源单独放一起 从而减少tomcat的工作量
准备工作
配置nginx.cof
高可用
什么是高可用
实现就是俩服务器 对外展示同一个虚拟的ip地址 然后用户一般访问主服务器 主服务器寄了就访问备用的 这样的话即使是主服务器寄了用户也不会感受到
参考指令
# 主服务器
vi /etc/keepalived/keepalived.conf
gbal_defs {
   notification_email {
       [email protected]
       [email protected]
       [email protected]
   }
   notification_email_from [email protected]
   smtp_server 192.168.2.177
   smtp_connect_timeout 30
   # 本机主机名,改不改无所谓
   router_id LVS_DEVEL
}
vrrp_script chk_http_port {
   # 检测脚本的位置
   script "/usr/local/src/nginx_check.sh"
   # 检测脚本执行的间隔
   interval 2
   # 执行完本高可用权重怎么的改变
   weight 2
}
vrrp_instance VI_1 {
   # 主服务器 MASTER 备份服务器 BACKUP
   state MASTER
   # 网卡名
   interface ens33
   # 主、备机的virtual_router_id 必须相同
   virtual_router_id 51
   # 主、备机取不同的优先级,主机值较大,备份机值较小
   priority 100
   # 一秒检测一次心跳
   advert_int 1
   # 验证方式为密码  密码1111
   authentication {
       auth_type PASS
       auth_pass 1111
   }
   virtual_ipaddress {
       # 虚拟ip为192.168.2.50
       192.168.2.50
   }
}
:wq
# 备份服务器
vi /etc/keepalived/keepalived.conf
gbal_defs {
   notification_email {
       [email protected]
       [email protected]
       [email protected]
   }
   notification_email_from [email protected]
   smtp_server 192.168.2.177
   smtp_connect_timeout 30
   # 本机主机名,改不改无所谓
   router_id LVS_DEVEL
}
vrrp_script chk_http_port {
   # 检测脚本的位置
   script "/usr/local/src/nginx_check.sh"
   # 检测脚本执行的间隔
   interval 2
   # 执行完本高可用权重怎么的改变
   weight 2
}
vrrp_instance VI_1 {
   # 主服务器 MASTER 备份服务器 BACKUP
   state BACKUP
   # 网卡名
   interface ens33
   # 主、备机的virtual_router_id 必须相同
   virtual_router_id 51
   # 主、备机取不同的优先级,主机值较大,备份机值较小
   priority 90
   # 一秒检测一次心跳
   advert_int 1
   # 验证方式为密码  密码1111
   authentication {
       auth_type PASS
       auth_pass 1111
   }
   virtual_ipaddress {
       # 虚拟ip为192.168.2.50
       192.168.2.50
   }
}
:wq
# 编写脚本文件放入2台服务器的/usr/local/src下
vi /usr/local/src/nginx_check.sh
#!/bin/bash
A=`ps -C nginx –no-header |wc -l`
if [ $A -eq 0 ];then
 /usr/local/nginx/sbin/nginx
 sleep 2
 if [ `ps -C nginx --no-header |wc -l` -eq 0 ];then
 killall keepalived
 fi
fi
:wq
# 2台服务器启动nginx和keepalived
systemctl restart keepalived
/usr/local/nginx/sbin/nginx
停掉主服务器
systemctl stop keepalived
[root@localhost ~]# netstat -nultp
Active Internet connections (only servers)
Proto Recv-Q Send-Q Local Address           Foreign Address         State       PID/Program name
tcp        0      0 0.0.0.0:22              0.0.0.0:*               LISTEN      1003/sshd
tcp        0      0 127.0.0.1:25            0.0.0.0:*               LISTEN      1220/master
tcp6       0      0 :::22                   :::*                    LISTEN      1003/sshd
tcp6       0      0 ::1:25                  :::*                    LISTEN      1220/master
udp        0      0 127.0.0.1:323           0.0.0.0:*                           661/chronyd
udp6       0      0 ::1:323                 :::*                                661/chronyd
然后再次访问


