【AI出牌器】第一次见这么“刺激”的斗地主,胜率高的关键因素竟是......
前言
作者 :“程序员梨子”
**文章简介 **:本篇文章主要制作一款AI斗地主自动出牌器啦。
**文章源码获取 **: 为了感谢每一个关注我的小可爱每篇文章的项目源码都是无偿分
享滴
点这里蓝色这行字体自取,需要什么源码记得说标题名字哈!私信我也可!
欢迎小伙伴们 点赞、收藏⭐、留言

正文
作为一款全民休闲娱乐游戏,斗地主从来不缺少关注。
小编闲暇之余就喜欢斗斗地主,开个小黑,还记得大学的时候一个宿舍可以开两桌子啦~哈哈
哈.jpg 作为小粉丝,小编今天带大家写一款AI出牌器!从此赢取海量“财富”,走上人生巅峰!
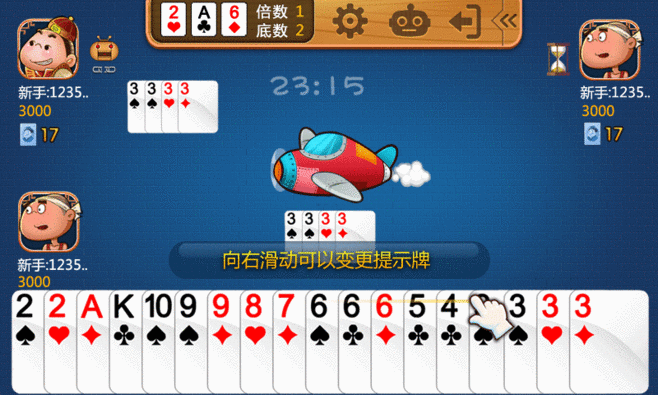
一、效果展示

出牌器效果——
二、代码步骤
第三方库配置
torch==1.9.0
GitPython==3.0.5
gitdb2==2.0.6
PyAutoGUI==0.9.50
PyQt5==5.13.0
PyQt5-sip==12.8.1
Pillow>=5.2.0
opencv-python
rlcard
1)思路解析
UI设计排版布局——
显示三张底牌
显示AI角色出牌数据区域,上家出牌数据区域,下家出牌数据区域,本局胜率区域
AI玩家手牌区域
AI出牌器开始停止
手牌和出牌数据识别——
游戏刚开始根据屏幕位置,截图识别AI玩家手牌及三张底牌
确认三者之间的关系,识别地主和农民角色,确认队友及对手关系
识别每轮三位玩家依次出了什么牌,刷新显示对应区域
AI出牌方案输出——
加载训练好的AI模型,初始化游戏环境
每轮出牌判断,根据上家出牌数据给出最优出牌决策
自动刷新玩家剩余手牌和本局胜率预测
2)代码解析
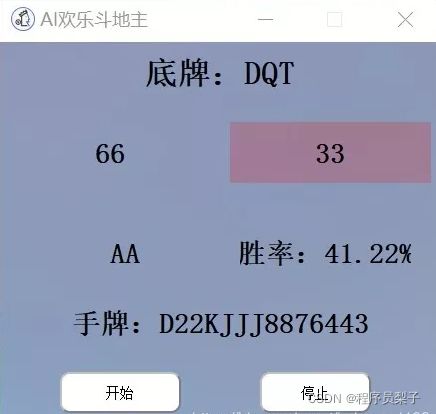
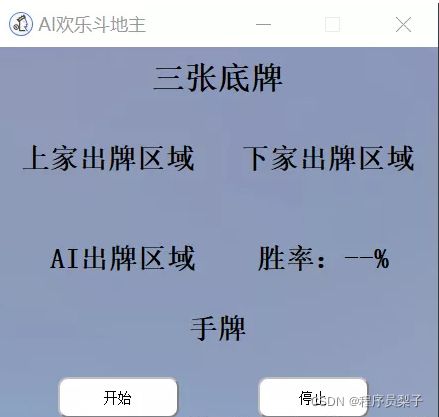
使用的是pyqt5,进行简单的UI布局设计,核心代码如下:
def retranslateUi(self, Form):
    _translate = QtCore.QCoreApplication.translate
    Form.setWindowTitle(_translate("Form", "AI欢乐斗地主"))
    self.WinRate.setText(_translate("Form", "胜率:--%"))
    self.InitCard.setText(_translate("Form", "开始"))
    self.UserHandCards.setText(_translate("Form", "手牌"))
    self.LPlayedCard.setText(_translate("Form", "上家出牌区域"))
    self.RPlayedCard.setText(_translate("Form", "下家出牌区域"))
    self.PredictedCard.setText(_translate("Form", "AI出牌区域"))
    self.ThreeLandlordCards.setText(_translate("Form", "三张底牌"))
    self.Stop.setText(_translate("Form", "停止"))
实现效果如下:
识别AI玩家手牌及三张底牌。
我们可以截取游戏屏幕的固定位置,送入训练好的YOLOv5网络,来识别当前AI玩家的手牌和三张
底牌。核心代码如下:
def find_three_landlord_cards(self, pos):
        three_landlord_cards_real = ""
        img = pyautogui.screenshot(region=pos)
        three_landlord_cards_real=detect_cards(img)
        return three_landlord_cards_real

def find_my_cards(self, pos):
        user_hand_cards_real = ""
        img = pyautogui.screenshot(region=pos)
        # img2 = color.rgb2gray(img)
        user_hand_cards_real=detect_cards(img)
        return user_hand_cards_real
def detect_cards(img):
path="datas\cards.png"
img.save(path)
raw_cards=detect(source=path)
replace_cards=[replace_num[i] if i in replace_num else i for i in raw_cards]
list_cards = sorted(replace_cards, key=lambda x: ranks_value[x])
cards=("".join(list_cards))
return cards
def detect()
# Initialize
set_logging()
# device = select_device(device)
device = torch.device("cuda:0" if torch.cuda.is_available() else "cpu")#若有gpu可用则用gpu
# half &= device.type != 'cpu' # half precision only supported on CUDA
w = weights[0] if isinstance(weights, list) else weights
classify, pt, onnx = False, w.endswith('.pt'), w.endswith('.onnx') # inference type
stride, names = 64, [f'class{i}' for i in range(1000)] # assign defaults
if pt:
model = attempt_load(weights, map_location=device) # load FP32 model
stride = int(model.stride.max()) # model stride
names = model.module.names if hasattr(model, 'module') else model.names # get class names
if half:
model.half() # to FP16
if classify: # second-stage classifier
modelc = load_classifier(name='resnet50', n=2) # initialize
modelc.load_state_dict(torch.load('resnet50.pt', map_location=device)['model']).to(device).eval()
elif onnx:
check_requirements(('onnx', 'onnxruntime'))
import onnxruntime
session = onnxruntime.InferenceSession(w, None)
dataset = LoadImages(source, img_size=imgsz, stride=stride)
bs = 1 # batch_size
vid_path, vid_writer = [None] * bs, [None] * bs
t0 = time.time()
imgsz = check_img_size(imgsz, s=stride) # check image size
for path, img, im0s, vid_cap in dataset:
if pt:
img = torch.from_numpy(img).to(device)
img = img.half() if half else img.float() # uint8 to fp16/32
elif onnx:
img = img.astype('float32')
img /= 255.0 # 0 - 255 to 0.0 - 1.0
if len(img.shape) == 3:
img = img[None] # expand for batch dim
# Inference
t1 = time_sync()
if pt:
pred = model(img, augment=augment, visualize=visualize)[0]
elif onnx:
pred = torch.tensor(session.run([session.get_outputs()[0].name], {session.get_inputs()[0].name: img}))
# NMS
pred = non_max_suppression(pred, conf_thres, iou_thres, classes, agnostic_nms, max_det=max_det)
t2 = time_sync()
# Second-stage classifier (optional)
if classify:
pred = apply_classifier(pred, modelc, img, im0s)
# Process predictions
for i, det in enumerate(pred): # detections per image
p, s, im0, frame = path, '', im0s.copy(), getattr(dataset, 'frame', 0)
p = Path(p) # to Path
gn = torch.tensor(im0.shape)[[1, 0, 1, 0]] # normalization gain whwh
imc = im0.copy() if save_crop else im0 # for save_crop
if len(det):
# Rescale boxes from img_size to im0 size
det[:, :4] = scale_coords(img.shape[2:], det[:, :4], im0.shape).round()
lists=[]
# Print results
for c in det[:, -1].unique():
n = (det[:, -1] == c).sum() # detections per class
for i in range(n):
lists.append(names[int(c)])
return lists效果展示:

地主、地主上家、地主下家:
同理我们可以根据游戏屏幕截图,识别地主的图标,确认地主角色。核心代码如下:
# 查找地主角色
def find_landlord(self, landlord_flag_pos):
    for pos in landlord_flag_pos:
        result = pyautogui.locateOnScreen('pics/landlord_words.png', region=pos, confidence=self.LandlordFlagConfidence)
        if result is not None:
            return landlord_flag_pos.index(pos)
    return None
效果展示:

这样我们就可以得到玩家AI手牌,其他玩家手牌(预测),地主三张底牌,三者角色关系,出牌顺
序。
出牌、不出、等待状态:
同理我们可以根据游戏屏幕截图,识别其他人出牌区域,判断其出牌状态 。核心代码如下:
labels=['等待','出牌','不出']
device = torch.device("cuda:0" if torch.cuda.is_available() else "cpu")#若有gpu可用则用gpu
model = models.resnet50(pretrained=False)
fc_inputs = model.fc.in_features
model.fc = nn.Sequential(
    nn.Linear(fc_inputs, 256),
    nn.ReLU(),
    nn.Dropout(0.4),
    nn.Linear(256, config.NUM_CLASSES),
    nn.LogSoftmax(dim=1)
)
pthfile=config.TRAINED_BEST_MODEL
checkpoint = torch.load(pthfile)
model.load_state_dict(checkpoint['model'])
# optimizer.load_state_dict(checkpoint['optimizer'])
start_epoch = checkpoint['epoch']
# test(model, test_load)
model.to(device).eval()
def detect_pass(pos):

    img = pyautogui.screenshot(region=pos)
    # path="datas\state.png"
    time =datetime.datetime.now().strftime(TIMESTAMP)
    path="datas\states\state"+'_'+time+'.png'
    img.save(path)
    # path="datas/states/state_20210807160852.png"
    src = cv2.imread(path) # aeroplane.jpg
    image = cv2.resize(src, (224, 224))
    image = np.float32(image) / 255.0
    image[:,:,] -= (np.float32(0.485), np.float32(0.456), np.float32(0.406))
    image[:,:,] /= (np.float32(0.229), np.float32(0.224), np.float32(0.225))
    image = image.transpose((2, 0, 1))
    input_x = torch.from_numpy(image).unsqueeze(0).to(device)
    pred = model(input_x)
    pred_index = torch.argmax(pred, 1).cpu().detach().numpy()
    pred_index=int(pred_index)
    print(pred_index)
    return pred_index
效果展示:
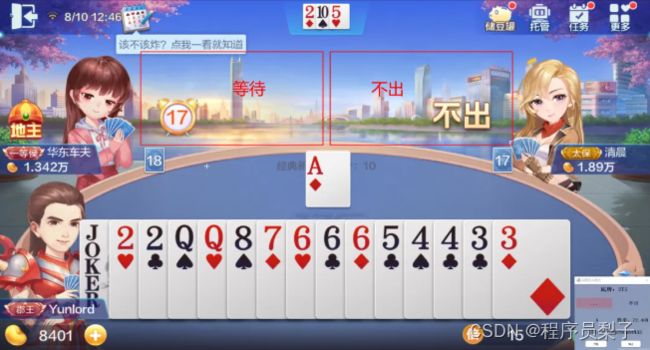
到这里,整个AI斗地主出牌流程基本已经完成了。
总结
当所有环境配置完成,各区域坐标位置确认无误之后,下面我们就可以直接运行程序,测试效果啦
~首先我们运行AI出牌器程序,打开欢乐斗地主游戏界面,进入游戏。当玩家就位,手牌分发完
、毕,地主身份确认之后,我们就可以点击画面中开始按钮,让AI来帮助我们斗地主了。
喜欢的记得找我拿源码拉!
关注小编获取更多精彩内容!记得点击传送门哈
记得三连哦! 如需打包好的源码+素材免费分享滴!!传送门
