Android 设置按钮透明和任意透明度 及 自定义按钮背景
一、Android 按钮设置为透明,及任意透明度
方式一:
在 .xml 布局文件中 设置背景
android:background="#00000000"  //设置成全透明
android:background="#e0000000"  //设置成半透明
用实际代码给大家演示一下
	<Button
	     android:id="@+id/btn_cancel"
	     android:layout_width="150dp"
	     android:layout_height="40dp"
	     android:layout_marginTop="2dp"
	     android:layout_marginLeft="5dp"
	     android:textSize="12sp"
	     android:textColor="#888888"
	     android:background="#00000000"
	     android:visibility="visible"
	     android:text="透明按钮"/>
看一下效果:

方式二:
方式一只能在xml布局文件中修改,比较固定,方式二我们可以修改任意透明度,而且可以随意调整
在0~255之间任意调整
	button1= (Button) findViewById(R.id.btn_cancel);
	button1.getBackground().setAlpha(100); //0~255 之间任意调整
二、Android 按钮自定义背景
1、设置圆弧形状的按钮
第一步:
在 res/drawable/ 目录下添加一个布局文件
第二步:
修改布局文件
<shape xmlns:android="http://schemas.android.com/apk/res/android" >
    <size android:width="60dp" android:height="30dp"/> //设置长和宽
    <!-- 设置描边 -->
    <stroke android:width="1dp" android:color="#55dd7b" ></stroke>  //设置外边框厚度和颜色
    <solid android:color="#000000" />  //设置内色
    <corners android:radius="100dp"/>  //设置圆弧形状的弧度
</shape>
看一下效果:

第三步:
	<Button
		android:id="@+id/btn_spaceclean"
		android:layout_width="150dp"
		android:layout_height="40dp"
		android:layout_marginTop="5dp"
		android:layout_marginLeft="5dp"
		android:textSize="15sp"
		android:textColor="#ffffff"
		android:background="@drawable/bt_shape_press_cancel"  //使用刚才定义过的背景
		android:text="自定义按钮"/>
看一下最终效果:
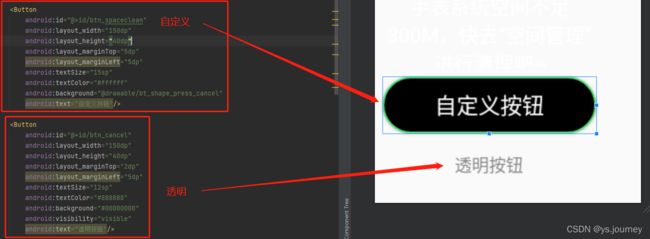
这样我们透明背景和自定义按钮背景就实现了。
2、设置直角形状渐变色的按钮
第一步:
和上面的一样
第二步:
<?xml version="1.0" encoding="utf-8"?>
<shape xmlns:android="http://schemas.android.com/apk/res/android">
    <corners android:radius="0dp"/>
    <stroke android:width="3dp"
        android:color="#FF00FF"
        android:dashGap="10dp"/>
    <gradient android:startColor="#F08080" //左边颜色
        android:centerColor="#F0E68C"      //中间颜色
        android:endColor="#F08080"/>       //右边颜色
</shape>
看一下效果:

这样就实现了 透明背景和自定义布局文件,下一篇文章 实现各种形状和颜色的按钮 我们讲解 如何设计各种形状的按钮。