手写demo了解vue响应式原理,订阅模式,观察者模式
Vue2.X响应式原理
一.defineProperty 的应用
在Vue2.X响应式中使用到了 defineProperty 进行数据劫持,所以我们对它必须有一定的了解,那么我们先来了解它的使用方法把, 这里我们来使用 defineProperty来模拟Vue 中的data
<body>
    <div id="app">div>
    <script>
        // 模拟 Vue的data
        let data = {
            msg: '',
        }
        // 模拟 Vue 实例
        let vm = {}
        // 对 vm 的 msg 进行数据劫持
        Object.defineProperty(vm, 'msg', {
            // 获取数据
            get() {
                return data.msg
            },
            // 设置 msg
            set(newValue) {
                // 如果传入的值相等就不用修改
                if (newValue === data.msg) return
                // 修改数据
                data.msg = newValue
                document.querySelector('#app').textContent = data.msg
            },
        })
        // 这样子就调用了 defineProperty vm.msg 的 set
        vm.msg = '1234'
    script>
body>
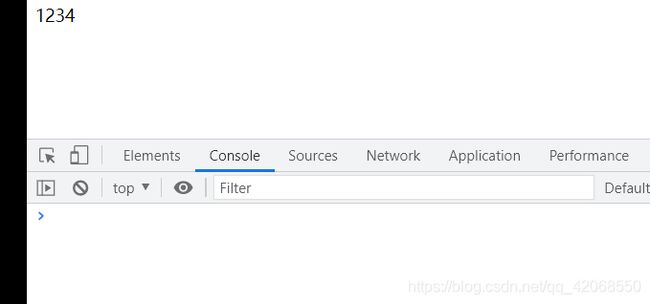
可以看见 上面 vm.msg 数据是响应式的
二.defineProperty修改多个参数为响应式
看了上面的方法只能修改一个属性,实际上我们 data 中数据不可能只有一个,我们何不定义一个方法把data中的数据进行遍历都修改成响应式呢
<body>
    <div id="app">div>
	<script>
        // 模拟 Vue的data
        let data = {
            msg: '哈哈',
            age: '18',
        }
        // 模拟 Vue 实例
        let vm = {}
        // 把多个属性转化 响应式
        function proxyData() {
            // 把data 中每一项都[msg,age] 拿出来操作
            Object.keys(data).forEach((key) => {
                // 对 vm 的 属性 进行数据劫持
                Object.defineProperty(vm, key, {
                    // 可枚举
                    enumerable: true,
                    // 可配置
                    configurable: true,
                    // 获取数据
                    get() {
                        return data[key]
                    },
                    // 设置 属性值
                    set(newValue) {
                        // 如果传入的值相等就不用修改
                        if (newValue === data[key]) return
                        // 修改数据
                        data[key] = newValue
                        document.querySelector('#app').textContent = data[key]
                    },
                })
            })
        }
        // 调用方法
        proxyData(data)
	script>
body>
三.Proxy
在Vue3 中使用 Proxy 来设置响应式的属性
先来了解下Proxy的两个参数
new Proxy(target,handler)
target:要使用Proxy包装的目标对象(可以是任何类型的对象,包括原生数组,函数,甚至另一个代理)handler:一个通常以函数作为属性的对象,各属性中的函数分别定义了在执行各种操作时代理 p 的行为
其实 和 Vue2.X实现的逻辑差不多,不过实现的方法不一样
<body>
    <div id="app">div>
    <script>
            // 模拟 Vue data
            let data = {
                msg: '',
                age: '',
            }
            // 模拟 Vue 的一个实例
            // Proxy 第一个
            let vm = new Proxy(data, {
                // get() 获取值
                // target 表示需要代理的对象这里指的就是 data
                // key 就是对象的 键
                get(target, key) {
                    return target[key]
                },
                // 设置值
                // newValue 是设置的值
                set(target, key, newValue) {
                    // 也先判断下是否和之前的值一样 节省性能
                    if (target[key] === newValue) return
                    // 进行设置值
                    target[key] = newValue
                    document.querySelector('#app').textContent = target[key]
                },
            })
    script>
body>
触发set 和get的方法
// 触发了set方法
vm.msg = 'haha'
// 触发了get方法
console.log(vm.msg)
四.发布订阅模式
在Vue 响应式中应用到了 发布订阅模式 我们先来了解下
首先来说简单介绍下 一共有三个角色
发布者、 订阅者、 信号中心 举个现实中例子 作者(发布者)写一篇文章 发到了掘金(信号中心) ,掘金可以处理文章然后推送到了首页,然后各自大佬(订阅者)就可以订阅文章
在Vue中的例子 就是EventBus $on $emit
那么我们就简单模仿一下 Vue 的事件总线吧
<body>
  <div id="app">div>
  <script>
    class Vue {
      constructor() {
        // 用来存储事件
        // 存储的 例子 this.subs = { 'myclick': [fn1, fn2, fn3] ,'inputchange': [fn1, fn2] }
        this.subs = {}
      }
      // 实现 $on 方法 type是任务队列的类型 ,fn是方法
      $on(type, fn) {
        // 判断在 subs是否有当前类型的 方法队列存在
        if (!this.subs[type]) {
          // 没有就新增一个 默认为空数组
          this.subs[type] = []
        }
        // 把方法加到该类型中
        this.subs[type].push(fn)
      }
      // 实现 $emit 方法
      $emit(type) {
        // 首先得判断该方法是否存在
        if (this.subs[type]) {
          // 获取到参数
          const args = Array.prototype.slice.call(arguments, 1)
          // 循环队列调用 fn
          this.subs[type].forEach((fn) => fn(...args))
        }
      }
    }

    // 使用
    const eventHub = new Vue()
    // 使用 $on 添加一个 sum 类型的 方法到 subs['sum']中
    eventHub.$on('sum', function () {
      let count = [...arguments].reduce((x, y) => x + y)
      console.log(count)
    })
    // 触发 sum 方法
    eventHub.$emit('sum', 1, 2, 4, 5, 6, 7, 8, 9, 10)
  script>
body>
五.观察者模式
与发布订阅 的差异
与发布订阅者不同 观察者中 发布者和订阅者(观察者)是相互依赖的 必须要求观察者订阅内容改变事件 ,而发布订阅者是由调度中心进行调度,那么看看观察者模式 是如何相互依赖,下面就举个简单例子
<body>
  <div id="app">div>
  <script>
    // 目标
    class Subject {
      constructor() {
        this.observerLists = []
      }
      // 添加观察者
      addObs(obs) {
        // 判断观察者是否有 和 存在更新订阅的方法
        if (obs && obs.update) {
          // 添加到观察者列表中
          this.observerLists.push(obs)
        }
      }
      // 通知观察者
      notify() {
        this.observerLists.forEach((obs) => {
          // 每个观察者收到通知后 会更新事件
          obs.update()
        })
      }
      // 清空观察者
      empty() {
        this.subs = []
      }
    }

    class Observer {
      // 定义观察者内容更新事件
      update() {
        // 在更新事件要处理的逻辑
        console.log('目标更新了')
      }
    }

    // 使用
    // 创建目标
    let sub = new Subject()
    // 创建观察者
    let obs1 = new Observer()
    let obs2 = new Observer()
    // 把观察者添加到列表中
    sub.addObs(obs1)
    sub.addObs(obs2)
    // 目标开启了通知 每个观察者者都会自己触发 update 更新事件
    sub.notify()
  script>
body>
六.模拟Vue的响应式原理
这里来实现一个小型简单的 Vue 主要实现以下的功能
- 接收初始化的参数,这里只举几个简单的例子 el data options
- 通过私有方法 _proxyData 把data 注册到 Vue 中 转成getter setter
- 使用 observer 把 data 中的属性转为 响应式 添加到 自身身上
- 使用 observer 方法监听 data 的所有属性变化来 通过观察者模式 更新视图
- 使用 compiler 编译元素节点上面指令 和 文本节点差值表达式
1.vue.js
在这里获取到 el data
通过_proxyData 把 data的属性 注册到Vue 并转成 getter setter
/* vue.js */
class Vue {
  constructor(options) {
    // 获取到传入的对象 没有默认为空对象
    this.$options = options || {}
    // 获取 el
    this.$el =
      typeof options.el === 'string'
        ? document.querySelector(options.el)
        : options.el
    // 获取 data
    this.$data = options.data || {}
    // 调用 _proxyData 处理 data中的属性
    this._proxyData(this.$data)
  }
  // 把data 中的属性注册到 Vue
  _proxyData(data) {
    Object.keys(data).forEach((key) => {
      // 进行数据劫持
      // 把每个data的属性 到添加到 Vue 转化为 getter setter方法
      Object.defineProperty(this, key, {
        // 设置可以枚举
        enumerable: true,
        // 设置可以配置
        configurable: true,
        // 获取数据
        get() {
          return data[key]
        },
        // 设置数据
        set(newValue) {
          // 判断新值和旧值是否相等
          if (newValue === data[key]) return
          // 设置新值
          data[key] = newValue
        },
      })
    })
  }
}
2.observer.js
在这里把 data 中的 属性变为响应式加在自身的身上,还有一个主要功能就是 观察者模式在 第 4.dep.js 会有详细的使用
/* observer.js */

class Observer {
  constructor(data) {
    // 用来遍历 data
    this.walk(data)
  }
  // 遍历 data 转为响应式
  walk(data) {
    // 判断 data是否为空 和 对象
    if (!data || typeof data !== 'object') return
    // 遍历 data
    Object.keys(data).forEach((key) => {
      // 转为响应式
      this.defineReactive(data, key, data[key])
    })
  }
  // 转为响应式
  // 要注意的 和vue.js 写的不同的是
  // vue.js中是将 属性给了 Vue 转为 getter setter
  // 这里是 将data中的属性转为getter setter
  defineReactive(obj, key, value) {
    // 如果是对象类型的 也调用walk 变成响应式,不是对象类型的直接在walk会被return
    this.walk(value)
    // 保存一下 this
    const self = this
    Object.defineProperty(obj, key, {
      // 设置可枚举
      enumerable: true,
      // 设置可配置
      configurable: true,
      // 获取值
      get() {
        return value
      },
      // 设置值
      set(newValue) {
        // 判断旧值和新值是否相等
        if (newValue === value) return
        // 设置新值
        value = newValue
        // 赋值的话如果是newValue是对象,对象里面的属性也应该设置为响应式的
        self.walk(newValue)
      },
    })
  }
}
在html中引入的话注意顺序
<script src="./js/observer.js">script>
<script src="./js/vue.js">script>
然后在vue.js 中使用Observer
/* vue.js */

class Vue {
  constructor(options) {
    ...
    // 使用 Obsever 把data中的数据转为响应式
    new Observer(this.$data)
  }
  // 把data 中的属性注册到 Vue
  _proxyData(data) {
   ...
  }
}
看到这里为什么做了两个重复性的操作呢?重复性两次把
data的属性转为响应式
在obsever.js中是把data的所有属性 加到 data 自身 变为响应式 转成getter setter方式
在vue.js中 也把data的 的所有属性 加到Vue上,是为了以后方面操作可以用Vue的实例直接访问到 或者在Vue中使用this访问
使用例子
<body>
    <div id="app">div>
    <script src="./js/observer.js">script>
    <script src="./js/vue.js">script>
    <script>
      let vm = new Vue({
        el: '#app',
        data: {
          msg: '123',
          age: 21,
        },
      })
    script>
  body>

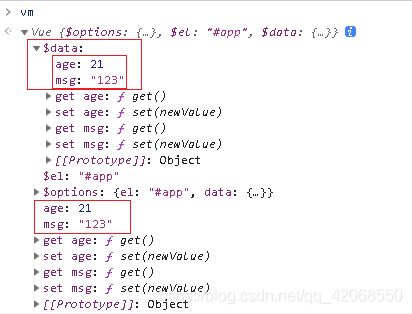
这样在Vue 和$data 中都存在了 所有的data属性了 并且是响应式的
3.compiler.js
comilper.js在这个文件里实现对文本节点 和 元素节点指令编译 主要是为了举例子 当然这个写的很简单 指令主要实现v-text v-model
/* compiler.js */

class Compiler {
  // vm 指 Vue 实例
  constructor(vm) {
    // 拿到 vm
    this.vm = vm
    // 拿到 el
    this.el = vm.$el
    // 编译模板
    this.compile(this.el)
  }
  // 编译模板
  compile(el) {
    // 获取子节点 如果使用 forEach遍历就把伪数组转为真的数组
    let childNodes = [...el.childNodes]
    childNodes.forEach((node) => {
      // 根据不同的节点类型进行编译
      // 文本类型的节点
      if (this.isTextNode(node)) {
        // 编译文本节点
        this.compileText(node)
      } else if (this.isElementNode(node)) {
        //元素节点
        this.compileElement(node)
      }
      // 判断是否还存在子节点考虑递归
      if (node.childNodes && node.childNodes.length) {
        // 继续递归编译模板
        this.compile(node)
      }
    })
  }
  // 编译文本节点(简单的实现)
  compileText(node) {
    // 核心思想利用把正则表达式把{{}}去掉找到里面的变量
    // 再去Vue找这个变量赋值给node.textContent
    let reg = /\{\{(.+?)\}\}/
    // 获取节点的文本内容
    let val = node.textContent
    // 判断是否有 {{}}
    if (reg.test(val)) {
      // 获取分组一  也就是 {{}} 里面的内容 去除前后空格
      let key = RegExp.$1.trim()
      // 进行替换再赋值给node
      node.textContent = val.replace(reg, this.vm[key])
    }
  }
  // 编译元素节点这里只处理指令
  compileElement(node) {
    // 获取到元素节点上面的所有属性进行遍历
    ![...node.attributes].forEach((attr) => {
      // 获取属性名
      let attrName = attr.name
      // 判断是否是 v- 开头的指令
      if (this.isDirective(attrName)) {
        // 除去 v- 方便操作
        attrName = attrName.substr(2)
        // 获取 指令的值就是  v-text = "msg"  中msg
        // msg 作为 key 去Vue 找这个变量
        let key = attr.value
        // 指令操作 执行指令方法
        // vue指令很多为了避免大量个 if判断这里就写个 uapdate 方法
        this.update(node, key, attrName)
      }
    })
  }
  // 添加指令方法 并且执行
  update(node, key, attrName) {
    // 比如添加 textUpdater 就是用来处理 v-text 方法
    // 我们应该就内置一个 textUpdater 方法进行调用
    // 加个后缀加什么无所谓但是要定义相应的方法
    let updateFn = this[attrName + 'Updater']
    // 如果存在这个内置方法 就可以调用了
    updateFn && updateFn(node, key, this.vm[key])
  }
  // 提前写好 相应的指定方法比如这个 v-text
  // 使用的时候 和 Vue 的一样
  textUpdater(node, key, value) {
    node.textContent = value
  }

  // v-model
  modelUpdater(node, key, value) {
    node.value = value
  }

  // 判断元素的属性是否是 vue 指令
  isDirective(attr) {
    return attr.startsWith('v-')
  }
  // 判断是否是元素节点
  isElementNode(node) {
    return node.nodeType === 1
  }
  // 判断是否是 文本 节点
  isTextNode(node) {
    return node.nodeType === 3
  }
}
4.dep.js
写一个
Dep类 它相当于 观察者中的发布者 每个响应式属性都会创建这么一个Dep对象 ,负责收集该依赖属性的Watcher对象 (是在使用响应式数据的时候做的操作)
当我们对响应式属性在setter中进行更新的时候,会调用Dep中notify方法发送更新通知
然后去调用Watcher中的update实现视图的更新操作(是当数据发生变化的时候去通知观察者调用观察者的update更新视图)
总的来说 在Dep(这里指发布者) 中负责收集依赖 添加观察者(这里指Wathcer),然后在setter数据更新的时候通知观察者
说的这么多重复的话,大家应该知道是在哪个阶段 收集依赖 哪个阶段 通知观察者了吧,下面就来实现一下吧
先写Dep类
/* dep.js */

class Dep {
  constructor() {
    // 存储观察者
    this.subs = []
  }
  // 添加观察者
  addSub(sub) {
    // 判断观察者是否存在 和 是否拥有update方法
    if (sub && sub.update) {
      this.subs.push(sub)
    }
  }
  // 通知方法
  notify() {
    // 触发每个观察者的更新方法
    this.subs.forEach((sub) => {
      sub.update()
    })
  }
}
在
obsever.js中使用Dep
在get中添加Dep.target(观察者)
在set中 触发notify(通知)
/* observer.js */

class Observer {
  ...
  }
  // 遍历 data 转为响应式
  walk(data) {
   ...
  }
  // 这里是 将data中的属性转为getter setter
  defineReactive(obj, key, value) {
	...
    // 创建 Dep 对象
    let dep = new Dep()
    Object.defineProperty(obj, key, {
	  ...
      // 获取值
      get() {
        // 在这里添加观察者对象 Dep.target 表示观察者
        Dep.target && dep.addSub(Dep.target)
        return value
      },
      // 设置值
      set(newValue) {
        if (newValue === value) return
        value = newValue
        self.walk(newValue)
        // 触发通知 更新视图
        dep.notify()
      },
    })
  }
}
5.watcher.js
watcher的作用 数据更新后 收到通知之后 调用 update进行更新
/* watcher.js */

class Watcher {
  constructor(vm, key, cb) {
    // vm 是 Vue 实例
    this.vm = vm
    // key 是 data 中的属性
    this.key = key
    // cb 回调函数 更新视图的具体方法
    this.cb = cb
    // 把观察者的存放在 Dep.target
    Dep.target = this
    // 旧数据 更新视图的时候要进行比较
    // 还有一点就是 vm[key] 这个时候就触发了 get 方法
    // 之前在 get 把 观察者 通过dep.addSub(Dep.target) 添加到了 dep.subs中
    this.oldValue = vm[key]
    // Dep.target 就不用存在了 因为上面的操作已经存好了
    Dep.target = null
  }
  // 观察者中的必备方法 用来更新视图
  update() {
    // 获取新值
    let newValue = this.vm[this.key]
    // 比较旧值和新值
    if (newValue === this.oldValue) return
    // 调用具体的更新方法
    this.cb(newValue)
  }
}
那么去哪里创建
Watcher呢?还记得在compiler.js中 对文本节点的编译操作吗
在编译完文本节点后 在这里添加一个Watcher
还有v-text v-model指令 当编译的是元素节点 就添加一个Watcher
/* compiler.js */

class Compiler {
  // vm 指 Vue 实例
  constructor(vm) {
    // 拿到 vm
    this.vm = vm
    // 拿到 el
    this.el = vm.$el
    // 编译模板
    this.compile(this.el)
  }
  // 编译模板
  compile(el) {
    let childNodes = [...el.childNodes]
    childNodes.forEach((node) => {
      if (this.isTextNode(node)) {
        // 编译文本节点
        this.compileText(node)
      }
       ...
  }
  // 编译文本节点(简单的实现)
  compileText(node) {
    let reg = /\{\{(.+)\}\}/
    let val = node.textContent
    if (reg.test(val)) {
      let key = RegExp.$1.trim()
      node.textContent = val.replace(reg, this.vm[key])
      // 创建观察者
      new Watcher(this.vm, key, newValue => {
        node.textContent = newValue
      })
    }
  }
  ...
  // v-text
  textUpdater(node, key, value) {
    node.textContent = value
     // 创建观察者2
    new Watcher(this.vm, key, (newValue) => {
      node.textContent = newValue
    })
  }
  // v-model
  modelUpdater(node, key, value) {
    node.value = value
    // 创建观察者
    new Watcher(this.vm, key, (newValue) => {
      node.value = newValue
    })
    // 这里实现双向绑定 监听input 事件修改 data中的属性
    node.addEventListener('input', () => {
      this.vm[key] = node.value
    })
  }
}
当 我们改变 响应式属性的时候 触发了
set()方法 ,然后里面 发布者dep.notify方法启动了,拿到了 所有的 观察者watcher实例去执行update方法调用了回调函数cb(newValue)方法并把 新值传递到了cb()当中cb方法是的具体更新视图的方法 去更新视图
比如上面的例子里的第三个参数cb方法
new Watcher(this.vm, key, newValue => {
    node.textContent = newValue
})
7.测试
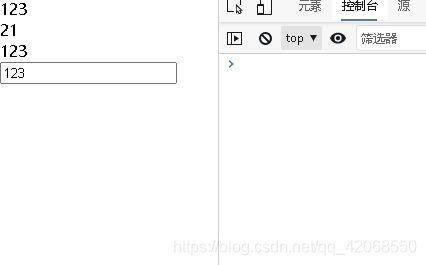
到了目前为止 响应式 和 双向绑定 都基本实现了 那么来写个例子测试下
<body>
  <div id="app">
    {{msg}} <br />
    {{age}} <br />
    <div v-text="msg">div>
    <input v-model="msg" type="text" />
  div>
  <script src="./js/dep.js">script>
  <script src="./js/watcher.js">script>
  <script src="./js/compiler.js">script>
  <script src="./js/observer.js">script>
  <script src="./js/vue.js">script>
  <script>
    let vm = new Vue({
      el: '#app',
      data: {
        msg: '123',
        age: 21,
      },
    })
  script>
body>
8.五个文件代码
vue.js
/* vue.js */

class Vue {
  constructor(options) {
    // 获取到传入的对象 没有默认为空对象
    this.$options = options || {}
    // 获取 el
    this.$el =
      typeof options.el === 'string'
        ? document.querySelector(options.el)
        : options.el
    // 获取 data
    this.$data = options.data || {}
    // 调用 _proxyData 处理 data中的属性
    this._proxyData(this.$data)
    // 使用 Obsever 把data中的数据转为响应式
    new Observer(this.$data)
    // 编译模板
    new Compiler(this)
  }
  // 把data 中的属性注册到 Vue
  _proxyData(data) {
    Object.keys(data).forEach((key) => {
      // 进行数据劫持
      // 把每个data的属性 到添加到 Vue 转化为 getter setter方法
      Object.defineProperty(this, key, {
        // 设置可以枚举
        enumerable: true,
        // 设置可以配置
        configurable: true,
        // 获取数据
        get() {
          return data[key]
        },
        // 设置数据
        set(newValue) {
          // 判断新值和旧值是否相等
          if (newValue === data[key]) return
          // 设置新值
          data[key] = newValue
        },
      })
    })
  }
}
obsever.js
/* observer.js */

class Observer {
  constructor(data) {
    // 用来遍历 data
    this.walk(data)
  }
  // 遍历 data 转为响应式
  walk(data) {
    // 判断 data是否为空 和 对象
    if (!data || typeof data !== 'object') return
    // 遍历 data
    Object.keys(data).forEach((key) => {
      // 转为响应式
      this.defineReactive(data, key, data[key])
    })
  }
  // 转为响应式
  // 要注意的 和vue.js 写的不同的是
  // vue.js中是将 属性给了 Vue 转为 getter setter
  // 这里是 将data中的属性转为getter setter
  defineReactive(obj, key, value) {
    // 如果是对象类型的 也调用walk 变成响应式,不是对象类型的直接在walk会被return
    this.walk(value)
    // 保存一下 this
    const self = this
    // 创建 Dep 对象
    let dep = new Dep()
    Object.defineProperty(obj, key, {
      // 设置可枚举
      enumerable: true,
      // 设置可配置
      configurable: true,

      // 获取值
      get() {
        // 在这里添加观察者对象 Dep.target 表示观察者
        Dep.target && dep.addSub(Dep.target)
        return value
      },
      // 设置值
      set(newValue) {
        // 判断旧值和新值是否相等
        if (newValue === value) return
        // 设置新值
        value = newValue
        // 赋值的话如果是newValue是对象,对象里面的属性也应该设置为响应式的
        self.walk(newValue)
        // 触发通知 更新视图
        dep.notify()
      },
    })
  }
}
compiler.js
/* compiler.js */

class Compiler {
  // vm 指 Vue 实例
  constructor(vm) {
    // 拿到 vm
    this.vm = vm
    // 拿到 el
    this.el = vm.$el
    // 编译模板
    this.compile(this.el)
  }
  // 编译模板
  compile(el) {
    // 获取子节点 如果使用 forEach遍历就把伪数组转为真的数组
    let childNodes = [...el.childNodes]
    childNodes.forEach((node) => {
      // 根据不同的节点类型进行编译
      // 文本类型的节点
      if (this.isTextNode(node)) {
        // 编译文本节点
        this.compileText(node)
      } else if (this.isElementNode(node)) {
        //元素节点
        this.compileElement(node)
      }
      // 判断是否还存在子节点考虑递归
      if (node.childNodes && node.childNodes.length) {
        // 继续递归编译模板
        this.compile(node)
      }
    })
  }
  // 编译文本节点(简单的实现)
  compileText(node) {
    // 核心思想利用把正则表达式把{{}}去掉找到里面的变量
    // 再去Vue找这个变量赋值给node.textContent
    let reg = /\{\{(.+?)\}\}/
    // 获取节点的文本内容
    let val = node.textContent
    // 判断是否有 {{}}
    if (reg.test(val)) {
      // 获取分组一  也就是 {{}} 里面的内容 去除前后空格
      let key = RegExp.$1.trim()
      // 进行替换再赋值给node
      node.textContent = val.replace(reg, this.vm[key])
      // 创建观察者
      new Watcher(this.vm, key, (newValue) => {
        node.textContent = newValue
      })
    }
  }
  // 编译元素节点这里只处理指令
  compileElement(node) {
    // 获取到元素节点上面的所有属性进行遍历
    ![...node.attributes].forEach((attr) => {
      // 获取属性名
      let attrName = attr.name
      // 判断是否是 v- 开头的指令
      if (this.isDirective(attrName)) {
        // 除去 v- 方便操作
        attrName = attrName.substr(2)
        // 获取 指令的值就是  v-text = "msg"  中msg
        // msg 作为 key 去Vue 找这个变量
        let key = attr.value
        // 指令操作 执行指令方法
        // vue指令很多为了避免大量个 if判断这里就写个 uapdate 方法
        this.update(node, key, attrName)
      }
    })
  }
  // 添加指令方法 并且执行
  update(node, key, attrName) {
    // 比如添加 textUpdater 就是用来处理 v-text 方法
    // 我们应该就内置一个 textUpdater 方法进行调用
    // 加个后缀加什么无所谓但是要定义相应的方法
    let updateFn = this[attrName + 'Updater']
    // 如果存在这个内置方法 就可以调用了
    updateFn && updateFn.call(this, node, key, this.vm[key])
  }
  // 提前写好 相应的指定方法比如这个 v-text
  // 使用的时候 和 Vue 的一样
  textUpdater(node, key, value) {
    node.textContent = value
    // 创建观察者
    new Watcher(this.vm, key, (newValue) => {
      node.textContent = newValue
    })
  }
  // v-model
  modelUpdater(node, key, value) {
    node.value = value
    // 创建观察者
    new Watcher(this.vm, key, (newValue) => {
      node.value = newValue
    })
    // 这里实现双向绑定
    node.addEventListener('input', () => {
      this.vm[key] = node.value
    })
  }

  // 判断元素的属性是否是 vue 指令
  isDirective(attr) {
    return attr.startsWith('v-')
  }
  // 判断是否是元素节点
  isElementNode(node) {
    return node.nodeType === 1
  }
  // 判断是否是 文本 节点
  isTextNode(node) {
    return node.nodeType === 3
  }
}
dep.js
/* dep.js */

class Dep {
  constructor() {
    // 存储观察者
    this.subs = []
  }
  // 添加观察者
  addSub(sub) {
    // 判断观察者是否存在 和 是否拥有update方法
    if (sub && sub.update) {
      this.subs.push(sub)
    }
  }
  // 通知方法
  notify() {
    // 触发每个观察者的更新方法
    this.subs.forEach((sub) => {
      sub.update()
    })
  }
}
watcher.js
/* watcher.js */

class Watcher {
  constructor(vm, key, cb) {
    // vm 是 Vue 实例
    this.vm = vm
    // key 是 data 中的属性
    this.key = key
    // cb 回调函数 更新视图的具体方法
    this.cb = cb
    // 把观察者的存放在 Dep.target
    Dep.target = this
    // 旧数据 更新视图的时候要进行比较
    // 还有一点就是 vm[key] 这个时候就触发了 get 方法
    // 之前在 get 把 观察者 通过dep.addSub(Dep.target) 添加到了 dep.subs中
    this.oldValue = vm[key]
    // Dep.target 就不用存在了 因为上面的操作已经存好了
    Dep.target = null
  }
  // 观察者中的必备方法 用来更新视图
  update() {
    // 获取新值
    let newValue = this.vm[this.key]
    // 比较旧值和新值
    if (newValue === this.oldValue) return
    // 调用具体的更新方法
    this.cb(newValue)
  }
}

