Tomat组件研究之ThreadPool
在2004年,JDK5尚未出世,还不存在公用的线程池,下面介绍的是Tomcat线程池的实现:
=======================================================
前几天曾向大家承诺,要完成ThredPool,Tomcat SSl的文章,今天终于有时间可以写一点。Tomcat的ThradPool不同于Apache的Common ThradPool,Tomcat的ThreadPool是专门为Tomcat服务的,确切说是为Tomcat处理Http连接服务地。经过研究发现,Apache用了及其难懂而又隐晦的方法写了这几个ThreadPool类,虽然仅简单的几个类,但其难理解的程度却是惊人的。在理解之后看,里面确实又值得我们学习的东西,但也有好多无用的东西。看来我们也不要盲目崇拜Apache。废话少说,下面直入正题.
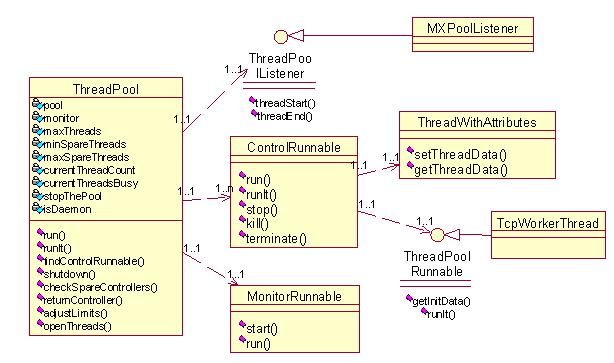
ThreadPool的Class图及整体结构:
一.源码说明
1. org.apache.tomcat.util.threads.ThreadPool
线程池类,本类仅维护一定数量的线程处理对象,而把具体执行操作的任务委派给其他对象(ControlRunnable),Apache并没有把过多的功能交给这个类,而仅只是让这个类维护线程的创建,销毁,取出,归还等功能。下面我们看该类的代码:
- 1.1 线程池常量
    //最大线程数

    public static final int MAX_THREADS = 200;

    //最大线程数的最小数(最大线程的数量不能小于这个数)

    public static final int MAX_THREADS_MIN = 10;

    //最大空闲线程数

    public static final int MAX_SPARE_THREADS = 50;

  //最小空闲线程数(当线程池初始化时就启动这么多线程)

    public static final int MIN_SPARE_THREADS = 4;

    //最大等待时间(1分钟)

    public static final int WORK_WAIT_TIMEOUT = 60*1000;
- 1.2 start方法
    public synchronized void start() {

        //是否停止线程

        stopThePool=false;

        //当前生成线程的数量

        currentThreadCount  = 0;

        //当前使用线程的数量

        currentThreadsBusy  = 0;

        //如果当前设置的各个参数不正确,调整一下

        adjustLimits();

        //生成空的线程池

        pool = new ControlRunnable[maxThreads];

        //启动最小线数线程

        openThreads(minSpareThreads);

        //启动监视线程,监视线程池内部状态

        monitor = new MonitorRunnable(this);

}
- 1.3 openThreads方法:
    protected void openThreads(int toOpen) {

        if(toOpen > maxThreads) {

            toOpen = maxThreads;

        }

        //新打开的线程数放在已经存在的空闲线程后面(用数组存放)

        for(int i = currentThreadCount ; i < toOpen ; i++) {

            pool[i - currentThreadsBusy] = new

     ControlRunnable(this);

        }

        currentThreadCount = toOpen;

    }
到这里我们感觉Apache的做法好生奇怪,首先这个toOpen,还有一点,以前我们写连接池时,都时用List作为容器,一般有个当前的空闲线程数,但Apache偏偏用数组作为容器来存放线程,用数组就要维护每种线程(新的,使用的,空闲的)在数组中的下标,若用List这些问题就没了,我们只要get,add,remove一下就一切OK,非常方便。
因为有了currentThreadsBusy,Apache的当前的空闲线程数就必须用currentThreadCount-currentThreadsBusy计算得来。这就时我们为什么会看到上面那个奇怪得小循环。但用数组到底有什么好处呢,还是Apache的人是猪头(靠,他们不可能是猪头)?,我们可能发现上面有个常量:
    //最大线程数

    public static final int MAX_THREADS = 200;
也就是说,默认最多池可以有200个线程,就是说有很多线程可能频繁地从池中取,放线程,如果用List效率将大打折扣,因此才用了数组。
- 1.4 findControlRunnable方法
private ControlRunnable findControlRunnable() {

        ControlRunnable c=null;

        if ( stopThePool ) {

            throw new IllegalStateException();

        }


        //从池中取一个可用的线程.

        synchronized(this) {

            //当前所有的线程都被使用

            while (currentThreadsBusy == currentThreadCount) {

                 //当前的线程数量小于最大线程数

                if (currentThreadCount < maxThreads) {

                      //生成一定数量(minSpareThreads)线程,这一点与

                   //我们做连接池时非常不一样,我们往往只生成一个新连

                   //接,看来Apache的东西真是值得我们学习

                    int toOpen = currentThreadCount + minSpareThreads;

                    openThreads(toOpen);

                } else {

                    logFull(log, currentThreadCount,

                            maxThreads);

                      //如果所有线程(已到最大数)都被使用,则等待其他线

                   //程释放.

                    try {

                        this.wait();

                    }catch(InterruptedException e) {

                        log.error("Unexpected exception", e);

                    }

                    // Pool was stopped. Get away of the pool.

                    if( stopThePool) {

                        break;

                    }

                }

            }

            // Pool was stopped. Get away of the pool.

            if(0 == currentThreadCount || stopThePool) {

                throw new IllegalStateException();

            }


            int pos = currentThreadCount - currentThreadsBusy - 1;

            //经过上面一番折腾,在线程池里终于又有了空闲线程,下面取数

            //组里最后一个线程

            c = pool[pos];


            //释放当前线程池对该线程的引用

            pool[pos] = null;


            //当然,使用线程的数量也要加1

            currentThreadsBusy++;

        }

        return c;

}
这个方法我们可以看出:
- 线程池里存放的都是空闲线程
- 新生成的线程放在已存在的线程后面(队列)
- 当取一个线程时,取队列上最后一个可用线程
- 当线程被取出去时,队列释放对该线程的引用,同时使用线程变量加1
- 线程池对使用线程的维护仅通过currentThreadsBusy变量得已实现
- 1.5 returnController方法
protected synchronized void returnController(ControlRunnable c) {

        if(0 == currentThreadCount || stopThePool) {

            c.terminate();

            return;

        }


        //使用线程减1

        currentThreadsBusy--;

       //把释放得线程放在空闲线程队列得最后

        pool[currentThreadCount - currentThreadsBusy - 1] = c;

       //唤醒等待线程,告诉他们有可用的线程了,不要在那傻等

        notify();

}
到这里我们看到,用数组作为容器存放线程真复杂,总让我们小心翼翼地操作数组的下标,但没办法,还是这玩意效率高。
- 1.6 runIt方法
public void runIt(ThreadPoolRunnable r) {

        if(null == r) {

            throw new NullPointerException();

        }

        //查找一个可用空闲线程处理具体任务

        ControlRunnable c = findControlRunnable();

        c.runIt(r);

}
- 1.7 shutdown方法
public synchronized void shutdown() {

        if(!stopThePool) {

            stopThePool = true;

           //停止监听器

            monitor.terminate();

            monitor = null;

           //释放空闲线程

            for(int i = 0 ; i < (currentThreadCount - currentThreadsBusy - 1) ; i++) {

                try {

                    pool[i].terminate();

                } catch(Throwable t) {

           log.error("Ignored exception while shutting down thread pool", t);

                }

            }

           //重置使用线程使用标志

            currentThreadsBusy = currentThreadCount = 0;

            pool = null;

            notifyAll();

        }

    }
2. org.apache.tomcat.util.threads.MonitorRunnable
这个类仅有的目的就是维护线程池的线程数量,看到这里我们不仅又对Apache的做法怪了起来,为什么要大动干戈做一个线程类去维护线程数量?其实线程池中线程数量的维护完全可以放在findControlRunnable及returnController方法中,但因为这两个方法的频繁调用,就对效率产生了影响,因此,归根结底还是从效率方面作考虑。
- 2.1 run方法
public void run() {

            while(true) {

                try {

                      //等待一段指定的时间,或有线程归还时唤醒本线程

                    synchronized(this) {

                        this.wait(WORK_WAIT_TIMEOUT);

                    }

                      //停止.

                    if(shouldTerminate) {

                        break;

                    }


                    //调用线程池的方法进行线程维护.

                    p.checkSpareControllers();


                } catch(Throwable t) {

           ThreadPool.log.error("Unexpected exception", t);

                }

            }

}
- 2.2 checkSpareControllers
protected synchronized void checkSpareControllers() {


        if(stopThePool) {

            return;

        }

       //当前空闲线程数量大于最大空闲线程,释放多余线程

        if((currentThreadCount - currentThreadsBusy) > maxSpareThreads) {

           //应该释放的线程数

            int toFree = currentThreadCount -currentThreadsBusy -

                         maxSpareThreads;


            for(int i = 0 ; i < toFree ; i++) {

                ControlRunnable c = pool[currentThreadCount - currentThreadsBusy - 1];

                c.terminate();

              //从后向前释放

                pool[currentThreadCount - currentThreadsBusy - 1] = null;


              //线程数量减1

                currentThreadCount --;

            }

        }

}
通过这个方法,我们要把握住两点:
- 释放空闲线程时按从后向前的顺序
- 释放线程时总线程的数量要随之减少
3. org.apache.tomcat.util.threads.ControlRunnable
本类是一个静态线程类,线程池里存放该类的实例。这个类主要被用来在线程池内部执行各种各样的操作。
- 3.1 构造函数ControlRunnable
ControlRunnable(ThreadPool p) {

            toRun = null;

            //停止标志

            shouldTerminate = false;

            //运行标志,构造函数时该线程不运行

            shouldRun = false;

            this.p = p;

            //类似线程本地数据操作,类ThreadWithAttributes将稍后介绍

            t = new ThreadWithAttributes(p, this);

            t.setDaemon(true);

            t.setName(p.getName() + "-Processor" + p.getSequence());

            //启动线程ThreadWithAttributes

            t.start();

            //向池中增加线程

            p.addThread( t, this );

            noThData=true;

}
可以看出该构造函数完成了以下几个功能:
Ø用线程池对象p和本身(this)构造了ThreadWithAttributes对象
ThreadWithAttributes是用来代替ThreadLocal对象的,它的作用是把线程数据的本地化,避免了线程之间数据的访问冲突,令一方面,它对线程属性的访问加以控制,阻止非信任的代码访问线程数据,我们将在下面作具体讲解。
Ø 启动了ThreadWithAttributes线程
Ø 向池中增加线程
到这里我们可以看出,线程池里的线程存放在两个不同的地方:用数组维护的线程池和用Hashtable维护的threads对象:
protected Hashtable threads=new Hashtable();
- key:ThreadWithAttributes对象
- value: ControlRunnable对象
- 3.2 addThread
public void addThread( Thread t, ControlRunnable cr ) {

        threads.put( t, cr );

        for( int i=0; i<listeners.size(); i++ ) {

            ThreadPoolListener tpl=(ThreadPoolListener)listeners.elementAt(i);

            //通知监听器,有线程加入

            tpl.threadStart(this, t);

        }

}
- 3.3 removeThread
public void removeThread( Thread t ) {

        threads.remove(t);

        for( int i=0; i<listeners.size(); i++ ) {

            ThreadPoolListener tpl=(ThreadPoolListener)listeners.elementAt(i);

           //通知监听器,有线程被删除

            tpl.threadEnd(this, t);

        }

}
看到这个方法,我们可能会回想起好多地方都在用Listener进行一些处理,Listener到底为何物?其实我们仔细观察一下就会发现,用Listener处理其实是使用了GOF23种模式种的Observer模式。
- 3.4 Observer模式
上面是一般的Observer模式Class图,如果Subject不使用接口而用一个类,并且把Subject的含义扩展一下,不是对其所有的属性而是部分属性作观察,则Subject其实就是我们的ThreadPool类,Observer其实就是Listener接口。被观察的对象就是ThreadPool类的threads,当对threads作put,remove时就会调用所有被注册到ThreadPool类的Listener方法,即上面的addThread,removeThread。
Observer模式的用意是:在对象间建立一个一对多的依赖关系,当一个对象的状态发生变化是,所有依赖于它的对象能获得通知并且能被随之自动更新。 - 3.5 Java的Observer模式
其实Java已经将Observer模式集成到语言里面,类java.util.Observable相当于Subject,java.util.Observer就时Observer接口,若要使用只要作简单的继承即可。但为了更好的扩展性及更明确的逻辑意义,ThreadPool类并无继承Observable类,而是用了自己的实现方式。 - 3.6 runIt方法
public synchronized void runIt(ThreadPoolRunnable toRun) {

           this.toRun = toRun;

            shouldRun = true;

            this.notify();

}
该方法主要是运行一个指定的任务,具体的任务都被封装在ThreadPoolRunnable接口里,该方法要注意以下几点:
Ø 该方法对每个线程仅被调用一次
Ø调用该方法不是马上运行ThreadPoolRunnable指定的任务,而是通知ControlRunnable”可以执行任务”。
具体的任务执行在下面的run方法里。
- 3.7 run方法
public void run() { try { while(true) { try { synchronized(this) { //当既不运行也不停止时,等待 if(!shouldRun && !shouldTerminate) { this.wait(); } } //停止 if( shouldTerminate ) { if( ThreadPool.log.isDebugEnabled()) ThreadPool.log.debug( "Terminate"); break; } try { //初始化线程数据,仅一次 if(noThData) { if( toRun != null ) { Object thData[]=toRun.getInitData(); t.setThreadData(p, thData); } noThData = false; } //执行操作 if(shouldRun) { //运行ThreadRunnalbe接口 if( toRun != null ) { toRun.runIt(t.getThreadData(p)); //ControlRunnable也提供一般Runnable接口参与处理的机会 } else if( toRunRunnable != null ) { toRunRunnable.run(); } else { if( ThreadPool.log.isDebugEnabled()) ThreadPool.log.debug( "No toRun ???"); } } } catch(Throwable t) { //发生致命错误,从池中删除线程 shouldTerminate = true; shouldRun = false; p.notifyThreadEnd(this); } finally { //运行结束回收线程 if(shouldRun) { shouldRun = false; p.returnController(this); } } if(shouldTerminate) { break; } } catch(InterruptedException ie) { //当执行wait时可能发生的异常(尽管这种异常不太可能发生) p.log.error("Unexpected exception", ie); } } } finally { //线程池停止或线程运行中发生错误时,从池中删除线程 p.removeThread(Thread.currentThread()); } }结合runIt方法,run方法能很容易看懂。
4. org.apache.tomcat.util.threads.ThreadPoolListener
前面我们曾提到过,该接口时Observer模式的Observer对象,该接口定义了两个方法://当线程被创建时执行的方法 public void threadStart( ThreadPool tp, Thread t); //当线程被停止时执行的方法 public void threadEnd( ThreadPool tp, Thread t);
关于该接口的详细使用可以参考上面提到的Observer模式。
5. org.apache.tomcat.util.threads.ThreadWithAttributes
ThreadWithAttributes是一个特殊的线程,该线程用来存放其他线程的属性和数据,并且该类提供了类似ThreadLocal的功能,但比ThreadLocal效率更高。
5.1 构造函数ThreadWithAttributespublic ThreadWithAttributes(Object control, Runnable r) { super(r); this.control=control; }用control(ThreadPool)和r(ControlRunnable)构造实例(具体可参见ControlRunnable的构造方法)
5.2 setNote方法
public final void setNote( Object control, int id, Object value ) { if( this.control != control ) return; notes[id]=value; }Ø用ControlRunnable构造一个新的ThreadWithAttributes对象避免了线程公用数据的争夺
Ø根据control设置线程属性,通过control可以阻止非信任的代码操作线程属性。
对其他操作线程属性的方法都比较简单就不再一一列出。
5.3 Java的ThreadLocal
java.lang.ThreadLocal是在Java1.2中出现的“线程局部变量”,它为每个使用它的线程提供单独的线程局部变量值的副本。每个线程只能看到与自己相联系的值,而不知道别的线程可能正在使用或修改它们自己的副本。
“线程局部变量”是一种能简化多线程编程的好方法,可惜的是多数开发者可能不了解它。具体的信息可以参考:http://www-900.ibm.com/developerWorks/cn/java/j-threads/index3.shtml6. org.apache.tomcat.util.threads.ThreadPoolRunnable
前面我们提到过,如果想把自己的代码嵌入到线程池内部被执行,就必须实现该接口。具体可以参照ControlRunnable的run方法。这个接口定义了下面两个方法:6.1 getInitData方法
public Object[] getInitData();
取得运行该对象所需要的初始化数据,对池中所有的线程来说应该返回相同类型的数据,否则处理机制将变的很复杂。
6.2 runIt方法
public void runIt(Object thData[]);
嵌入执行的代码将在这个方法里得以体现,以后我们将会看到,对TCP Connection得处理也是在这里进行的。
至此,Tomcat ThreadPool的介绍就算基本结束,对Tomcat ThreadPool始终要把握住下面几点:
ØTomcat ThreadPool仅提供了对线程的管理维护功能
Ø池所执行的操作有外部组件去实现
Ø从池的设计可以看出一点面向组件(COP)编程的痕迹
二.ThreadPool在处理TCP Connection中的应用
在接下来的内容中我们将演示Tomat是如何在指定的端口监听HTTP连接,并利用ThreadPool生成一个线程处理接受的请求。1. org.apache.tomcat.util.net.PoolTcpEndpoint
类PoolTcpEndpoint主要是被用来处理接受到的HTTP连接,处理方式是处理原始的Socket,下面我们看几个重要的方法:1.1 initEndpoint方法
对该方法,现在我们可以暂时不要考虑太多,只要知道在初始化ServerSocket的工作就足够了。public void initEndpoint() throws IOException, InstantiationException { try { //创建ServerSocket工厂 if(factory==null) factory=ServerSocketFactory.getDefault(); //创建ServerSocket,将被用于在指定的端口(8080)监听连接 if(serverSocket==null) { try { if (inet == null) { serverSocket = factory.createSocket(port, backlog); } else { serverSocket = factory.createSocket(port, backlog, inet); } } catch ( BindException be ) { throw new BindException(be.getMessage() + ":" + port); } } //设定连接的超时限制时间 if( serverTimeout >= 0 ) serverSocket.setSoTimeout( serverTimeout ); } catch( IOException ex ) { throw ex; } catch( InstantiationException ex1 ) { throw ex1; } //保证初始化一次 initialized = true; }1.2 startEndpoint方法
该方法将在Tocmat启动时被调用,主要作用时启动线程池并生成监听线程。
public void startEndpoint() throws IOException, InstantiationException { if (!initialized) { initEndpoint(); } //tp是外部组件传进来的ThreadPool对象,这里Tomcat启动了该线程池 if(isPool) { tp.start(); } running = true; //生成工作线程监听HTTP连接 if(isPool) { listener = new TcpWorkerThread(this); tp.runIt(listener); } else { log.error("XXX Error - need pool !"); } }下面将向大家描述,工作线程是如何监听HTTP连接的:
2. org.apache.tomcat.util.net.TcpWorkerThread
该类是PoolTcpEndpoint的内部类,它实现了ThreadPoolRunnable接口执行HTTP连接监听和请求处理。(classTcpWorkerThread implements ThreadPoolRunnable)
2.1 构造函数TcpWorkerThread
该方法的主要目的是通过PoolTcpEndpoint对象生成一个实例,并且在缓存中生成一定数量的TcpConnection对象。
public TcpWorkerThread(PoolTcpEndpoint endpoint) { this.endpoint = endpoint; if( usePool ) { //缓存初始化SimplePool为缓存对象,可先不理会其实现细节 connectionCache = new SimplePool(endpoint.getMaxThreads()); for(int i = 0;i< endpoint.getMaxThreads()/2 ; i++) { connectionCache.put(new TcpConnection()); } } }我们目的是先弄清楚HTTP的监听及处理,对其他细节可先不于深究。
2.2 getInitData方法
对该方法的描述前面已经说过,大家还记得否?本方法主要是取得线程的初始化数据。
public Object[] getInitData() { if( usePool ) { return endpoint.getConnectionHandler().init(); } else { Object obj[]=new Object[2]; //第二个参数存放HTTP请求处理器(可先不考虑细节) obj[1]= endpoint.getConnectionHandler().init(); //第一个参数存放TcpConnection对象 obj[0]=new TcpConnection(); return obj; } }关于第二个参数,其实是初始化了HTTP请求处理器及其他的信息,大家可先不究其细节。只要能认识到这个方法是返回线程初始化数据即可。
2.3 runIt方法
前面我们说过,嵌入到线程池执行的代码要写在这个方法里,这个方法是HTTP监听的核心,我们看具体实现:
public void runIt(Object perThrData[]) {

       if (endpoint.isRunning()) {

           Socket s = null;

           //在指定的端口(8080)监听客户端连接

           try {

               s = endpoint.acceptSocket();

           } finally {

              //当接受到一个连接后继续启动下一个线程进行监听

               if (endpoint.isRunning()) {

                   endpoint.tp.runIt(this);

               }

           }

           if (null != s) {

           try {

               if(endpoint.getServerSocketFactory()!=null) {

    //客户端与服务器第一次握手,主要用于SSI连接(即https)              endpoint.getServerSocketFactory().handshake(s);

               }

            } catch (Throwable t) {

           PoolTcpEndpoint.log.debug("Handshake failed", t);

                try {

                    s.close();

                } catch (IOException e) {

                }

                return;

            }

           TcpConnection con = null;

           try {

               if( usePool ) {

                  //从缓存中取一个TcpConnection对象

                  con=(TcpConnection)connectionCache.get();


                  if( con == null ) {

                      con = new TcpConnection();

                  }

               } else {

                  //若不使用缓存从初始化数据中取一个TcpConnection对象

                          con = (TcpConnection) perThrData[0];

                          perThrData = (Object []) perThrData[1];

               }

               //设定刚生成TcpConnection对象

               con.setEndpoint(endpoint);

               con.setSocket(s);

               endpoint.setSocketOptions( s );

//把TcpConnection及所需要的初始化数据传给HTTP处理器处理

//在Process处理中将把原始的Socket流解析成Request对象传

//给容器调用

endpoint.getConnectionHandler().processConnection(con, perThrData);

             } catch (SocketException se) {

               try {

                   s.close();

               } catch (IOException e) {}

            } catch (Throwable t) {

               try {

                   s.close();

               } catch (IOException e) {}

            } finally {

               if (con != null) {

                   con.recycle();

                   if (usePool) {

                       connectionCache.put(con);

                   }

               }

            }

         }

       }

}
请大家仔细而反复的多看一下上面带阴影的注释。通过上面我们看到工作线程作了如下的工作:
Ø 启动了线程池(线程池启动时将生成指定数量的线程及监视线程)
Ø 如果使用缓冲处理则预先生成指定数量的TcpConnection对象
Ø 在指定的端口(默认是8080)监听HTTP连接
Ø 当接收的一个连接时再启动一个线程继续监听连接
Ø 用接收的连接生成TcpConnection对象,即Tomcat对HTTP的处理是以TcpConnection对象为基础的
Ø 把生成的TcpConnection对象交由HTTP Process进行Socket解析,最终生成Request对象
要注意的是:Tomcat并不是事先用指定数量的线程在端口监听,而是当一个监听完成后再启动下一个监听线程。