1. Consul 简介
Consul是 HashiCorp 公司推出的开源工具,用于实现分布式系统的服务发现与配置。与其它分布式服 务注册与发现的方案,Consul 的方案更“一站式”,内置了服务注册与发现框 架、分布一致性协议实 现、健康检查、Key/Value 存储、多数据中心方案,不再需要依赖其它工具(比如 ZooKeeper 等)。 使用起来也较为简单。Consul 使用 Go 语言编写,因此具有天然可移植性(支持Linux、windows和 Mac OS X);安装包仅包含一个可执行文件,方便部署,与 Docker 等轻量级容器可无缝配合。
2. 专业名词
-
agent
组成 consul 集群的每个成员上都要运行一个 agent,可以通过 consul agent 命令来启动。agent可以运行在 server 状态或者 client 状态。自然的, 运行在 server 状态的节点被称为 server 节点,运行在 client 状态的节点被称 为 client 节点。
-
server 节点
负责组成 cluster 的复杂工作(选举server 自行选举一个 leader、状态维 护、转发请求到 leader),以及 consul 提供的服务(响应RPC 请求),以及存放和复制数据。考虑到容错和可用性,一般部署 3 ~ 5 个比较合适。
-
client 节点
负责转发所有的 RPC 到 server 节点。本身无状态,且轻量级,因此,可以部署大量的client 节点。
-
数据中心
虽然数据中心的定义似乎很明显,但仍有一些细微的细节必须考虑。我们 将一个数据中心定义为一个私有、低延迟和高带宽的网络环境。这不包括通过公共互联网的通信,但是为了我们的目的,单个EC2 (aws云主机)区域内的多个可用区域将被视为单个数据中心的一部分。
3. Consul 的优势
-
使用 Raft 算法来保证一致性, 比复杂的 Paxos 算法更直接. 相比较而言, zookeeper 采用的是 Paxos, 而 etcd 使用的则是 Raft。
-
支持多数据中心,内外网的服务采用不同的端口进行监听。 多数据中心集群可以避免单数据中心 的单点故障,而其部署则需要考虑网络延迟, 分片等情况等。 zookeeper 和 etcd 均不提供多数据中 心功能的支持。
-
支持健康检查。 etcd 不提供此功能。
-
支持 http 和 dns 协议接口。 zookeeper 的集成较为复杂, etcd 只支持 http 协议。 官方提供 web 管理界面, etcd 无此功能。
-
综合比较, Consul 作为服务注册和配置管理的新星, 比较值得关注和研究。
4. 特性
- 服务发现
- 健康检查
- Key/Value 存储
- 多数据中心
5. Consul与Eureka的区别
-
一致性 Consul强一致性(CP)
- 服务注册相比Eureka会稍慢一些。因为Consul的raft协议要求必须过半数的节点都写入成功才认 为注册成功
- Leader挂掉时,重新选举期间整个consul不可用。保证了强一致性但牺牲了可用性。
-
Eureka保证高可用和最终一致性(AP)
-
服务注册相对要快,因为不需要等注册信息replicate到其他节点,也不保证注册信息是否 replicate成功
-
当数据出现不一致时,虽然A, B上的注册信息不完全相同,但每个Eureka节点依然能够正常对外提 供服务,这会出现查询服务信息时如果请求A查不到,但请求B就能查到。如此保证了可用性但牺牲了一致性。
-
6. Consul 安装
consul docker-hub
6.1 docker-compose安装
以dev模式启动 且 设置client=0.0.0.0为所有ip都可以连接此服务
version: '2'
services:
  consul-container:
    image: consul
    container_name: consul-dev
    environment:
      - CONSUL_BIND_INTERFACE=eth0
    ports:
      - "8500:8500"
    volumes:
      - "./config:/consul/config/"
      - "./data/:/consul/data/"
    command: agent -dev -client=0.0.0.0
服务启动成功后,通过浏览器访问localhost:8500,显示如下页面即安装成功。

7. Quick Start
7.1 启动consul服务
本文使用的是docker-compose方式管理consul服务,直接启动即可
7.2 创建客户端-provider
7.2.1 引入依赖坐标
   org.springframework.boot
   spring-boot-starter-web


   org.springframework.cloud
   spring-cloud-starter-consul-discovery


   org.springframework.boot
   spring-boot-starter-actuator
7.2.2 配置application.yml
server:
  port: ${port:8082}

spring:
  application:
    name: provider
  cloud:
    consul:
      #consul服务地址
      host: 127.0.0.1
      #consul服务端口
      port: 8500
      discovery:
        #是否注册
        register: true
        #实例ID
        #        instance-id: ${spring.application.name}-${server.port}
        instance-id: ${spring.application.name}:${random.value}
        #服务实例名称
        service-name: ${spring.application.name}
        #服务实例端口
        port: ${server.port}
        #健康检查路径
        healthCheckPath: /actuator/health
        #健康检查时间间隔
        healthCheckInterval: 15s
        #开启ip地址注册
        prefer-ip-address: true
        #实例的请求ip
        ip-address: ${spring.cloud.client.ip-address}
7.2.3 添加测试方法
package com.ldx.provider.controller;

import org.springframework.beans.factory.annotation.Autowired;
import org.springframework.beans.factory.annotation.Value;
import org.springframework.cloud.client.ServiceInstance;
import org.springframework.cloud.client.discovery.DiscoveryClient;
import org.springframework.web.bind.annotation.GetMapping;
import org.springframework.web.bind.annotation.PathVariable;
import org.springframework.web.bind.annotation.RestController;
import java.util.List;

@RestController
public class TestController {
    @Autowired
    private DiscoveryClient discoveryClient;

    @Value("${server.port}")
    private String port;

    @GetMapping("products")
    public String products(){
        List list = discoveryClient.getInstances("consumer");

        if(list != null && list.size() > 0 ) {
            ServiceInstance serviceInstance = list.get(0);
            System.out.println(serviceInstance);
        }

        return "Hello World:" + port;
    }
}
7.3 创建客户端-comsumer
创建过程和provider一样 测试方法换一下,并且在启动类上添加RestTemplate Bean
7.3.1 配置application.yml
server:
  port: ${port:8081}

spring:
  application:
    name: consumer
  cloud:
    consul:
      #consul服务地址
      host: 127.0.0.1
      #consul服务端口
      port: 8500
      discovery:
        #是否注册
        register: true
        #实例ID
        #        instance-id: ${spring.application.name}-${server.port}
        instance-id: ${spring.application.name}:${random.value}
        #服务实例名称
        service-name: ${spring.application.name}
        #服务实例端口
        port: ${server.port}
        #健康检查路径
        healthCheckPath: /actuator/health
        #健康检查时间间隔
        healthCheckInterval: 15s
        #开启ip地址注册
        prefer-ip-address: true
        #实例的请求ip
        ip-address: ${spring.cloud.client.ip-address}
        metadata:
          #添加自定义元数据
          my-name: zhangtieniu-consumer
7.3.2 添加支持负载均衡的RestTemplate
package com.ldx.consumer;

import org.springframework.boot.SpringApplication;
import org.springframework.boot.autoconfigure.SpringBootApplication;
import org.springframework.cloud.client.loadbalancer.LoadBalanced;
import org.springframework.context.annotation.Bean;
import org.springframework.web.client.RestTemplate;

@SpringBootApplication
public class ConsumerApplication {
   @Bean
   @LoadBalanced
   public RestTemplate loadbalancedRestTemplate(){
      return new RestTemplate();
   }

   public static void main(String[] args) {
      SpringApplication.run(ConsumerApplication.class, args);
   }
}
7.3.3 添加测试方法
package com.ldx.consumer.controller;

import org.springframework.beans.factory.annotation.Autowired;
import org.springframework.cloud.client.ServiceInstance;
import org.springframework.cloud.client.discovery.DiscoveryClient;
import org.springframework.web.bind.annotation.GetMapping;
import org.springframework.web.bind.annotation.PathVariable;
import org.springframework.web.bind.annotation.RestController;
import org.springframework.web.client.RestTemplate;
import java.util.List;

@RestController
public class TestController {
    @Autowired
    private RestTemplate restTemplate;

    @GetMapping()
    public String consumer(){
        return this.restTemplate.getForObject("http://provider/products", String.class);
    }
}
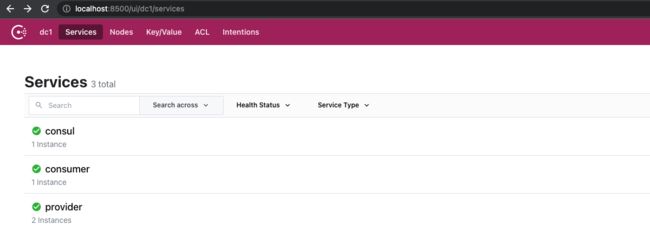
7.4 启动
启动了两个 provider 和一个 consumer
浏览器输入
localhost:8500查看consul控制台,显示服务注册成功
测试服务调用
其中provider 输出的 实例信息如下:
[ConsulServiceInstance@4c2b7437 instanceId = 'consumer-6cfd981c90545313155d1f43c3ed23a5', serviceId = 'consumer', host = '192.168.0.101', port = 8081, secure = false, metadata = map['my-name' -> 'zhangtieniu-consumer', 'secure' -> 'false'], uri = http://192.168.0.101:8081, healthService = HealthService{node=Node{id='3fe6ea9e-3846-ff8d-b01f-a6528caaa3fd', node='44a66c1caa9c', address='172.26.0.2', datacenter='dc1', taggedAddresses={lan=172.26.0.2, lan_ipv4=172.26.0.2, wan=172.26.0.2, wan_ipv4=172.26.0.2}, meta={consul-network-segment=}, createIndex=11, modifyIndex=13}, service=Service{id='consumer-6cfd981c90545313155d1f43c3ed23a5', service='consumer', tags=[], address='192.168.0.101', meta={my-name=zhangtieniu-consumer, secure=false}, port=8081, enableTagOverride=false, createIndex=275, modifyIndex=275}, checks=[Check{node='44a66c1caa9c', checkId='serfHealth', name='Serf Health Status', status=PASSING, notes='', output='Agent alive and reachable', serviceId='', serviceName='', serviceTags=[], createIndex=11, modifyIndex=11}, Check{node='44a66c1caa9c', checkId='service:consumer-6cfd981c90545313155d1f43c3ed23a5', name='Service 'consumer' check', status=PASSING, notes='', output='HTTP GET http://192.168.0.101:8081/actuator/health: 200 Output: {"status":"UP"}', serviceId='consumer-6cfd981c90545313155d1f43c3ed23a5', serviceName='consumer', serviceTags=[], createIndex=275, modifyIndex=278}]}]


