thinkPHP6.0入门笔记(三)——新增用户信息
thinkPHP6.0实现新增用户
-
-
- 1.新增用户UI设计
- 2.新增用户表单验证模块
- 3.新增用户反馈模态框设计
- 4.新增用户信息加密写入数据表
-

1.新增用户UI设计
结合之前完成的内容,现在我们需要完善的是上面的用户新增模块。为了尽可能简化入门难度,这里,我们不考虑Ajax对于页面跳转的优化,新增用户、用户提示都采用不同的页面,当然现网站比较常用的利用Ajax在同一个页面通过弹出模态框新增用户,这样对用户更加友好吧。
好,废话不多少,直接切入正题。首先,我们把新增用户设计成一个页面跳转出发点,修改代码为如下形式:
<a class="form-control create" href="{:url('/user/create')}">新增用户</a>
解释:{:url(’/user/create’)}是实现路由跳转,与文件跳转略有不同,但这种跳转更加实用,不会受到内部文件的层级关系影响。
接下来我们需要在app/controller/User.php页面中增加如下代码,使得上述路由能够跳转到我们想要设计的新增用户表单页面:
  public function create(){
        return View('create');
    }
为了方便快速验证,讲重点回归到PHP上面来,我们简单设计一下新增用户的form表单,代码如下:
<form class="form-horizontal create-form" role="form" method="post" action="{:url('/user')}">
        <div class="form-group">
            <label for="firstname" class="col-sm-2 control-label">用户昵称:</label>
            <div class="col-sm-10">
                <input type="text" class="form-control" id="firstname" name="username" placeholder="请输入用户昵称">
            </div>
        </div>
        <div class="form-group">
            <label for="email" class="col-sm-2 control-label">用户邮箱:</label>
            <div class="col-sm-10">
                <input type="text" class="form-control" id="email" name="email" placeholder="请输入用户邮箱">
            </div>
        </div>
        <div class="form-group">
            <label for="password" class="col-sm-2 control-label">用户密码:</label>
            <div class="col-sm-10">
                <input type="password" class="form-control" id="password" name="password" placeholder="请输入用户密码">
            </div>
        </div>
        <div class="form-group">
            <label for="passwordnot" class="col-sm-2 control-label">重复密码:</label>
            <div class="col-sm-10">
                <input type="password" class="form-control" id="passwordnot" name="passwordnot" placeholder="请输入重复密码">
            </div>
        </div>
        <div class="form-group">
            <label for="email" class="col-sm-2 control-label">用户状态:</label>
            <div class="col-sm-10">
                <select name="status" class="form-control">
                    <option class="disabled" value="">请选择用户状态</option>
                    <option value="0">待审核</option>
                    <option value="1">正常</option>
                </select>
            </div>
        </div>
        <div class="form-group">
            <div class="col-sm-offset-2 col-sm-10">
                <button type="submit" class="btn btn-success">新增用户</button>
                <button class="btn btn-default">返回列表</button>
            </div>
        </div>
    </form>
展示得到如下页面:

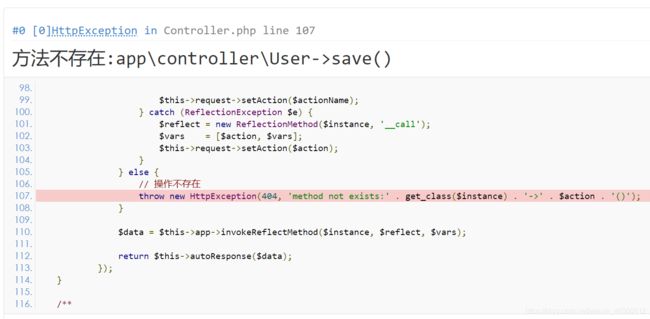
接下来用户会输入需要新增用户的数据并提交表单,但是我们发现报如下错误:

原因很简单,我们提交用户信息,但是没有对这个信息进行处理,可能是php需要save函数,不然这个提交的表单数据就没有任何意义,因此按照提示的要求,在controller/User.php文件中增加如下代码:
public function save(Request $request){
        return dd($request->param());
    }
解释:首先这个save函数是为了填充空白下面会根据实际需要进一步完善。dd表示的是以数组形式输出对应参数(也就是表单提交的参数),提交测试效果展示如下:

2.新增用户表单验证模块
thinkPHP新增用户提供了比较便捷清晰的验证方法,在app目录下新建Validate文件夹,并新建User.php文件,目的是继承原生的验证方法并重写部分验证方式。在app/Validate/User.php文件中写入如下代码:
namespace app\Validate;
use think\Validate;
class User extends Validate{
    protected $rule=[
        'username' => 'require|min:2|max:10|chsDash|unique:user',
        'password' => 'require|min:6',
        'passwordnot' => 'require|confirm:password',
        'email' => 'require|email|unique:user'
//        'agree' => 'require|accept'

    ];
    protected $message=[
        'username.require' => '用户名不得为空,且只能长度为2-10位,只能是汉字、字母、数字、下划线和破折号',
        'password.require' => '用户密码至少为6位',
        'passwordnot.require' => '用户密码不一致',
        'email.require' =>'用户邮箱不能为空',
//        'agree.require' =>'只能同意'
    ];
}
解释:(1)protected $rule中写入验证方法,require表示该项必填,min与max分别表示最大最小长度,chsDash表示所填内容只能是汉字、字母、数字、下划线以及‘-’号,unique:user则表示的是该项数据在user数据表中的数据是独一无二的,如果重复会报错。confirm:password指的是两次数据需要一致。此外,值得一提的是agree,agree只能是rule中的三个值中的一种,可用于同意用户协议。
(2)protected $rule中写入验证出错的提示,eg:username.max,password.require都可以用于重写对应的验证。
接下来是为了使用对应的验证方法,在controller/User.php文件中引入Validate文件,优化上面提到的save函数,改成如下:
public function save(Request $request){
        $data = $request->param();
        try {
            validate(UserValidate::class)->batch(true)->check($data);
        } catch (ValidateException $exception) {
            dd($exception->getError());
        }
    }
解释:batch表示的是是否进行批量验证,check表示的是验证的数据项。$exception用于验证失败,getError()函数可以获取全部错误提示信息。
3.新增用户反馈模态框设计
用户数据检测之后,无论成功与否,都需要给出反馈提示,考虑到模态框重用率比较高,因此在view文件夹中新建一个public文件夹并写入toast.html,填充代码如下(部分自定义代码省略):
 <div class="modal-dialog">
      <div class="modal-content">
          <div class="modal-header">
              <button type="button" class="close" data-dismiss="modal" aria-hidden="true">×</button>
              <h4 class="modal-title text-center" id="myModalLabel">温馨提示</h4>
          </div>
          <div class="modal-body text-left text-muted">
              {volist name="infos" id="item"}
              <li>{$item}</li>
              {/volist}
          </div>
          <div class="modal-footer new-set">
              <button type="button" class="btn btn-default" ><a href="{$url_path}">{$url_text}</a></button>
              <button type="button" class="btn btn-default" ><a href="#">确定</a></button>
          </div>
      </div>
  </div>
回到save函数,在catch部分使用如下代码替换dd函数,使得提示可见性更强:
return view('../view/public/toast.html',[
                'infos' => $exception->getError(),
                'url_text' => '返回上一页',
                'url_path' => url('/user/create')
            ]);
运行效果展示如下:

有了错误反馈,最好也加上新增用户成功的反馈,如果用户没有进入catch函数,那么执行一下代码:
return view('../view/public/toast.html',[
            'infos' => ['恭喜你,注册成功!'],
            'url_text' => '返回首页',
            'url_path' => url('/')
        ]);
4.新增用户信息加密写入数据表
接下来便是用户数据新增的数据表写入,其实直接使用thinkPHP框架提供的create函数实现就行。代码比较简单,对于数据库写入:
$id=UserModel::create($data)->getData('id');
解释:UserModel其实是继承了model的类,利用create方法进行数据表数据新增,getData是为了进一步检测用户数据写入是否成功,返回id是为了辅助检测。因为唯一键值和其他错误可能数据通过验证但是由于唯一键值等导致写入失败,这算是一种小小的优化吧。
新增用户信息的密码加密:
$data['password']=sha1($data['password']);
解释:前面我们通过data获取了全部参数,于是利用‘password‘’找到对应的字段使用sha1方式加密,如此使用先加密后写入的方法就能完整实现新增用户。
加入这些后,save函数修改为如下:
$data=$request->param();
        try{
            validate(UserValidate::class)->batch(true)->check($data);
        }catch(ValidateException $exception){
            return view('../view/public/toast.html',[
                'infos' => $exception->getError(),
                'url_text' => '返回上一页',
                'url_path' => url('/user/create')
            ]);
        }
        //写入数据库
        $data['password']=sha1($data['password']);
        $id=UserModel::create($data)->getData('id');
        return $id ? view('../view/public/toast.html',[
            'infos' => ['恭喜你,注册成功!'],
            'url_text' => '返回首页',
            'url_path' => url('/')
        ]): '注册失败';

