python机械臂仿真_使用VTK与Python实现机械臂三维模型可视化
三维可视化系统的建立依赖于三维图形平台, 如 OpenGL、VTK、OGRE、OSG等, 传统的方法多采用OpenGL进行底层编程,即对其特有的函数进行定量操作, 需要开发人员熟悉相关函数, 从而造成了开发难度大、 周期长等问题。VTK、 ORGE、OSG等平台使用封装更好的函数简化了开发过程。下面将使用Python与VTK进行机器人上位机监控界面的快速原型开发。
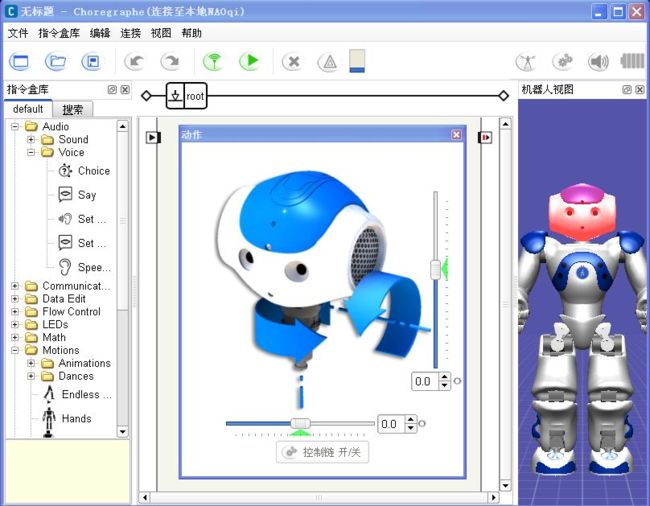
完整的上位机程序需要有三维显示模块、机器人信息监测模块(位置/角度/速度/电量/温度/错误信息...)、通信模块(串口/USB/WIFI/蓝牙...)、控制模块等功能模块。三维显示模块主要用于实时显示机器人的姿态(或位置)信息。比如机器人上肢手臂抬起,程序界面中的虚拟机器人也会同时进行同样的动作。三维显示模块也可以用于对机器人进行控制,实现良好的人机交互。比如在三维图像界面中可以点击拾取机器人某一关节,拖拽部件(肢体)控制真实的机器人完成同样的运动。Aldebaran Robotics的图形化编程软件Choregraphe可以完成上述的一些功能对NAO机器人进行控制。
对于简单的模型可以自己编写函数进行创建,但这种方法做出来的模型过于简单不够逼真。因此可以先在SolidWorks、Blender、3DMax、Maya、Rhino等三维设计软件中建立好模型,然后导出为通用的三维文件格式,再使用VTK将其读入并进行渲染。
在SolidWorks等三维设计软件中设计好机器人的大臂(upperarm)和小臂(forearm),然后创建装配体如下图所示。在将装配体导出为STL文件前需要注意几点:
1. 当从外界读入STL类型的模型时,其会按照它内部的坐标位置进行显示,因此它的位置和大小是确定的。为了以后的定位以及移动、旋转等操作的方便,需要先在SolidWorks中创建一个坐标系。如下图所示,坐标系建立在大臂关节中心点。
2. 如果将装配体整体输出为一个STL文件,则导入VTK后无法控制零部件进行相对运动。因此,需要将装配体各可动部件分别导出。
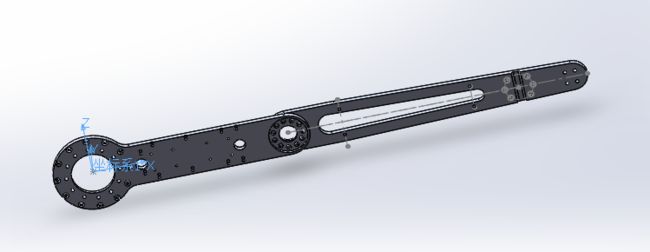
在SolidWorks的另存为STL对话框中,点开输出选项卡,如下图所示。注意之前提到的几点:如果勾选“在单一文件中保存装配体的所有零部件”则会将整个装配体导出为一个STL文件,否则就是分别命名的两个STL文件;输出坐标系下拉列表中选择之前创建的坐标系1,并勾选“不要转换STL输出数据到正的坐标空间”。

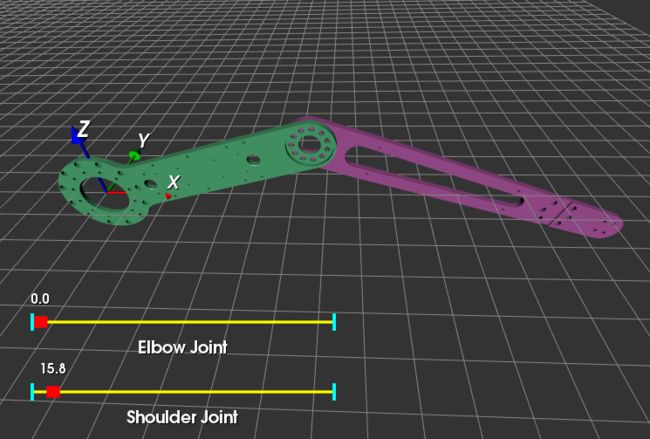
下面的Python代码简单实现了一个2自由度机械臂的三维仿真,可以拖动滑块或按键盘上的方向键控制肩关节或肘关节运动。当然程序还存在一些问题有待完善...
#!/usr/bin/env python
import vtk
import math
from vtk.util.colors import *
filenames = ["upperarm.stl","forearm.stl"]
dt = 1.0 # degree step in rotation
angle = [0, 0] # shoulder and elbow joint angle
renWin = vtk.vtkRenderWindow()
assembly = vtk.vtkAssembly()
slider_shoulder = vtk.vtkSliderRepresentation2D()
slider_elbow = vtk.vtkSliderRepresentation2D()
actor = list() # the list of links
# Customize vtkInteractorStyleTrackballCamera
class MyInteractor(vtk.vtkInteractorStyleTrackballCamera):
def __init__(self,parent=None):
self.AddObserver("CharEvent",self.OnCharEvent)
self.AddObserver("KeyPressEvent",self.OnKeyPressEvent)
# Override the default key operations which currently handle trackball or joystick styles is provided
# OnChar is triggered when an ASCII key is pressed. Some basic key presses are handled here
def OnCharEvent(self,obj,event):
pass
def OnKeyPressEvent(self,obj,event):
global angle
# Get the compound key strokes for the event
key = self.GetInteractor().GetKeySym()
# Output the key that was pressed
#print "Pressed: " , key
# Handle an arrow key
if(key == "Left"):
actor[1].RotateY(-dt)
if(key == "Right"):
actor[1].RotateY(dt)
if(key == "Up"):
assembly.RotateY(-dt)
angle[0] += dt
if angle[0] >= 360.0:
angle[0] -= 360.0
slider_shoulder.SetValue(angle[0])
if(key == "Down"):
assembly.RotateY(dt)
angle[0] -= dt
if angle[0] < 0.0:
angle[0] += 360.0
slider_shoulder.SetValue(angle[0])
# Ask each renderer owned by this RenderWindow to render its image and synchronize this process
renWin.Render()
return
def LoadSTL(filename):
reader = vtk.vtkSTLReader()
reader.SetFileName(filename)
mapper = vtk.vtkPolyDataMapper() # maps polygonal data to graphics primitives
mapper.SetInputConnection(reader.GetOutputPort())
actor = vtk.vtkLODActor()
actor.SetMapper(mapper)
return actor # represents an entity in a rendered scene
def CreateCoordinates():
# create coordinate axes in the render window
axes = vtk.vtkAxesActor()
axes.SetTotalLength(100, 100, 100) # Set the total length of the axes in 3 dimensions
# Set the type of the shaft to a cylinder:0, line:1, or user defined geometry.
axes.SetShaftType(0)
axes.SetCylinderRadius(0.02)
axes.GetXAxisCaptionActor2D().SetWidth(0.03)
axes.GetYAxisCaptionActor2D().SetWidth(0.03)
axes.GetZAxisCaptionActor2D().SetWidth(0.03)
#axes.SetAxisLabels(0) # Enable:1/disable:0 drawing the axis labels
#transform = vtk.vtkTransform()
#transform.Translate(0.0, 0.0, 0.0)
#axes.SetUserTransform(transform)
#axes.GetXAxisCaptionActor2D().GetCaptionTextProperty().SetColor(1,0,0)
#axes.GetXAxisCaptionActor2D().GetCaptionTextProperty().BoldOff() # disable text bolding
return axes
def ShoulderSliderCallback(obj,event):
sliderRepres = obj.GetRepresentation()
pos = sliderRepres.GetValue()
assembly.SetOrientation(0,-pos,0)
renWin.Render()
def ElbowSliderCallback(obj,event):
sliderRepres = obj.GetRepresentation()
pos = sliderRepres.GetValue()
actor[1].SetOrientation(0,-pos,0)
renWin.Render()
def ConfigSlider(sliderRep, TitleText, Yaxes):
sliderRep.SetMinimumValue(0.0)
sliderRep.SetMaximumValue(360.0)
sliderRep.SetValue(0.0) # Specify the current value for the widget
sliderRep.SetTitleText(TitleText) # Specify the label text for this widget
sliderRep.GetSliderProperty().SetColor(1,0,0) # Change the color of the knob that slides
sliderRep.GetSelectedProperty().SetColor(0,0,1) # Change the color of the knob when the mouse is held on it
sliderRep.GetTubeProperty().SetColor(1,1,0) # Change the color of the bar
sliderRep.GetCapProperty().SetColor(0,1,1) # Change the color of the ends of the bar
#sliderRep.GetTitleProperty().SetColor(1,0,0) # Change the color of the text displaying the value
# Position the first end point of the slider
sliderRep.GetPoint1Coordinate().SetCoordinateSystemToDisplay()
sliderRep.GetPoint1Coordinate().SetValue(50, Yaxes)
# Position the second end point of the slider
sliderRep.GetPoint2Coordinate().SetCoordinateSystemToDisplay()
sliderRep.GetPoint2Coordinate().SetValue(400, Yaxes)
sliderRep.SetSliderLength(0.02) # Specify the length of the slider shape.The slider length by default is 0.05
sliderRep.SetSliderWidth(0.02) # Set the width of the slider in the directions orthogonal to the slider axis
sliderRep.SetTubeWidth(0.005)
sliderRep.SetEndCapWidth(0.03)
sliderRep.ShowSliderLabelOn() # display the slider text label
sliderRep.SetLabelFormat("%.1f")
sliderWidget = vtk.vtkSliderWidget()
sliderWidget.SetRepresentation(sliderRep)
sliderWidget.SetAnimationModeToAnimate()
return sliderWidget
def CreateGround():
# create plane source
plane = vtk.vtkPlaneSource()
plane.SetXResolution(50)
plane.SetYResolution(50)
plane.SetCenter(0,0,0)
plane.SetNormal(0,0,1)
# mapper
mapper = vtk.vtkPolyDataMapper()
mapper.SetInputConnection(plane.GetOutputPort())
# actor
actor = vtk.vtkActor()
actor.SetMapper(mapper)
actor.GetProperty().SetRepresentationToWireframe()
#actor.GetProperty().SetOpacity(0.4) # 1.0 is totally opaque and 0.0 is completely transparent
actor.GetProperty().SetColor(light_grey)
'''
# Load in the texture map. A texture is any unsigned char image.
bmpReader = vtk.vtkBMPReader()
bmpReader.SetFileName("ground_texture.bmp")
texture = vtk.vtkTexture()
texture.SetInputConnection(bmpReader.GetOutputPort())
texture.InterpolateOn()
actor.SetTexture(texture)
'''
transform = vtk.vtkTransform()
transform.Scale(2000,2000, 1)
actor.SetUserTransform(transform)
return actor
def CreateScene():
# Create a rendering window and renderer
ren = vtk.vtkRenderer()
#renWin = vtk.vtkRenderWindow()
renWin.AddRenderer(ren)
# Create a renderwindowinteractor
iren = vtk.vtkRenderWindowInteractor()
iren.SetRenderWindow(renWin)
style = MyInteractor()
style.SetDefaultRenderer(ren)
iren.SetInteractorStyle(style)
for id, file in enumerate(filenames):
actor.append(LoadSTL(file))
#actor[id].GetProperty().SetColor(blue)
r = vtk.vtkMath.Random(.4, 1.0)
g = vtk.vtkMath.Random(.4, 1.0)
b = vtk.vtkMath.Random(.4, 1.0)
actor[id].GetProperty().SetDiffuseColor(r, g, b)
actor[id].GetProperty().SetDiffuse(.8)
actor[id].GetProperty().SetSpecular(.5)
actor[id].GetProperty().SetSpecularColor(1.0,1.0,1.0)
actor[id].GetProperty().SetSpecularPower(30.0)
assembly.AddPart(actor[id])
# Add the actors to the scene
#ren.AddActor(actor[id])
# Also set the origin, position and orientation of assembly in space.
assembly.SetOrigin(0, 0, 0) # This is the point about which all rotations take place
#assembly.AddPosition(0, 0, 0)
#assembly.RotateX(45)
actor[1].SetOrigin(274, 0, 0) # initial elbow joint position
ren.AddActor(assembly)
# Add coordinates
axes = CreateCoordinates()
ren.AddActor(axes)
# Add ground
ground = CreateGround()
ren.AddActor(ground)
# Add slider to control the robot
sliderWidget_shoulder = ConfigSlider(slider_shoulder,"Shoulder Joint", 80)
sliderWidget_shoulder.SetInteractor(iren)
sliderWidget_shoulder.EnabledOn()
sliderWidget_shoulder.AddObserver("InteractionEvent", ShoulderSliderCallback)
sliderWidget_elbow = ConfigSlider(slider_elbow,"Elbow Joint", 160)
sliderWidget_elbow.SetInteractor(iren)
sliderWidget_elbow.EnabledOn()
sliderWidget_elbow.AddObserver("InteractionEvent", ElbowSliderCallback)
# Set background color
ren.SetBackground(.2, .2, .2)
# Set window size
renWin.SetSize(600, 600)
# Set up the camera to get a particular view of the scene
camera = vtk.vtkCamera()
camera.SetFocalPoint(300, 0, 0)
camera.SetPosition(300, -400, 350)
camera.ComputeViewPlaneNormal()
camera.SetViewUp(0, 1, 0)
camera.Zoom(0.4)
ren.SetActiveCamera(camera)
# Enable user interface interactor
iren.Initialize()
iren.Start()
if __name__ == "__main__":
CreateScene()
下面是使用MFC搭建的机器人上位机监控平台,可以实现上述的一些基本功能。这个GIF动画使用开源软件

参考 :
UR机械臂运动学正逆解方法
最近几个月因为工作接触到了机械臂的项目,突然对机械臂运动方法产生了兴趣,也就是如何控制机械臂的位置和姿态.借用一张网上的图片,应该是ur5的尺寸.我用到的是ur3机械臂,除了尺寸不一样,各关节结构和初 ...
基于 Mathematica 的机器人仿真环境(机械臂篇)[转]
完美的教程,没有之一,收藏学习. 目的 本文手把手教你在 Mathematica 软件中搭建机器人的仿真环境,具体包括以下内容(所使用的版本是 Mathematica 11.1,更早的版本可能缺少某些 ...
ros平台下python脚本控制机械臂运动
在使用moveit_setup_assistant生成机械臂的配置文件后可以使用roslaunch demo.launch启动demo,在rviz中可以通过拖动机械臂进行运动学正逆解/轨迹规划等仿真运 ...
【BZOJ3506】排序机械臂(Splay)
[BZOJ3506]排序机械臂(Splay) 题面 神TMBZOJ没有题面,感谢SYC的题面 洛谷的题面也不错 题解 对于每次旋转的物体 显然可以预处理出来 现在只要模拟旋转操作就行了 至于在哪里放标 ...
ROS连接ABB机械臂调试详细教程-ROS(indigo)和ABB RobotStudio 6.03.02-
在ROS industrial介绍中,给出了ROS和常用机械臂的连接方式.具体信息可以参考:http://wiki.ros.org/Industrial ROS连接ABB机械臂调试详细教程-ROS(i ...
机械臂——arduino、marlin固件、printrun软件【转】
最近了解到,在市面上大多数机械臂控制都采用的arduino这个开源硬件来控制的,而我发现既然会单片机,就没有必要采用arduino来控制了,arduino只是一种为了简化编程而开发一种软硬件控制平台, ...
机械臂运动学逆解(Analytical solution)
计算机器人运动学逆解首先要考虑可解性(solvability),即考虑无解.多解等情况.在机器人工作空间外的目标点显然是无解的.对于多解的情况从下面的例子可以看出平面二杆机械臂(两个关节可以360°旋 ...
P3165 [CQOI2014]排序机械臂
题目描述 为了把工厂中高低不等的物品按从低到高排好序,工程师发明了一种排序机械臂.它遵循一个简单的排序规则,第一次操作找到高度最低的物品的位置 P1P_1P1 ,并把左起第一个物品至 P1P_1P1 ...
【BZOJ3506】[CQOI2014] 排序机械臂(Splay)
点此看题面 大致题意: 给你\(n\)个数.第一次找到最小值所在位置\(P_1\),翻转\([1,P_1]\),第二次找到剩余数中最小值所在位置\(P_2\),翻转\([2,P_2]\),以此类推.求 ...
随机推荐
LeetCode[5] 最长的回文子串
题目描述 Given a string S, find the longest palindromic substring in S. You may assume that the maximum ...
QGridLayout--01
#include "mainwindow.h" #include #include #include
gc 辅助打印信息
cat xx.xml|grep GC -XX:+PrintGCDetails-XX:+PrintGCDat ...
仿百度自动补全jquery
新建index.html文件,直接复制下面代码到新建的文件index.html里面,用浏览器访问,仅用于参考:
常用经典SQL语句大全(基础)
一.基础 1.说明:创建数据库 CREATE DATABASE database-name 2.说明:删除数据库 drop database dbname 3.说明:备份sqlserver --- 创 ...
QT5新手上路(1)安装
这几天学了一下windows下的QT,也不算什么心得吧,就是谈一下我的做法.希望看到这篇随笔的菜鸟们略有所得,少走弯路. 闲话少说,先说安装.首先是选版本,我用的是qt-opensource-wind ...
POJ 1753 Flip Game (DFS + 枚举)
题目:http://poj.org/problem?id=1753 这个题在開始接触的训练计划的时候做过,当时用的是DFS遍历,其机制就是把每一个棋子翻一遍.然后顺利的过了.所以也就没有深究. 省赛前 ...
mysql_SQL_按照日统计微博数
主要备忘: DATE_FORMAT 函数 1:微博对比图(按日统计) SELECT DATE_FORMAT(tw.article_publish_time, '%Y-%m-%d'),count(pag ...
部署LNMP架构Blog博客平台 ---惟净
部署环境:VM虚拟机 操作系统:CentOS-6.8-x64 IP地址:192.168.31.91Mysql数据库版本:5.6.34 Cmake软件包版本:3.5.2Nginx软件包版本:1.10.2 ...
只用200行Go代码写一个自己的区块链!
Coral Health · 大约23小时之前 · 220 次点击 · 预计阅读时间 7 分钟 · 不到1分钟之前 开始浏览 区块链是目前最热门的话题,广大读者都听说过比特币,或许还有智能合约,相信大 ...