SpringBoot小知识点(一)
文章目录
- 1.为啥要用SpringBoot
- 2.什么是Spring Boot Starter?
- 3.lombok注解简化开发
- 4.热部署热加载设置
- 5.Restful
- 6.Json
-
- 6.1 常用注解
- 6.2 手动对象转换
- 7.Mockito编码完成接口测试
- 8.swagger
-
- 8.1 演示
- 8.2 生成离线文档
- 9.bean加载原理(简单分析)
- 参考
1.为啥要用SpringBoot
- 在spring boot出现以前,使用spring框架的程序员是这样配置web应用环境的,需要大量的xml配置。
- 随着web项目集成软件的不断增多,xml配置也不断的增多,xml配置文件也在不断地增多,项目的依赖管理也越发的复杂。spring框架也因此饱受争议,配置文件难以理解且容易出错。
- xml配置文件不但复杂,而且绝大部分属于模板配置,也就是说有80%以上的配置是不断重复的。在这个web项目里面这样配置,挪到另一个项目里面这部分配置仍然相同。
Spring Boot 的目标不在于为已解决的问题领域提供新的解决方案,而是为平台带来另一种新的开发体验,从而简化对这些已有技术的使用。
使配置变简单
使监控变简单
使部署变简单
使开发变简单
主要特性:
1.遵循“约定优于配置”的原则,简化配置
2.可以完全脱离XML配置文件,采用注解配置和java Config
3.内嵌Servlet容器,应用可用jar包执行:java -jar
4.快速完成项目搭建、整合第三方类库,方便易用
5.提供了starter POM, 能够非常方便的进行包管理, 简化包管理配置
6.与Spring cloud天然集成,spring boot是目前java体系内实现微服务最佳方案
与第三方集成:
1.通过maven引入springboot-XXXX-starter
2.修改ymal或properties全局统一配置文件
3.加入一个Java Config。这个属于个性化配置,如果使用通用配置,这一步不需要。
2.什么是Spring Boot Starter?
Spring Boot Starter是一组被依赖第三方类库的集合。
如果你要开发一个web应用程序,就通过包管理工具(如maven)引入spring-boot-starter-web就可以了,而不用分别引入下面这么多依赖类库,spring-boot-starter-web一次性帮你引入下面的这些常用类库。
Spring — spring 核心, beans, context上下文, AOP面向切面
Web MVC — Spring MVC
Jackson — JSON数据的序列化与反序列化
Validation — Hibernate参数校验及校验API
嵌入式 Servlet Container — Tomcat
日志框架Logging — logback, slf4j
所有的Spring Boot项目默认使用spring-boot-starter-parent作为应用程序的父项目。
<parent>
 <groupId>org.springframework.bootgroupId>
 <artifactId>spring-boot-starter-parentartifactId>
 <version>XXX.RELEASEversion>
parent>
继承父项目的好处在于: 统一java版本配置和其他的一些依赖类库的版本。也就是说,你引入的第三方类库不要加版本号,父项目替你管理版本,而且是经过兼容性测试的。比你自己随便引入一个版本兼容性更好。
当然父项目只能帮你管理一些常用类库的版本,如果你引入一些不常用的jar,还是要自己管理版本号及兼容性!
3.lombok注解简化开发
1.IDEA先安装插件

2.加入依赖
 <dependency>
            <groupId>org.projectlombokgroupId>
            <artifactId>lombokartifactId>
            <optional>trueoptional>
dependency>
< optional >true :比如 A项目引入依赖B项目,而B项目依赖了一个lombok,那么A项目也能正常依赖这个lombok,但若有一个新的项目N引入A项目,由于lombok离设置了option,那么这个N项目就不会再引入了,若要引入,就必须在pom声明
3.主要注解
@Slf4j
@AllArgsConstructor
@NoArgsConstructor
@Setter
@Getter
@ToString
@Builder
public class Person {

}
4.热部署热加载设置
1.引入依赖插件
1.Jrebel插件在有些Spring Boot版本不够兼容,会报错,越新的版本越容易报错。所以笔者目前还是选择性放弃使用该方法!
2.devtools实现热加载
spring-boot-devtools从名称就可以看出来,是开发者工具包,其主要的功能就是实现热加载。
<dependency>
   <groupId>org.springframework.bootgroupId>
   <artifactId>spring-boot-devtoolsartifactId>
   <optional>trueoptional>
dependency>
2.设置配置
运行时编译配置:组合键:“Shift+Ctrl+Alt+/” ,选择 “Registry” ,选中打勾 “compiler.automake.allow.when.app.running” 。
我的IDEA版本是2019.3.5的,所以只需要设置这个配置即可

3.测试

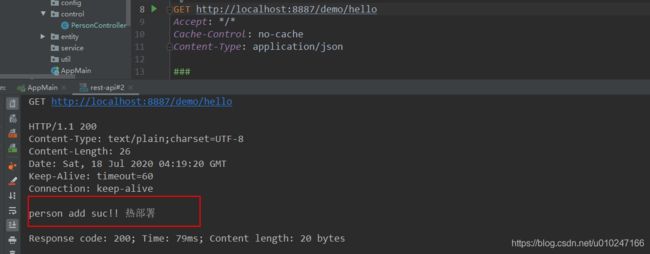
自动化编译配置: “File” -> “Settings” -> “Build,Execution,Deplyment” -> “Compiler”,选中打勾 “Make project automatically” 。也可以这样设置,不过不建议这种,因为每次刚一修改,就要编译,比较影响性能
5.Restful
RESTful是基于http方法的API设计风格,而不是一种新的技术.
- 看Url就知道要什么资源
- 看http method就知道针对资源干什么
- 看http status code就知道结果如何
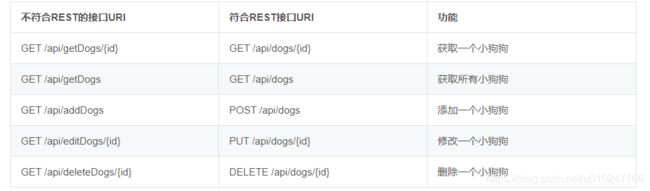
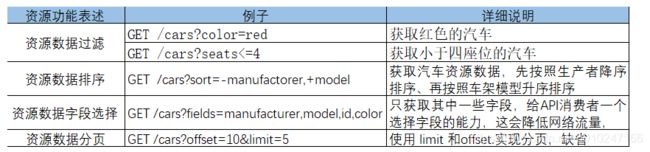

RESTful接口与http协议状态表述
6.Json
开源的Jackson:SpringBoot默认是使用Jackson作为JSON数据格式处理的类库,Jackson在各方面都比较优秀,所以不建议将Jackson替换为Gson或fastjson。
- 序列化过程性能:fastjson >= jackson > Gson,Gson在数据并发量较大时会与其他二者有较明显差距。
- 反序列化性能:三者几乎不相上下,Gson略好一点。
反序列化:在客户端将请求数据上传到服务端的时候,自动的处理JSON数据对象中的字符串、数字,将其转换为包含Date类型、Integer等类型的对象。
序列化:按照指定的格式、顺序等将实体类对象转换为JSON字符串
6.1 常用注解
这些注解通常用于标注java实体类或实体类的属性。
- @JsonPropertyOrder(value={“pname1”,“pname2”}) 改变子属性在JSON序列化中的默认定义的顺序。如:param1在先,param2在后。
- @JsonIgnore 排除某个属性不做序列化与反序列化
- @JsonProperty(anotherName) 为某个属性换一个名称,体现在JSON数据里面
- @JsonInclude(JsonInclude.Include.NON_NULL) 排除为空的元素不做序列化反序列化
- @JsonFormat(pattern = “yyyy-MM-dd HH:mm:ss”, timezone = “GMT+8”) 指定日期类型的属性格式
@JsonPropertyOrder(value={"content","title"})
public class Article {

    @JsonIgnore
    private Long id;

    @JsonProperty("auther")
    private String author;
    private String title;
    private String content;

    @JsonInclude(JsonInclude.Include.NON_NULL)
    @JsonFormat(pattern = "yyyy-MM-dd HH:mm:ss", timezone = "GMT+8")
    private Date createTime;
    private List<Reader> reader;

}
对应结果:
{
    auther :"",
    content:"",
    title:"",
    createTime:"2019-10-20 12:12:12",
    reader:[{"name":"zimug","age":18},{"name":"kobe","age":37}]
}
分析:
因为定义了JsonPropertyOrder,content在先,title在后
因为定义了JsonIgnore,id属性被忽略
因为定义了JsonProperty,author属性变为auther
因为定义了JsonInclude和JsonFormat,createTime不要为空,并且格式为 “yyyy-MM-dd HH:mm:ss”
通常会对日期类型转换,进行全局配置,而不是在每一个java bean里面配置
spring:
    jackson:
        date-format: yyyy-MM-dd HH:mm:ss
        time-zone: GMT+8
6.2 手动对象转换
//jackson的ObjectMapper 转换对象
ObjectMapper mapper = new ObjectMapper();
//将某个java对象转换为JSON字符串
String jsonStr = mapper.writeValueAsString(javaObj);
//将jsonStr转换为Ademo类的对象(注意前提是:对象需要无参和全参构造方法)
Ademo ademo = mapper.readValue(jsonStr, Ademo.class);
7.Mockito编码完成接口测试
在做系统的自动化持续集成的时候,会要求自动的做单元测试,只有所有的单元测试都跑通了,才能打包构建。比如:使用maven在打包之前将所有的测试用例执行一遍。这里重点是自动化,所以postman这种工具很难插入到持续集成的自动化流程中去。
Mockito是GitHub上使用最广泛的Mock框架,并与JUnit结合使用.Mockito框架可以创建和配置mock对象.使用Mockito简化了具有外部依赖的类的测试开发。Mockito测试框架可以帮助我们模拟HTTP请求,从而达到在服务端测试目的。因为其不会真的去发送HTTP请求,而是模拟HTTP请求内容,从而节省了HTTP请求的网络传输,测试速度更快。
<dependency>
   <groupId>org.springframework.bootgroupId>
   <artifactId>spring-boot-starter-testartifactId>
   <scope>testscope>
   <exclusions>
      <exclusion>
         <groupId>org.junit.vintagegroupId>
         <artifactId>junit-vintage-engineartifactId>
      exclusion>
   exclusions>
dependency>
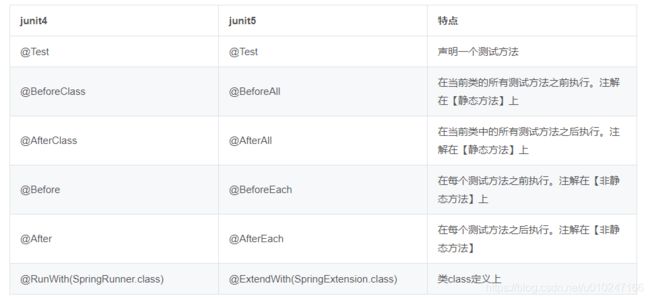
spring-boot-starter-test(Spring Boot 2.3.0.RELEASE)自动包含Junit 5 和Mockito框架,以下测试代码是基于Junit5
@Slf4j
public class ArticleRestControllerTest {

    //mock对象
    private static MockMvc mockMvc;

    //在所有测试方法执行之前进行mock对象初始化
    @BeforeAll
    static void setUp() {
        mockMvc = MockMvcBuilders.standaloneSetup(new ArticleController()).build();
    }

    //测试方法
    @Test
    public void saveArticle() throws Exception {

        String article = "{\n" +
                "    \"id\": 1,\n" +
                "    \"author\": \"zimug\",\n" +
                "    \"title\": \"手摸手教你开发spring boot\",\n" +
                "    \"content\": \"c\",\n" +
                "    \"createTime\": \"2017-07-16 05:23:34\",\n" +
                "    \"reader\":[{\"name\":\"zimug\",\"age\":18},{\"name\":\"kobe\",\"age\":37}]\n" +
                "}";
        MvcResult result = mockMvc.perform(
            MockMvcRequestBuilders
                .request(HttpMethod.POST, "/rest/articles")
                .contentType("application/json")
                .content(article)
        )
        .andExpect(MockMvcResultMatchers.status().isOk())  //HTTP:status 200
        .andExpect(MockMvcResultMatchers.jsonPath("$.data.author").value("zimug"))
        .andExpect(MockMvcResultMatchers.jsonPath("$.data.reader[0].age").value(18))
        .andDo(print())
        .andReturn();
        result.getResponse().setCharacterEncoding("UTF-8");
        log.info(result.getResponse().getContentAsString());

    }
}

MockMvc对象有以下几个基本的方法:

perform : 模拟执行一个RequestBuilder构建的HTTP请求,会执行SpringMVC的流程并映射到相应的控制器Controller执行。
contentType:发送请求内容的序列化的格式,"application/json"表示JSON数据格式
andExpect: 添加RequsetMatcher验证规则,验证控制器执行完成后结果是否正确,或者说是结果是否与我们期望(Expect)的一致。
andDo: 添加ResultHandler结果处理器,比如调试时打印结果到控制台
andReturn: 最后返回相应的MvcResult,然后进行自定义验证/进行下一步的异步处理
若需要用到依赖注入,则需要增加另外注解

8.swagger
- 代码变,文档变。只需要少量的注解,Swagger 就可以根据代码自动生成 API 文档,很好的保证了文档的时效性。
- 跨语言性,支持 40 多种语言。
- Swagger UI 呈现出来的是一份可交互式的 API 文档,我们可以直接在文档页面尝试 API 的调用,省去了准备复杂的调用参数的过程。
- 还可以将文档规范导入相关的工具(例如 SoapUI), 这些工具将会为我们自动地创建自动化测试。
@Api:用在Controller控制器类上
     属性tags="说明该类的功能及作用"

@ApiOperation:用在Controller控制器类的请求的方法上
    value="说明方法的用途、作用"
    notes="方法的备注说明"

@ApiImplicitParams:用在请求的方法上,表示一组参数说明
    @ApiImplicitParam:请求方法中参数的说明
        name:参数名
        value:参数的汉字说明、解释、用途
        required:参数是否必须传,布尔类型
        paramType:参数的类型,即参数存储位置或提交方式
            · header --> Http的Header携带的参数的获取:@RequestHeader
            · query --> 请求参数的获取:@RequestParam   (如上面的例子)
            · path(用于restful接口)--> 请求参数的获取:@PathVariable
            · body(不常用)
            · form(不常用)
        dataType:参数类型,默认String,其它值dataType="Integer"
        defaultValue:参数的默认值

@ApiResponses:用在控制器的请求的方法上,对方法的响应结果进行描述
    @ApiResponse:用于表达一个响应信息
        code:数字,例如400
        message:信息,例如"请求参数没填好"
        response:响应结果封装类,如上例子中的AjaxResponse.class

@ApiModel:value=“通常用在描述@RequestBody和@ResponseBody注解修饰的接收参数或响应参数实体类”
    @ApiModelProperty:value="实体类属性的描述"
@ApiParam和@ApiImplicitParam的功能是相同的,但是@ApiImplicitParam的适用范围更广。在非JAX-RS的场合(比如使用servlet提供HTTP接口),只能使用@ApiImplicitParam进行参数说明。我认为,这是因为接口并不显式展示入参的名称,所以没有地方去使用@ApiParam,只能在接口的方法声明下方写@ApiImplicitParam
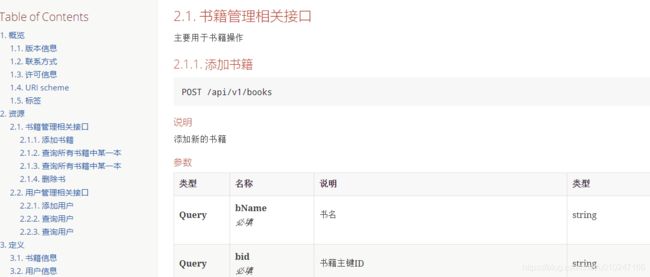
8.1 演示
1.引入依赖
        <dependency>
            <groupId>io.springfoxgroupId>
            <artifactId>springfox-swagger2artifactId>
            <version>2.9.2version>
        dependency>
        <dependency>
            <groupId>io.springfoxgroupId>
            <artifactId>springfox-swagger-uiartifactId>
            <version>2.9.2version>
        dependency>
2.主要代码
@RestController
@Api(value = "/api", description = "主要用于书籍操作",tags = "书籍管理相关接口")
@RequestMapping("/api")
public class BookController {

    @GetMapping("/v1/books/{bid}")
    @ApiOperation(value = "查询所有书籍中某一本", notes = "调用方:", produces = MimeTypeUtils.APPLICATION_JSON_VALUE, httpMethod = "GET")
    @ApiImplicitParams({
            @ApiImplicitParam(value = "书籍主键ID", name = "bid", required = true, paramType = "path", dataType = "string")
    })
    public Book getBook(@PathVariable String bid) {
        return new Book(bid+"","从入门到放弃");
    }


    @PostMapping("/v1/books")
    @ApiOperation(value = "添加书籍", notes = "添加新的书籍",httpMethod = "POST")
    @ApiImplicitParams({
            @ApiImplicitParam(value = "书籍主键ID", name = "bid", required = true, paramType = "query", dataType = "string"),
            @ApiImplicitParam(value = "书名", name = "bName", required = true, paramType = "query", dataType = "string")
    })
    @ApiResponses({
            @ApiResponse(code=200,message="成功",response=Book.class),
            @ApiResponse(code=400,message="用户输入错误",response=Book.class),
            @ApiResponse(code=500,message="系统内部错误",response=Book.class)
    })
    public Book saveBook(@RequestParam String  bid, @RequestParam String  bName) {
        return  new Book(bid,bName);
    }

    @PutMapping("/v1/books/{bid}")
    @ApiOperation(value = "查询所有书籍中某一本", notes = "修改一本书", produces = MimeTypeUtils.APPLICATION_JSON_VALUE, httpMethod = "PUT")
    @ApiImplicitParams({
            @ApiImplicitParam(value = "书籍主键ID", name = "bid", required = true, paramType = "path", dataType = "string"),
            @ApiImplicitParam(value = "书实体信息", name = "book", required = true, paramType = "body", dataType = "Book")
    })
    public Book updateBook(@PathVariable String bid, @RequestBody Book book) {
        return book;
    }

    @DeleteMapping("/v1/books/{bid}")
    @ApiOperation(value = "删除书", notes = "删除一本书", produces = MimeTypeUtils.APPLICATION_JSON_VALUE, httpMethod = "DELETE")
    @ApiImplicitParams({
            @ApiImplicitParam(value = "书籍主键ID", name = "bid", required = true, paramType = "path", dataType = "string")
    })
    public String deleteBook(@PathVariable String bid) {
        return "删除成功";
    }


}
@RestController
@RequestMapping("/api")
@Api(value = "/api", description = "主要用于用户操作",tags = "用户管理相关接口")
public class PersonController {


    @PostMapping("/v1/persons")
    @ApiOperation(value = "添加用户",notes = "主要是向后台添加数据",tags = {"person"}) //用于方法;表示一个http请求的操作
    @ApiResponses(value = { @ApiResponse(code = 1000, message = "成功"),
            @ApiResponse(code = 1001, message = "失败"),
            @ApiResponse(code = 1002, message = "缺少参数") })
    public String addPerson(@ApiParam(name = "person",required = true,value = "用户实体类") Person person) {
        return "person add suc!!";
    }

    @GetMapping("/v1/persons/{pid}")
    @ApiOperation(value = "查询用户", notes = "主要是根据ID查询用户",tags = {"person"})
    @ApiImplicitParams({
            @ApiImplicitParam(name = "pid", value = "用户id", defaultValue = "66", required = true, paramType = "String", example = "66")
    })
    public Person getPersonById(@PathVariable String pid) {
        if("1".equals(pid)){
            return new Person("p1","XIAOMIGN",1,new Date());
        }
        return null;
    }


    @GetMapping("/v2/persons/{pid}")
    @ApiOperation(value = "查询用户", notes = "主要是根据ID查询用户",tags = {"person"})
    public Person getPersonById2(@ApiParam(name = "pid", value = "需要删除的公告ids", required = true) @PathVariable String pid) {
        if("1".equals(pid)){
            return new Person("p1","XIAOMIGN",1,new Date());
        }
        return null;
    }


}
注意:引用Api等代码注解,后续的参数,一定要用spring(比如@PathVariable,@RequestBody)的相关注解进行定义,不然导出来的swagger.json文件会有未定义等问题
dataType=“int” 代表请求参数类型为int类型,当然也可以是Map、User、String等;
paramType=“body” 代表参数应该放在请求的什么地方:
header–>放在请求头。请求参数的获取:@RequestHeader(代码中接收注解)
query–>用于get请求的参数拼接。请求参数的获取:@RequestParam(代码中接收注解)
path(用于restful接口)–>请求参数的获取:@PathVariable(代码中接收注解)
body–>放在请求体。请求参数的获取:@RequestBody(代码中接收注解)
form(不常用)

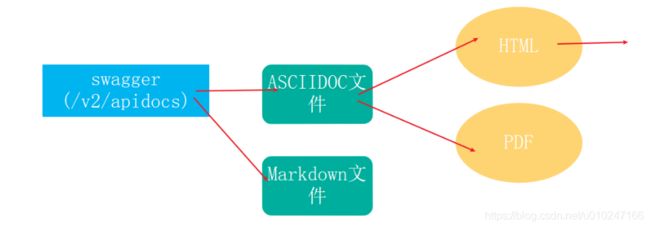
8.2 生成离线文档
之前讲的是在线文档,需要使用HTTP访问。但是在我们日常使用swagger接口文档的时候,有的时候需要接口文档离线访问,如将文档导出为html、markdown格式。又或者我们不希望应用系统与swagger接口文档使用同一个服务,而是导出HTML之后单独部署,这样做保证了对接口文档的访问不影响业务系统,也一定程度提高了接口文档的安全性。
1.导入依赖
        <dependency>
            <groupId>io.github.swagger2markupgroupId>
            <artifactId>swagger2markupartifactId>
            <version>1.3.3version>
        dependency>

    dependencies>

    <repositories>
        <repository>
            <snapshots>
                <enabled>trueenabled>
                <updatePolicy>alwaysupdatePolicy>
            snapshots>
            <id>jcenter-releasesid>
            <name>jcentername>
            <url>http://jcenter.bintray.comurl>
        repository>
    repositories>
2.编写代码,生成指定格式文档
    @Test
    public void generateAsciiDocs2() throws Exception {
        //    输出Ascii格式
        Swagger2MarkupConfig config = new Swagger2MarkupConfigBuilder()
                .withMarkupLanguage(MarkupLanguage.ASCIIDOC)
                .withOutputLanguage(Language.ZH)
                .withPathsGroupedBy(GroupBy.TAGS)
                .withGeneratedExamples()
                .withoutInlineSchema()
                .build();

        Swagger2MarkupConverter.from(new URL("http://localhost:8080/v2/api-docs"))
                .withConfig(config)
                .build()
                .toFile(Paths.get("./docs/asciidoc/generated/mydoc"));
    }

    @Test
    public void generateMarkdownDocs2() throws Exception {
        //    输出Markdown格式
        Swagger2MarkupConfig config = new Swagger2MarkupConfigBuilder()
                .withMarkupLanguage(MarkupLanguage.MARKDOWN)
                .withOutputLanguage(Language.ZH)
                .withPathsGroupedBy(GroupBy.TAGS)
                .withGeneratedExamples()
                .withoutInlineSchema()
                .build();

        Swagger2MarkupConverter.from(new URL("http://localhost:8080/v2/api-docs"))
                .withConfig(config)
                .build()
                .toFile(Paths.get("./docs/markdown/generated/all"));
    }
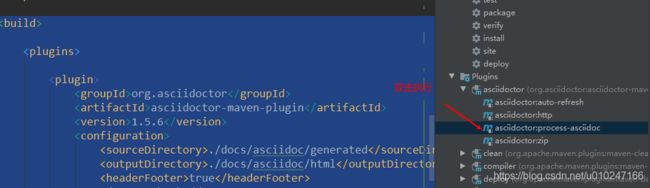
3.添加maven插件,AsciiDocs转换为html
    <build>

        <plugins>

            <plugin>
                <groupId>org.asciidoctorgroupId>
                <artifactId>asciidoctor-maven-pluginartifactId>
                <version>1.5.6version>
                <configuration>
                    <sourceDirectory>./docs/asciidoc/generatedsourceDirectory>
                    <outputDirectory>./docs/asciidoc/htmloutputDirectory>
                    <headerFooter>trueheaderFooter>
                    <doctype>bookdoctype>
                    <backend>htmlbackend>
                    <sourceHighlighter>coderaysourceHighlighter>
                    <attributes>

                        <toc>lefttoc>

                        <toclevels>3toclevels>

                        <sectnums>truesectnums>
                    attributes>
                configuration>
            plugin>


        plugins>

    build>
参考:
使用Swagger2Markup实现导出API文档
官网
9.bean加载原理(简单分析)
1.所有的Spring Boot应用程序都是以SpringApplication.run()作为应用程序入口的。下面我们来一步一步跟踪一下这个函数。
    public ConfigurableApplicationContext run(String... args) {
        StopWatch stopWatch = new StopWatch();
        stopWatch.start();
        ConfigurableApplicationContext context = null;
        Collection<SpringBootExceptionReporter> exceptionReporters = new ArrayList();
        this.configureHeadlessProperty();
        SpringApplicationRunListeners listeners = this.getRunListeners(args);
        listeners.starting();

        Collection exceptionReporters;
        try {
            ApplicationArguments applicationArguments = new DefaultApplicationArguments(args);
            ConfigurableEnvironment environment = this.prepareEnvironment(listeners, applicationArguments);
            this.configureIgnoreBeanInfo(environment);
            Banner printedBanner = this.printBanner(environment);
            context = this.createApplicationContext();
            exceptionReporters = this.getSpringFactoriesInstances(SpringBootExceptionReporter.class, new Class[]{ConfigurableApplicationContext.class}, context);
            this.prepareContext(context, environment, listeners, applicationArguments, printedBanner);
            this.refreshContext(context);
            this.afterRefresh(context, applicationArguments);
            stopWatch.stop();
            if (this.logStartupInfo) {
                (new StartupInfoLogger(this.mainApplicationClass)).logStarted(this.getApplicationLog(), stopWatch);
            }

            listeners.started(context);
            this.callRunners(context, applicationArguments);
        } catch (Throwable var10) {
            this.handleRunFailure(context, var10, exceptionReporters, listeners);
            throw new IllegalStateException(var10);
        }

        try {
            listeners.running(context);
            return context;
        } catch (Throwable var9) {
            this.handleRunFailure(context, var9, exceptionReporters, (SpringApplicationRunListeners)null);
            throw new IllegalStateException(var9);
        }
    }
2.run方法传入了SpringApplication对象和一些运行期参数。找到getSpringFactoriesInstances,继续向前跟进,我们发现一个类叫做SpringFactoriesLoader,这里面体现了Spring Boot加载配置文件的核心逻辑。


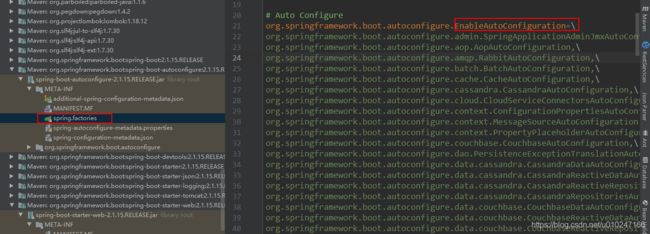
当引入一个starter的时候,就会引入一个依赖配置文件,这个配置文件就会去加载规定的相关类进入到我们spring容器中,我们就可以直接拿来使用

每一个自动配置类进行自动配置功能(spring.factories中的每一行对应的类),我们以HttpEncodingAutoConfiguration为例讲解一下:
//加载application全局配置文件内的部分配置到HttpEncodingProperties里面
@Configuration
@EnableConfigurationProperties({HttpEncodingProperties.class})
//当web容器类型是servlet的时候执行本类中的自动装配代码
@ConditionalOnWebApplication(
    type = Type.SERVLET
)
//当有一个CharacterEncodingFilter的这样一个类的字节码文件时时执行本类中的自动装配代码
@ConditionalOnClass({CharacterEncodingFilter.class})
//当spring.http.encoding配置值为enabled的时候执行本类中的自动装配代码
@ConditionalOnProperty(
    prefix = "spring.http.encoding",
    value = {"enabled"},
    matchIfMissing = true   //如果application配置文件里面不配置,默认为true
)
public class HttpEncodingAutoConfiguration {
    private final HttpEncodingProperties properties;

    public HttpEncodingAutoConfiguration(HttpEncodingProperties properties) {
        this.properties = properties;
    }

    @Bean
    //当没有CharacterEncodingFilter这个Bean就实例化CharacterEncodingFilter为一个bean
    @ConditionalOnMissingBean
    public CharacterEncodingFilter characterEncodingFilter() {
        CharacterEncodingFilter filter = new OrderedCharacterEncodingFilter();
        filter.setEncoding(this.properties.getCharset().name());
        filter.setForceRequestEncoding(this.properties.shouldForce(org.springframework.boot.autoconfigure.http.HttpEncodingProperties.Type.REQUEST));
        filter.setForceResponseEncoding(this.properties.shouldForce(org.springframework.boot.autoconfigure.http.HttpEncodingProperties.Type.RESPONSE));
        return filter;
    }

    @Bean
    public HttpEncodingAutoConfiguration.LocaleCharsetMappingsCustomizer localeCharsetMappingsCustomizer() {
        return new HttpEncodingAutoConfiguration.LocaleCharsetMappingsCustomizer(this.properties);
    }

   //此处省略与自动加载无关的代码:HttpEncode的逻辑及其他
}

参考
手摸手教你学spring boot 2.x
新版Spring boot2.0全套视频教程