从零开始搭建Springboot+JPA后台
目录
- 从零开始搭建Springboot+JPA后台
- 一、环境、工具
- 二、搭建后台spring-boot框架
- 2.1 创建项目
- 2.2 数据库层(DAO层)
- 2.3 业务层(Service层)
- 2.4 控制器层(Web层)
- 后台测试
从零开始搭建Springboot+JPA后台
一、环境、工具
- jdk16.0.2
- java 15
- SpringBoot
- JPA
- Maven
- mysql
二、搭建后台spring-boot框架
2.1 创建项目
1、首先创建新项目,点击new- project,选择Spring Initializr next:
默认使用 https://start.spring.io/ 创建项目
如果很慢或连接不上,则使用:https://start.aliyun.com/ (阿里云镜像)

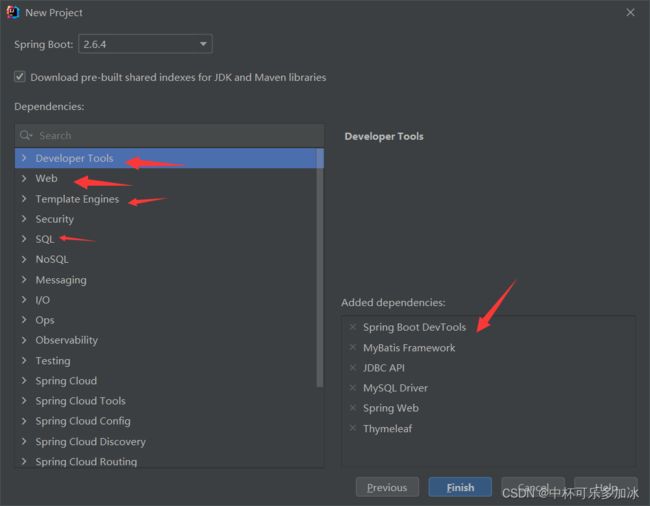
2、选择项目需要的依赖(如果用JPA的话,Mybatis Framework可以不选)
3、创建好的项目结构如下:
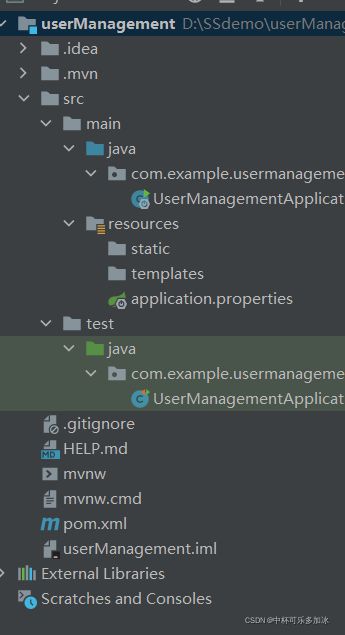
其中
- java:Java程序开发目录,其中***Application文件是Spring-boot的入口程序;
- resources:资源文件目录,其中static文件夹:存放静态文件,如css,js,图片等资源;templates文件夹:存放Web页面的模板文件;application.properties:项目配置文件,如服务端口、数据库配置等
- test:测试程序目录
- pom.xml:Maven项目管理文件,用于构建Maven项目的各种配置信息,如项目信息,Java版本信息、项目依赖,插件等等
3、在pom.xml中添加Spring Data JPA依赖
        <dependency>
            <groupId>org.springframework.bootgroupId>
            <artifactId>spring-boot-starter-data-jpaartifactId>
        dependency>
4、数据库连接配置
首先打开mysql workbench,查看数据库的用户名和密码
在 application.properties 添加数据库连接配置
#自动生成数据库表(关键)
spring.jpa.hibernate.ddl-auto=update
#mysql数据库连接配置(非常重要)
spring.datasource.url = jdbc:mysql://localhost:3306/mydb?serverTimezone=Asia/Shanghai
spring.datasource.username = root
spring.datasource.password = root
#mysql数据库驱动程序(重要)
spring.datasource.driver-class-name = com.mysql.cj.jdbc.Driver
#jpa配置:在控制台显示Hibernate的sql(可选)
spring.jpa.show-sql = true
#其他配置:关闭Thymeleaf 的缓存
spring.thymeleaf.cache = false
其中spring.datasource.url中要填端口号(一般为3306)和数据库名
datasource.username中填数据库管理员账号
datasource.password中填数据库管理员密码
2.2 数据库层(DAO层)
数据库层(DAO层)主要面向数据库底层,负责CRUD等操作,该层包括映射数据库表的实体类,和包含Repository仓库的数据访问接口层。
5、创建实体类User
新建entity包,在 entity 包中新建 User 类:用于映射数据库表:

User.java
package com.example.usermanagement.entity;
import org.springframework.format.annotation.DateTimeFormat;

import javax.persistence.*;
import java.io.Serializable;
import java.util.Date;
public class User implements Serializable {
    @Id //表示该属性作为表的主键
    @GeneratedValue(strategy = GenerationType.IDENTITY) //设定主键生成策略:IDENTITY表示由数据库自动生成
    private Long id; // Long 对应MySQL数据库 bigint 类型
    @Column(nullable = false, unique = true, length = 20) //列字段,非空且唯一,字符最大长度20
    private String username;
    @Column(nullable = false, length = 20) //列字段,非空,字符最大长度20
    private String password;

// getter/setter 略
}
6、创建数据接口访问层(repository仓库)
◼JPA 提供了操作数据库的接口。在开发过程中继承和使用这些接口,可简化持久化开发工作。
◼ Spring能够找到自定义接口,并生成代理类,在开发过程中可以不写相关SQL操作,由代理类自动生成。
◼ JPA接口:JpaRepository
新建repository包,在包中新建接口:UserRepository并且其extends JpaRepository

UserRepository:
package com.example.usermanagement.repository;


import com.example.usermanagement.entity.User;
import org.springframework.data.jpa.repository.JpaRepository;

public interface UserRepository extends JpaRepository<User, Long> {
    public User findByUsernameAndPassword(String username,String password);
// JpaRepository 自动实现了很多内置的CURD方法
// 这些方法以后可直接调用,例如:
// List findAll();
// Optional findById(id);
// User save(user);
// void delete(user);
// void deleteById(id);
// long count();
// boolean existsById(id);
}
2.3 业务层(Service层)
业务层包括主要面向具体业务,实现具体功能,其在DAO层之上,处理控制器层的需求,实现对应功能。
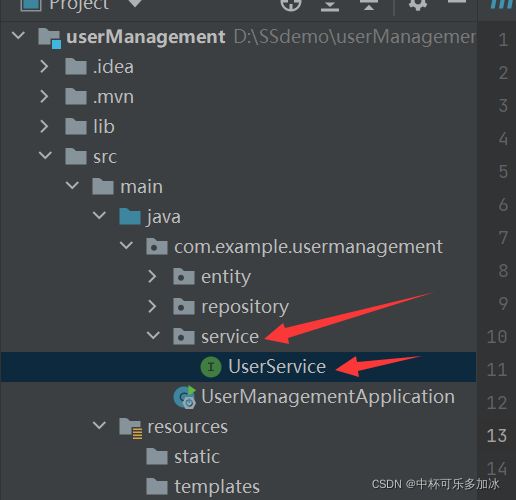
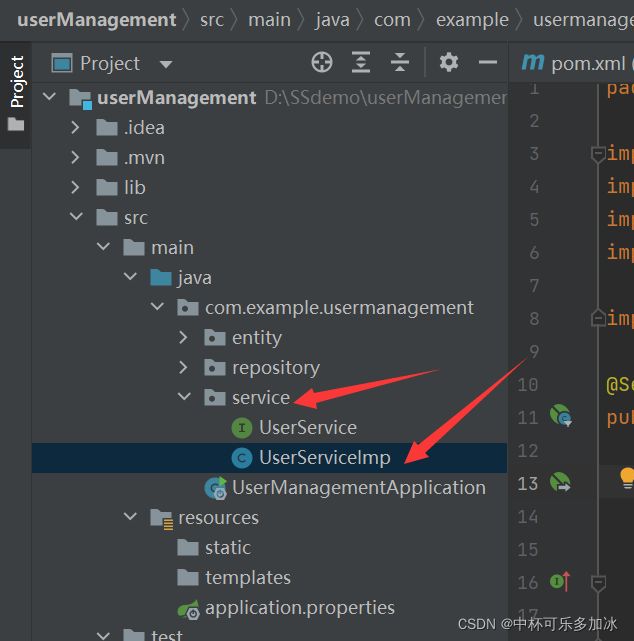
7、首先创建服务层接口。即新建service包,然后在包中新建UserService接口。然后在UserService中根据业务功能的需要声明相关方法。
UserService:
package com.example.usermanagement.service;

import com.example.usermanagement.entity.User;

import java.util.List;

public interface UserService {
    public List<User> getUserList();
    public User findUserById(Long id);
    public void save(User user);
    public void edit(User user);
    public void delete(Long id);
    public User login(String username, String password);
}
8、实现服务层接口
在service包中新建UserServiceImp类,用于实现UserService接口,其通过调用DAO层的UserRespository的函数实现具体的业务。
UserServiceImp:
package com.example.usermanagement.service;

import com.example.usermanagement.entity.User;
import com.example.usermanagement.repository.UserRepository;
import org.springframework.beans.factory.annotation.Autowired;
import org.springframework.stereotype.Service;

import java.util.List;

@Service //声明类为服务实现类
public class UserServiceImp implements UserService {
    @Qualifier
    private UserRepository userRepository;

    @Override
    public List<User> getUserList() {
        return userRepository.findAll(); //直接调用Repository内置的CURD方法
    }

    @Override
    public User findUserById(Long id) {
        return userRepository.findById(id).get(); //直接调用Repository内置的CURD方法
//findById(id)返回的是Optional类(一个可以为null的容器对象)
//如果Optional容器中存在对象,则调用get()方法返回该对象
    }

    @Override
    public void save(User user) {
        userRepository.save(user); //直接调用Repository内置的CURD方法
    }

    @Override
    public void edit(User user) { //保存修改的对象
        userRepository.save(user); //直接调用Repository内置的CURD方法
    }

    @Override
    public void delete(Long id) {
        userRepository.deleteById(id); //直接调用Repository内置的CURD方法
    }
    /*@Override
    public User login(String username, String password) {
        User user=userRepository.findByUsernameAndPassword(username,password);
        return user;
    }*/
}
2.4 控制器层(Web层)
控制器层面向Controller层,其主要通过调用业务层实现的具体业务,Controller层调用服务层业务(Service层)负责业务调度,在这一层,一个方法所体现的是一个可以对外提供的功能。
9.首先创建controller包,在controller包中新建UserController控制器
UserController.java:
package com.example.usermanag.controller;

import com.example.usermanag.entity.User;
import com.example.usermanag.service.UserService;
import org.springframework.beans.factory.annotation.Autowired;
import org.springframework.beans.factory.annotation.Qualifier;
import org.springframework.stereotype.Controller;
import org.springframework.ui.Model;
import org.springframework.web.bind.annotation.PathVariable;
import org.springframework.web.bind.annotation.PostMapping;
import org.springframework.web.bind.annotation.RequestMapping;

import java.util.Date;
import java.util.List;

@Controller
public class UserController {
    //@Autowired // 自动注入( 无需自己new对象:UserService userService=new UserServiceImp(); )
    @Qualifier
    private UserService userService;
    @RequestMapping("/")
    public String index() {
        return "redirect:/list"; //请求转发到 /list
    }
    @RequestMapping("/list")
    public String list(Model model) {
        List<User> users = userService.getUserList();
        model.addAttribute("users", users);
        return "user/list";
    }
@RequestMapping("/add")
public String add() {
    return "user/add"; //打开创建user界面
}
    @PostMapping("/add")
    public String add(User user) { //保存新创建的user
        userService.save(user);
        return "redirect:/list";
    }
    @RequestMapping("/edit/{id}")
    public String edit(Model model, @PathVariable Long id) {
        User user=userService.findUserById(id);
        model.addAttribute("user", user);
        return "user/edit"; //打开编辑user界面
    }
    @PostMapping("/edit")
    public String edit(User user) { //保存编辑好的user
        userService.edit(user);
        return "redirect:/list";
    }
    @RequestMapping("/delete/{id}")
    public String delete(Model model,@PathVariable Long id) {
        User user=userService.findUserById(id);
        model.addAttribute("user", user);
        return "user/delete"; //删除之前道个别(看看数据)
    }
    @PostMapping("/delete/{id}")
    public String delete(@PathVariable Long id) { //确认删除
        userService.delete(id);
        return "redirect:/list";
    }
}
后台测试
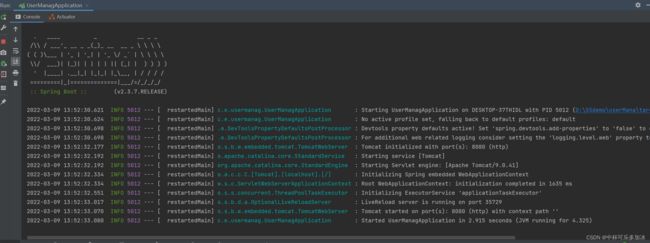
至此,我们的后台已经基本搭建好了,右键点击application文件运行,或者点右上角的锤子图标进行部署。等待一段时间后显示如下就是成功完成。
