windows 基于 MediaPipe 实现 PoseTracking
MediaPipe是用于构建跨平台多模态应用ML管道的框架,其包括快速ML推理,经典计算机视觉和媒体内容处理(如视频解码)。在2019年6月举行的CVPR大会,MeidaPipe正式开源,版本是v0.5.0。自那以后,谷歌陆续发布了一系列的ML管道示例。
日前,谷歌撰文介绍了又一个MediaPipe示例:Object Detection and Tracking。谷歌首次描述了新发布的Box Tracking解决方案,并解释了它是如何与Object Detection结合并提供一个对象检测与追踪系统。
MediaPipe 主要概念
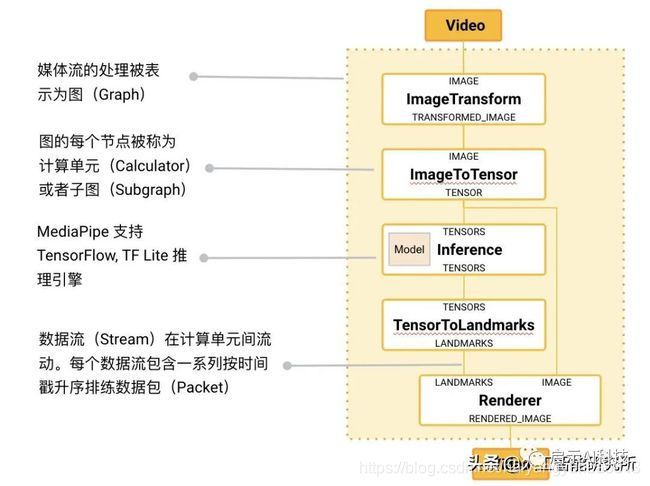
- MediaPipe 的核心框架由 C++ 实现,并提供 Java 以及 Objective C 等语言的支持。MediaPipe 的主要概念包括数据包(Packet)、数据流(Stream)、计算单元(Calculator)、图(Graph)以及子图(Subgraph)。数据包是最基础的数据单位,一个数据包代表了在某一特定时间节点的数据,例如一帧图像或一小段音频信号;数据流是由按时间顺序升序排列的多个数据包组成,一个数据流的某一特定时间戳(Timestamp)只允许至多一个数据包的存在;而数据流则是在多个计算单元构成的图中流动。MediaPipe 图是有向的——数据包从数据源(Source Calculator或者 Graph Input Stream)流入图直至在汇聚结点(Sink Calculator 或者 Graph Output Stream) 离开。

Windows 编译
- 参考这个博主编译就行, https://blog.csdn.net/sunnyblogs/article/details/118891249
- 编译过程中遇到的问题:
- 无法打开包括文件: “opencv2/optflow.hpp”
- 编译 opencv + contrib 模块
- 无法打开包括文件: “Windows.h”
- windows sdk 版本与 BAZEL_WINSDK_FULL_VERSION设置不匹配
- 如果opencv不是用官方版本,则需要更改opencv路径和版本号
- 编辑 WORKSPACE 查找 windows_opencv ,修改opencv路径
- 编译 third_party/opencv_windows.BUILD , 修改 opencv版本号
- 无法打开包括文件: “opencv2/optflow.hpp”
- 编译hello world
bazel build -c opt --define MEDIAPIPE_DISABLE_GPU=1 --action_env PYTHON_BIN_PATH="C://Users//xxx//AppData//Local//conda//conda//envs//py36//python.exe" mediapipe/examples/desktop/hello_world --verbose_failuresbazel-bin\mediapipe\examples\desktop\hello_world\hello_world.exe- 输出 hello world ,则编译成功。
- 编译 pose_tracking
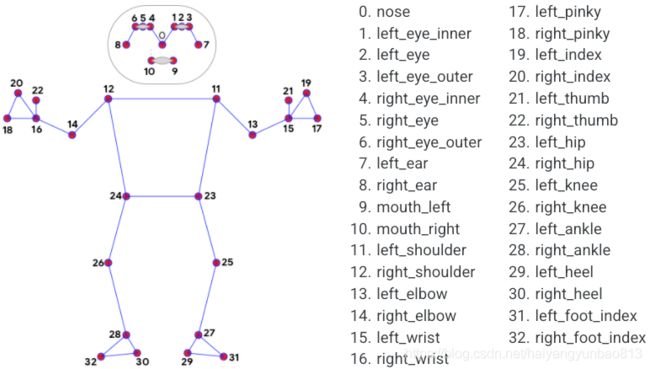
bazel build -c opt --define MEDIAPIPE_DISABLE_GPU=1 --action_env PYTHON_BIN_PATH=“C://Users//xxx//AppData//Local//conda//conda//envs//py36//python.exe” mediapipe/examples/desktop/pose_tracking:pose_tracking_cpu --verbose_failuresbazel-bin/mediapipe/examples/desktop/pose_tracking/pose_tracking_cpu --calculator_graph_config_file=mediapipe/graphs/pose_tracking/pose_tracking_cpu.pbtxt- 编译成功,则会开启摄像头,识别姿态,一共33个点。
集成到项目中,生成动态库
- 代码实现
// pose_api.h  定义动态库接口
#if defined(_WIN32)
#define POSE_API __declspec(dllexport)
#endif

struct  POSEInfo;
typedef void(*PoseFrameCallBack)(POSEInfo* infos, int count);

extern "C" POSE_API int POSE_INIT(char* model);

extern "C" POSE_API int POSE_DETECT_VIDEO(const char* video, int show_image, PoseFrameCallBack call);

extern "C" POSE_API int POSE_RELEASE();
//pose_api.cpp
#include "pose_api.h"
#include "pose_detect.h"

using namespace POSE_SAMPLE;
pose_detect m_pose;

extern "C" POSE_API int POSE_INIT(char* model) {
	return m_pose.init_graph(model);
}

extern "C" POSE_API int POSE_DETECT_VIDEO(const char* video, int show_image, PoseFrameCallBack call) {
	return m_pose.detect_video(video, show_image, call);
}

extern "C" POSE_API int POSE_RELEASE() {
	return m_pose.release();
}
// pose_detect.h 实现 pose tracking
#ifndef POSE_DETECT_H
#define POSE_DETECT_H
#include //pose_detect.cpp
#include "pose_detect.h"
using namespace POSE_SAMPLE;
POSEResult pose_detect::init_graph(const char* model_path) noexcept {
absl::Status run_status = InitGraph(model_path);
if (!run_status.ok()) {
return POSE_RESULT_GRAPH_INIT_EXCEPTION;
}
m_init = true;
return POSE_RESULT_OK;
}
POSEResult pose_detect::detect_video(const char* video_path, int show_image, PoseFrameCallBack call) {
if (!m_init)
return POSE_RESULT_NOT_INIT;
absl::Status run_status = RunMPPGraphVideo(video_path, show_image, call);
if (!run_status.ok()) {
return POSE_RESULT_RUN_GRAPH_EXCEPTION;
}
return POSE_RESULT_OK;
}
POSEResult pose_detect::release() {
absl::Status run_status = ReleaseGraph();
if (!run_status.ok()) {
return POSE_RESULT_RELEASE_EXCEPTION;
}
return POSE_RESULT_OK;
}
absl::Status pose_detect::InitGraph(const char* model_path) {
std::string calculator_graph_config_contents;
MP_RETURN_IF_ERROR(mediapipe::file::GetContents(model_path, &calculator_graph_config_contents));
mediapipe::CalculatorGraphConfig config =
mediapipe::ParseTextProtoOrDie<mediapipe::CalculatorGraphConfig>(
calculator_graph_config_contents);
MP_RETURN_IF_ERROR(m_graph.Initialize(config));
auto sop = m_graph.AddOutputStreamPoller(kOutputStream);
assert(sop.ok());
p_poller = std::make_unique<mediapipe::OutputStreamPoller>(std::move(sop.value()));
mediapipe::StatusOrPoller sop_landmark = m_graph.AddOutputStreamPoller(kOutputLandmarks);
assert(sop_landmark.ok());
p_poller_landmarks = std::make_unique<mediapipe::OutputStreamPoller>(std::move(sop_landmark.value()));
MP_RETURN_IF_ERROR(m_graph.StartRun({}));
return absl::OkStatus();
}
absl::Status pose_detect::RunMPPGraphVideo(const char* video_path, int show_image, PoseFrameCallBack call) {
cv::VideoCapture capture;
capture.open(video_path);
RET_CHECK(capture.isOpened());
if (show_image) {
cv::namedWindow(kWindowName, /*flags=WINDOW_AUTOSIZE*/ 1);
}
#if (CV_MAJOR_VERSION >= 3) && (CV_MINOR_VERSION >= 2)
capture.set(cv::CAP_PROP_FRAME_WIDTH, 640);
capture.set(cv::CAP_PROP_FRAME_HEIGHT, 480);
capture.set(cv::CAP_PROP_FPS, 30);
#endif
bool grab_frames = true;
while (grab_frames) {
// Capture opencv camera or video frame.
cv::Mat camera_frame_raw;
capture >> camera_frame_raw;
if (camera_frame_raw.empty())
break;
cv::Mat camera_frame;
cv::cvtColor(camera_frame_raw, camera_frame, cv::COLOR_BGR2RGB);
cv::flip(camera_frame, camera_frame, /*flipcode=HORIZONTAL*/ 1);
// Wrap Mat into an ImageFrame.
auto input_frame = absl::make_unique<mediapipe::ImageFrame>(
mediapipe::ImageFormat::SRGB, camera_frame.cols, camera_frame.rows,
mediapipe::ImageFrame::kDefaultAlignmentBoundary);
cv::Mat input_frame_mat = mediapipe::formats::MatView(input_frame.get());
camera_frame.copyTo(input_frame_mat);
// Send image packet into the graph.
size_t frame_timestamp_us =
(double)cv::getTickCount() / (double)cv::getTickFrequency() * 1e6;
MP_RETURN_IF_ERROR(m_graph.AddPacketToInputStream(
kInputStream, mediapipe::Adopt(input_frame.release())
.At(mediapipe::Timestamp(frame_timestamp_us))));
// Get the graph result packet, or stop if that fails.
mediapipe::Packet packet;
mediapipe::Packet packet_landmarks;
if (!p_poller->Next(&packet)) break;
if (p_poller_landmarks->QueueSize() > 0) {
if (p_poller_landmarks->Next(&packet_landmarks)) {
auto& output_landmarks = packet_landmarks.Get<mediapipe::NormalizedLandmarkList>();
POSEInfo* infos = new POSEInfo[output_landmarks.landmark_size()];
for (int i = 0; i < output_landmarks.landmark_size(); ++i)
{
POSEInfo info;
const mediapipe::NormalizedLandmark landmark = output_landmarks.landmark(i);
infos[i].x = landmark.x() * camera_frame.cols;
infos[i].y = landmark.y() * camera_frame.rows;
}
if (call) {
call(infos, output_landmarks.landmark_size());
}
delete[] infos;
}
}
if (show_image) {
auto& output_frame = packet.Get<mediapipe::ImageFrame>();
// Convert back to opencv for display or saving.
cv::Mat output_frame_mat = mediapipe::formats::MatView(&output_frame);
cv::cvtColor(output_frame_mat, output_frame_mat, cv::COLOR_RGB2BGR);
cv::Mat dst;
cv::resize(output_frame_mat, dst, cv::Size(output_frame_mat.cols / 2, output_frame_mat.rows / 2));
cv::imshow(kWindowName, dst);
cv::waitKey(1);
}
}
if (show_image)
cv::destroyWindow(kWindowName);
return absl::OkStatus();
}
absl::Status pose_detect::ReleaseGraph() {
MP_RETURN_IF_ERROR(m_graph.CloseInputStream(kInputStream));
MP_RETURN_IF_ERROR(m_graph.CloseInputStream(kOutputLandmarks));
return m_graph.WaitUntilDone();
}

-
代码中遇到的问题
- landmark (demo中没有提供如何获取landmark,所以需自行实现)
- 通过查看 mediapipe\graphs\pose_tracking\pose_tracking_cpu.pbtxt ,知道 landmark output_stream 是 pose_landmarks
//定义 landmark 轮询器 (个人理解相当于一个轮询器) const char* kOutputLandmarks = "pose_landmarks"; mediapipe::StatusOrPoller sop_landmark = m_graph.AddOutputStreamPoller(kOutputLandmarks); assert(sop_landmark.ok()); p_poller_landmarks = std::make_unique<mediapipe::OutputStreamPoller>(std::move(sop_landmark.value())); //获取 landmark mediapipe::Packet packet_landmarks; p_poller_landmarks->Next(&packet_landmarks) - 在测试时候发现,识别不到姿态时,图像会卡死不动。经查询后发现,p_poller_landmarks->Next : 如果没有识别到 landmark ,则会发生阻塞,所以增加 QueueSize() 查询,判断是否有数据包。
// 判断是否有数据包
if (p_poller_landmarks->QueueSize() > 0) {
	if (p_poller_landmarks->Next(&packet_landmarks)) {
		//  获取 landmark 坐标值
		auto& output_landmarks = packet_landmarks.Get<mediapipe::NormalizedLandmarkList>();
		for (int i = 0; i < output_landmarks.landmark_size(); ++i)
		{
			const mediapipe::NormalizedLandmark landmark = output_landmarks.landmark(i);
			float x = landmark.x() * camera_frame.cols;
			float y = landmark.y() * camera_frame.rows;
		}
	}
}
-
通过bazel编译成动态库
- 最开始想通过cmake来编译mediapipe, 生成个动态库,供项目中使用,可惜没实现出来,如果有大佬实现了,还望指点一番,抱拳了。
- 使用 bazel 编译,生成动态库。 编辑 pose_tracking/BUILD , 修改 cc_binary
cc_binary(
	name = "POSE_SAMPLE",
	srcs = ["pose_api.h","pose_api.cpp","pose_detect.h","pose_detect.cpp","pose_data.h"], # 包含项
	linkshared=True, # 生成动态库
	deps = [
		"//mediapipe/graphs/pose_tracking:pose_tracking_cpu_deps", #依赖项
	],
)

# 编译  生成目录:bazel-bin\mediapipe\examples\desktop\pose_tracking\POSE_SAMPLE.dll
# POSE_SAMPLE 与 cc_binary 中 name 对应
bazel build -c opt --define MEDIAPIPE_DISABLE_GPU=1 --action_env PYTHON_BIN_PATH="C://Users//xxx//AppData//Local//conda//conda//envs//py36//python.exe" mediapipe/examples/desktop/pose_tracking:POSE_SAMPLE --verbose_failures
- 项目中应用
- 我项目中使用的是C# winform, 所以测试了在winform中应用。
- 测试代码
// 初始化
int res = Helper.QH_DST_POSE_INIT("model/pose_tracking_cpu.pbtxt");
if (res > 0)
  label1.Text = "初始化成功";
else
  label1.Text = "初始化失败";

// 调用
 int res = Helper.QH_DST_POSE_DETECT_VIDEO(_filePath, 1, PoseFrameCallBack);
 if (res > 0)
   Console.WriteLine("success.");

// Helper.cs
public delegate void PoseFrameCallBack(IntPtr infos , int count);
[DllImport("POSE_LIB.dll")]
public static extern int QH_DST_POSE_INIT(string model);
[DllImport("POSE_LIB.dll")]
public static extern int QH_DST_POSE_DETECT_VIDEO(string video,int showVideo, PoseFrameCallBack call);
[DllImport("POSE_LIB.dll")]
public static extern int QH_DST_POSE_RELEASE();
- 测试Demo

DEMO地址: PoseTrackingDemo
MediaPipe 其他实现
- IrisTracking
- PoseTracking
- 其他待续…

END
-
至此,关于 pose tracking 模块全部的内容就基本整理完了,其他模块待续。。
-
以上内容纯属个人理解,若有不正确的地方,请大佬们多多指正 , 感谢。