【opencv-python】官方教程整理(一):GUI使用:画线、圆、矩形,滑动条鼠标交互等
简介:
本博文主要基于opencv官网教程的第一部分 OpenCV-Python Tutorials:Gui Features in OpenCV 进行整理的,其中 OpenCV-Python Tutorials的位置是在online documentation中,选择Doxygen HTML对应opencv版本后出现的。。。不在官网首页的Tutorials,那里面只是教程的一部分,面向C++的。
点击进入online documentation(https://docs.opencv.org/),如下图所示:
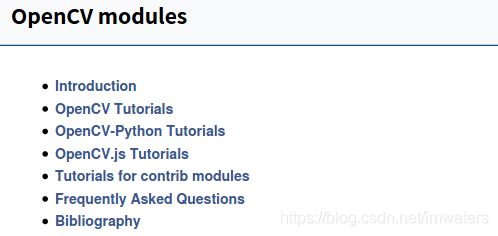
在上图选择Doxygen HTML中任意版本进入后,出现多个教程与文档,如下图:
OpenCV-PythonGUI相关的代码
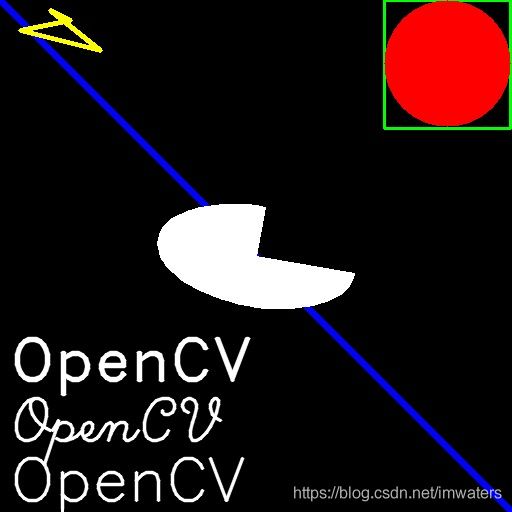
画几何图形与显示文字
https://docs.opencv.org/master/dc/da5/tutorial_py_drawing_functions.html
导入头文件,创建黑色背景图片
#from https://docs.opencv.org/master/dc/da5/tutorial_py_drawing_functions.html

import numpy as np
import cv2 as cv

# Create a black image 创建一个全零的大小为512*512*3矩阵,数据类型为np.uint8
img = np.zeros((512,512,3), np.uint8)
画直线
其中(0,0)和(511,511)两个端点,(255,0,0)表示颜色为蓝色(BGR),5表示线宽为5像素
#line
# Draw a diagonal blue line with thickness of 5 px
#画一个宽度为5pix的线
cv.line(img,(0,0),(511,511),(255,0,0),5)
画圆
(447,63)为圆心坐标
cv.circle(img,(447,63), 63, (0,0,255), -1)画矩形
第一个参数是输入图像img,然后是矩形的左上角顶点(384,0),右下角顶点(510,128),(0,255,0)是绿色,最后参数是线宽
cv.rectangle(img,(384,0),(510,128),(0,255,0),2)画椭圆
#其中(256,256)为椭圆长轴与短轴的交点,即椭圆中心,
#(100,50)分别表示椭圆长轴和短轴的长度
#-1表示填充轮廓
rotate=10 #旋转角度,顺时针旋转角度(官方教程写的是逆时针,大家可根据实际情况画anti-clockwise direction)
rotate=10 #旋转角度,顺时针旋转角度(官方教程写的是逆时针,大家可根据实际情况画anti-clockwise direction)
#img=cv.ellipse(img, center, axes, angle, startAngle, endAngle, color[, thickness[, lineType[, shift]]]	)
cv.ellipse(img,(256,256),(100,50),rotate,0,270,(255,255,255),-1)
画多边形
pts = np.array([[100,50],[20,30],[70,20],[50,10]], np.int32)
pts = pts.reshape((-1,1,2))
cv.polylines(img,[pts],True,(0,255,255),3)
显示文字
#放文字在图片上
#
font= cv.FONT_HERSHEY_SIMPLEX #普通字体  这个参数是必须的经常要复制
cv.putText(img,'OpenCV',(10,500), font, 2,(255,255,255),2,cv.LINE_AA)
font= cv.FONT_HERSHEY_SCRIPT_SIMPLEX #手写字体
cv.putText(img,'OpenCV',(10,440), font, 2,(255,255,255),2,cv.LINE_AA)
font= cv.FONT_HERSHEY_DUPLEX #复杂字体
cv.putText(img,'OpenCV',(10,380), font, 2,(255,255,255),2,cv.LINE_AA)
显示和保存图片
cv.imshow("hello world",img)
cv.imwrite("python_opencv_drawing.jpg",img)
cv.waitKey(0)
使用鼠标交互画图
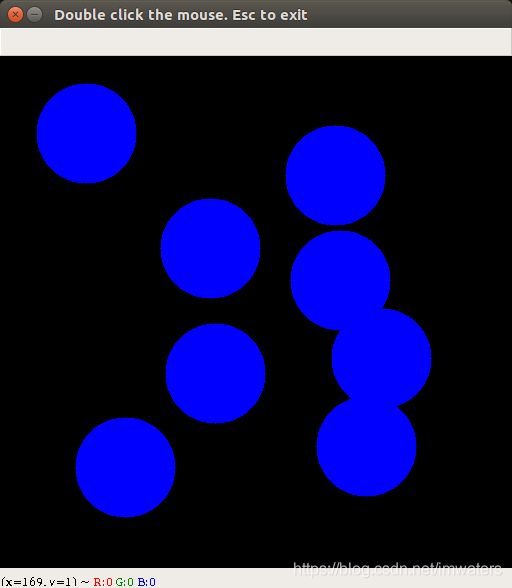
双击画圆,esc退出
https://docs.opencv.org/master/db/d5b/tutorial_py_mouse_handling.html
双击画圆,esc退出
# from https://docs.opencv.org/master/db/d5b/tutorial_py_mouse_handling.html


import cv2 as cv
import numpy as np
events = [i for i in dir(cv) if 'EVENT' in i]
print(events)
#['EVENT_FLAG_ALTKEY', 'EVENT_FLAG_CTRLKEY', 'EVENT_FLAG_LBUTTON', 'EVENT_FLAG_MBUTTON', 'EVENT_FLAG_RBUTTON', 'EVENT_FLAG_SHIFTKEY', 'EVENT_LBUTTONDBLCLK', 'EVENT_LBUTTONDOWN', 'EVENT_LBUTTONUP', 'EVENT_MBUTTONDBLCLK', 'EVENT_MBUTTONDOWN', 'EVENT_MBUTTONUP', 'EVENT_MOUSEHWHEEL', 'EVENT_MOUSEMOVE', 'EVENT_MOUSEWHEEL', 'EVENT_RBUTTONDBLCLK', 'EVENT_RBUTTONDOWN', 'EVENT_RBUTTONUP']

# mouse callback function 鼠标使用时的操作


def draw_circle(event, x, y, flags, param):
	#双击鼠标才能花园
    # 当鼠标双击时,以双击点为圆心,50像素为半径,画以蓝色填充的圆
    if event == cv.EVENT_LBUTTONDBLCLK:
        cv.circle(img, (x, y), 50, (255, 0, 0), -1)


# Create a black image, a window and bind the function to window
img = np.zeros((512, 512, 3), np.uint8)
cv.namedWindow('image')
cv.setMouseCallback('image', draw_circle)
while(1):
    cv.imshow('image', img)
    # 27对应的ascill编码是 键盘左上角的ESC
    if cv.waitKey(20) & 0xFF == 27:
        break
cv.destroyAllWindows()


#-----------附录
# dir 函数返回所有属性和方法,甚至是 内置属性
# https://www.w3school.com.cn/python/ref_func_dir.asp
class Person:
    name = "Bill"
    age = 63
    country = "USA"


print(dir(Person))
使用鼠标动态作图
m键切换画图方式,有画圆和矩形两种模式
https://docs.opencv.org/master/db/d5b/tutorial_py_mouse_handling.html
#from https://docs.opencv.org/master/db/d5b/tutorial_py_mouse_handling.html

import numpy as np
import cv2 as cv
drawing = False # true if mouse is pressed
mode = True # if True, draw rectangle. Press 'm' to toggle to curve
ix,iy = -1,-1
# mouse callback function
def draw_circle(event,x,y,flags,param):
    global ix,iy,drawing,mode
    if event == cv.EVENT_LBUTTONDOWN: #鼠标按下时才开启绘画功能
        drawing = True
        ix,iy = x,y
    elif event == cv.EVENT_MOUSEMOVE:
        if drawing == True:
            if mode == True:
                cv.rectangle(img,(ix,iy),(x,y),(0,255,0),-1)
            else:
                cv.circle(img,(x,y),5,(0,0,255),-1)
    elif event == cv.EVENT_LBUTTONUP:
        drawing = False
        if mode == True:
            cv.rectangle(img,(ix,iy),(x,y),(0,255,0),-1)
        else:
            cv.circle(img,(x,y),5,(0,0,255),-1)


img = np.zeros((512,512,3), np.uint8)
cv.namedWindow('image')
cv.setMouseCallback('image',draw_circle)
while(1):
    cv.imshow('image',img)
    k = cv.waitKey(1) & 0xFF
    if k == ord('m'):
        mode = not mode #按下m按键后,mode数值取反
    elif k == 27:
        break
cv.destroyAllWindows()
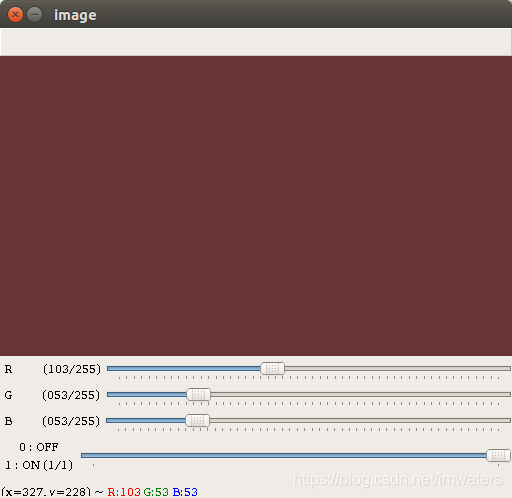
使用滑动框(轨迹块)实现调色板功能
https://docs.opencv.org/master/d9/dc8/tutorial_py_trackbar.html
只有将最下面那个活动条调到1才会显示颜色
'''
from https://docs.opencv.org/master/d9/dc8/tutorial_py_trackbar.html
# Trackbar as the Color Palette
# 代码功能:轨迹栏作为调色板
'''
import numpy as np
import cv2 as cv

## 滑动轨迹栏是调用的函数
def nothing(x):
    pass

# Create a black image, a window
img = np.zeros((300, 512, 3), np.uint8)
cv.namedWindow('image')
# create trackbars for color change
# createTrackbar函数的作用是在窗口上创建一个可以滑动的选择参数的轨迹栏
'''
第1个参数为轨迹栏的名称,
第2个参数是附着的窗口名称,
第3个参数是起始刻度
第4个参数是终止刻度
第5个参数是回调函数,本教程采用空操作
'''
cv.createTrackbar('R', 'image', 0, 255, nothing)
cv.createTrackbar('G', 'image', 0, 255, nothing)
cv.createTrackbar('B', 'image', 0, 255, nothing)
# create switch for ON/OFF functionality
switch = '0 : OFF \n1 : ON'
cv.createTrackbar(switch, 'image', 0, 1, nothing)
while(1):
    #图像的值根据获取轨迹栏数值变化
    cv.imshow('image', img)
    k = cv.waitKey(1) & 0xFF
    if k == 27:  # esc 退出
        break
    # get current positions of four trackbars
    r = cv.getTrackbarPos('R', 'image')
    g = cv.getTrackbarPos('G', 'image')
    b = cv.getTrackbarPos('B', 'image')
    s = cv.getTrackbarPos(switch, 'image')
    #如果开关没有打开,则显示全黑
    if s == 0:
        img[:] = 0
    else:
        img[:] = [b, g, r]
cv.destroyAllWindows()
附录
OpenCV-Python Tutorials的目录
OpenCV-Python Tutorials
-
Introduction to OpenCV
Learn how to setup OpenCV-Python on your computer!
-
Gui Features in OpenCV
Here you will learn how to display and save images and videos, control mouse events and create trackbar.
-
Core Operations
In this section you will learn basic operations on image like pixel editing, geometric transformations, code optimization, some mathematical tools etc.
-
Image Processing in OpenCV
In this section you will learn different image processing functions inside OpenCV.
-
Feature Detection and Description
In this section you will learn about feature detectors and descriptors
-
Video analysis (video module)
In this section you will learn different techniques to work with videos like object tracking etc.
-
Camera Calibration and 3D Reconstruction
In this section we will learn about camera calibration, stereo imaging etc.
-
Machine Learning
In this section you will learn different image processing functions inside OpenCV.
-
Computational Photography
In this section you will learn different computational photography techniques like image denoising etc.
-
Object Detection (objdetect module)
In this section you will learn object detection techniques like face detection etc.
-
OpenCV-Python Bindings
In this section, we will see how OpenCV-Python bindings are generated


