VUE学习笔记:26.脚手架vue-cli之路由vue-router
一.网页路由基础讲解
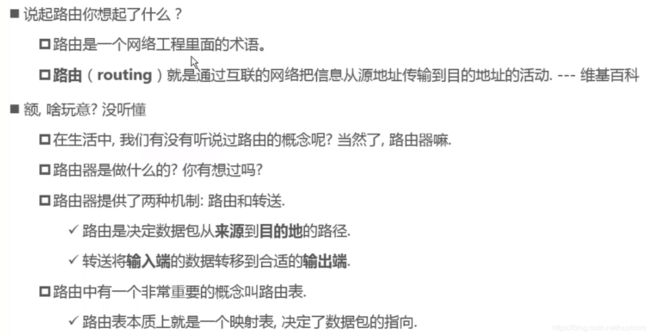
1.什么是路由
2.后端路由
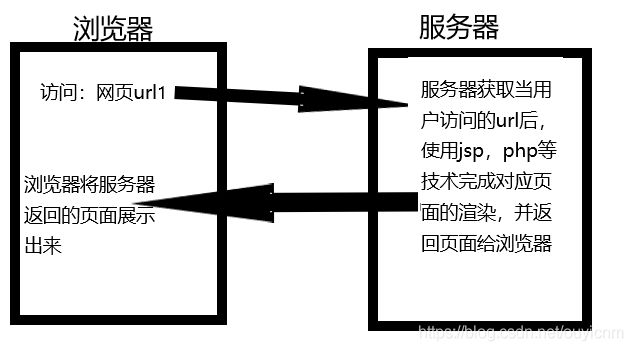
- 在早期的网页开发中,都是使用后端渲染。常用的计算包括:jsp,php等。
- 后端渲染原理:当使用浏览器访问某个url时,会将该url发送到对应网站的服务器。服务器会根据对应url完成相关操作(如从数据库中取出数据并填充到HTML模板中,然后将HTML模板返回给浏览器)。所以使用后端渲染模式,在服务器中就已经将我们需要展示的页面全部渲染完成了。
- 后端路由:后端服务器来处理页面与URL的映射关系就是后端路由。
3.前端路由
前后端分离原理
SPA原理及前端路由
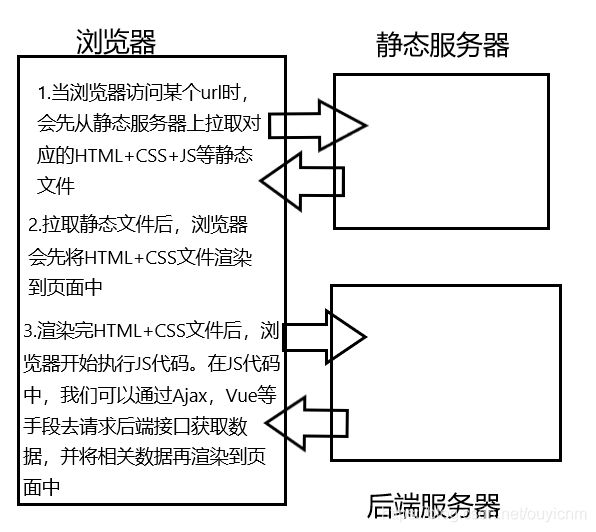
- 普通的前后端分离模式,当我们的url改变时,就需要访问静态服务器拉取对应的静态资源。而频繁的访问静态服务器会导致静态服务器的压力过大。尤其是对于用户量较大的网站,虽然可以使用负载均衡,但是静态服务器的压力依然很多,会导致资源的下载速度变慢影响网页性能。
- SPA网页:SPA是单页面富应用,整个项目只有一个HTML。而且访问网页项目,只会在第一次url时访问静态服务器,将所有资源全部下载到浏览器。
- 当点击SPA网页的按钮等元素时,会通过前端路由来映射到对应url。而该url不会去访问静态服务器,而是在已经拉取的全部静态资源中分离出该url对应的资源,并完成页面的局部刷新。
4.url的hash和HTML5的history
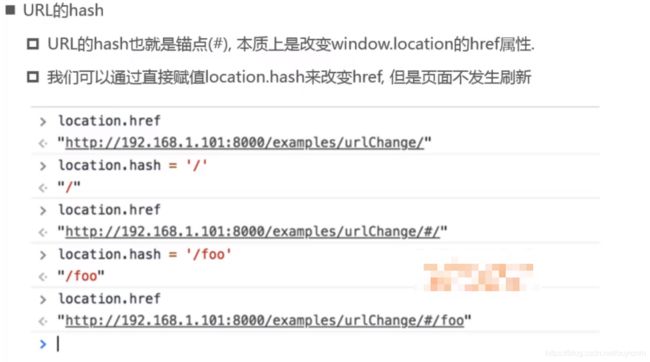
在SPA网页中有一个重要的特性就是改变url而不需要访问静态服务器去拉取资源,也就是页面不发生刷新。要做到这个特性可以使用两种方式实现:
(1)url的hash
(2)HTML5中的history
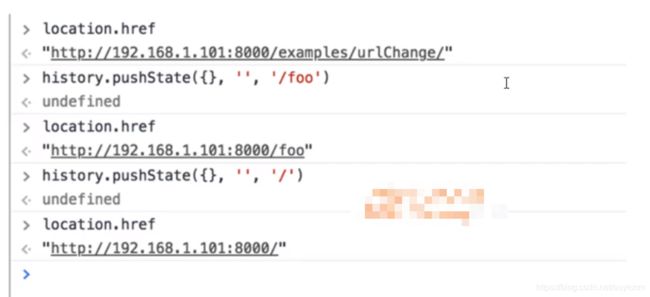
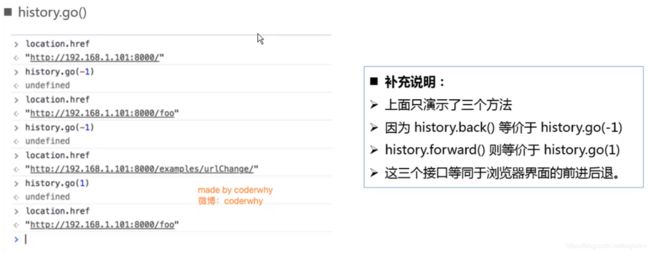
history.pushState({},'','xxx'):将url改变为xxx,但不刷新页面history.back():返回之前的urlhistory.replaceState({},'','xxx'):将url改变为xxx,且不可回退,即不会入栈history.go():当我们使用history.pushState改变url时,相对与入栈,会将url放入栈中,且最新的url在最上面。所有我们可以使用history.go去到栈中的任意一个url。例如:history.go(-1):回到上一个url;history.go(1):回到下一个url
二.vue-router详解
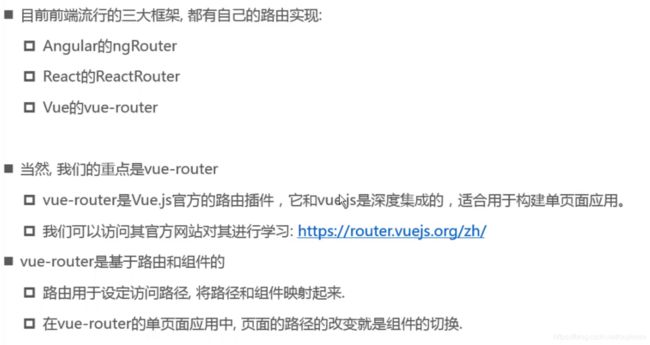
1.认识vue-router
2.安装配置vue-router
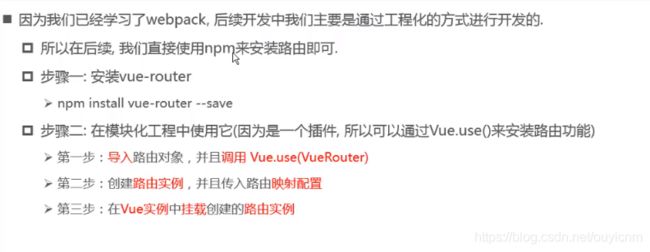
第一步:安装vue-router
npm install [email protected] --save
第二步:配置vue-router
- 在项目的src目录下创建router目录,并在router目录下创建文件index.js,在该文件中配置vue-router相关的信息
//1.导入vue-router
import VueRouter from 'vue-router'
import Vue from 'vue'

//2.通过vue.use(),安装插件vue-router
Vue.use(VueRouter)

//3.实例化一个VueRouter对象
const router = new VueRouter({
	// 在routes中配置url与组件的映射关系
	routes:[

	]

})

//4.将VueRouter对象router导出
export default router
- 修改项目入口文件,将VueRouter对象router挂载到vue实例中
import Vue from 'vue'
import App from './App.vue'
import router from './router/index.js'

Vue.config.productionTip = false

new Vue({
  render: h => h(App),
  //将VueRouter对象router挂载到vue实例中
  router: router
}).$mount('#app')
这样我们的vue-router就配置生效了,当然实际开发中我们可以在vue-cli初始化项目时,选择Router。vue-cli会自动帮助我们安装配置vue-router
3.使用vue-router
(1)基本使用
练习:
第一步:创建路由组件(也就是vue组件)
在项目的src/components目录下,新建两个组件Home.vue和About.vue作为练习的路由组件。
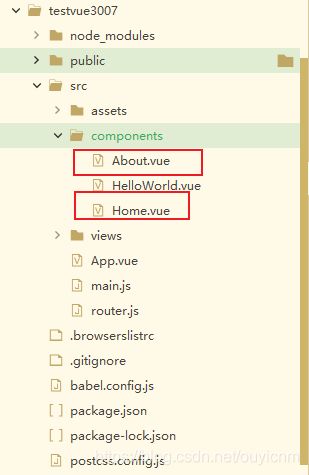
Home.vue文件如下:
<template>
	<div>
		<h3>{{message}}</h3>
	</div>
</template>

<script>
	export default{
		name: 'Home',
		data: function(){
			return {
				message: '我是Home组件'
			}
		}
	}
</script>

<style>
</style>
About.vue组件文件如下:
<template>
	<div>
		<h3>{{message}}</h3>
	</div>
</template>

<script>
	export default{
		name: 'About',
		data: function(){
			return {
				message: '我是About组件'
			}
		}
	}
</script>

<style>
</style>
第二步:在route.js文件中配置路由映射,即url与组件之间的映射关系
import Vue from 'vue'
import Router from 'vue-router'
import Home from './components/Home.vue'
import About from './components/About.vue'

Vue.use(Router)

export default new Router({
  mode: 'history',
  base: process.env.BASE_URL,
  //routes中将url与组件映射起来
  routes: [
    {
		path: '/home',
		component: Home
	},
	{
		path: '/about',
		component: About
	}
  ]
})
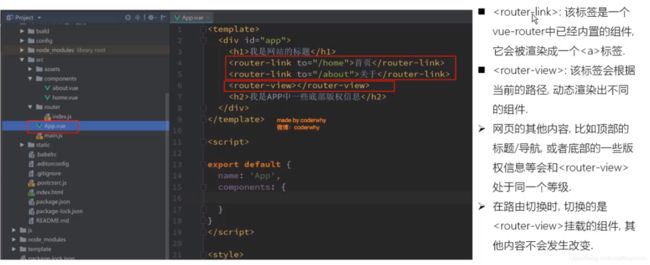
第三步:在项目入口组件App.vue文件中使用router
<template>
	<div>
		<router-link to="/home">首页</router-link>
		<router-link to="/about">关于</router-link>
		<router-view></router-view>
	</div>
</template>

<script>
	export default{
		name: 'App'
	}
</script>

<style>
</style>
说明:
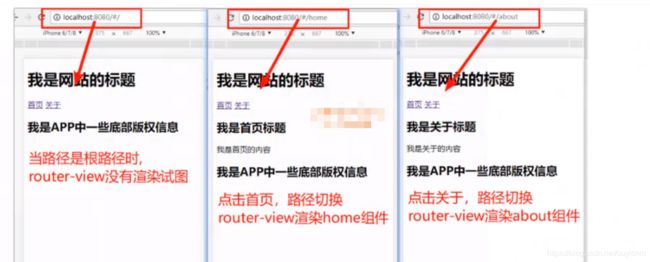
router-link是vue-router注册的一个全局标签,可以在项目任何地方使用。其作用是当点击router-link标签的内容时,会将url改变为to属性中的url。并将该url映射的组件渲染到router-view标签的位置。router-view标签相当于一个占位符,当router-link中的内容被点击时,会将router-link映射的组件渲染到router-view位置·。
效果如下:

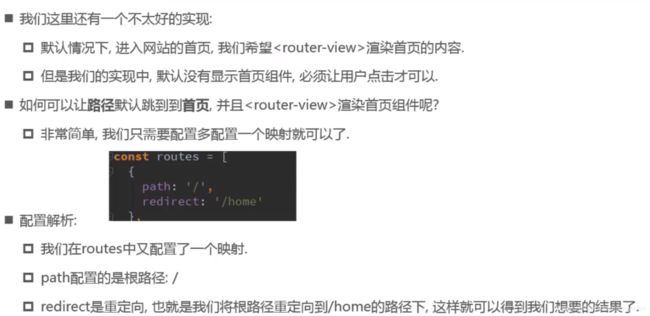
(2)路由的重定向
import Vue from 'vue'
import Router from 'vue-router'
import Home from './components/Home.vue'
import About from './components/About.vue'

Vue.use(Router)

export default new Router({
  mode: 'history',
  base: process.env.BASE_URL,
  //routes中将url与组件映射起来
  routes: [
	{
		path: '/',
		redirect: '/home' //将跟路径重定向到‘/home’
	},
    {
		path: '/home',
		component: Home
	},
	{
		path: '/about',
		component: About
	}
  ]
})
(3)使用HTML5的history来改变url
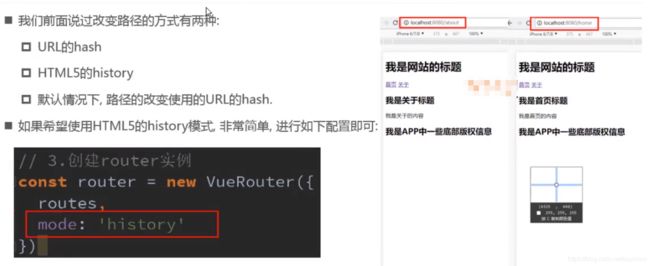
当然如果我们是使用vue-cli来安装router,可以在选择router时,选择history模式。这种模式下默认就是使用使用HTML5的history。
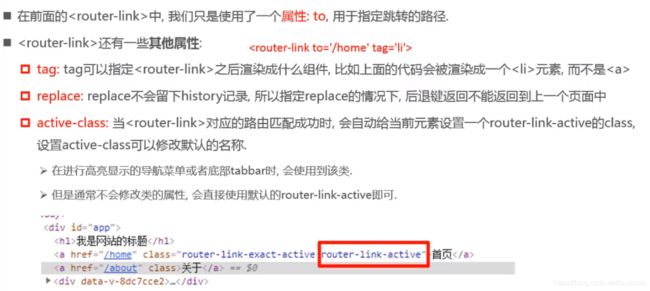
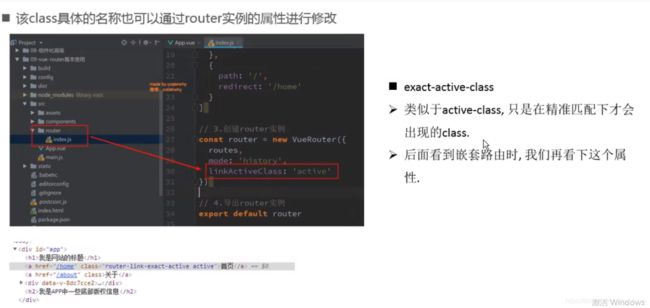
(4)router-link的属性补充
(5)通过代码实现路由跳转
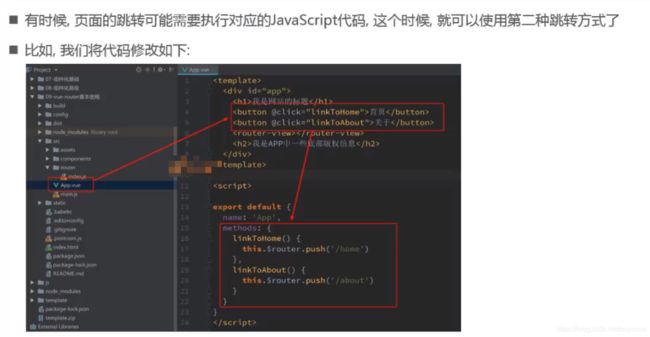
在组件的方法中使用this.$router.push('url地址')也能实现路由的跳转。其中this是当前组件对象;$router是每个组件都有的对象,其push方法可以实现路由跳转。
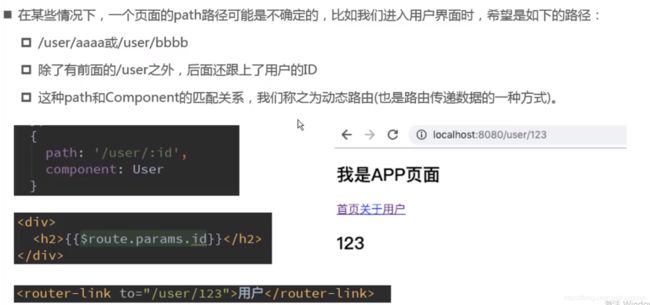
(6)动态路由
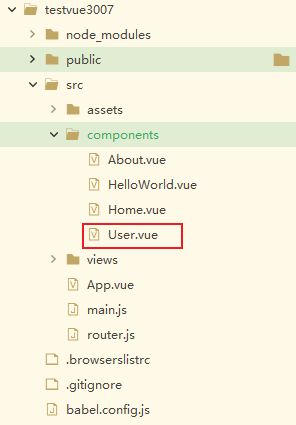
第一步:在项目src/components目录下创建User.vue组件作为动态路由的组件
<template>
	<div>
		<h3>我是用户:{{$route.params.userid}}</h3>
		<!--$route.params.userid:获取当前活跃路由的参数userid的值-->
	</div>
</template>

<script>
	export default{
		name: 'User',
	}
</script>

<style>
</style>
第二步:修改router.js文件,将组件User.vue与url映射起来
import Vue from 'vue'
import Router from 'vue-router'
import Home from './components/Home.vue'
import About from './components/About.vue'
import User from './components/User.vue'

Vue.use(Router)

export default new Router({
  mode: 'history',
  base: process.env.BASE_URL,
  //routes中将url与组件映射起来
  routes: [
	{
		path: '/',
		redirect: '/home' //将跟路径重定向到‘/home’
	},
    {
		path: '/home',
		component: Home
	},
	{
		path: '/about',
		component: About
	},
	{
		path: '/user/:userid', // ':userid'表示动态变量
		component: User
	}
  ]
})
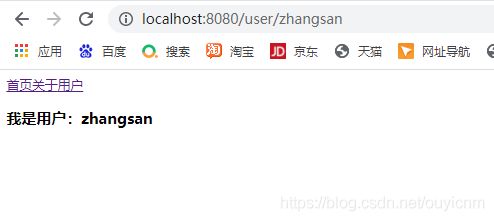
第三步:修改入口组件App.vue文件,使用将url与页面元素映射
<template>
	<div>
		<router-link to="/home">首页</router-link>
		<router-link to="/about">关于</router-link>
		<!--使用v-bind将变量userid的值拼接到url中,实现动态路由。一般这种值都是后端传来的-->
		<router-link v-bind:to="'/user/'+userid">用户</router-link>
		<router-view></router-view>
	</div>
</template>

<script>
	export default{
		name: 'App',
		data:function(){
			return {
				userid: 'zhangsan'
			}
		}
	}
</script>

<style>
</style>
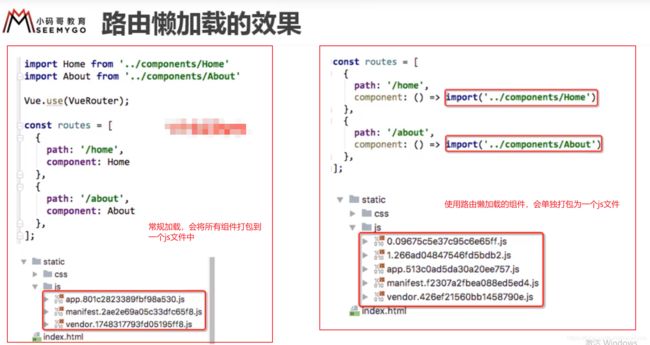
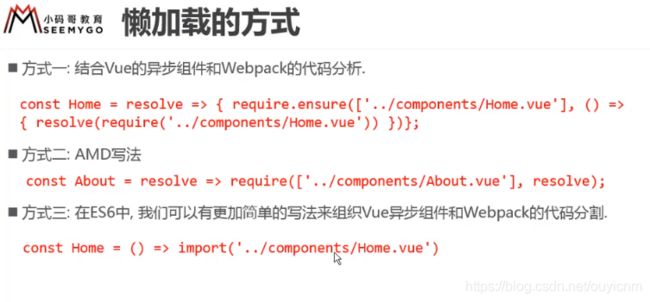
(7)路由的懒加载
修改router.js文件,使用路由懒加载的方式导入组件:
import Vue from 'vue'
import Router from 'vue-router'
// import Home from './components/Home.vue'
// import About from './components/About.vue'
// import User from './components/User.vue'

// 使用路由懒加载方式导入组件
const Home = () => import('./components/Home.vue')
const About = () => import('./components/About.vue')
const User = () => import('./components/User.vue')

Vue.use(Router)

export default new Router({
  mode: 'history',
  base: process.env.BASE_URL,
  //routes中将url与组件映射起来
  routes: [
	{
		path: '/',
		redirect: '/home' //将跟路径重定向到‘/home’
	},
    {
		path: '/home',
		component: Home
	},
	{
		path: '/about',
		component: About
	},
	{
		path: '/user/:userid', // ':userid'表示动态变量
		component: User
	}
  ]
})
(8)路由嵌套
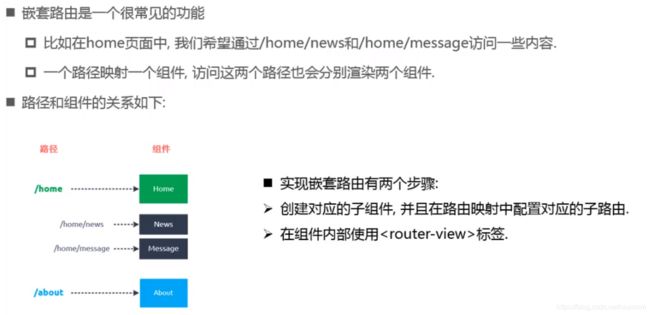
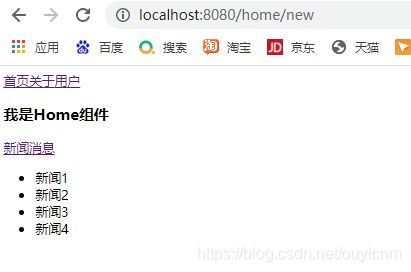
路由嵌套练习:在/home路由下嵌套两个子路由/home/news和/home/message
第一步:在在项目src/components目录下创建两个组件HomeNew.vue和HomeMessage.vue作为子路由组件。
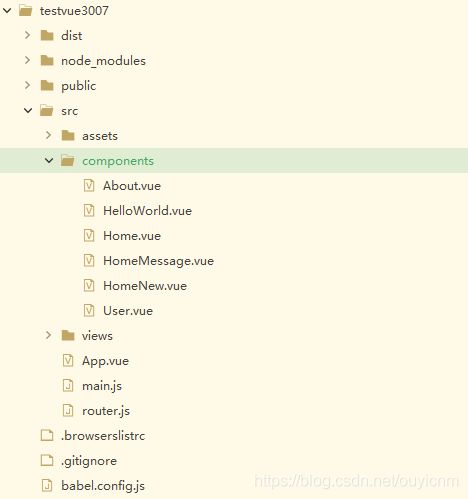
HomeNew.vue文件如下:
<template>
	<div>
		<ul>
			<li>新闻1</li>
			<li>新闻2</li>
			<li>新闻3</li>
			<li>新闻4</li>
		</ul>
	</div>
</template>

<script>
	export default {
		name: 'HomeNew'
	}
</script>

<style>
</style>
HomeMessage.vue文件如下:
<template>
	<div>
		<ul>
			<li>消息1</li>
			<li>消息2</li>
			<li>消息3</li>
			<li>消息4</li>
		</ul>
	</div>
</template>

<script>
	export default {
		name: 'HomeMessage'
	}
</script>

<style>
</style>
第二步:修改router.js文件,在Home组件的路由中添加子路由
import Vue from 'vue'
import Router from 'vue-router'
// import Home from './components/Home.vue'
// import About from './components/About.vue'
// import User from './components/User.vue'

// 使用路由懒加载方式导入组件
const Home = () => import('./components/Home.vue')
const HomeNew = () => import('./components/HomeNew.vue')
const HomeMessage = () => import('./components/HomeMessage.vue')
const About = () => import('./components/About.vue')
const User = () => import('./components/User.vue')

Vue.use(Router)

export default new Router({
  mode: 'history',
  base: process.env.BASE_URL,
  //routes中将url与组件映射起来
  routes: [
	{
		path: '/',
		redirect: '/home' //将跟路径重定向到‘/home’
	},
    {
		path: '/home',
		component: Home,
		// 添加子路由
		children: [
			{
				path: 'new',//注意:子路由路径不需要加/,会自动拼接到父路由路径后面
				component: HomeNew
			},
			{
				path: 'message',//注意:子路由路径不需要加/,会自动拼接到父路由路径后面
				component: HomeMessage
			},
			{
				path: '',
				redirect: 'new', //将/home路径重定向到/home/new
			}
		]

	},
	{
		path: '/about',
		component: About
	},
	{
		path: '/user/:userid', // ':userid'表示动态变量
		component: User
	}
  ]
})
第三步:修改Home.vue文件,将子路由与界面元素映射起来
<template>
	<div>
		<h3>{{message}}</h3>
		<!--这里子路由的路径必须写全-->
		<router-link to="/home/new">新闻</router-link>
		<router-link to="/home/message">消息</router-link>
		<router-view></router-view>
	</div>
</template>

<script>
	export default{
		name: 'Home',
		data: function(){
			return {
				message: '我是Home组件'
			}
		}
	}
</script>

<style>
</style>
(9)路由传递参数
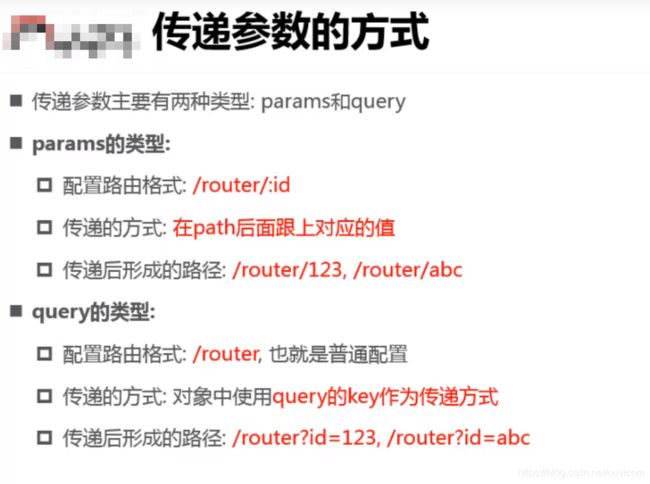
params方式就是动态路由,我们这里不再做讲解。我们主要讲解第二种方式:query
路由传递参数练习
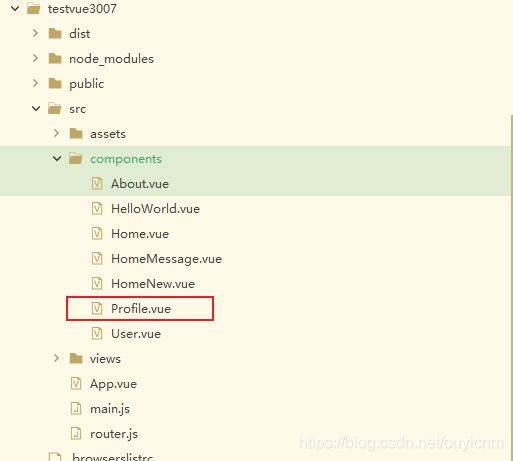
第一步:在在项目src/components目录下新建Profile.vue文件,作为练习组件
<template>
	<div>
		<h3>我是profile组件</h3>
	</div>
</template>

<script>
	export default {
		name: 'Profile'
	}
</script>

<style>
</style>
第二步:修改router.js文件,增加Profile组件的url映射
import Vue from 'vue'
import Router from 'vue-router'
// import Home from './components/Home.vue'
// import About from './components/About.vue'
// import User from './components/User.vue'

// 使用路由懒加载方式导入组件
const Home = () => import('./components/Home.vue')
const HomeNew = () => import('./components/HomeNew.vue')
const HomeMessage = () => import('./components/HomeMessage.vue')
const About = () => import('./components/About.vue')
const User = () => import('./components/User.vue')
const Profile = () => import('./components/Profile.vue')

Vue.use(Router)

export default new Router({
  mode: 'history',
  base: process.env.BASE_URL,
  //routes中将url与组件映射起来
  routes: [
	{
		path: '/',
		redirect: '/home' //将跟路径重定向到‘/home’
	},
    {
		path: '/home',
		component: Home,
		// 添加子路由
		children: [
			{
				path: 'new',//注意:子路由路径不需要加/,会自动拼接到父路由路径后面
				component: HomeNew
			},
			{
				path: 'message',//注意:子路由路径不需要加/,会自动拼接到父路由路径后面
				component: HomeMessage
			},
			{
				path: '',
				redirect: 'new', //将/home路径重定向到/home/new
			}
		]

	},
	{
		path: '/about',
		component: About
	},
	{
		path: '/user/:userid', // ':userid'表示动态变量
		component: User
	},
	{
		path: '/profile',
		component: Profile
	}
  ]
})
第三步:修改App.vue组件,将/profile路由与界面元素映射起来
<template>
	<div>
		<router-link to="/home">首页</router-link>
		<router-link to="/about">关于</router-link>
		<!--使用v-bind将变量userid的值拼接到url中,实现动态路由。一般这种值都是后端传来的-->
		<router-link v-bind:to="'/user/'+userid">用户</router-link>
		<!--因为/profile路由需要传递query参数,所以to属性值应该为一个对象-->
		<!--其中path为字符串类型,表示跳转的url-->
		<!--其中query为对象类型,表示需要传递的query参数-->
		<router-link v-bind:to="{path:'/profile',query:{name:'zhangsan',age:18}}">档案</router-link>
		<router-view></router-view>
	</div>
</template>

<script>
	export default{
		name: 'App',
		data:function(){
			return {
				userid: 'zhangsan'
			}
		}
	}
</script>

<style>
</style>
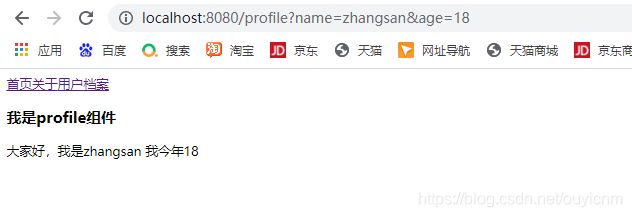
效果如下:

在路由对应的组件中,使用路由传递的query参数
修改Profile.vue文件,在组件中使用路由传递过来的query参数。
<template>
	<div>
		<h3>我是profile组件</h3>
		<!--$route:获取当前活跃的路由对象-->
		<p>大家好,我是{{$route.query.name}} 我今年{{$route.query.age}}</p>
	</div>
</template>

<script>
	export default {
		name: 'Profile'
	}
</script>

<style>
</style>
(10)$router和$route的区别
$router和$route都是vue-router中注册的全局组件,那么它们有什么区别呢?
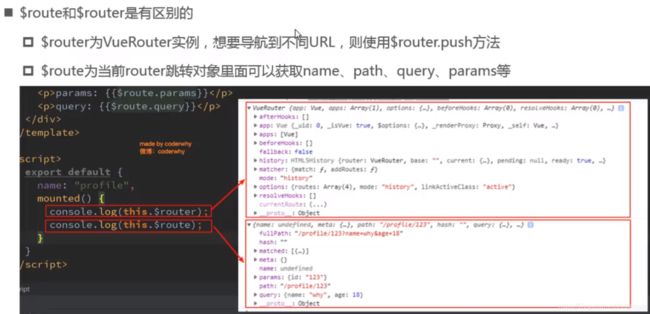
(11)路由导航守卫(监听路由跳转)
(11.1)全局前置守卫
beforeEach:前置守卫,即路由从一个组件跳转到另一个组件前执行的钩子函数。
定义格式:
const router = new VueRouter({ ... })

router.beforeEach((to, from, next) => {
  // ...
})
参数讲解:
- to: Router对象。表示跳转后的组件路由
- from: Router对象。表示跳转前的组件路由
- next:一个vue-router中的内置函数,必须在beforeEach中调用一下
next()。否则路由会跳转失败
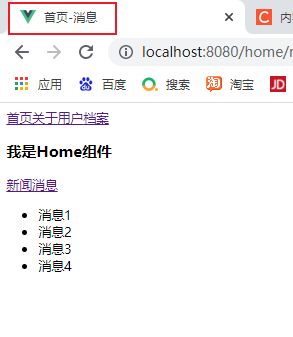
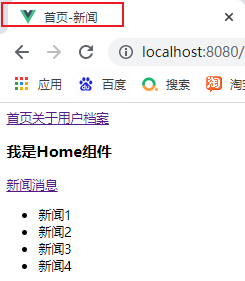
练习:实现当跳转到不同的组件时,页面标题改变为对应组件中设置的标题。
修改router.js文件如下:
import Vue from 'vue'
import Router from 'vue-router'
// import Home from './components/Home.vue'
// import About from './components/About.vue'
// import User from './components/User.vue'

// 使用路由懒加载方式导入组件
const Home = () => import('./components/Home.vue')
const HomeNew = () => import('./components/HomeNew.vue')
const HomeMessage = () => import('./components/HomeMessage.vue')
const About = () => import('./components/About.vue')
const User = () => import('./components/User.vue')
const Profile = () => import('./components/Profile.vue')

Vue.use(Router)

const router = new Router({
  mode: 'history',
  base: process.env.BASE_URL,
  //routes中将url与组件映射起来
  routes: [
	{
		path: '/',
		redirect: '/home' //将跟路径重定向到‘/home’
	},
    {
		path: '/home',
		component: Home,
		//在元数据meta中添加组件title
		meta:{
			title: '首页'
		},
		// 添加子路由
		children: [
			{
				path: 'new',//注意:子路由路径不需要加/,会自动拼接到父路由路径后面
				component: HomeNew,
				//在元数据meta中添加组件title
				meta:{
					title: '首页-新闻'
				}
			},
			{
				path: 'message',//注意:子路由路径不需要加/,会自动拼接到父路由路径后面
				component: HomeMessage,
				//在元数据meta中添加组件title
				meta:{
					title: '首页-消息'
				}
			},
			{
				path: '',
				redirect: 'new', //将/home路径重定向到/home/new
			}
		]

	},
	{
		path: '/about',
		component: About,
		//在元数据meta中添加组件title
		meta:{
			title: '关于'
		}
	},
	{
		path: '/user/:userid', // ':userid'表示动态变量
		component: User,
		//在元数据meta中添加组件title
		meta:{
			title: '用户'
		}
	},
	{
		path: '/profile',
		component: Profile,
		//在元数据meta中添加组件title
		meta:{
			title: '档案'
		}
	}
  ]
})
//全局路由前置守卫
router.beforeEach((to,from,next) => {
	document.title = to.meta.title //在路由跳转前,将页面title改为to(将跳转到的组件)中的title
	next() //必须调用一下next函数,路由才会跳转
})

export default router
(11.2)全局后置守卫
afterEach:后值守卫,即路由跳转后才执行的钩子函数
格式:
router.afterEach((to, from) => {
  // ...
})
参数讲解:
- to: Router对象。表示跳转后的组件路由
- from: Router对象。表示跳转前的组件路由
- 注意:后置守卫中不需要传入next函数
练习:实现当跳转到不同的组件时,页面标题改变为对应组件中设置的标题。
import Vue from 'vue'
import Router from 'vue-router'
// import Home from './components/Home.vue'
// import About from './components/About.vue'
// import User from './components/User.vue'

// 使用路由懒加载方式导入组件
const Home = () => import('./components/Home.vue')
const HomeNew = () => import('./components/HomeNew.vue')
const HomeMessage = () => import('./components/HomeMessage.vue')
const About = () => import('./components/About.vue')
const User = () => import('./components/User.vue')
const Profile = () => import('./components/Profile.vue')

Vue.use(Router)

const router = new Router({
  mode: 'history',
  base: process.env.BASE_URL,
  //routes中将url与组件映射起来
  routes: [
	{
		path: '/',
		redirect: '/home' //将跟路径重定向到‘/home’
	},
    {
		path: '/home',
		component: Home,
		//在元数据meta中添加组件title
		meta:{
			title: '首页'
		},
		// 添加子路由
		children: [
			{
				path: 'new',//注意:子路由路径不需要加/,会自动拼接到父路由路径后面
				component: HomeNew,
				//在元数据meta中添加组件title
				meta:{
					title: '首页-新闻'
				}
			},
			{
				path: 'message',//注意:子路由路径不需要加/,会自动拼接到父路由路径后面
				component: HomeMessage,
				//在元数据meta中添加组件title
				meta:{
					title: '首页-消息'
				}
			},
			{
				path: '',
				redirect: 'new', //将/home路径重定向到/home/new
			}
		]

	},
	{
		path: '/about',
		component: About,
		//在元数据meta中添加组件title
		meta:{
			title: '关于'
		}
	},
	{
		path: '/user/:userid', // ':userid'表示动态变量
		component: User,
		//在元数据meta中添加组件title
		meta:{
			title: '用户'
		}
	},
	{
		path: '/profile',
		component: Profile,
		//在元数据meta中添加组件title
		meta:{
			title: '档案'
		}
	}
  ]
})
//全局路由后置守卫
router.afterEach((to,from) => {
	document.title = to.meta.title //在路由跳转后,将页面title改为to(跳转后的组件)中的title
})

export default router
(11.3)路由独享的守卫
你可以在路由配置上直接定义 beforeEnter 守卫:这样的守卫只会作用于该路由
const router = new VueRouter({
  routes: [
    {
      path: '/foo',
      component: Foo,
      beforeEnter: (to, from, next) => {
        // ...
      }
    }
  ]
})
这些守卫与全局前置守卫的方法参数是一样的
(11.4)组件内的守卫
最后,你可以在路由组件内直接定义以下路由导航守卫:
- beforeRouteEnter
- beforeRouteUpdate (2.2 新增)
- beforeRouteLeave
const Foo = {
  template: `...`,
  beforeRouteEnter(to, from, next) {
    // 在渲染该组件的对应路由被 confirm 前调用
    // 不!能!获取组件实例 `this`
    // 因为当守卫执行前,组件实例还没被创建
  },
  beforeRouteUpdate(to, from, next) {
    // 在当前路由改变,但是该组件被复用时调用
    // 举例来说,对于一个带有动态参数的路径 /foo/:id,在 /foo/1 和 /foo/2 之间跳转的时候,
    // 由于会渲染同样的 Foo 组件,因此组件实例会被复用。而这个钩子就会在这个情况下被调用。
    // 可以访问组件实例 `this`
  },
  beforeRouteLeave(to, from, next) {
    // 导航离开该组件的对应路由时调用
    // 可以访问组件实例 `this`
  }
}
更多的关于路由守卫的内容,可以查看vue-router官网:https://router.vuejs.org/zh/guide/advanced/navigation-guards.html
(12)keep-alive实现组件的缓存
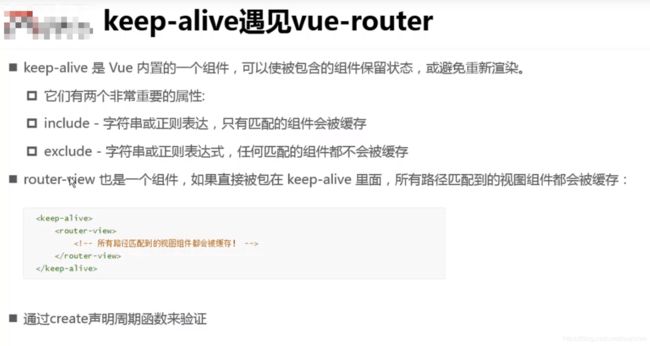
在之前的案例中,当我们url跳转到另一个组件时,之前的组件会被销毁。再次跳转获取时又会重新创建。但是在实际的项目中许多组件并不希望被频繁创建销毁,这时可以将组件的状态保存到缓存中,。
