Vue — 第七天(vue-cli-案例)
资料获取地址:
github: https://gitee.com/wang_yu5201314/VUE_vuecli
SSH: [email protected]:wang_yu5201314/VUE_vuecli.git
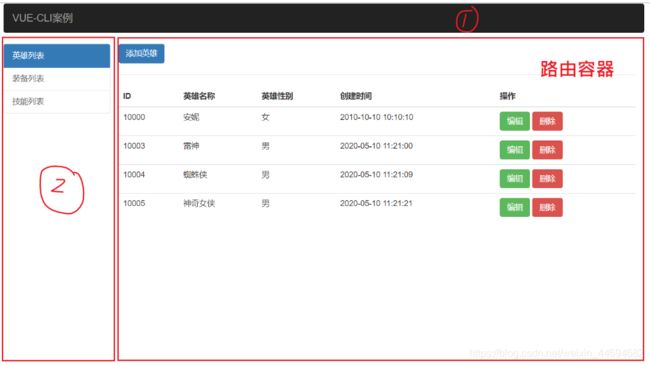
hero案例-项目介绍
功能介绍:
- 三个模块
- 英雄列表(只做这个)
- 装备列表
- 技能列表
- 英雄列表
- 列表组件
- 删除功能
- 添加组件
- 编辑组件
脚手架工具创建项目
从头开始创建一个全新的
- 在桌面,打开命令行窗口
vue create hero-project - 选择默认创建,
defalut(babel,eslint),进行创建 - 等待下载依赖。完毕后切到项目目录,执行
npm run serve - 注意:不用关闭,这个服务是预览项目。
从现有的项目复制重命名
要改名的地方如下:
-
文件夹的名字
-
package.json文件中的name
- Readme.md中的内容
引入bootstrap,改造app.vue
导入bootstrap到项目中
- 安装
npm i [email protected] - 导入
main.js
// main.js
import 'bootstrap/dist/css/bootstrap.min.css'
app.vue
container,col-md-2,col-md-10 都是在boostarp.css中要用到的class。
<template>
  <div id="app" class="container">
    <nav>
        顶部的导航
    nav>
    <div class="col-md-2">
      侧边栏 col-md-2 bootstrap中的栅格系统
    div>
    <div class="col-md-10">
      路由容器
    div>

  div>
template>

<script>


// 默认导出
export default {
  // 约定组件的名字。在调试工具中方便调试
  name: 'App',
  // 这里有一个组件的嵌套
  // 2. 在components中注册一下你引入的子组件
  components: {

  }
}
script>

<style>

style>
实现顶部通栏组件
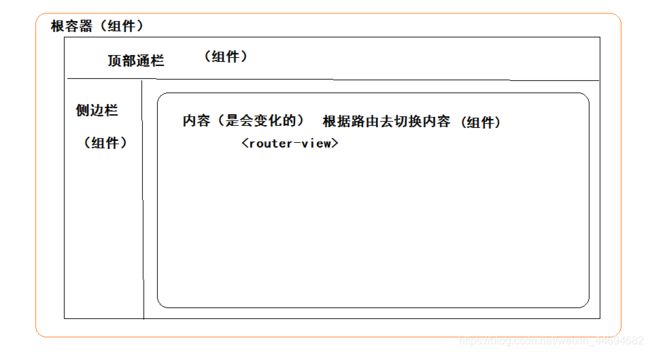
分析布局:
创建组件
components/NavBar.vue按boostrap样式要求,完成dom
在app.vue中引入组件
步骤:
- 导入
- 注册组件
- 在模板中使用
实现左侧侧边栏组件
创建组件
components/MyAside.vue按boostrap样式要求,完成dom
在app.vue中引入组件
步骤:
- 导入
- 注册组件
- 在模板中使用
实现路由
目标
- 在支持左侧边栏中的链接显示不同的内容。
思路
引入vue-router
配置路由规则
给左侧添加声明式路由导航
在根组件中添加router-view
基本步骤
在vue-cli的项目中,使用路由插件的基本步骤:
-
安装vue-router
vue-router是vue的插件,在vue-cli的项目中,我们通过npm包的方式来加载(在.html中,是通过srcript 的src属性来加载的)
npm i vue-router
-
导入并注册插件
main.js
import VueRouter from 'vue-router'

Vue.use(VueRouter) //注册插件(**重要**)
- 准备页面组件
在src下创建views文件夹,并在下面放置三个组件,分别表示路由切换时的三个页面:
src/views/Hero.vue
src/views/Zb.vue
src/views/Jn.vue
每个页面组件中,都只需要维持基本内容即可。
- 导入组件,初始化插件,路由规则配置,
// 提前定义好三个组件,以备在路由中使用
import Hero from './views/Hero.vue'
import Zb from './views/Zb.vue'
import Jn from './views/Jn.vue'
// 创建路由实例,定义路由规则
const router = new VueRouter( {
  routes: [
    {path: '/hero', component: Hero },
    {path: '/zb', component: Zb},
    {path: '/jn', component: Jn}
  ]
} )

const router = new VueRouter({routes})
- 把vueRouter挂载在vue实例上
new Vue({
  render: h => h(App),
  router
}).$mount('#app')
- 在根组件中,使用router-view设置路由出口
App.vue
<div class="col-md-10">

    <router-view>router-view>
div>
7.直接在地址栏中进行测试
修改左侧导航组件
在components/MyAside.vue中,使用router-link替换之前的a。
<div class="list-group">
    <router-link to="/hero" class="list-group-item active">英雄列表router-link>
    <router-link to="/zb" class="list-group-item">装备列表router-link>
    <router-link to="/jn" class="list-group-item">技能列表router-link>
div>
再次点击测试。
解决打开页面时,没有显示组件的bug,解决方案,就是主页重定向一下。
const router = new VueRouter( {
  routes: [
    // 主页重定向
    // 默认显示hero组件
+    {path: '/', redirect:'/hero' },
    {path: '/hero', component: Hero },
    {path: '/zb', component: Zb},
    {path: '/jn', component: Jn}
  ]
} )
路由激活样式
目标
对当前路由高亮显示
前置知识
- vue-router会根据路由地址,给router-link解析后的a标签加上类:
- router-link-exact-active 精准匹配时(地址/hero === to属性/hero ),加上的类名
- router-link-active 模糊匹配时(地址/hero/add 以to属性/hero 开头),加上的类名
- bootstrap有一个类active,表示菜单选中的样式 。
解决方案
- 方案1: 在bootstrap中抄出 active的样式,再加给router-link-exact-active类中。
- 方案2:通过设置VueRouter配置,指定 router-link-exact-active时的类名为active。
方案1
components/MyAside.vue
<style>
/* 此时的样式router-link-active需要和bootstrap的active样式一致 */
.list-group-item.router-link-exact-active,
.list-group-item.router-link-exact-active:focus,
.list-group-item.router-link-active:hover {
    z-index: 2;
    color: #fff;
    background-color: #337ab7;
    border-color: #337ab7;
}
style>
方案2
在初始化路由的时候提供的配置选项中,添加对linkExactActiveClass的设置:给它换个名字‘active’。(active是bootstrap中内置的一个特殊的类名,有它,则会有高亮的效果)
main.js
// 创建路由实例,定义路由规则
const router = new VueRouter({
  // 当路由与router-link中的to 精确匹配时,给rotuer-link上添加一个类,名是active
  linkExactActiveClass: 'active',
  routes: [
    // 主页重定向
    // 默认显示hero组件
    {path: '/', redirect:'/hero' },
    {path: '/hero', component: Hero },
    {path: '/zb', component: Zb},
    {path: '/jn', component: Jn}
  ]
} )
示意图:
提取路由模块
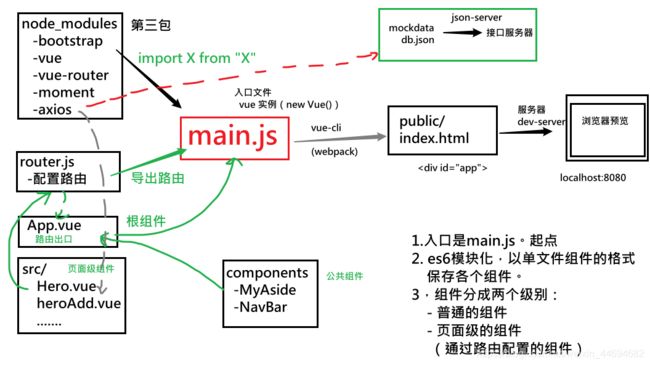
当路由相关配置,越来越多的时候,main.js中要用大量的代码去做路由配置功能。所以:把路由封装成一个模块,提取出去,导入main.js进行使用即可。
|-main.js
|-router.js
分成两步:
第一步:创建router.js。在其中定义VueRouter实例,并导出
第二步:在main.js导入
router.js
router.js 配置路由,导出路由实例。
// 创建路由对象,并默认导出


// 导入路由插件
import VueRouter from "vue-router"
import Vue from 'vue'

// 使用插件 - 重要
Vue.use(VueRouter)

// 提前定义好五个组件,以备在路由中使用
import Hero from './views/Hero.vue'
import Zb from './views/Zb.vue'
import Jn from './views/Jn.vue'
import HeroAdd from './views/HeroAdd.vue'
import HeroEdit from './views/HeroEdit.vue'

// 创建路由实例 默认导出
// 定义路由规则
export default new VueRouter({
    // 当路由与router-link中的to 精确匹配时,给rotuer-link上添加一个类,名是active
    // active是bootstrap中内置的一个特殊的类名,有它,则会有高亮的效果
    linkExactActiveClass: 'active',
    routes: [
      // 主页重定向
      // 默认显示hero组件
      {path: '/', redirect:'/hero' },
      // component : 组件对象,其中就应该有data,template,methods....。
      {path: '/hero', component: Hero },
      {path: '/zb', component: Zb },
      {path: '/jn', component: Jn },
      {path: '/hero/add', component: HeroAdd },
      // 动态路由
      {path: '/hero/edit/:id', component: HeroEdit }
    ]
  })
main.js 中导入路由
导入路由,挂载根实例即可。
// 配置好路由实例
import router from './router.js'

// 根实例,挂载路由
new Vue({
  render: h => h(App),
  router
}).$mount('#app')
列表组件
基础布局
- 进行组件的基础布局
<template>
  <div>
    <a href="#" class="btn btn-primary">添加英雄a>
    <hr />
    <table class="table table-hover">
      <thead>
        <tr>
          <th>IDth>
          <th>英雄名称th>
          <th>英雄性别th>
          <th>创建时间th>
          <th>操作th>
        tr>
      thead>
      <tbody>
        <tr>
          <td>101td>
          <td>亚索td>
          <td>男td>
          <td>2019-02-10 10:50:12td>
          <td>
            <button class="btn btn-success">编辑button>

            <button class="btn btn-danger">删除button>
          td>
        tr>
      tbody>
    table>
  div>
template>

<script>
export default {};
script>
json-server模拟接口
json-server 是一个全局安装的工具,用来把.json快速生成RESTful风格的接口。
在前面的学习中,已经全局安装过。
建立目录mockdata,在下面放置一个db.json文件,内容如下:
|-src
|-src\mockdata\db.json
内容:
{
  "heroes":[
    { "id":10000, "heroName": "安妮", "gender": "女", "cTime": "2010-10-10 10:10:10" },
    { "id":10001, "heroName": "德玛西亚", "gender": "男", "cTime": "2014-10-10 10:10:10" },
    { "id":10002, "heroName": "刘三姐", "gender": "女", "cTime": "Fri Apr 17 2020 16:24:42 GMT+0800 (中国标准时间)" },
    { "id":10003, "heroName": "超人", "gender": "男", "cTime": "2020/10/10 10:10:10" }
  ]
}
在 db.json 的位置启动数据接口服务器:json-server db.json
axios
在项目中通过npm i axios安装axios,方便我们来获取json-server接口服务器中数据。
安装
之前是
编辑功能
实现大致步骤:
- 在英雄列表,给编辑按钮绑定点击事件,跳转到编辑组件
/hero/edit/:id。 - 创建编辑组件,配置路由规则,使用的动态路由规则
- 完成编辑组件中的基础布局(表单),双向绑定表单元素。
- 在组件初始化的时候,获取当英雄数据,填充给表单。
- 监听表单的提交事件,进行编辑请求的发送。
- 成功:跳转英雄列表进行预览,失败:错误提示。
准备页面组件和路由
页面组件
新增:views/heroEdit.vue(直接从heroAdd.vue复制过来的)
<template>
  <form>
    <legend>编辑英雄legend>
    <div class="form-group">
      <label>英雄名称label>
      <input v-model="hero.heroName" type="text" class="form-control" />
    div>
    <div class="form-group">
      <label>英雄性别label>
      <div>
        <input type="radio" value="男" v-model="hero.gender" /> 男
        <input type="radio" value="女" v-model="hero.gender" /> 女
      div>
    div>
    <button class="btn btn-primary">提交button>
  form>
template>

<script>
import axios from 'axios'
export default {
  data () {
    return {
      hero: {
        heroName: '',
        gender: ''
      }
    }
  }
script>
设置路由
main.js
import HeroEdit from './views/HeroEdit.vue'
// 创建路由实例,定义路由规则
const router = new VueRouter({
  // 当路由与router-link中的to 精确匹配时,给rotuer-link上添加一个类,名是active
  // active是bootstrap中内置的一个特殊的类名,有它,则会有高亮的效果
  linkExactActiveClass: 'active',
  routes: [
    // 主页重定向
    // 默认显示hero组件
    {path: '/', redirect:'/hero' },
    // component : 组件对象,其中就应该有data,template,methods....。
    {path: '/hero', component: Hero },
    {path: '/zb', component: Zb },
    {path: '/jn', component: Jn },
    {path: '/hero/add', component: HeroAdd },
    // 动态路由
    {path: '/hero/edit/:id', component: HeroEdit }
  ]
})
测试
补充路由跳转
落地项目代码:
views/hero.vue
<td>

    <button @click="hEdit(item.id)" class="btn btn-success">编辑button>

    <button @click="hDel(item.id)" class="btn btn-danger" >删除button>
td>
// 跳转到编辑页,并传入当前的id
hEdit(id) {
    this.$router.push('/hero/edit/'+id)
}
实现功能
思路:
1.发一次请求,根据id获取这个英雄的详情并显示出来
2.用户在此基础上进行修改,并提交数据。
显示初值
思路:
发一次请求,根据id获取这个英雄的详情并显示出来
要点:
- 定义数据项,在表单元素进行双向绑定。
- 定义getHero访求,根据id获取详情。
- 在created中去调用getHero
实现保存
用户在页面上进行修改,点击保存,把改动通过axios调用接口,实现保存。
- 给按钮添加click事件。
- 在回调函数中:
- 收集用户信息
- 判空
- 调用接口
hSave () {
    // 1. 获取用户的输入
    // 2. 判断是否为空
    console.log(this.hero)
    if(this.hero.heroName == '') {
        return
    }
    // 3. ajax提交 - 修改
    axios({
        method: 'PUT', //完整修改
        url: 'http://localhost:3000/heroes/' + this.$route.params.id,
        // 根据RESTFul接口要求传入参数
        data: {
            heroName : this.hero.heroName,
            gender: this.hero.gender,
            cTime: new Date()
        }
    }).then(res => {
        console.log(res)
        // alert('修改成功')
        // 实现:修改成功之后,自动跳回到英雄列表页。
        // 编程式导航 : 通过代码的方式来进行页面的跳转
        this.$router.push('/hero')

    }).catch(err => {
        console.log(err)
        alert('修改失败')

    })
}
项目工作过程
优化
axios全局使用
痛点:
- 使用axios来发送ajax请求,步骤:先导入,再使用。
- 很多组件都使用了axios,所以以上操作经常进行,工作很重复。
目标
**一次**到导入后,在其他**组件**下,都可以直接使用,那该多好啊!!!
方案:
- 目的:在任意组件下访问axios,通过组件实例进行访问,this.$http 调用axios。
- 组件实例,其实是vue实例,vue实例本质通过Vue构造函数得来的。
- 凡是Vue构造函数上拥有的原型属性,vue实例也会拥有。
- 原型属性:
$http$迎合vue的写法,没任何含义,指向axios即可。
代码:
main.js
// 导入axios
import axios from "axios"
// 给Vue的原型上添加一个自定义的属性: 在所有的Vue实例中均可以访问这个属性
//     (组件本质也是Vue的实例,在所有组件内部都可以访问这个属性)
//  属性名是: $http ( 是可以更改 )
//  属性值是:axios
Vue.prototype.$http = axios
// Vue.prototype.abcccc = 100001
其他组件
// 删除axios的导入
// 将axios改成  this.$http  即可
axios基准地址
痛点:
- 项目中有很多处接口调用逻辑,其中要使用接口地址。
- 接口的路径可能不变,但是服务器地址一定会变,开发环境和 上线环境使用的服务器肯定不一样。
- 服务器的域名肯定会变,一旦变化,所有的代码都需要重新修改,太恶心!!!
方案:
- 在代码中经常出现的数据,可以声明成变量。
- axios提供了默认配置,配置接口地址中,前一段相同的地址(域名地址)
- 你在调用接口的时候,可有只写除去 前一段相同的地址,写简短的路径即可。
- axios在发请求的时候,自己根据配置的路径 + 你调用接口简短路径 进行拼接,调用接口。
- 前一段相同的地址(基准地址) baseURL
代码:
main.js
// 导入axios挂载在Vue的原型上,将来任意vue实例都可以访问。
import axios from 'axios'
+// 基准地址
+axios.defaults.baseURL = 'http://localhost:3000/'
Vue.prototype.$http = axios
其他组件:
// 其他组件 接口地址  删除  http://localhost:3000/
// 例如:
this.$http({
                method: 'PUT', //完整修改
                url: '/heroes/' + this.$route.params.id,
                // 根据RESTFul接口要求传入参数
                data: {
                    heroName : this.hero.heroName,
                    gender: this.hero.gender,
                    cTime: new Date()
                }
            })
是Vue构造函数上拥有的原型属性,vue实例也会拥有。
- 原型属性:
$http$迎合vue的写法,没任何含义,指向axios即可。
代码:
main.js
// 导入axios
import axios from "axios"
// 给Vue的原型上添加一个自定义的属性: 在所有的Vue实例中均可以访问这个属性
//     (组件本质也是Vue的实例,在所有组件内部都可以访问这个属性)
//  属性名是: $http ( 是可以更改 )
//  属性值是:axios
Vue.prototype.$http = axios
// Vue.prototype.abcccc = 100001
其他组件
// 删除axios的导入
// 将axios改成  this.$http  即可
axios基准地址
痛点:
- 项目中有很多处接口调用逻辑,其中要使用接口地址。
- 接口的路径可能不变,但是服务器地址一定会变,开发环境和 上线环境使用的服务器肯定不一样。
- 服务器的域名肯定会变,一旦变化,所有的代码都需要重新修改,太恶心!!!
方案:
- 在代码中经常出现的数据,可以声明成变量。
- axios提供了默认配置,配置接口地址中,前一段相同的地址(域名地址)
- 你在调用接口的时候,可有只写除去 前一段相同的地址,写简短的路径即可。
- axios在发请求的时候,自己根据配置的路径 + 你调用接口简短路径 进行拼接,调用接口。
- 前一段相同的地址(基准地址) baseURL
代码:
main.js
// 导入axios挂载在Vue的原型上,将来任意vue实例都可以访问。
import axios from 'axios'
+// 基准地址
+axios.defaults.baseURL = 'http://localhost:3000/'
Vue.prototype.$http = axios
其他组件:
// 其他组件 接口地址  删除  http://localhost:3000/
// 例如:
this.$http({
                method: 'PUT', //完整修改
                url: '/heroes/' + this.$route.params.id,
                // 根据RESTFul接口要求传入参数
                data: {
                    heroName : this.hero.heroName,
                    gender: this.hero.gender,
                    cTime: new Date()
                }
            })


