opencv学习—简单车牌识别操作(python)
opencv学习—简单车牌识别操作(python)
目录
opencv学习—简单车牌识别操作(python)
利用opencv进行车牌识别的详细流程如下:
1、车牌检测
2、分割车牌号并进行识别
3、字符识别
tesseract.exe下载链接
Tesseract-OCR\tesseract.exe
全部Code:
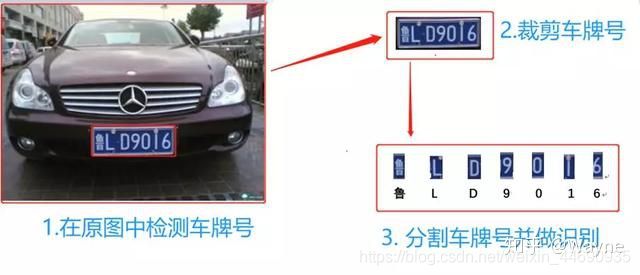
车牌的检测和识别的应用非常广泛,比如交通违章车牌追踪,小区或地下车库门禁。在对车牌识别和检测的过程中,因为车牌往往是规整的矩形,长宽比相对固定,色调纹理相对固定,常用的方法有:基于形状、基于色调、基于纹理、基于文字特征等方法,近年来随着深度学习的发展也会使用目标检测的一些深度学习方法。该项目主要的流程如下图所示:
利用opencv进行车牌识别的详细流程如下:
1、车牌检测
首先我们需要从汽车中检测到车牌所在的位置。利用opencv中的轮廓检测来寻找车牌,如果知道车牌的确切尺寸、大致位置以及颜色,则可以提高检测的准确性。通常会根据摄像机的位置以及该车牌特定国家和区域的车牌来训练算法。
以图1样本图像为例,首先需要检测该汽车上的车牌,然后需要对车牌图像进行字符分割和字符识别。
图1测试图像
车牌检测的步骤如下流程图所示:
一、调整图像大小以及灰度化操作
img = cv2.imread("E:\\car\\2.jpg",cv2.IMREAD_COLOR)
img = cv2.resize(img, (600,400) )
gray = cv2.cvtColor(img, cv2.COLOR_BGR2GRAY)
cv2.imshow('gray',gray)
cv2.waitKey(0)
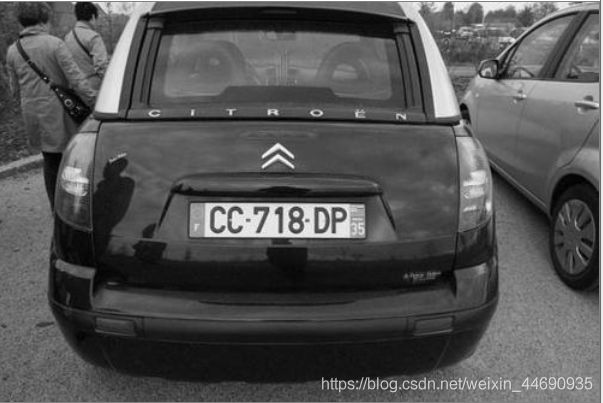
将图像调整到所需要的大小,可以避免图像分辨率过小或者过大的问题,在处理图像时如果不需要处理颜色细节,可以通过灰度化,加快处理速度。如图2所示。
图2灰度化图像
二、双边滤波去噪
gray = cv2.bilateralFilter(gray, 13, 15, 15)
# cv2.imshow('gray',gray)
# cv2.waitKey(0)
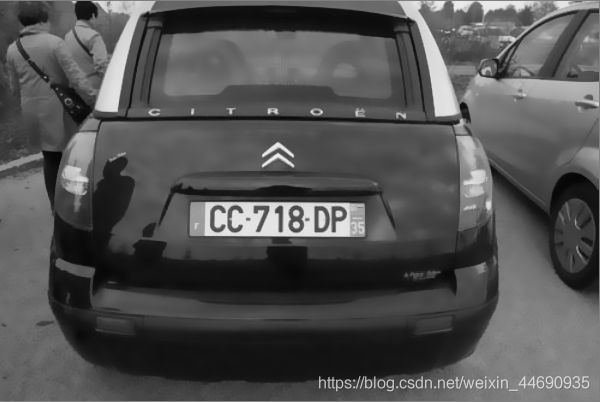
利用双边滤波可以去除灰度图像中的一些噪声信息。
cv2.bilateralFilter(src, d, sigmaColor, sigmaSpace) 语法参数解释:
-
src:输入图像
-
d:过滤时周围每个像素领域的直径
-
sigmaColor:在color space中过滤sigma。参数越大,临近像素将会在越远的地方mix。
-
sigmaSpace:在coordinate space中过滤sigma。参数越大,那些颜色足够相近的的颜色的影响越大。
双边滤波后的图像如图3所示:
图3双边滤波后图像
三、Canny边缘检测
Canny边缘检是在在1986年提出来的,到今天已经30多年过去了,但Canny算法仍然是图像边缘检测算法中最经典、先进的算法之一。
1.Canny边缘检测基本原理
(1)图象边缘检测必须满足两个条件:一能有效地抑制噪声;二必须尽量精确确定边缘的位置。
(2)根据对信噪比与定位乘积进行测度,得到最优化逼近算子。这就是Canny边缘检测算子。
(3)类似与Marr(LoG)边缘检测方法,也属于先平滑后求导数的方法。
2.Canny边缘检测算法:
step1:用高斯滤波器平滑图象;
step2:用一阶偏导的有限差分来计算梯度的幅值和方向;
step3:对梯度幅值进行非极大值抑制;
step4:用双阈值算法检测和连接边缘。
void Canny(InputArray image,OutputArray edges, double threshold1, double threshold2, int apertureSize=3,bool L2gradient=false )
- InputArray类型的image,输入图像,即源图像,填Mat类的对象即可,且需为单通道8位图像。
- OutputArray类型的edges,输出的边缘图,需要和源图片有一样的尺寸和类型。
- double类型的threshold1,第一个滞后性阈值【低阈值】。值越大,找到的边缘越少
- double类型的threshold2,第二个滞后性阈值【高阈值】。
- int类型的apertureSize,表示应用Sobel算子的孔径大小,其有默认值3。
- bool类型的L2gradient,一个计算图像梯度幅值的标识,有默认值false。
Canny边缘检测结果如图4所示
图4canny边缘检测结果
四、寻找车牌轮廓
contours=cv2.findContours(edged.copy(),cv2.RETR_TREE,
                                            cv2.CHAIN_APPROX_SIMPLE)
contours = imutils.grab_contours(contours)
contours = sorted(contours,key=cv2.contourArea, reverse = True)[:20]
screenCnt = None
for c in contours:
    # approximate the contour
    peri = cv2.arcLength(c, True)
    approx = cv2.approxPolyDP(c, 0.018 * peri, True)
    # if our approximated contour has four points, then
    # we can assume that we have found our screen
    if len(approx) == 4:
        screenCnt = approx
        break
print(screenCnt)
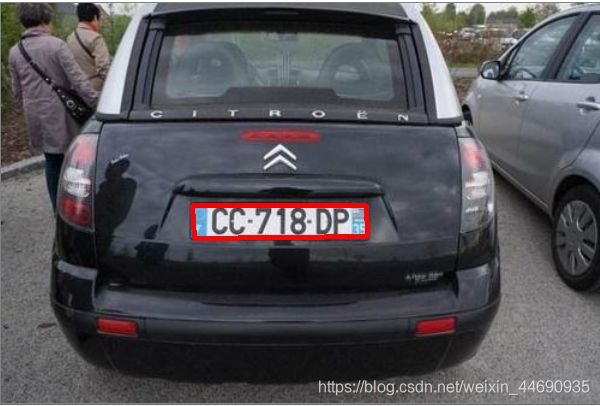
利用opencv中cv2.findContours函数寻找Canny 边缘检测图像的轮廓,并且按照面积大小从小到大进行排序,只考虑前20个结果。为了过滤获取我们需要的车牌,需要遍历结果, 并检查其具有四个侧面和闭合图形的矩形轮廓。由于车牌肯定是四边形的矩形。通过计数器保存轮廓,然后在原图上绘制出车牌的矩形框。
图5检测到的车牌位置
图5车牌位置
五、利用掩膜方法获取车牌图像
上面的方法我们可以获取车牌位置,但是针对于车牌以外的其他信息对我们来说无用,因此可以利用掩膜方法进行遮罩。
mask = np.zeros(gray.shape,np.uint8)
new_image = cv2.drawContours(mask,[screenCnt],0,255,-1,)
new_image = cv2.bitwise_and(img,img,mask=mask)
cv2.imshow('new_image',new_image)
cv2.waitKey(0)
图6掩膜方法获取车牌位置
2、分割车牌号并进行识别
(x, y) = np.where(mask == 255)
(topx, topy) = (np.min(x), np.min(y))
(bottomx, bottomy) = (np.max(x), np.max(y))
Cropped = gray[topx:bottomx+1, topy:bottomy+1]
车牌识别的下一步是通过裁剪车牌并将其保存为新图像,将车牌从图像中分割出来。然后,我们可以使用此图像来检测其中的字符。下面显示了从主图像裁剪出ROI(感兴趣区域)图像的代码。
图7ROI区域
3、字符识别
tesseract.exe下载链接
Tesseract-OCR\tesseract.exe
可以使用pytesseract包从图像读取字符。
text = pytesseract.image_to_string(Cropped, config='--psm 11')
print("programming_fever's License Plate Recognition\n")
print("Detected license plate Number is:",text)
img = cv2.resize(img,(500,300))
Cropped = cv2.resize(Cropped,(400,200))
cv2.imshow('car',img)
cv2.imshow('Cropped',Cropped)
cv2.waitKey(0)
cv2.destroyAllWindows()
识别结果 :
programming_fever's License Plate Recognition
Detected license plate Number is: "CC—718—DP :
全部Code
import cv2
import imutils
import numpy as np
import pytesseract
pytesseract.pytesseract.tesseract_cmd = r"E:\\tesseract4win64-master\\tesseract4win64-master\\x64\\tesseract.exe"
img = cv2.imread("E:\\car\\2.jpg",cv2.IMREAD_COLOR)
img = cv2.resize(img, (600,400) )
gray = cv2.cvtColor(img, cv2.COLOR_BGR2GRAY)
# cv2.imshow('gray',gray)
# cv2.waitKey(0)
gray = cv2.bilateralFilter(gray, 13, 15, 15)
# cv2.imshow('gray',gray)
# cv2.waitKey(0)
edged = cv2.Canny(gray, 30,150) #Perform Edge detection
cv2.imshow('edged',edged)
cv2.waitKey(0)
contours=cv2.findContours(edged.copy(),cv2.RETR_TREE,
                                            cv2.CHAIN_APPROX_SIMPLE)
contours = imutils.grab_contours(contours)
contours = sorted(contours,key=cv2.contourArea, reverse = True)[:20]
screenCnt = None
for c in contours:
    # approximate the contour
    peri = cv2.arcLength(c, True)
    approx = cv2.approxPolyDP(c, 0.018 * peri, True)
    # if our approximated contour has four points, then
    # we can assume that we have found our screen
    if len(approx) == 4:
        screenCnt = approx
        break
print(screenCnt)
# Masking the part other than the number plate
mask = np.zeros(gray.shape,np.uint8)
new_image = cv2.drawContours(mask,[screenCnt],0,255,-1,)
new_image = cv2.bitwise_and(img,img,mask=mask)
cv2.imshow('new_image',new_image)
cv2.waitKey(0)
(x, y) = np.where(mask == 255)
(topx, topy) = (np.min(x), np.min(y))
(bottomx, bottomy) = (np.max(x), np.max(y))
Cropped = gray[topx:bottomx+1, topy:bottomy+1]

text = pytesseract.image_to_string(Cropped, config='--psm 11')
print("programming_fever's License Plate Recognition\n")
print("Detected license plate Number is:",text)
img = cv2.resize(img,(500,300))
Cropped = cv2.resize(Cropped,(400,200))
cv2.imshow('car',img)
cv2.imshow('Cropped',Cropped)
cv2.waitKey(0)
cv2.destroyAllWindows()
原图
问题:目前来看该方法主要针对于较为规则的四边形车牌,对于多边形以及包含特殊字符(如汉字)的车牌识别效果并不好。
鸣谢
手动搭建一个车牌识别系统 | 附源码


