springBoot 实现分页
前言
以前觉得分页很难,在书上也看到关于分页的,但是很麻烦,要写几个类什么的,技术也有限,于是选择性的忽略掉,但是困难总是要面对的,解决了问题,记录一下。最近发现写博客很好玩,得到认可也很开心,希望和你们一起学习进步!
技术上因为不用写的太复杂,所以没有用MVC思想。后端用的springBoot+mybits+mysql,前端用的thymeleaf框架的html。
配置环境 >>>>
导入依赖:pom.xml
<dependencies>
	 <!-- mybatis -->
        <dependency>
            <groupId>org.mybatis.spring.boot</groupId>
            <artifactId>mybatis-spring-boot-starter</artifactId>
            <version>2.1.1</version>
        </dependency>
        <dependency>
            <groupId>org.springframework.boot</groupId>
            <artifactId>spring-boot-starter-web</artifactId>
        </dependency>
        <!--thymeleaf-->
        <dependency>
            <groupId>org.thymeleaf</groupId>
            <artifactId>thymeleaf-spring5</artifactId>
            <version>3.0.11.RELEASE</version>
        </dependency>
        <dependency>
            <groupId>org.thymeleaf.extras</groupId>
            <artifactId>thymeleaf-extras-java8time</artifactId>
        </dependency>
<!--        thymeleaf依赖包-->
        <dependency>
            <groupId>org.springframework.boot</groupId>
            <artifactId>spring-boot-starter-thymeleaf</artifactId>
        </dependency>
<!--        -->
<!--        连接数据库-->
        <dependency>
            <groupId>org.springframework.boot</groupId>
            <artifactId>spring-boot-starter-jdbc</artifactId>
        </dependency>
        <dependency>
            <groupId>mysql</groupId>
            <artifactId>mysql-connector-java</artifactId>
        </dependency>
</dependencies>
数据库配置,端口配置:application.yml
spring:
  datasource:
    password: 123456
    url: jdbc:mysql://localhost:3306/clear?useUnicode=true&characterEncoding=UTF-8&serverTimezone=UTC
    driver-class-name: com.mysql.cj.jdbc.Driver
    username: root
    type: com.alibaba.druid.pool.DruidDataSource


server:
  port: 8080
idea连接数据库
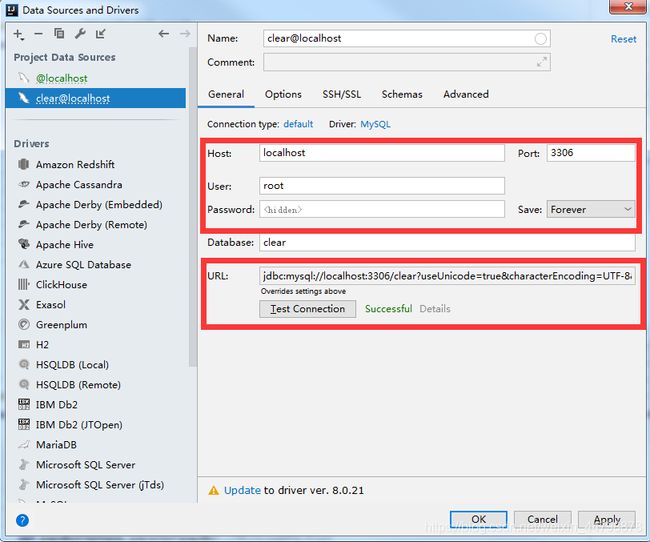
将url,账户密码都填正确之后,点击Test Connection ,如果连接成功那么就会显示Successful字样。
有时候连接失败的原因是需要url加上时区:
serverTimezone=UTC
资源配置:application.properties
#关闭默认图标
spring.mvc.favicon.enabled=false
#清除模板引擎缓存
spring.thymeleaf.cache=false
//
server.servlet.content-type=/wx1

spring.mvc.date-format=yyyy-MM-dd

spring.mvc.static-path-pattern=/static/**


#默认路径
spring.thymeleaf.prefix=classpath:/templates/
# 后缀
spring.thymeleaf.suffix=.html
# 模板格式
spring.thymeleaf.mode=LEGACYHTML5
spring.thymeleaf.encoding=UTF-8

spring.thymeleaf.servlet.content-type=text/html

spring.resources.static-locations=classpath:/static/,classpath:/templates/,classpath:/public,classpath:/resources,

#整合mybatis :
mybatis.type-aliases-package=com.example.wx1.pojo
mybatis.mapper-locations=classpath:mapper/*.xml
环境都设置完毕接下来,开始切入主题:
前端界面
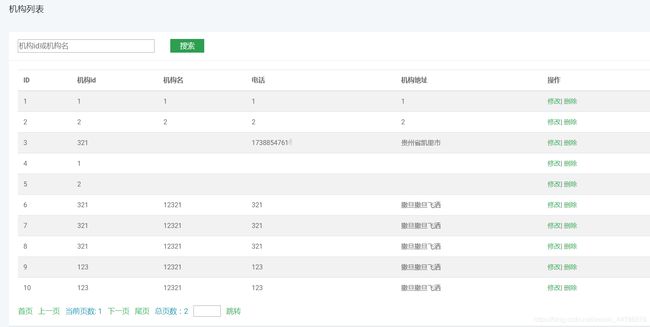
前端代码
   <header>
     <h1 class="h3 display">机构列表h1>
   header>
   <div class="row">
     <div class="col-lg-12">
       <div class="card">
         <div class="card-header">
           <form id="search" method="post" th:action="@{findOrgen1}">
             <input type="text" name="searchkey" placeholder="机构id或机构名" style="width: 300px">
             <a href="#" onclick="document.getElementById('search').submit();return false;" style="height: 30px;width: 75px;margin-left: 30px;background-color: #2d9f50;color: white;display: inline-block;text-align: center;margin-top: -30px;line-height: 30px;text-decoration:none;">搜索a>
           form>
         div>
         <div class="card-body">
           <div class="table-responsive">
             <table class="table table-striped table-hover">
               <tbody>
               <thead>
               <tr>
                 <th>IDth>
                 <th>机构idth>
                 <th>机构名th>
                 <th>电话th>
                 <th>机构地址th>
                 <th>操作th>
               tr>
               thead>
                 <tr th:each="orgenList:${orgenList}">
                   <td th:text="${orgenList.id}">1td>
                   <td th:text="${orgenList.orgenid}">123td>
                   <td th:text="${orgenList.orgenname}">张三td>
                   <td th:text="${orgenList.phone}">123456td>
                   <td th:text="${orgenList.address}">贵州省凯里市td>
                   <td>
                     <a href="#">修改a>|
                     <a href="#">删除a>
                   td>
                 tr>
               tbody>
             table>
               <a th:href="@{orgenList1(pageNo=1)}">首页a>
               <a th:href="@{orgenList1(pageNo=${pageNo1-1})}">上一页a>
               <span style="color: #17a2b8">当前页数: <span th:text="${pageNo1}">span>span>
               <a th:href="@{orgenList1(pageNo=${pageNo1+1})}">下一页a>
               <a th:href="@{orgenList1(pageNo=${pangCount})}">尾页a>
               <span style="color: #17a2b8">总页数:<span th:text="${pangCount}">span>span>
               <form th:action="@{orgenList1}" method="get" id="pageTo" style="display: inline">
                   <input type="text" style="width: 60px;height: 25px" name="pageNo">
                   <a href="#" onclick="document.getElementById('pageTo').submit();return false;">跳转a>
               form>
           div>
         div>
       div>
     div>
   div>
记得在html标签里写框架依赖:
xmlns:th="http://www.thymeleaf.org"
分页代码在Controller里面,先上代码再谈思路:
 @RequestMapping("orgenList1")
    public String orgenList1(String pageNo,Model model){
        System.out.println(pageNo);
        int count=adminMapper.calOrgenCount();
        int pageSize=10;//一页中条数为10条
        if (pageNo.equals(null)){
            pageNo="1";
        }
        int pageNo1=Integer.parseInt(pageNo);//将String转化为int
        int pangCount=count%pageSize==0?count/10:count/pageSize+1;//页面总数
        if (pageNo1>pangCount ||pageNo1<1){//当页数大于数据库页数时,页数变为1
            pageNo1=1;
        }
        pageNo1=(pageNo1-1)*10;//当前页数
        List<Orgen> orgenList=adminMapper.findOrgenList(pageNo1);

        model.addAttribute("pangCount",pangCount);//返回页面总数
        model.addAttribute("pageNo1",pageNo1/10+1);//返回当前页数
        model.addAttribute("orgenList",orgenList);
        return "orgenList";
    }
这里只是弄一个的所以没有用类封装起来,如果你的项目需要大量的分页,那么建议封装成类,这样更节约时间。
思路:
1、你想让每一页展示多少个数据:
int pageSize=10;//一页中条数为10条
2、通过数据库查询,查出表中的数据量:
int count=adminMapper.calOrgenCount();
3、通过总数,与每一页展示的数据量算出总页数
int pangCount=count%pageSize==0?count/10:count/pageSize+1;//页面总数
4、因为方法中我们要从前端获取pageNo,那么前端连接最起码要传一个页数,否则会报错,当然你可以设置两个方法,一个是刚点击页面用到的方法,另一个是点击上一页,下一页,首页,尾页以及跳转页面的方法。我这里只弄了一个方法,所以刚点击的链接为:
<li><a th:href="@{orgenList1(pageNo=1)}">机构列表a>li>
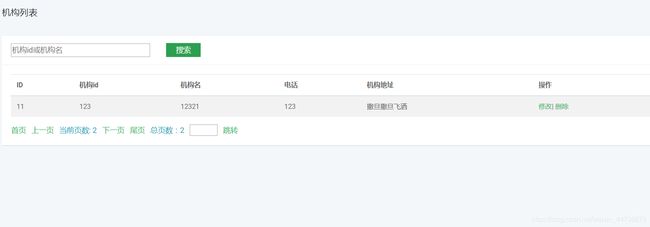
5、为了点击的页数大于总页数以及小于1页,所以将大于和小于的页数都为第一页。例如当总页数为3页当我跳转第四页时,跳转的是第一页。
 if (pageNo1>pangCount ||pageNo1<1){//当页数大于数据库页数时,页数变为1
        pageNo1=1;
    }
mybatis代码
mapper接口:
计算总数的方法:
int calOrgenCount();//计算机构数量
跳转第几页的方法:
List<Orgen> findOrgenList(int pageNo);//查询机构列表
两个方法的实现:mapper.xml
<mapper namespace="com.example.wx1.mapper.AdminMapper">
	<select id="calOrgenCount" resultType="int">
        select count(*) from orgen
    select>
    <select id="findOrgenList" resultType="Orgen" parameterType="int">
        select * from orgen where id order by id limit #{pageNo},10;
    select>
mapper>
数据库分页查询语句:
select * from 表 where 字段 order by 字段 limit m,n;
m代表数据库开始从第几条数据开始查,n代表查询多少条数据
实体类
package com.example.wx1.pojo;

import lombok.Data;
import lombok.NoArgsConstructor;

@Data
//@AllArgsConstructor  //有参
@NoArgsConstructor   //无参
public class Orgen {
    private int id;
    private String orgenid;
    private String orgenname;
    private String phone;
    private String address;
    private String pwd;
    private String creatdate;

    public Orgen(String orgenid1, String phone, String pwd, String address, String creatdate) {
        this.orgenid=orgenid1;
        this.phone=phone;
        this.pwd=pwd;
        this.address=address;
        this.creatdate=creatdate;
    }

    public int getId() {
        return id;
    }

    public void setId(int id) {
        this.id = id;
    }

    public String getOrgenid() {
        return orgenid;
    }

    public void setOrgenid(String orgenid) {
        this.orgenid = orgenid;
    }

    public String getOrgenname() {
        return orgenname;
    }

    public void setOrgenname(String orgenname) {
        this.orgenname = orgenname;
    }

    public String getPhone() {
        return phone;
    }

    public void setPhone(String phone) {
        this.phone = phone;
    }

    public String getAddress() {
        return address;
    }

    public void setAddress(String address) {
        this.address = address;
    }

    public String getPwd() {
        return pwd;
    }

    public void setPwd(String pwd) {
        this.pwd = pwd;
    }

    public String getCreatdate() {
        return creatdate;
    }

    public void setCreatdate(String creatdate) {
        this.creatdate = creatdate;
    }
}
注意事项:
1、在资源配置环节的时候一定要配置对,如果不对会报错,报错信息为找不到资源。
2、在mapper.xml中的:
namespace="com.example.wx1.mapper.AdminMapper"
mapper接口的名字一定要写对,不对的话,controller就会找不到方法。
3、mapper.xml中的方法名一定要和mapper接口的方法一致,否则也会导致运行的时候controller找不到方法。最好 方法名,类名都是复制过去,手敲的话,一个不留神,报错会让人抓狂。
结语
和你们一起学习进步,有什么问题,以及兴趣,评论一下吧~ ~ ~