【从kitti开始自动驾驶】--6.1 下载tracking和2d侦测
“剑道万古如长夜”
- 1. 预准备
-
- 1.1 下载tracking 资料
- 1.2 jupyter notebook下载
- 2. 预知识
-
- 2.1 对tracking数据分析
-
- 2.1.1 压缩包数据格式理解
- 2.1.2 单文件理解
- 2.2 在jupyter中查看tracking数据
- 3. 在jupyter中框选object
-
-
- 3.1 数据处理
- 3.2 提取需要的信息
- 3.3 CV画出tracking的框
-
- 4. 效果一览
- 5. python文件源码
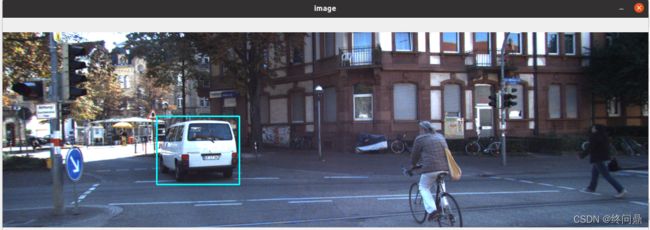
本节将采用在jupyter notebook上的方式执行对单张图片进行二维侦测以及打标(画出二维侦测框i)效果工作的情况.
tracking资料存放在/kitti_folder/tracking中
jupyter工程存放在/test3_autodrive_ws/src/jupyter_prj下的2D_tracking_label.ipynb
数据文件存放在/home/qinsir/kitti_folder/tracking/data_tracking_label_2/training/label_02
下,可以看到是txt文件
1. 预准备
1.1 下载tracking 资料
1.2 jupyter notebook下载
为了方便的执行python的程序来测试ROS, 这个下载比较简单,参考linux安装jupyter教程,基本多数电脑pip install完成后,就可以直接打开了
出现read_timeout等问题参考pip安装timeout解决方法2,将它的包换为jupyter即可
2. 预知识
2.1 对tracking数据分析
2.1.1 压缩包数据格式理解
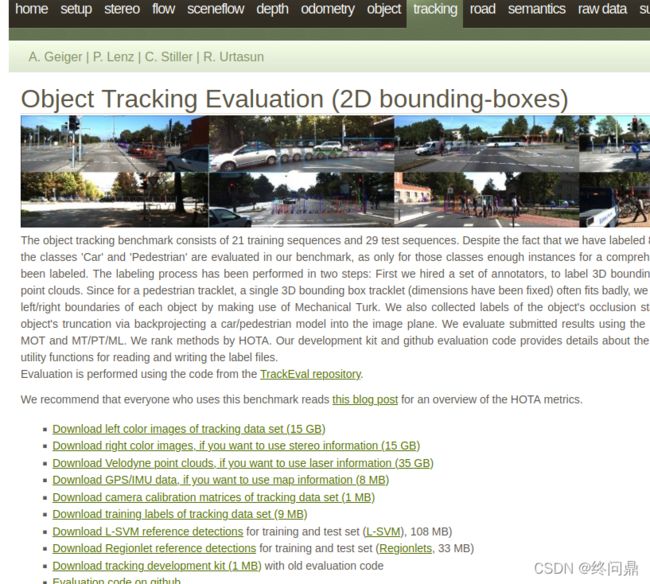
一共20种数据/20类环境,我们采用第一种:自行车和厢型车的环境
2.1.2 单文件理解
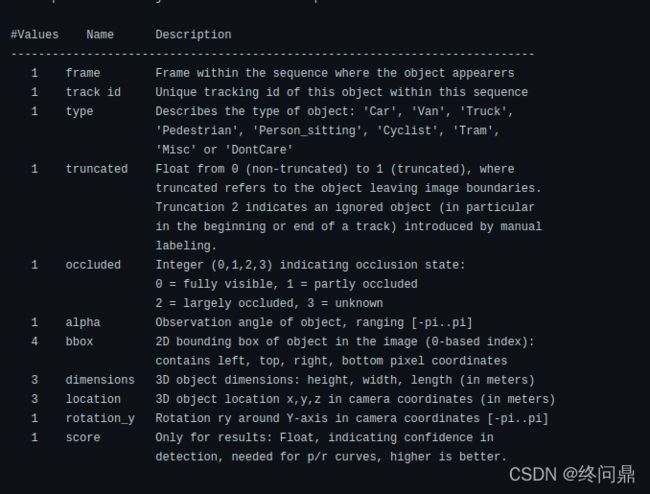
打开浏览器,键入kitti tracking 找到github上关于此的readme文档,图如下:

每个文件包含如下的参数,之后会在jupyter 和ROS 中读取到
2.2 在jupyter中查看tracking数据
运行代码:
import pandas as pd
import numpy as np

COLUMN_NAMES = ['frame', 'track_id', 'type', 'truncated', 'occluded', 'alpha', 'bbox_left', 'bbox_stop',
               'bbox_right', 'bbox_bottom', 'height', 'width', 'length', 'pos_x', 'pos_y', 'pos_z', 'rot_y']

df = pd.read_csv('/home/qinsir/kitti_folder/tracking/data_tracking_label_2/training/label_02/0000.txt',
                header=None, sep=' ')

df.columns = COLUMN_NAMES
df.head()
显示如下:
 可以看但参数中有,van(厢型车),上下左右坐标等等参数,以及3D位置
3. 在jupyter中框选object
3.1 数据处理
df.loc[df.type.isin(['Truck', 'Van', 'Tram']), 'type'] = 'car'   # 将列表中有的这三种车归类为car
df = df[df.type.isin(['car', 'Pedestrian', 'Cyclist'])]  #取出这三个类别,更新df
df             #查看
- 将列表中这三种类型中存在的都命名为car,就是如果df中有这三种,都命名为car
- 取出需要的类别,更新tf
3.2 提取需要的信息
#df.loc[2, ['bbox_left', 'bbox_top', 'bbox_right', 'bbox_bottom']] #读取第一帧的四个坐标,在列表里是2
box = np.array(df.loc[2, ['bbox_left', 'bbox_top', 'bbox_right', 'bbox_bottom']]) #转变为数组
box
- 提取出第一帧的这四个信息,再转变为np数组
3.3 CV画出tracking的框
import cv2

image = cv2.imread('/home/qinsir/kitti_folder/2011_09_26/2011_09_26_drive_0005_sync/image_02/data/0000000000.png')
# 左上角,右下角,像素都是整数
top_left = int(box[0]), int(box[1])
right_down = int(box[2]), int(box[3])
# 画举行
cv2.rectangle(image, top_left, right_down, (255, 255, 0), 2)

cv2.imshow('image', image)
cv2.waitKey(0)
cv2.destroyAllWindows()
4. 效果一览
5. python文件源码
import pandas as pd
import numpy as np
# 设定行名称
COLUMN_NAMES = ['frame', 'track_id', 'type', 'truncated', 'occluded', 'alpha', 'bbox_left', 'bbox_top',
               'bbox_right', 'bbox_bottom', 'height', 'width', 'length', 'pos_x', 'pos_y', 'pos_z', 'rot_y']

df = pd.read_csv('/home/qinsir/kitti_folder/tracking/data_tracking_label_2/training/label_02/0000.txt',
                header=None, sep=' ')

df.columns = COLUMN_NAMES
df.head()
df.loc[df.type.isin(['Truck', 'Van', 'Tram']), 'type'] = 'car'   # 将列表中有的这三种车归类为car
df = df[df.type.isin(['car', 'Pedestrian', 'Cyclist'])]  #取出这三个类别,更新df
df             #查看
#df.loc[2, ['bbox_left', 'bbox_top', 'bbox_right', 'bbox_bottom']] #读取第一帧的四个坐标,在列表里是2
box = np.array(df.loc[2, ['bbox_left', 'bbox_top', 'bbox_right', 'bbox_bottom']]) #转变为数组
import cv2

image = cv2.imread('/home/qinsir/kitti_folder/2011_09_26/2011_09_26_drive_0005_sync/image_02/data/0000000000.png')
# 左上角,右下角,像素都是整数
top_left = int(box[0]), int(box[1])
right_down = int(box[2]), int(box[3])
# 画举行
cv2.rectangle(image, top_left, right_down, (255, 255, 0), 2)

cv2.imshow('image', image)
cv2.waitKey(0)
cv2.destroyAllWindows()


