tSNE-python代码实现及使用讲解
在读基于深度学习的机械故障诊断论文时,不免会看到如下所示的t-SNE 可视化图,看着比较高级。那这个图又是如何绘制出来的呢?本文将通过mnist手写数据集来实现t-SNE

代码实现
# coding='utf-8'
"""t-SNE对手写数字进行可视化"""
from time import time
import numpy as np
import matplotlib.pyplot as plt

from sklearn import datasets
from sklearn.manifold import TSNE


def get_data():
    digits = datasets.load_digits(n_class=6)
    data = digits.data
    label = digits.target
    n_samples, n_features = data.shape
    return data, label, n_samples, n_features


def plot_embedding(data, label, title):
    x_min, x_max = np.min(data, 0), np.max(data, 0)
    data = (data - x_min) / (x_max - x_min)

    fig = plt.figure()
    ax = plt.subplot(111)
    for i in range(data.shape[0]):
        plt.text(data[i, 0], data[i, 1], str(label[i]),
                 color=plt.cm.Set1(label[i] / 10.),
                 fontdict={'weight': 'bold', 'size': 9})
    plt.xticks([])
    plt.yticks([])
    plt.title(title)
    return fig


def main():
    data, label, n_samples, n_features = get_data()
    print('data.shape',data.shape)
    print('label',label)
    print('label中数字有',len(set(label)),'个不同的数字')
    print('data有',n_samples,'个样本')
    print('每个样本',n_features,'维数据')
    print('Computing t-SNE embedding')
    tsne = TSNE(n_components=2, init='pca', random_state=0)
    t0 = time()
    result = tsne.fit_transform(data)
    print('result.shape',result.shape)
    fig = plot_embedding(result, label,
                         't-SNE embedding of the digits (time %.2fs)'
                         % (time() - t0))
    plt.show(fig)


if __name__ == '__main__':
    main()
>>>输出结果
data.shape (1083, 64)
label [0 1 2 ... 4 4 0]
label中数字有 6 个不同的数字
data有 1083 个样本
每个样本 64 维数据
Computing t-SNE embedding
result.shape (1083, 2)
结果分析
由结果可知,需输入两个参数,data和label,其中data是一个2维数组(num,dim),label是1维数组,为对应的标签。
TSNE通过PCA降维之后输出的是result是一个2维数组(num, 2)。在这里将64维降到2维。最后绘图出来。
#1DCNN加t-sne实践
1、先构建一个1DCNN,本次用的是多尺度卷积神经网络(MSCNN)

模型参数见论文:基于多尺度卷积神经网络的电机故障诊断方法研究_王威
# 输入x = (batch, 1, 1024)的模型,输出结果为(64, 4)
class Net(nn.Module):
    def __init__(self):
        super(Net, self).__init__()
        self.conv1 = nn.Conv1d(in_channels = 1,out_channels= 64,kernel_size = 32, stride = 8, padding = 12)
        self.pool1 = nn.MaxPool1d(kernel_size=2, stride=2)
        self.BN = nn.BatchNorm1d(num_features=64)
        self.conv3_1 = nn.Conv1d(in_channels=64, out_channels=64, kernel_size=3, stride=1, padding=1)
        self.pool3_1 = nn.MaxPool1d(kernel_size=2, stride=2)
        self.conv3_2 = nn.Conv1d(in_channels=64, out_channels=128, kernel_size=3, stride=1, padding=1)
        self.pool3_2 = nn.MaxPool1d(kernel_size=2, stride=2)
        self.conv3_3 = nn.Conv1d(in_channels=128, out_channels=256, kernel_size=3, stride=1, padding=1)
        self.pool3_3 = nn.MaxPool1d(kernel_size=2, stride=2)

        self.conv5_1 = nn.Conv1d(in_channels=64, out_channels=64, kernel_size=5, stride=1, padding=2)
        self.pool5_1 = nn.MaxPool1d(kernel_size=2 , stride=2)
        self.conv5_2 = nn.Conv1d(in_channels=64, out_channels=128, kernel_size=5, stride=1, padding=2)
        self.pool5_2 = nn.MaxPool1d(kernel_size=2, stride=2)
        self.conv5_3 = nn.Conv1d(in_channels=128, out_channels=256, kernel_size=5, stride=1, padding=2)
        self.pool5_3 = nn.MaxPool1d(kernel_size=2, stride=2)

        self.conv7_1 = nn.Conv1d(in_channels=64, out_channels=64, kernel_size=7, stride=1, padding=3)
        self.pool7_1 = nn.MaxPool1d(kernel_size=2, stride=2)
        self.conv7_2 = nn.Conv1d(in_channels=64, out_channels=128, kernel_size=7, stride=1, padding=3)
        self.pool7_2 = nn.MaxPool1d(kernel_size=2, stride=2)
        self.conv7_3 = nn.Conv1d(in_channels=128, out_channels=256, kernel_size=7, stride=1, padding=3)
        self.pool7_3 = nn.MaxPool1d(kernel_size=2, stride=2)

        self.pool2 = nn.MaxPool1d(kernel_size=8, stride=1)
        self.fc = nn.Linear(in_features=256*3, out_features=4)  ##这里的4096是计算出来的
        self.softmax = nn.Softmax()

    def forward(self, x):
        x = self.conv1(x)  ## x:Batch, 1, 1024
        x = self.pool1(x)
        # kernel_size为3
        x1 = self.conv3_1(x)
        x1 = self.pool3_1(x1)
        x1 = self.conv3_2(x1)
        x1 = self.pool3_2(x1)
        x1 = self.conv3_3(x1)
        x1 = self.pool3_3(x1)

        # kernel_size为5
        x2 = self.conv5_1(x)
        x2 = self.pool5_1(x2)
        x2 = self.conv5_2(x2)
        x2 = self.pool5_2(x2)
        x2 = self.conv5_3(x2)
        x2 = self.pool5_3(x2)

        # kernel_size为7
        x3 = self.conv7_1(x)
        x3 = self.pool7_1(x3)
        x3  = self.conv7_2(x3)
        x3 = self.pool7_2(x3)
        x3 = self.conv7_3(x3)
        x3 = self.pool7_3(x3)

        # 池化层
        x1 = self.pool2(x1)
        x2 = self.pool2(x2)
        x3 = self.pool2(x3)

        # flatten展平
        Batch, Channel, Length = x1.size()
        x1 = x1.view(Batch, -1)
        Batch, Channel, Length = x2.size()
        x2 = x2.view(Batch, -1)
        Batch, Channel, Length = x3.size()
        x3 = x3.view(Batch, -1)
        #将3个尺度提取到的特征连接在一起
        x0 = torch.cat((x1, x2, x3), dim=1)
		# 全连接层
        x = self.fc(x0)
        return x, x0
2、测试一下模型
x = torch.rand(64, 1, 1024)  #输入x大小:batch=64, channel=1, length=1024
model = Net()
(y, y0) = model(x)
print(y.shape)  #打印输出y大小
print(y0.shape)  #打印输出y0大小
output>>>
torch.Size([64, 4])
torch.Size([64, 768])
可以看出y的大小是[64, 4],是4分类的预测结果
y0的大小是[64, 768],是把3个尺度方向提取到的特征拼接在一起的结果。也可以把它理解为提取到的特征。
现在问题就是如何把它做t-sne图
从前面分析可知,做t-sne需输入两个参数,data和label,其中data是一个2维数组(num,dim),label是1维数组,为对应的标签。现在[64, 768]符合data大小要求,还差个label,这个用随机数生成一下。
label = torch.randint(low=0, high=4, size= (64, ))
print(label.shape)
>>>output
tensor([0, 3, 2, 2, 2, 0, 3, 2, 0, 0, 1, 3, 0, 3, 2, 2, 3, 2, 0, 1, 2, 1, 0, 2,
        0, 0, 1, 0, 2, 2, 1, 2, 1, 1, 3, 1, 0, 0, 0, 3, 3, 1, 3, 0, 0, 0, 3, 3,
        3, 1, 2, 3, 0, 2, 3, 0, 1, 0, 2, 0, 3, 1, 1, 2])
下面对y0和label做t-sne
tsne = TSNE(n_components=2, init='pca', random_state=0)
y0 = y0.detach().numpy()  #需从tensor类型转为array类型
label = label.detach().numpy()  #需从tensor类型转为array类型
result = tsne.fit_transform(y0)
fig = plot_embedding(result, label, title='tsne')
plt.show(fig)
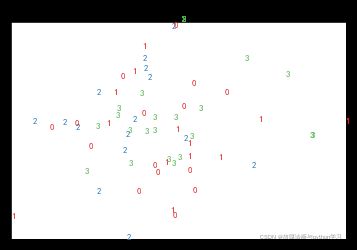
输出图片:

因为数据都是随机生成的,所以数据分布也是随机的。然后其他每个类型的点用 * +这样标记还没研究。后续加上。
这样通过return y0,的确可以实现返回想要的层提取到的特征,但这样在实际应用中会遇到很多麻烦。
下面有个稍微简单一些的方法。
# 输入x = (batch, 1, 1024)的模型,输出结果为(64, 4)
class Net(nn.Module):
    def __init__(self):
        super(Net, self).__init__()
        self.conv1 = nn.Conv1d(in_channels = 1,out_channels= 64,kernel_size = 32, stride = 8, padding = 12)
        self.pool1 = nn.MaxPool1d(kernel_size=2, stride=2)
        self.BN = nn.BatchNorm1d(num_features=64)
        self.conv3_1 = nn.Conv1d(in_channels=64, out_channels=64, kernel_size=3, stride=1, padding=1)
        self.pool3_1 = nn.MaxPool1d(kernel_size=2, stride=2)
        self.conv3_2 = nn.Conv1d(in_channels=64, out_channels=128, kernel_size=3, stride=1, padding=1)
        self.pool3_2 = nn.MaxPool1d(kernel_size=2, stride=2)
        self.conv3_3 = nn.Conv1d(in_channels=128, out_channels=256, kernel_size=3, stride=1, padding=1)
        self.pool3_3 = nn.MaxPool1d(kernel_size=2, stride=2)

        self.conv5_1 = nn.Conv1d(in_channels=64, out_channels=64, kernel_size=5, stride=1, padding=2)
        self.pool5_1 = nn.MaxPool1d(kernel_size=2 , stride=2)
        self.conv5_2 = nn.Conv1d(in_channels=64, out_channels=128, kernel_size=5, stride=1, padding=2)
        self.pool5_2 = nn.MaxPool1d(kernel_size=2, stride=2)
        self.conv5_3 = nn.Conv1d(in_channels=128, out_channels=256, kernel_size=5, stride=1, padding=2)
        self.pool5_3 = nn.MaxPool1d(kernel_size=2, stride=2)

        self.conv7_1 = nn.Conv1d(in_channels=64, out_channels=64, kernel_size=7, stride=1, padding=3)
        self.pool7_1 = nn.MaxPool1d(kernel_size=2, stride=2)
        self.conv7_2 = nn.Conv1d(in_channels=64, out_channels=128, kernel_size=7, stride=1, padding=3)
        self.pool7_2 = nn.MaxPool1d(kernel_size=2, stride=2)
        self.conv7_3 = nn.Conv1d(in_channels=128, out_channels=256, kernel_size=7, stride=1, padding=3)
        self.pool7_3 = nn.MaxPool1d(kernel_size=2, stride=2)

        self.pool2 = nn.MaxPool1d(kernel_size=8, stride=1)
        self.fc = nn.Linear(in_features=256*3, out_features=4)  ##这里的4096是计算出来的
        self.softmax = nn.Softmax()

    def forward(self, x):
        x = self.conv1(x)  ## x:Batch, 1, 1024
        x = self.pool1(x)
        # kernel_size为3
        x1 = self.conv3_1(x)
        x1 = self.pool3_1(x1)
        x1 = self.conv3_2(x1)
        x1 = self.pool3_2(x1)
        x1 = self.conv3_3(x1)
        x1 = self.pool3_3(x1)

        # kernel_size为5
        x2 = self.conv5_1(x)
        x2 = self.pool5_1(x2)
        x2 = self.conv5_2(x2)
        x2 = self.pool5_2(x2)
        x2 = self.conv5_3(x2)
        x2 = self.pool5_3(x2)

        # kernel_size为7
        x3 = self.conv7_1(x)
        x3 = self.pool7_1(x3)
        x3  = self.conv7_2(x3)
        x3 = self.pool7_2(x3)
        x3 = self.conv7_3(x3)
        x3 = self.pool7_3(x3)

        # 池化层
        x1 = self.pool2(x1)
        x2 = self.pool2(x2)
        x3 = self.pool2(x3)

        # flatten展平
        Batch, Channel, Length = x1.size()
        x1 = x1.view(Batch, -1)
        Batch, Channel, Length = x2.size()
        x2 = x2.view(Batch, -1)
        Batch, Channel, Length = x3.size()
        x3 = x3.view(Batch, -1)
        #将3个尺度提取到的特征连接在一起
        x0 = torch.cat((x1, x2, x3), dim=1)
        # 全连接层
        x = self.fc(x0)

        # 将x0为定义类变量,方便其他类函数调用
        self.x0 = x0
        return x

    #定义一个get_fea类函数,返回类变量x0
    def get_fea(self):
        return self.x0
x = torch.rand(64, 1, 1024) #输入x大小:batch=64, channel=1, length=1024
label = torch.randint(low=0, high=4, size= (64, )) #0-4之间随机生成整数,当做标签,输入label大小:batch=64
model = Net()
y = model(x) #输出是分类结果
y_fea = model.get_fea() #输出是提取到的特征
print('y的shape为:',y.shape)
print('y_fea的shape为:',y_fea.shape)
>>>output
y的shape为: torch.Size([64, 4])
y_fea的shape为: torch.Size([64, 768])
可见该方法更方便,如果想要某一层中间特征时,只要改动get_fea()里面函数要返回的参数即可。
tsne = TSNE(n_components=2, init='pca', random_state=0)
y_fea = y_fea.detach().numpy()
label = label.detach().numpy()
result = tsne.fit_transform(y_fea)
fig = plot_embedding(result, label, title='tsne')
plt.show(fig)
欢迎关注我的公众号:《故障诊断与python学习》

