Mnist手写数字识别进阶:多层神经网络应用
在上个实例当中,实现了单个神经元模型来识别手写数字,对于单个神经元模型,首先是输入数据,然后根据对应的权重进行求和,再通过一个激活函数即可得到最终的结果。
目录
-
- 一、单个神经元模型回顾
- 二、全连接单隐含层神经网络
-
- 1、载入数据
- 2、构建输入层
- 3、构建隐藏层(新)
- 4、构建输出层
- 5、训练模型
- 6、模型应用
- 附:完整代码
一、单个神经元模型回顾
就如下图所示,就是单个神经元实现的,而我们将一个求和和激活函数这个整体看作是一个神经元,而多层神经网络无非就是多加几个神经元。

关于激活函数,常见的有以下几种:

但是从上次的训练结果来看,正确率似乎不是很高,那么我们如果想要更加准确一点,就可以尝试多加上几个神经元。
二、全连接单隐含层神经网络
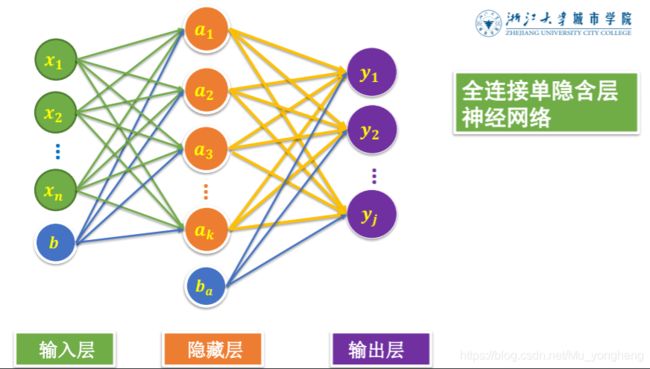
对于多层神经网络,一般包括输入层、隐藏层和输出层。
通常说的神经网络有多少层指的是隐藏层有几层。

接下来就来构建多层神经网络,先构建相对比较容易的:一个隐含层。很多代码和前面的都是一样的,只有个别地方做了一些改动。
1、载入数据
还是首先载入mnist数据集。
import tensorflow as tf
import tensorflow.examples.tutorials.mnist.input_data as input_data
import matplotlib.pyplot as plt
import numpy as np


# 读取数据文件
mnist = input_data.read_data_sets("MNIST_data/", one_hot=True)
2、构建输入层
# 构建输入层
# 定义标签数据占位符
x = tf.placeholder(tf.float32, [None, 784], name="X")
y = tf.placeholder(tf.float32, [None, 10], name="Y")
3、构建隐藏层(新)
# 构建隐藏层
H1_NN = 256   # 隐藏层神经元数量

w1 = tf.Variable(tf.random_normal([784, H1_NN]))
b1 = tf.Variable(tf.zeros([H1_NN]))
# 使用 relu() 激活函数
y1 = tf.nn.relu(tf.matmul(x, w1) + b1)
4、构建输出层
# 构建输出层
w2 = tf.Variable(tf.random_normal([H1_NN, 10]))
b2 = tf.Variable(tf.zeros([10]))

forward = tf.matmul(y1, w2) + b2
pred = tf.nn.softmax(forward)
5、训练模型
# 定义训练参数
train_epochs = 40  # 训练的轮数
batch_size = 50  # 单次训练样本数
total_batch = int(mnist.train.num_examples/batch_size)
display_step = 1  # 显示粒度
learning_rate = 0.01  # 学习率

# 定义损失函数
# loss_function = tf.reduce_mean(-tf.reduce_sum(y*tf.log(pred), reduction_indices=1))
loss_function = tf.reduce_mean(tf.nn.softmax_cross_entropy_with_logits(logits=forward, labels=y))  # 结合Softmax的交叉熵损失函数定义方法

# 定义优化器
optimizer = tf.train.AdamOptimizer(learning_rate).minimize(loss_function)


# 定义准确率
correct_prediction = tf.equal(tf.argmax(pred, 1), tf.argmax(y, 1))
# 准确率,将布尔值转化为浮点数,并计算平均值
accuracy = tf.reduce_mean(tf.cast(correct_prediction, tf.float32))


# 模型训练
# 记录训练开始的时间
from time import time
startTime = time()

sess = tf.Session()
sess.run(tf.global_variables_initializer())

for epoch in range(train_epochs):
    for batch in range(total_batch):
        xs, ys = mnist.train.next_batch(batch_size)  # 读取批次数据
        sess.run(optimizer, feed_dict={x: xs, y: ys})   # 执行批次训练

    # total_batch 个批次训练完后,使用验证数据计算准确率
    loss, acc = sess.run([loss_function, accuracy], feed_dict={x: mnist.validation.images, y: mnist.validation.labels})
    # 打印训练过程中的详细信息
    if (epoch + 1) % display_step == 0:
        print("训练轮次:", epoch + 1, "损失值:", format(loss), "准确率:", format(acc))


# 显示运行总时间
duration = time() - startTime
print("本次训练所花的总时间为:", duration)
注意这里的损失函数,如果还用我们上个模型中的损失函数,可能会出现问题,就如下图一样。

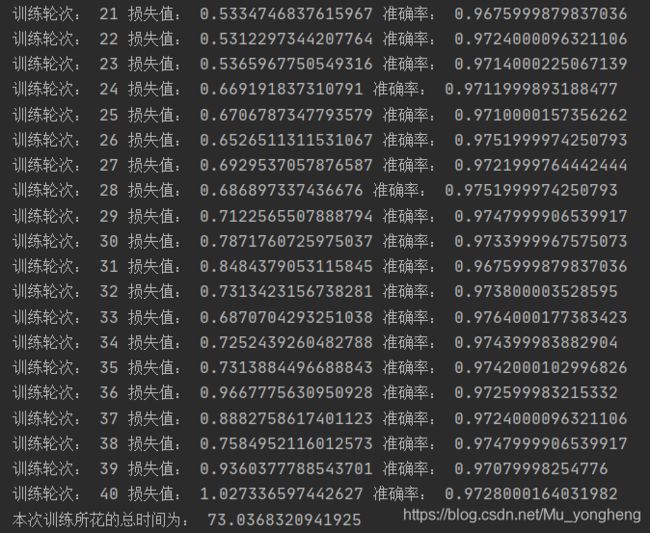
所以这里我们换用了tensorflow里提供的另一个损失函数。就可以正常的对模型进行训练。最终的训练结果如图所示,我们可以看到准确率还是很高的。

6、模型应用
当训练完模型之后,我们可以利用训练的模型进行应用。当然也可以做可视化,函数和上一个实例中是一样的。
# 应用模型
prediction_result = sess.run(tf.argmax(pred, 1), feed_dict={x: mnist.test.images})
print(prediction_result[0:10])

# 找出预测错误的
compare_lists = prediction_result == np.argmax(mnist.test.labels, 1)
print(compare_lists)

err_lists = [i for i in range(len(compare_lists)) if compare_lists[i] == False]
print(err_lists, len(err_lists))
输出结果:
![]()
这里我只有加入了一个隐藏层,也就是一个神经元,当然我们还可以多加几个神经元,来进行训练,具体的实现后续再来实现。
附:完整代码
#-*- coding = utf-8 -*-
#@Time : 2021-03-13 21:11
#@Author : 穆永恒
#@File : Mnist_2.py
#@Software: PyCharm

import tensorflow as tf
import tensorflow.examples.tutorials.mnist.input_data as input_data
import matplotlib.pyplot as plt
import numpy as np


# 读取数据文件
mnist = input_data.read_data_sets("MNIST_data/", one_hot=True)

# 构建输入层
# 定义标签数据占位符
x = tf.placeholder(tf.float32, [None, 784], name="X")
y = tf.placeholder(tf.float32, [None, 10], name="Y")


# 构建隐藏层
H1_NN = 256   # 隐藏层神经元数量

w1 = tf.Variable(tf.random_normal([784, H1_NN]))
b1 = tf.Variable(tf.zeros([H1_NN]))
# 使用 relu() 激活函数
y1 = tf.nn.relu(tf.matmul(x, w1) + b1)

# 构建输出层
w2 = tf.Variable(tf.random_normal([H1_NN, 10]))
b2 = tf.Variable(tf.zeros([10]))

forward = tf.matmul(y1, w2) + b2
pred = tf.nn.softmax(forward)


# 定义训练参数
train_epochs = 40  # 训练的轮数
batch_size = 50  # 单次训练样本数
total_batch = int(mnist.train.num_examples/batch_size)
display_step = 1  # 显示粒度
learning_rate = 0.01  # 学习率

# 定义损失函数
# loss_function = tf.reduce_mean(-tf.reduce_sum(y*tf.log(pred), reduction_indices=1))
loss_function = tf.reduce_mean(tf.nn.softmax_cross_entropy_with_logits(logits=forward, labels=y))  # 结合Softmax的交叉熵损失函数定义方法

# 定义优化器
optimizer = tf.train.AdamOptimizer(learning_rate).minimize(loss_function)


# 定义准确率
correct_prediction = tf.equal(tf.argmax(pred, 1), tf.argmax(y, 1))
# 准确率,将布尔值转化为浮点数,并计算平均值
accuracy = tf.reduce_mean(tf.cast(correct_prediction, tf.float32))


# 模型训练
# 记录训练开始的时间
from time import time
startTime = time()

sess = tf.Session()
sess.run(tf.global_variables_initializer())

for epoch in range(train_epochs):
    for batch in range(total_batch):
        xs, ys = mnist.train.next_batch(batch_size)  # 读取批次数据
        sess.run(optimizer, feed_dict={x: xs, y: ys})   # 执行批次训练

    # total_batch 个批次训练完后,使用验证数据计算准确率
    loss, acc = sess.run([loss_function, accuracy], feed_dict={x: mnist.validation.images, y: mnist.validation.labels})
    # 打印训练过程中的详细信息
    if (epoch + 1) % display_step == 0:
        print("训练轮次:", epoch + 1, "损失值:", format(loss), "准确率:", format(acc))


# 显示运行总时间
duration = time() - startTime
print("本次训练所花的总时间为:", duration)


# 应用模型
prediction_result = sess.run(tf.argmax(pred, 1), feed_dict={x: mnist.test.images})
print(prediction_result[0:10])

# 找出预测错误的
compare_lists = prediction_result == np.argmax(mnist.test.labels, 1)
print(compare_lists)

err_lists = [i for i in range(len(compare_lists)) if compare_lists[i] == False]
print(err_lists, len(err_lists))