Linux企业运维--nginx高速缓存-
*************构建nginx高速缓存***********
iptables -t nat -I POSTROUTING -s 172.25.14.0/24 -j MASQUERADE 链接服务器
下载openresty-1.19.9.1.tar.gz
解压安装

cd openresty-1.19.9.1 -----进入目录里
./configure --with-http_ssl_module ---添加模块

make && make install
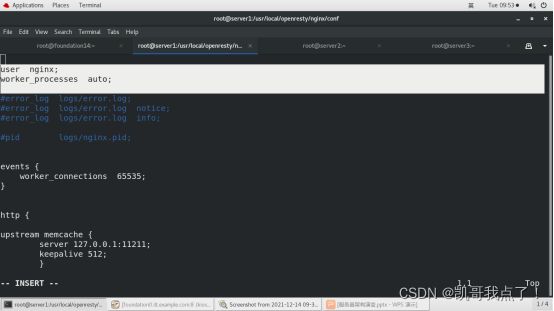
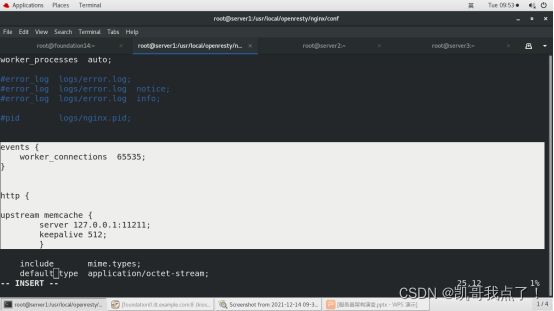
cd /usr/local/openresty/nginx/
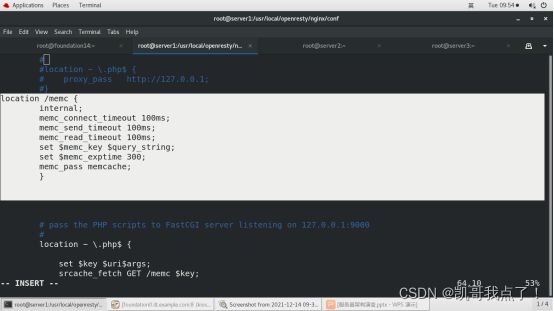
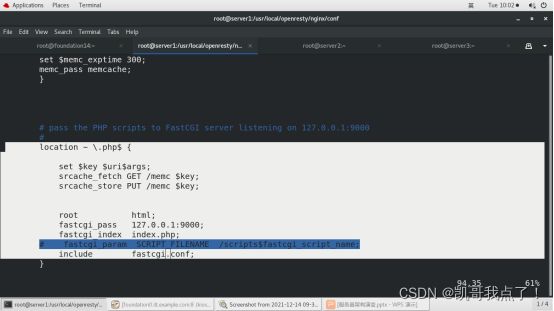
vim nginx.conf
systemctl start memcached.service 开启端口11211
systemctl start php-fpm 开启端口9000

nginx 开启最初的nginx
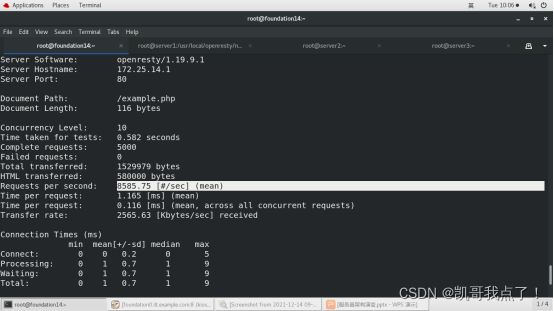
ab -c 10 -n 5000 http://172.25.14.1/example.php
nginx -s stop
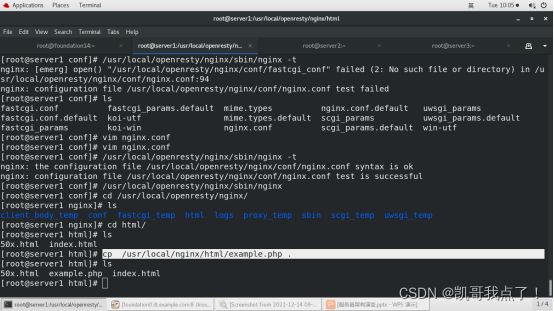
/usr/local/openresty/nginx/sbin/nginx -t 检测新nginx语法
/usr/local/openresty/nginx/sbin/nginx 开启

cd /usr/local/openresty/nginx/html
cp /usr/local/nginx/html/example.php . 将example.php复制当前目录
ab -c 10 -n 5000 http://172.25.14.1/example.php 再次检测 发现平发远远大于第一次的并发
************tomcat结合memcache**************
需要三台虚拟机server1,server2,server3
server1:
把刚刚开启的nginx关闭
/usr/local/openresty/nginx/sbin/nginx -s stop
cd /usr/local/nginx/conf/
vim nginx.conf


nginx -t ----检测nginx语法
nginx /nginx -s reload 开启/重启
server2:
下载
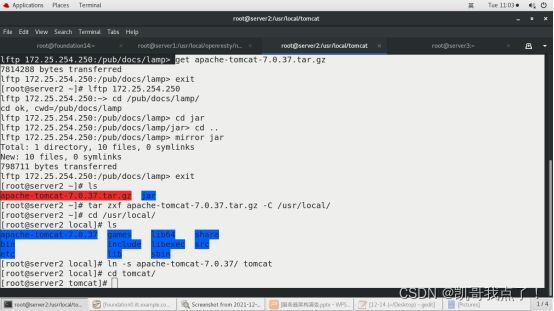
apache-tomcat-7.0.37.tar.gz
tar zxf apache-tomcat-7.0.37.tar.gz -C /usr/local/ 解压到usr/local
ln -s apache-tomcat-7.0.37/ tomcat --为了方便访问以及使用此目录,给他一个软链接
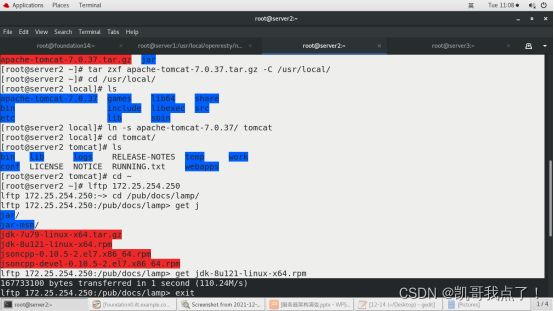
jdk-8u121-linux-x64.rpm
rpm -ivh jdk-8u121-linux-x64.rpm
从服务器上 mirror jar
cd /usr/local/tomcat/webapps/ROOT/
在此目录下载测试页test.jsp

/usr/local/tomcat/bin/shutdown.sh ---------开启测试页
server3:(和server2操作一样 为了方便可以直接从server2 scp下载好的包)
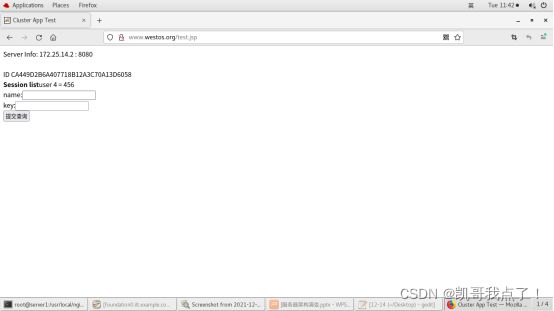
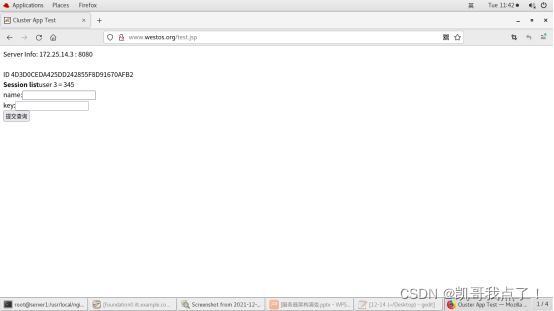
在浏览器上输入www.westos.org/test.jsp访问 此时是负载均衡 14.2与14.3相互切换
若将server1里nginx.conf的ip_hash打开 则打破负载均衡

若关闭一个虚拟机的测试 shutdown.sh
则测试页面只会访问1个ip
*******Memcache 和Tomcat交叉存储******
Server1:
make clean1.20.2的
./configure --prefix=/usr/local/nginx --with-http_stub_status_module --with-http_ssl_module --add-module=/root/nginx-goodies-nginx-sticky-module-ng-08a395c66e42
make
重新解析添加模块
cd /usr/local/nginx/conf/
\cp -f nginx /usr/local/nginx/sbin/nginx 覆盖sbin下的nginx
cd /usr/local/nginx/conf/
vim nginx.conf
打开sticky
Server2:
yum install -y memcached
systemctl start memcached.service

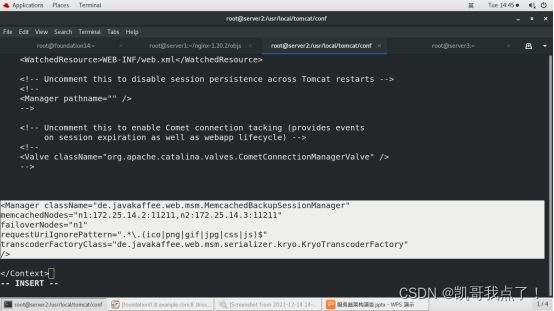
cd /usr/local/tomcat/conf/
vi context.xml

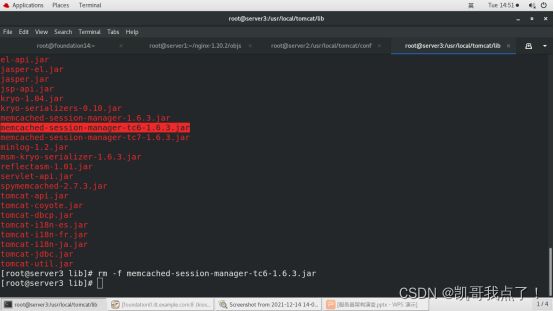
cd /usr/local/tomcat/lib/
cp ~/jar/* . -------把先前下载的jar包复制到lib下
rm -f memcached-session-manager-tc6-1.6.3.jar 把不匹配的jar包删除

Server3同理,只需把n1改称n2

开启脚本 /usr/local/tomcat/bin/startup.sh
在网页查看发现server2的输入会存储到server3 ,server3输入存储到server2。

这里在server2输入,输出可以在server3查看日志
cd /usr/local/tomcat/logs/
vi catalina.out,需要找到下面的句子

表示2,3是交互存储!
***********nginx限流************
在server1中做准备:
Cd /usr/local/nginx/html/
mkdir download
cd download/
随意下载一张图片

在真机查看是否成功

编辑/usr/local/nginx/conf
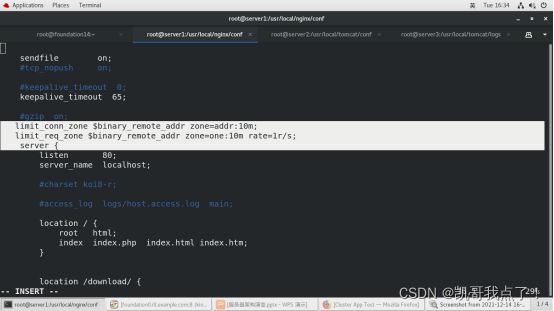
vim nginx.conf
limit_conn_zone $binary_remote_addr zone=addr:10m; ----定义并发名称
limit_req_zone $binary_remote_addr zone=one:10m rate=1r/s; -----限速为每秒1次
=======================================================
location /download/ {
limit_conn addr 1; ----并发1个
limit_req zone=one burst=5 nodelay;
limit_rate 50K ; ----限速带宽
}

nginx -t
nginx -s reload
真机执行ab -c1 -n10 http://172.25.14.1/download/vim.jpg
查看日志
cd /usr/local/nginx/ logs/
cat access.log | tail -20