TensorFlow Object Detection API 运行Demo程序
原文地址:https://blog.csdn.net/weixin_42499236/article/details/83823893
var articleTitles = “TensorFlow Object Detection API 技术手册(3)——运行Demo程序 - J.C.Friedrich.Gauss的博客”;
版权声明:© Copyright By Mingqi Yuan All right reserved https://blog.csdn.net/weixin_42499236/article/details/83823893 TensorFlow Object Detection API 技术手册(3)——运行Demo程序
(一)打开示例程序
在(research/object_detection/)目录下按住shift键,点击右键打开powershell窗口,输入命令:
>>>jupyter notebook
如图:

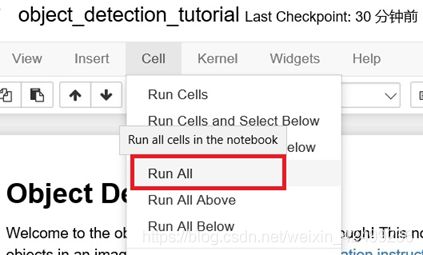
进行jupyter后如下图所示,点击红框标注的文件,注意在使用过程中不要关闭powershell窗口,不然jupyter无法继续运行:

进入文件后,如下图所示:

(二)代码解读及修正
从GitHub下载的源码有多处缩进错误,接下来我们对每一段进行解读并修正:
- Import框(导入模型所需的包)
# 删除from matplotlib import pyplot as plt加调整缩进
import numpy as np
import os
import six.moves.urllib as urllib
import sys
import tarfile
import tensorflow as tf
import zipfile
from distutils.version import StrictVersion
from collections import defaultdict
from io import StringIO
from PIL import Image
# This is needed since the notebook is stored in the object_detection folder.
sys.path.append("…")
from object_detection.utils import ops as utils_ops
if StrictVersion(tf.version) < StrictVersion(‘1.9.0’):
raise ImportError(‘Please upgrade your TensorFlow installation to v1.9.* or later!’)
- Env Setup(设置环境以展示图像)
# 将%matplotlib inline换为import matplotlib.pyplot as plt
import matplotlib.pyplot as plt
- Object detection imports(导入object_detection包内模块)
# 防止路径错误,改为
from object_detection.utils import label_map_util
from object_detection.utils import visualization_utils as vis_util
- Download Model(从TensorFlow下载库下载训练好的模型)
# 所下载的预训练模型的名称
MODEL_NAME = 'ssd_mobilenet_v1_coco_2017_11_17'
MODEL_FILE = MODEL_NAME + '.tar.gz'
DOWNLOAD_BASE = 'http://download.tensorflow.org/models/object_detection/'
# 压缩包中的冻结模型的路径,这个是用来实现目标探测的核心
PATH_TO_FROZEN_GRAPH = MODEL_NAME + ‘/frozen_inference_graph.pb’
# 标签文件的路径
PATH_TO_LABELS = os.path.join(‘data’, ‘mscoco_label_map.pbtxt’)
# 启动下载,下载完成后解压文件
opener = urllib.request.URLopener()
opener.retrieve(DOWNLOAD_BASE + MODEL_FILE, MODEL_FILE)
tar_file = tarfile.open(MODEL_FILE)
for file in tar_file.getmembers():
file_name = os.path.basename(file.name)
if ‘frozen_inference_graph.pb’ in file_name:
tar_file.extract(file, os.getcwd())
- Load a (frozen) Tensorflow model into memory(将冻结的模型导入内存)
detection_graph = tf.Graph()
with detection_graph.as_default():
    od_graph_def = tf.GraphDef()
    with tf.gfile.GFile(PATH_TO_FROZEN_GRAPH, 'rb') as fid:
        serialized_graph = fid.read()
        od_graph_def.ParseFromString(serialized_graph)
        tf.import_graph_def(od_graph_def, name='')
- Loading label map(写入标签文件)
category_index = label_map_util.create_category_index_from_labelmap(PATH_TO_LABELS, use_display_name=True)
- Helper code(将图像转化为图像数组)
def load_image_into_numpy_array(image):
    (im_width, im_height) = image.size
    return np.array(image.getdata()).reshape((im_height, im_width, 3)).astype(np.uint8)
# 测试两张图像
PATH_TO_TEST_IMAGES_DIR = 'test_images'
TEST_IMAGE_PATHS = [ os.path.join(PATH_TO_TEST_IMAGES_DIR, 'image{}.jpg'.format(i)) for i in range(1, 3) ]
# Size, in inches, of the output images.
IMAGE_SIZE = (12, 8)

# 这段函数的缩进错误很多,请参照下列代码修改
def run_inference_for_single_image(image, graph):
    with graph.as_default():
        with tf.Session() as sess:
            # Get handles to input and output tensors
            ops = tf.get_default_graph().get_operations()
            all_tensor_names = {output.name for op in ops for output in op.outputs}
            tensor_dict = {}
            for key in ['num_detections', 'detection_boxes', 'detection_scores','detection_classes', 'detection_masks']:
                tensor_name = key + ':0'
                if tensor_name in all_tensor_names:
                    tensor_dict[key] = tf.get_default_graph().get_tensor_by_name(tensor_name)

            if 'detection_masks' in tensor_dict:
                # The following processing is only for single image
                detection_boxes = tf.squeeze(tensor_dict['detection_boxes'], [0])
                detection_masks = tf.squeeze(tensor_dict['detection_masks'], [0])
                # Reframe is required to translate mask from box coordinates to image coordinates and fit the image size.
                real_num_detection = tf.cast(tensor_dict['num_detections'][0], tf.int32)
                detection_boxes = tf.slice(detection_boxes, [0, 0], [real_num_detection, -1])
                detection_masks = tf.slice(detection_masks, [0, 0, 0], [real_num_detection, -1, -1])
                detection_masks_reframed = utils_ops.reframe_box_masks_to_image_masks(
                detection_masks, detection_boxes, image.shape[0], image.shape[1])
                detection_masks_reframed = tf.cast(tf.greater(detection_masks_reframed, 0.5), tf.uint8)
                # Follow the convention by adding back the batch dimension
                tensor_dict['detection_masks'] = tf.expand_dims(detection_masks_reframed, 0)
            image_tensor = tf.get_default_graph().get_tensor_by_name('image_tensor:0')

            # Run inference
            output_dict = sess.run(tensor_dict,feed_dict={image_tensor: np.expand_dims(image, 0)})

            # all outputs are float32 numpy arrays, so convert types as appropriate
            output_dict['num_detections'] = int(output_dict['num_detections'][0])
            output_dict['detection_classes'] = output_dict['detection_classes'][0].astype(np.uint8)
            output_dict['detection_boxes'] = output_dict['detection_boxes'][0]
            output_dict['detection_scores'] = output_dict['detection_scores'][0]
            if 'detection_masks' in output_dict:
                output_dict['detection_masks'] = output_dict['detection_masks'][0]
    return output_dict
-
- 开始检测
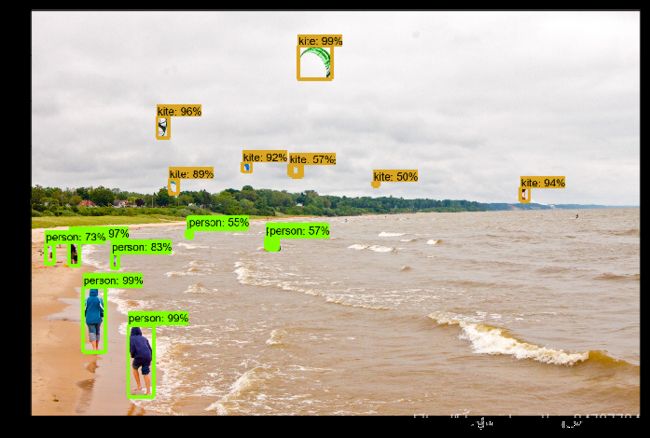
for image_path in TEST_IMAGE_PATHS:
    image = Image.open(image_path)
    # the array based representation of the image will be used later in order to prepare the
    # result image with boxes and labels on it.
    image_np = load_image_into_numpy_array(image)
    # Expand dimensions since the model expects images to have shape: [1, None, None, 3]
    image_np_expanded = np.expand_dims(image_np, axis=0)
    # Actual detection.
    output_dict = run_inference_for_single_image(image_np, detection_graph)
    # Visualization of the results of a detection.
    vis_util.visualize_boxes_and_labels_on_image_array(
        image_np,
        output_dict['detection_boxes'],
        output_dict['detection_classes'],
        output_dict['detection_scores'],
        category_index,
        instance_masks=output_dict.get('detection_masks'),
        use_normalized_coordinates=True,
        line_thickness=8)
    plt.figure(figsize=IMAGE_SIZE)
    plt.imshow(image_np)
至此,代码全部调整完毕,开始运行,程序会下载一个已经训练好了模型文件,它是使用COCO数据集训练完成的,模型下载完成后使用两张图像进行测试。点击Run All,下载模型需要一段时间(大小约为75MB),请耐心等待:
结果如图所示:


(三)使用其他预训练模型
TensorFlow Object Detection API默认提供了5个预训练模型,它们都是使用COCO数据集训练完成的,结构分别为SSD+MobileNet、SSD+Inception、R-FCN+ResNet101、Faster RCNN+ResNet101、Faster RCNN+ Inception_ResNet。只需要更改MODEL_FILE的值就可以下载不同的模型:

下面给出其他四个模型的MODEL_FILE值:
| 模型名 |
|---|
| MODEL_NAME = ‘ssd_inception_v2_coco_11_06_2017’ |
| MODEL_NAME = ’rfcn_resnet101_coco_11_06_2017’ |
| MODEL_NAME = ‘faster_rcnn_resnet101_coco_11_06_2017’ |
| MODEL_NAME = ‘faster_rcnn_inception_resnet_v2_atrous_coco_11_06_2017’ |
- 注 意
每一次重新运行Demo程序的时候,程序都会重新下载一次模型文件,这非常浪费时间和网络资源,我们可以直接下载好模型,然后指定模型的位置,然后直接读取即可:

在解压的预训练模型文件夹中找到frozen_inference_graph.pb即可,然后对应不同数据集训练的模型,需要修改标签分类的配置文件,即PATH_TO_LABELS,在(Anaconda3\Lib\site-packages\research\object_detection\data)可以找到对应预训练模型的标签配置文件,如下图所示所示:

图中标红的就是COCO数据集的标签配置文件。
(四)使用预训练模型预测自己的图片
修改TEST_IMAGE_PATHS的值,使其指向自己设置的测试图片:
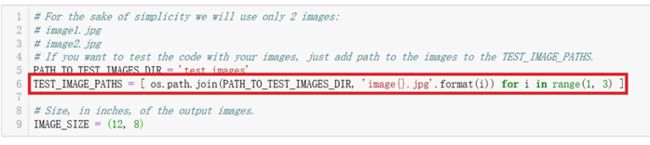
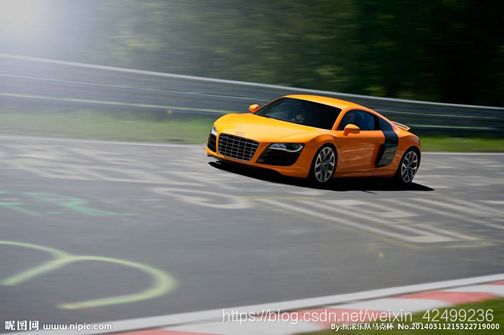
准备一张汽车的图片,并将它放在D盘下:
修改TEST_IMAGE_PATHS的值,如下图所示:

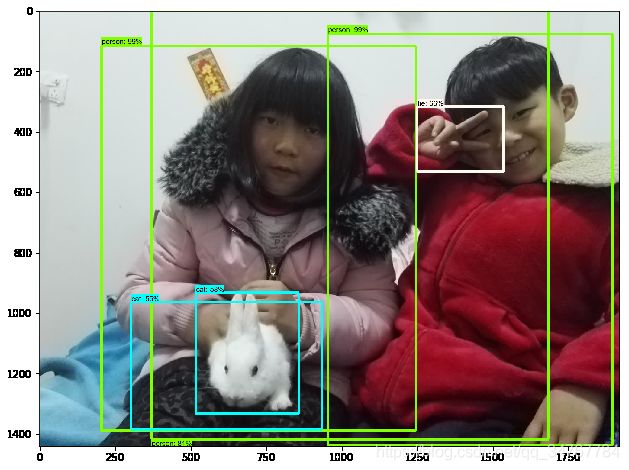
运行得:
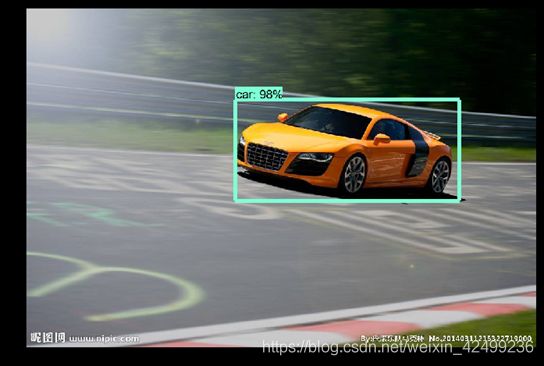
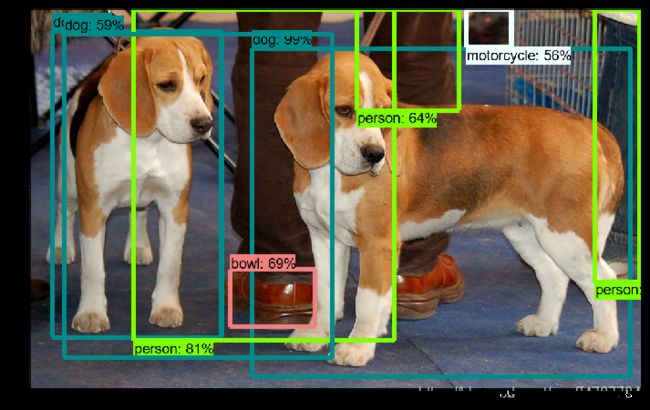
再测试一张别的图片:

该预训练模型使用COCO数据集训练,可识别90种物体,大家可以尽情的探索,下一节我们对现有的模型做一个升级,使其能够通过摄像头进行动态检测。
(五)安装最后的运行库
在我们正式开始训练自己的模型之前,我们需要做最后的确认,确认安装了以下两个运行依赖库:
-
安装Microsoft Visual Studio 2014
必须安装这个运行库,不然下一步安装其他组件会出错 -
安装pycocotools
不要使用pip命令去安装该库,很可能会下载Linux系统使用的版本,我们直接到GitHub下载Windows对应的版本。将压缩包解压到(/Anaconda3/Lib/site-packages/)下,得到cocoapi-master文件夹,进入该文件夹中的PythonAPI 找到setup.py,在Anaconda Prompt中运行它,等待安装完毕即可。
下一节:TensorFlow Object Detection API 技术手册(4)——使用摄像头进行实时目标检测
我的Faster RCNN运行结果: