MNIST手写数字识别进阶:多层神经网络与应用
慕课:《深度学习应用开发-TensorFlow实践》
章节:第八讲 MNIST手写数字识别进阶:多层神经网络与应用
TensorFlow版本为2.3
本章中有许多地方和之前一样,不知道的可以去看:MNIST手写数字识别:分类应用入门(实践篇)
目录
- 全连接单隐藏层网络
-
- 数据载入
- 数据集划分及数据归一化
- 独热编码
- 构建模型
-
- 创建待优化变量
- 定义模型前向计算
- 定义损失函数
- 定义梯度计算函数
- 定义准确率
- 设置训练参数及优化器
- 模型训练
- 多隐藏层网络
-
- 创建变量
- 构建模型
- 完整代码
- 使用Keras序列模型建模
-
- Keras序列模型建模的一般步骤
- 用Keras训练MNIST手写数字识别
-
- 常规操作
- 构建模型
- 定义训练模式
- 设置训练参数
- 训练模型
- 可视化结果
- 模型评估
全连接单隐藏层网络
数据载入
import tensorflow as tf
import numpy as np
import matplotlib.pyplot as plt
%matplotlib inline
tf.__version__
mnist=tf.keras.datasets.mnist
(train_images,train_labels),(test_images,test_labels)=mnist.load_data()
这一部分和之前一样,不再重复了
数据集划分及数据归一化
这一部分也和之前一样,同样不再重复
total_num=len(train_images)
valid_split=0.2# 验证集占20%
train_num=int(total_num*(1-valid_split))

train_x=train_images[:train_num]
train_y=train_labels[:train_num]

valid_x=train_images[train_num:]
valid_y=train_labels[train_num:]

test_x=test_images
test_y=test_labels

train_x=train_x.reshape(-1,784)
valid_x=valid_x.reshape(-1,784)
test_x=test_x.reshape(-1,784)

train_x=tf.cast(train_x/255.0,tf.float32)
valid_x=tf.cast(valid_x/255.0,tf.float32)
test_x=tf.cast(test_x/255.0,tf.float32)
独热编码
同样和之前一样,不重复
train_y=tf.one_hot(train_y,depth=10)
valid_y=tf.one_hot(valid_y,depth=10)
test_y=tf.one_hot(test_y,depth=10)
构建模型
先来看看我们要构建的模型
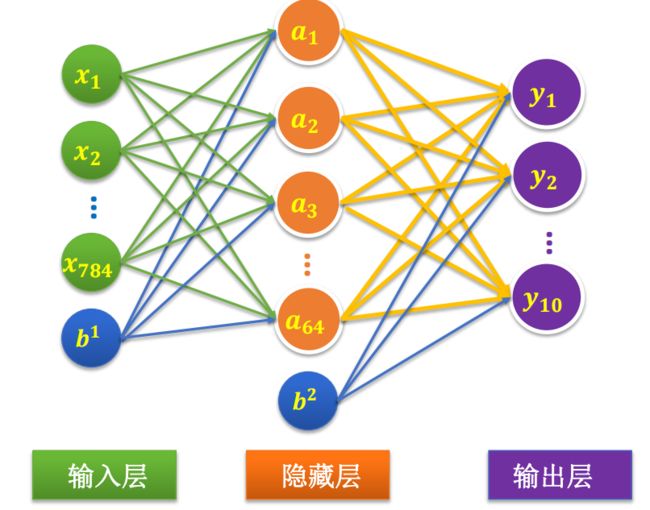
这个网络相较于之前做的那个多了个隐藏层,这里面的b,是我们所加上的偏置项,接下来我们来实现它
创建待优化变量
#定义第一层隐藏层权重和偏置项变量
Input_Dim=784
H1_NN=64
W1=tf.Variable(tf.random.normal([Input_Dim,H1_NN],mean=0.0,stddev=1.0,dtype=tf.float32))
B1=tf.Variable(tf.zeros([H1_NN]),dtype=tf.float32)

#定义输出层权重和偏置项变量
Output_Dim=10
W2=tf.Variable(tf.random.normal([H1_NN,Output_Dim],mean=0.0,stddev=1.0,dtype=tf.float32))
B2=tf.Variable(tf.zeros([Output_Dim]),dtype=tf.float32)

#建立待优化变量列表
W=[W1,W2]
B=[B1,B2]
定义模型前向计算
def model(x,w,b):
    x=tf.matmul(x,w[0])+b[0]
    x=tf.nn.relu(x)
    x=tf.matmul(x,w[1])+b[1]
    pred=tf.nn.softmax(x)
    return pred
定义损失函数
我们所使用的是交叉熵的损失函数,并且直接调用TensorFlow提供的交叉熵函数,也就不用自己再写了
def loss(x,y,w,b):
    pred=model(x,w,b)
    loss_=tf.keras.losses.categorical_crossentropy(y_true=y,y_pred=pred)
    return tf.reduce_mean(loss_)
定义梯度计算函数
def grad(x,y,w,b):
    var_list=w+b
    with tf.GradientTape() as tape:
        loss_=loss(x,y,w,b)
    return tape.gradient(loss_,var_list)
定义准确率
def accuracy(x,y,w,b):
    pred=model(x,w,b)
    correct_prediction=tf.equal(tf.argmax(pred,1),tf.argmax(y,1))
    return tf.reduce_mean(tf.cast(correct_prediction,tf.float32))
设置训练参数及优化器
training_epochs=20
batch_size=50
lr=0.01

optimizer=tf.keras.optimizers.Adam(learning_rate=lr)
模型训练
total_step=int(train_num/batch_size)
loss_list_train=[]#train loss
loss_list_valid=[]
acc_list_train=[]#train loss
acc_list_valid=[]

for epoch in range(training_epochs):
    for step in range(total_step):
        xs=train_x[step*batch_size:(step+1)*batch_size,:]
        ys=train_y[step*batch_size:(step+1)*batch_size]
        grads=grad(xs,ys,W,B)#计算梯度
        optimizer.apply_gradients(zip(grads,W+B))#优化器调参
    loss_train=loss(train_x,train_y,W,B).numpy()
    loss_valid=loss(valid_x,valid_y,W,B).numpy()
    acc_train=accuracy(train_x,train_y,W,B).numpy()
    acc_vaild=accuracy(valid_x,valid_y,W,B).numpy()
    loss_list_train.append(loss_train)
    loss_list_valid.append(loss_valid)
    acc_list_train.append(acc_train)
    acc_list_valid.append(acc_vaild)
    print(f"epoch={epoch+1},train_loss={loss_train},valid_loss={loss_valid},train_accuracy={acc_train},valid_accuracy={acc_vaild}")
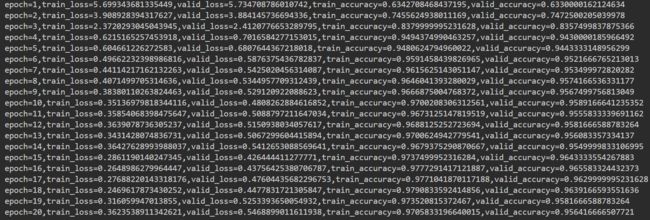
从打印结果可以看到,损失值loss是趋于更小的,同时,准确率越来越高
多隐藏层网络
那么,假如我们要实现多隐藏层的网络,要如何实现呢?比如实现下面这个网络

我们只需要在上面的模型中改变一部分就可以了
创建变量
#定义第一层隐藏层权重和偏置项变量
Input_Dim=784
H1_NN=64
W1=tf.Variable(tf.random.normal([Input_Dim,H1_NN],mean=0.0,stddev=1.0,dtype=tf.float32))
B1=tf.Variable(tf.zeros([H1_NN]),dtype=tf.float32)
#定义第二层隐藏层权重和偏置项变量
H2_NN=32
W2=tf.Variable(tf.random.normal([H1_NN,H2_NN],mean=0.0,stddev=1.0,dtype=tf.float32))
B2=tf.Variable(tf.zeros([H2_NN]),dtype=tf.float32)
#定义输出层权重和偏置项变量
Output_Dim=10
W3=tf.Variable(tf.random.normal([H2_NN,Output_Dim],mean=0.0,stddev=1.0,dtype=tf.float32))
B3=tf.Variable(tf.zeros([Output_Dim]),dtype=tf.float32)
#建立待优化变量列表
W=[W1,W2,W3]
B=[B1,B2,B3]
构建模型
也就是加上一层
def model(x,w,b):
    x=tf.matmul(x,w[0])+b[0]
    x=tf.nn.relu(x)
    x=tf.matmul(x,w[1])+b[1]
    x=tf.nn.relu(x)
    x=tf.matmul(x,w[2])+b[2]
    pred=tf.nn.softmax(x)
    return pred
其他部分也就没有其他区别了,还是放一下完整的代码
完整代码
import tensorflow as tf
import numpy as np
import matplotlib.pyplot as plt
%matplotlib inline
tf.__version__

mnist=tf.keras.datasets.mnist
(train_images,train_labels),(test_images,test_labels)=mnist.load_data()

total_num=len(train_images)
valid_split=0.2# 验证集占20%
train_num=int(total_num*(1-valid_split))

train_x=train_images[:train_num]
train_y=train_labels[:train_num]

valid_x=train_images[train_num:]
valid_y=train_labels[train_num:]

test_x=test_images
test_y=test_labels

train_x=train_x.reshape(-1,784)
valid_x=valid_x.reshape(-1,784)
test_x=test_x.reshape(-1,784)

train_x=tf.cast(train_x/255.0,tf.float32)
valid_x=tf.cast(valid_x/255.0,tf.float32)
test_x=tf.cast(test_x/255.0,tf.float32)

train_y=tf.one_hot(train_y,depth=10)
valid_y=tf.one_hot(valid_y,depth=10)
test_y=tf.one_hot(test_y,depth=10)

#定义第一层隐藏层权重和偏置项变量
Input_Dim=784
H1_NN=64
W1=tf.Variable(tf.random.normal([Input_Dim,H1_NN],mean=0.0,stddev=1.0,dtype=tf.float32))
B1=tf.Variable(tf.zeros([H1_NN]),dtype=tf.float32)

#定义第二层隐藏层权重和偏置项变量
H2_NN=32
W2=tf.Variable(tf.random.normal([H1_NN,H2_NN],mean=0.0,stddev=1.0,dtype=tf.float32))
B2=tf.Variable(tf.zeros([H2_NN]),dtype=tf.float32)

#定义输出层权重和偏置项变量
Output_Dim=10
W3=tf.Variable(tf.random.normal([H2_NN,Output_Dim],mean=0.0,stddev=1.0,dtype=tf.float32))
B3=tf.Variable(tf.zeros([Output_Dim]),dtype=tf.float32)

#建立待优化变量列表
W=[W1,W2,W3]
B=[B1,B2,B3]

def model(x,w,b):
    x=tf.matmul(x,w[0])+b[0]
    x=tf.nn.relu(x)
    x=tf.matmul(x,w[1])+b[1]
    x=tf.nn.relu(x)
    x=tf.matmul(x,w[2])+b[2]
    pred=tf.nn.softmax(x)
    return pred

def loss(x,y,w,b):
    pred=model(x,w,b)
    loss_=tf.keras.losses.categorical_crossentropy(y_true=y,y_pred=pred)
    return tf.reduce_mean(loss_)

def grad(x,y,w,b):
    var_list=w+b
    with tf.GradientTape() as tape:
        loss_=loss(x,y,w,b)
    return tape.gradient(loss_,var_list)

def accuracy(x,y,w,b):
    pred=model(x,w,b)
    correct_prediction=tf.equal(tf.argmax(pred,1),tf.argmax(y,1))
    return tf.reduce_mean(tf.cast(correct_prediction,tf.float32))

training_epochs=20
batch_size=50
lr=0.01

optimizer=tf.keras.optimizers.Adam(learning_rate=lr)

total_step=int(train_num/batch_size)
loss_list_train=[]#train loss
loss_list_valid=[]
acc_list_train=[]#train loss
acc_list_valid=[]

for epoch in range(training_epochs):
    for step in range(total_step):
        xs=train_x[step*batch_size:(step+1)*batch_size,:]
        ys=train_y[step*batch_size:(step+1)*batch_size]
        grads=grad(xs,ys,W,B)#计算梯度
        optimizer.apply_gradients(zip(grads,W+B))#优化器调参
    loss_train=loss(train_x,train_y,W,B).numpy()
    loss_valid=loss(valid_x,valid_y,W,B).numpy()
    acc_train=accuracy(train_x,train_y,W,B).numpy()
    acc_vaild=accuracy(valid_x,valid_y,W,B).numpy()
    loss_list_train.append(loss_train)
    loss_list_valid.append(loss_valid)
    acc_list_train.append(acc_train)
    acc_list_valid.append(acc_vaild)
    print(f"epoch={epoch+1},train_loss={loss_train},valid_loss={loss_valid},train_accuracy={acc_train},valid_accuracy={acc_vaild}")
下面是训练的结果

如果想要更多层的神经网络,和上面的差不多,直接网上加就好了。
然而,也看到了,假设你要加10个隐藏层,你就要写十遍…enmm,好像比较麻烦。
事实上,在TensorFlow2.0中,更加提倡的做法是使用Keras来建模
使用Keras序列模型建模
用Keras建模相当于是做一个汉堡,构建模型就是不断在上面叠加已经封装好的层就行了
Keras序列模型建模的一般步骤
采用Keras序列模型进行建模与训练过程一般分为六个步骤:
(1)创建一个Sequential模型;
(2)根据需要,通过“add()”方法在模型中添加所需要的神经网络层,
完成模型构建;
(3)编译模型,通过“compile()”定义模型的训练模式;
(4)训练模型,通过“fit()”方法进行训练模型;
(5)评估模型,通过“evaluate()”进行模型评估;
(6)应用模型,通过“predict()”进行模型预测。
用Keras训练MNIST手写数字识别
常规操作
值得注意的是,这里我们不再去划分验证集了,因为在之后用Keras建模的时候,有更方便的方法去完成这一件事情
import tensorflow as tf
import numpy as np
import matplotlib.pyplot as plt
%matplotlib inline
tf.__version__

mnist=tf.keras.datasets.mnist
(train_images,train_labels),(test_images,test_labels)=mnist.load_data()

train_images=train_images/255.0
test_images=test_images/255.0

train_labels_ohe=tf.one_hot(train_labels,depth=10).numpy()
test_labels_ohe=tf.one_hot(test_labels,depth=10).numpy()
构建模型
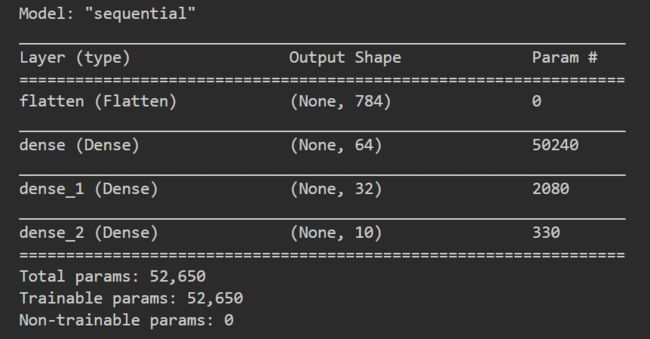
来看看我们的目标模型,这是一个64的隐藏层+32的隐藏层的双隐藏层模型。
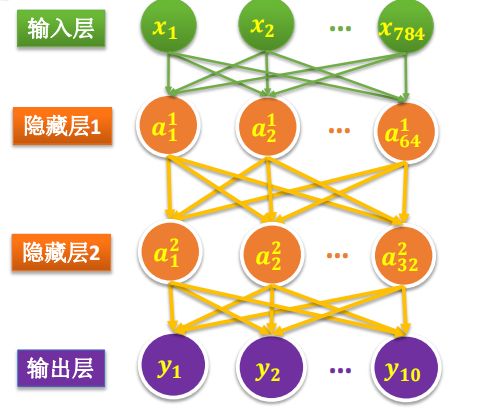
接下来去构建我们的这个模型
#建立Sequential线性堆叠模型
model=tf.keras.models.Sequential()
# 添加平坦层(输入层)
model.add(tf.keras.layers.Flatten(input_shape=(28,28)))
#添加隐藏层(这里是两个全连接层)
model.add(tf.keras.layers.Dense(units=64,
                                kernel_initializer='normal',
                                activation='relu'))
model.add(tf.keras.layers.Dense(units=32,
                                kernel_initializer='normal',
                                activation='relu'))
#添加输出层
model.add(tf.keras.layers.Dense(10,activation='softmax'))
#输出模型摘要
model.summary()
定义训练模式
model.compile(optimizer='adam',
              loss='categorical_crossentropy',
              metrics=['accuracy'])
tf.keras.Model.compile 接受 3 个重要的参数:
optimizer:优化器,可从tf.keras.optimizers中选择;loss:损失函数,可从tf.keras.losses中选择;metrics:评估指标,可从tf.keras.metrics中选择。
设置训练参数
train_epochs=10
batch_size=30
训练模型
train_history=model.fit(train_images,train_labels_ohe,
                        validation_split=0.2,
                        epochs=train_epochs,
                        batch_size=batch_size,
                        verbose=2)
tf.keras.Model.fit()常见参数:
x:训练数据;y:目标数据(数据标签);epochs:将训练数据迭代多少遍;batch_size:批次的大小;validation_data:验证数据,可用于在训练过程中监控模型的性能。verbose:训练过程的日志信息显示,0为不在标准输出流输出日志信息,1为输出进度条记录,2为每个epoch输出一行记录。

我们还可以通过train_history.history来获取训练过程中的一些指标数据。
history是一个字典类型数据,包含了4个Key:loss、accuracy、val_loss和val_accuracy,分别表示训练集上的损失、准确率和验证集上的损失和准确率。它们的值都是一个列表,记录了每个周期该指标的具体数值。比如本例子的输出就是:
{'loss': [0.36542361974716187,
  0.16213099658489227,
  0.11819229274988174,
  0.09180226922035217,
  0.07720495760440826,
  0.06569258868694305,
  0.05359013006091118,
  0.04583737626671791,
  0.03984333202242851,
  0.0345105342566967],
 'accuracy': [0.8956249952316284,
  0.9523333311080933,
  0.9642083048820496,
  0.9711666703224182,
  0.9759166836738586,
  0.979520857334137,
  0.9833124876022339,
  0.9855208396911621,
  0.9870625138282776,
  0.9889166951179504],
 'val_loss': [0.19308912754058838,
  0.15329642593860626,
  0.12567788362503052,
  0.11830687522888184,
  0.10141497850418091,
  0.11186043173074722,
  0.10655724257230759,
  0.10808669775724411,
  0.10833317041397095,
  0.12016895413398743],
 'val_accuracy': [0.9438333511352539,
  0.952833354473114,
  0.9645000100135803,
  0.9646666646003723,
  0.9710833430290222,
  0.9669166803359985,
  0.9715833067893982,
  0.9695000052452087,
  0.9702500104904175,
  0.9696666598320007]}
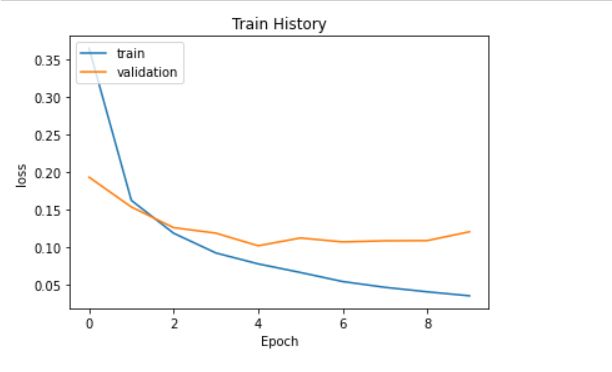
可视化结果
def show_train_history(train_history,train_metric,val_metric):
    plt.plot(train_history.history[train_metric])
    plt.plot(train_history.history[val_metric])
    plt.title('Train History')
    plt.ylabel(train_metric)
    plt.xlabel('Epoch')
    plt.legend(['train','validation'],loc='upper left')
    plt.show()

show_train_history(train_history,'loss','val_loss')
show_train_history(train_history,'accuracy', 'val_accuracy')
模型评估
test_loss,test_acc=model.evaluate(test_images,test_labels_ohe,verbose=2)
