前端三剑客_CSS
前端三剑客_CSS
1、CSS简介
DOCTYPE html>
<html lang="en">
<head>
    <meta charset="UTF-8">
    <title>Documenttitle>

head>
<body>


    <link rel="stylesheet" href="./style.css">
    <p>少小离家老大回,乡音无改鬓毛衰p>
body>
html>
2、CSS基本语法
Document
落霞与孤鹜齐飞,秋水共长天一色
3、选择器
1、常用选择器
DOCTYPE html>
<html lang="en">
<head>
    <meta charset="UTF-8">
    <title>Documenttitle>
head>
<body>

body>
html>
2、复合选择器
DOCTYPE html>
<html lang="en">
<head>
    <meta charset="UTF-8">
    <title>Documenttitle>
    <style>
        /* 1、将class为red元素的字体设置为红色。 */
        .red{
            color: red;
        }

        /* 2、将class为red的div字体大小设置为30px */
        /*
            交集选择器(相当于逻辑“与”):
                作用:选中同时符合多个条件的元素。
                语法:选择器1选择器2选择器3选择器n{}
                注意点:交集选择器中如果有元素选择器,必须使用元素选择器开头。
        */
        div.red{ /*选择div元素,且元素属性的类名是red的元素。*/
            font-size: 30px;
        }

        .a.b.c{ /*元素的属性类名必须同时是a b c的元素*/
            color: blue;
        }

        /* 下面的这种方式不太推荐使用,但是语法是没有错误的,因为通过id就可以唯一确定一个元素了,没必要在使用元素选择器。 */
        /* div#box1{} */

        /*
            3、选择器分组(并集选择器,相当于逻辑“或”)
                作用:同时选择多个选择器对应的元素。
                语法:选择器1,选择器2,选择器3,选择器n{}
                如:#b1,.p1,h1,span,div.red{}

        */
        h1, span{
            color: green;
        }
    style>
head>
<body>
    <div class="red">我是divdiv>

    <p class="red">我是p元素p>

    <div class="red2 a b c">我是div2div>

    <h1>我是h1元素h1>
    <span>我是span元素span>
body>
html>
3、关系选择器
DOCTYPE html>
<html lang="en">
<head>
    <meta charset="UTF-8">
    <title>Documenttitle>
    <style>
        /*
            为div的子元素span设置一个红色字体(为div直接包含的span设置一个字体颜色)。
            1、子元素选择器
                作用:选中指定父元素的指定子元素。
                语法:父元素 > 子元素
        */

        div.one > span {
            color: orange;
        }


        /*
            2、后代元素选择器
                作用:选中指定元素内的指定后代元素。
                语法:祖先 后代
        */
        /* div span {
            color: skyblue;
        } */

        /*
            3、选择下一个兄弟选择器(必须是紧挨着)
                语法:兄元素 + 弟元素
                注:这种方法是,兄和弟元素必须是紧挨着的且只会选择一个弟元素。

            4、选择下边所有的兄弟选择器
                语法:兄 ~ 弟
                注:这种方法是,选择兄后面所有的弟元素。

             这里的3和4两种选择器都是向下选择,出现在它上面的元素不会被选择到。
        */
        /* p + span {
            color: red;
        } */

        /* p ~ span {
            color: blue;
            font-size: 30px;
        } */

    style>
head>
<body>

    <div class="one">
        我是一个div
        <p>
            我是div中的p元素
            <span>我是p元素中的spanspan>
        p>
        <span>我是div中的span元素span>
        <span>我是div中的span元素span>
        <span>我是div中的span元素span>
        <span>我是div中的span元素span>
        <span>我是div中的span元素span>
    div>
body>
html>
4、属性选择器
DOCTYPE html>
<html lang="en">
<head>
    <meta charset="UTF-8">
    <title>Documenttitle>
    <style>
        /*
            [属性名] 选择含有指定属性的元素;
            [属性名=属性值] 选择含有指定属性和属性值的元素;
            [属性名^=属性值] 选择以指定值开头的元素
            [属性名$=属性值] 选择以指定值结尾的元素
            [属性名*=属性值] 选择属性值中含有特定值的元素

            注意:可以在方括号[]的前面加上元素,表示选择特定的元素。
        */
        /* p[title] */  /*选择p标签中含有title属性的p元素。*/
        /* p[title=abc] */
        /* p[title^=abc] */
        /* p[title$=abc] */
        p[title*=e]
        {
            color: red;
        }
    style>
head>
<body>

    <p title="abc">少小离家老大回,p>
    <p title="abcdef">乡音无改鬓毛衰。p>
    <p title="helloabc">儿童相见不相识,p>
    <p>笑问客从何处来。p>
body>
html>
5、伪类选择器
DOCTYPE html>
<html lang="en">
<head>
    <meta charset="UTF-8">
    <title>Documenttitle>
    <style>
        /* 将ul李的第一个li设置为红色。 */
        /*
            伪类(不存在的类,特殊的类)
                1)伪类用来描述一个元素的特殊状态,比如:第一个子元素、被点击的元素、鼠标移入的元素。

                2)伪类一般情况下都是:开头。
                    比如:
                        :first-child 选择第一个元素
                        :last-child  选择最后一个元素
                        :nth-child()  选中第n个子元素。
                            特殊值:
                                n 第n个元素, n的范围从0到正无穷。
                                2n 或 even 表示选中偶数位的元素
                                2n+1 或 odd 表示选中奇数为的元素

                            以上这些伪类都是根据所有的子元素进行排序,即并不是指某一个类型。

                        :first-of-type
                        :last-of-type
                        :nth-of-type()
                        这几个伪类的功和上述的类似,不通点是它们在同类型元素中进行排序。

                        :not() 否定伪类,将符合条件的元素从选择器中去除。
        */

        /* ul > li:nth-child(2)  {
            color: red;
        }  */

        /* ul > li:last-child{
            color: red;
            font-size: 30px;
        } */
        /* ul > li:nth-child(2){
            color: blue;
            font-size: 50px;
        } */
        /* ul > li:first-of-type {
            color: red;
            font-size: 40px;
        } */
        /*在ul标签中的所有li标签中,除了第二个li标签外,其它的颜色全部为yellogreen*/
        /* ul > li:not(:nth-of-type(2)){
            color: yellowgreen;
        } */
    style>
head>
<body>

    <ul>
        <span>我是一个spanspan>
        <li>第〇个li>
        <li>第一个li>
        <li>第二个li>
        <li>第三个li>
        <li>第四个li>
        <li>第五个li>
    ul>
body>
html>
6、超链接伪类
DOCTYPE html>
<html lang="en">
<head>
    <meta charset="UTF-8">
    <title>Documenttitle>
    <style>
        /* :link 用来表示没访问过的连接(正常的连接) */
        a:link{
            color: red;
        }

        /* :visited 用来表示访问过的连接,由于隐私原因,visited这个伪类只能修改连接的颜色。 */
        a:visited{
            color: orange;
        }

        /* :hover 用来表示鼠标移入的状态。 */
        a:hover{
            color: aqua;
            font-size: 30px;
        }

        /* :active 用来表示鼠标的点击。 */
        a:active{
            color: yellowgreen;
        }
        /* 注意:上面超链接伪类的设置顺序是不能发生变化的。 */
    style>
head>
<body>

     <a href="#">访问过的连接a>
     <br><br>
     <a href="javascript:;">没有访问过的连接a>
body>
html>
7、伪元素选择器
DOCTYPE html>
<html lang="en">
<head>
    <meta charset="UTF-8">
    <title>Documenttitle>
    <style>
        /*
            伪元素,表示页面中一些特殊的并不真实存在的元素(特殊的位置)。
                伪元素使用 :: 开头。

                ::first-letter  表示第一个字母
                ::first-line  表示第一行
                ::selection  表示在页面中使用鼠标选中的内容
                ::before  元素的开始
                ::after   元素的最后
                    before 和 after 必须结合content属性来使用。
                    通过before 和 after 所添加的内容在页面中是无法被选中的,且这两个属性在开发中使用是最多的。
        */
        p::first-letter{
            font-size: 50px;
        }

        p::first-line{
            color: yellowgreen;
        }

        p::selection{
            background-color: greenyellow;
        }

        div::before{
            content: '『';
        }
        div::after{
            content: '』';
        }
    style>
head>
<body>
    <div>Hello Hello How are you.div>
    <p>Lorem ipsum dolor sit amet consectetur adipisicing elit. Quod maiores adipisci exercitationem, magnam labore ipsum. Vero expedita fuga minus alias, omnis magnam maxime, dolorum, libero sed laudantium nesciunt explicabo dolorem.p>
body>
html>
10、样式的继承
DOCTYPE html>
<html lang="en">
<head>
    <meta charset="UTF-8">
    <title>Documenttitle>
    <style>
        /*
            样式的继承,我们为一个元素设置的样式同时也会应用到它的后代元素上。

            继承是发在在祖先后带之间的。

            继承的设计是为了方便我们的开发,利用继承我们可以将一些通用的样式统一设置到共同的祖先元素上,
            这样只需要设置一次即可让所有的元素都具有该样式。

            注意:并不是所有的样式都会被继承,比如:背景相关的、布局相关等这些样式都不会被继承。
        */
        p{
            color: red;
        }

        div{
            color: yellowgreen;
        }
    style>
head>
<body>
    <p>
        我是一个p元素
        <span>我是p元素中的span元素span>
    p>
    <span>我是p元素外面的spanspan>
    <div>
        我是div
        <span>
            我是div中的span
            <em>我是span中的emem>
        span>
    div>
body>
html>
11、样式选择器的权重
主要解决样式不生效的问题!
DOCTYPE html>
<html lang="en">
<head>
    <meta charset="UTF-8">
    <title>Documenttitle>
    <style>
        /*
            样式冲突:当我们通过不同的选择器选中了相同的元素,并且为相同的样式设置不同的值时,此时就发生样式的冲突。

            发生样式冲突时,应用那个样式由选择器的权重(优先级)决定,且与选择器在页面中出现的顺序无关。

            选择器的权重:
                内联样式 > id选择器 > 类和伪类选择器 > 元素选择器。
        */
        #box1{
            background-color: yellow;
        }

        .red{
            background-color: peru;
        }

        div{
            background-color: palegreen;
        }

        div#box1{
            background-color: yellow;
        }

        .d1{
            background-color: purple;
        }

        .red{
            background-color: red;
        }

        div,p,span{  /*分组选择器*/
            background-color: yellowgreen;
        }
        /*
            样式选择器的权重:
                内联样式                1,0,0,0
                id选择器                0,1,0,0
                类和伪类选择器           0,0,1,0
                元素选择器。             0,0,0,1
                通配选择器               0,0,0,0
                继承的样式               没有优先级

            比较优先级时,需要将所有的选择器的优先级进行相加计算,最后优先级越高,则月优先显示(分组选择器是单独计算的),
            选择器的累加不会超过其大于它的数量级,类选择器在搞也不会超过id选择器,如果优先级计算后相同,此时则优先使用靠下的样式。

            可以在某一个样式的后边添加 !important ,则此时该样式会获取到最高的优先级,甚至超过内联样式。
            注意:在开发中一定要慎用!!!
        */
    style>
head>
<body>
    <div id="box1" class="red d1 d2 d3 d4" style="background-color: chartreuse;">我是一个divdiv>
body>
html>
12、单位
DOCTYPE html>
<html lang="en">
<head>
    <meta charset="UTF-8">
    <title>Documenttitle>
    <style>
        /*
        长度单位:
            1)像素:
                屏幕(显示器)实际上是由一个一个的小点构成的;
                不同屏幕的像素大小是不同的,像素越小的屏幕显示的效果越清晰;
                所以同样的200px在不同的设备下显示效果不一样;
            2)百分比:
                也可以将属性值设置为相对于其父元素属性的百分比;
                设置百分比可以是子元素跟随父元素的改变而改变;
            3)em:
                em是相对于元素本身的字体大小来计算的;
                1em = 1 font-size;
                em会根据字体的大小改变而改变;
            4)rem:
                rem是相对于根元素(HTML)的字体大小来计算;
        */
        .box1{
            width: 200px;
            height: 200px;
            background-color: orange;
        }
        .box2{
            width: 50%;
            height: 50%;
            background-color: aqua;
        }

        .box3{
            font-size: 20;
            width: 10em;
            height: 10em;
            background-color: blue;
        }

        html{
            font-size: 20px;
        }

        .box4{
            width: 10rem;
            height: 10rem;
            background-color: crimson;
        }
    style>
head>
<body>

    <div class="box1">
        <div class="box2">div>
    div>

    <div class="box3">div>
    <div class="box4">div>
body>
html>
13、颜色
DOCTYPE html>
<html lang="en">
<head>
    <meta charset="UTF-8">
    <title>Documenttitle>
    <style>
        .box1{
            width: 100px;
            height: 100px;
            /*
            颜色单位:
            1)在CSS中,可以直接使用颜色名来设置各种颜色。
                如:red、orange……
                但是在CSS中直接使用颜色名是非常不方便的。

            2)RGB值:
                RGB通过三种颜色的不同浓度来调配出不同的颜色。
                R -> red, G -> green, B -> blue,即光的“三原色”。
                每一种颜色的范围在 0~255(0%~100%)之间。
                语法:
                    RGB(红色,绿色,蓝色)

            3)RGBA:
                就是在RGB的基础上增加了一个A,用来表示不透明度;
                需要四个值,前三个和RGB一样,第四个表示不透明度,1表示完全不透明,0表示完全透明,.5(点五)表示半透明。

            4)十六进制的RGB值:
                语法:#红色绿色蓝色;
                颜色浓度通过 00~ff;
                如果颜色两位两位的重复则可以简写,如:#aabbcc -> #abc

            5)HSL值与HSLA值
                H 色相(0 ~ 360);
                S 饱和度,颜色的浓度 0% ~ 100%;
                L 亮度,颜色的亮度 0% ~ 100%;
            */
            background-color: red;
            background-color: rgb(255, 0, 0);
            background-color: rgb(0, 255, 0);
            background-color: rgb(255, 255, 255);
            background-color: rgb(0, 0, 0);
            background-color: rgb(0, 0, 255);
            background-color: rgba(0, 0, 255, .5);
            background-color: #f0f;
            background-color: hsl(0, 100%, 50%);
        }
    style>
head>
<body>
    <div class="box1">div>
body>
html>
14、文档流
**文档流(normal flow):**网页是一个多层的结构,一层压着一层,通过CSS可以分别为每一层来设置样式。作为用户来讲只能看到最顶上一层,这些层中,最底下的一层称为“文档流”。文档流是网页的基础,我们所创建的元素默认都是在文档流中进行排列。
对于我们来说元素主要有两个状态:在文档流中和不在文档流中。
在文档流中的特点:
-
块元素:
- 块元素会在页面中独占一行;
- 默认宽度是父元素的全部(会把父元素撑满);
- 默认高度是被内容撑开(子元素)的高度;
-
行内元素
- 行内元素不会独占页面的一行,只占自身的大小;
- 行内元素在页面中自左向右水平排列,如果一行之中不能容纳下所有的行内元素,则元素会换到第二行继续自左向右排列。
- 行内元素的默认宽度和高度都是被内容撑开。
!DOCTYPE html>
<html lang="en">
<head>
    <meta charset="UTF-8">
    <title>Documenttitle>
    <style>
        .box1{
            width: 100px;
            background-color: yellowgreen;
        }
        .box2{
            width: 100px;
            background-color: red;
        }
        .box3{
            background-color: seagreen;
        }
    style>
head>
<body>
    <div class="box1">我是div1div>
    <div class="box2">我是div2div>

    <span class="box3">我是span标签span>
    <span class="box3">我是span标签span>
    <span class="box3">我是span标签span>
    <span class="box3">我是span标签span>
    <span class="box3">我是span标签span>
body>
html>
15、框模型
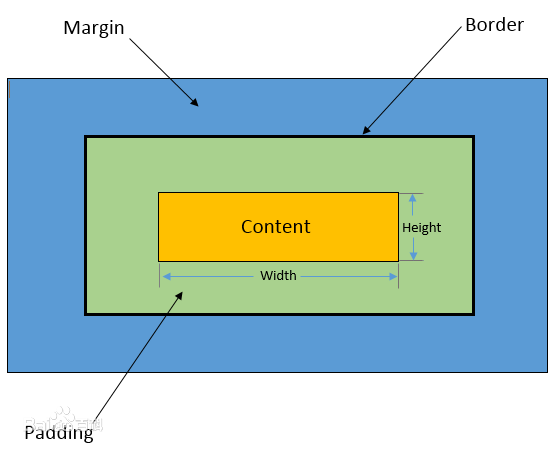
盒子模型(box model),又叫做盒模型、框模型。
- CSS将页面中的所有元素都设置为了一个矩形盒子;
- 将元素设置为矩形盒子后,对页面的布局就编程了将不同的盒子摆放到不同的位置;
- 每一个盒子都有以下几个部分组成:
- 内容区(content):元素中的所有的子元素和文本内容都在内容区中排列,内容区的大小有width和height两个属性来设置。
- width设置内容区宽度;
- height设置内容区高度;
- 边框(border):边框属于盒子边缘,边框里边属于盒子内部,出了边框都是盒子的外部,要设置边框,至少需要设置三个样式:
- 边框的宽度(border-width);
- 边框的颜色(border-color);
- 边框的样式(border-style);
- 内边距(padding):
- 外边距(margin):
- 内容区(content):元素中的所有的子元素和文本内容都在内容区中排列,内容区的大小有width和height两个属性来设置。
Document
15.1、框模型_边框
边框(这种设置方法了解一下):
- 边框的宽度 border-width;
- 边框的颜色 border-color;
- 边框的样式 border-style;
border-width:
- 默认值一般都是3个像素(即可以默认不写,但是不赞成);
- border-width可以用来指定四个方向的边框的宽度,值的情况为:
- 四个值:上 右 下 左;
- 三个值:上 左右 下;
- 两个值:上下 右左;
- 一个值:上下左右;
- 除了border-width还有一组border-xxx-width:
- xxx可以是top right bottom left;
- 用来单独指定某一个变得宽度;
border-color:
- border-color用来指定边框的颜色,同样可以分别指定四个边的颜色,规则和border-width一样;
- border-color也可以省略不写,如果省略了则自动使用color的颜色值(黑色)。
border-style:
border-style指定边框的样式:solid表示实线,dotted表示点状虚线,dashed表示虚线,double表示双线。border-style的默认值是none,表示没有。则如果我们想要取消一个边框,直接将border-style设置为none即可。
设置border的常用方法:
- border简写属性,通过该属性可以同时设置边框所有的相关样式,并且没有顺序要求;
- 除了border以外还有四个border-xxx;
- border-top;
- border-right;
- border-bottom;
- border-left;
DOCTYPE html>
<html lang="en">
<head>
    <meta charset="UTF-8">
    <title>Documenttitle>
    <style>
        .box1{
            /* 内容区 */
            width: 200px;
            height: 200px;
            background-color: slateblue;

            /* 边框区 */
            /* 边框的四个边都设置为10px。 */
            /* border-width: 10px; */
            /* 四个值:上 右 下 左 */
            /* border-width: 10px 20px 20px 30px; */
            /* 三个值:上 右左 下 */
            /* border-width: 10px 30px 10px; */
            /* 两个值:上下 右左 */
            /* border-width: 10px 40px; */

            /* 颜色区(其设置的方法与边框border-width规则差不多) */
            /* 同时设置边框四条边的颜色 */
            /* border-color: rgb(0, 255, 0); */
            /* border-color: red green yellowgreen skyblue; */

            /* 样式区 */
            /* 样式区的设置和前面的边框区设置基本相同 */
            /* 设置四个边框都是实线 */
            /* border-style: solid; */
            /* 分别设置四个不同边的边框 */
            /* border-style: solid dotted dashed double; */

            border: solid 10px orange;
            /*取消右边的边框*/
            border-right: none;
        }
    style>
head>
<body>
    <div class="box1">div>
body>
html>
15.2、框模型_内边距
内边距(padding):
- 内容区和边框区之间的距离是内边距;
- 一共有四个方向的内边距;
- padding-top;
- padding-right;
- padding-bottom;
- padding-left;
- 内边距的设置会影响到盒子的大小;
- 背景颜色会引申到内边距上;
- 一个盒子的可见框的大小,有内容区、内边距和边框共同决定,所以在计算盒子大小是,需要将这三个区域加到一起计算。
padding-top: 100px;
padding-right: 100px;
padding-bottom: 100px;
padding-left: 100px;
padding内边距的简写属性,可以同时指定四个方向的内边距,规则和border-width一样。
padding: 10px 20px 30px 40px;
padding: 10px 20px 30px;  /*上 左右 下*/
padding: 10px 20px; /*上下 左右*/
padding: 10px /*四个方向*/
DOCTYPE html>
<html lang="en">
<head>
    <meta charset="UTF-8">
    <title>Documenttitle>
    <style>
        .box1{
            width: 200px;
            height: 200px;
            background-color: palegoldenrod;
            border: 10px solid orange;
            /* padding-top: 20px;
            padding-right: 20px;
            padding-bottom: 20px;
            padding-left: 20px; */
            /* padding: 10px 20px 30px 40px; */
            padding: 10px;
        }
        .inner{
            background-color: red;
            width: 200px;
            height: 200px;
        }
    style>
head>
<body>
    <div class="box1">
        <div class="inner">div>
    div>
body>
html>
15.3、框模型_外边距
外边距(margin):
- 外边距不会影响盒子可见框的大小,但是会影响到盒子实际占用空间的大小;
- 但是外边距会影响盒子的位置;
- 一共有四个方向的外边距:
- margin-top:上外边距,设置一个正值,元素回向下移动;
- margin-right:默认情况下,设置margin-right不会产生任何效果;
- margin-bottom:下外边距,设置一个正值,其下边的元素会向下移动;
- margin-left:左外边距,设置一个正值,元素会向右移动;
- margin也可以设置负值,如果是负值则元素会向相反的方向移动;
- 元素在页面中是按照自左向右的顺序排列的,所以默认情况下如果我们设置的左和上外边距则会移动元素自身,而设置下和右外边距会移动其他元素;
- margin的简写属性:margin 可以同时设置四个方向的外边距,用法和padding一样;
DOCTYPE html>
<html lang="en">
<head>
    <meta charset="UTF-8">
    <title>Documenttitle>
    <style>
        .box1{
            width: 200px;
            height: 200px;
            background-color: paleturquoise;
            border: 10px solid orange;
            /* margin-top: 100px;  */
            /* margin-left: 100px;  */
            /* margin-bottom: 100px; */
            margin: 100px 20px 40px 50px;
        }
        .box2{
            width: 220px;
            height: 220px;
            background-color: rebeccapurple;
        }
    style>
head>
<body>
    <div class="box1">div>
    <div class="box2">div>
body>
html>
16、盒子的水平布局
**元素水平方向的布局:**元素在其父元素中水平方向的位置有以下几个属性共同决定。
- margin-left;
- border-left;
- padding-left;
- width;
- padding-right;
- border-right;
- margin-right;
一个元素在其父元素中,水平布局必须要满足一下的等式:
"margin-left"+"border-left"+"padding-left"+"width"+"padding-right"+"border-right"+"margin-right"
= 其父元素内容区的宽度(必须满足)
在以上的等式中,如果样式没有写,则默认为0,如margin-left默认值是0。如果以上的等式中两边的等式不成立,则称为==过渡约束==,则等式会自动调整。
调整情况为:如果这七个字中没有 auto 的情况,则浏览器会自动设置margin-right值以使等式满足。这七个值中有三个值可以设置为auto,分别为width、margin-left、margin-right,如果某个值为auto,则会自动调整为auto的那个值以使等式成立。
有以下例子:
DOCTYPE html>
<html lang="en">
<head>
    <meta charset="UTF-8">
    <title>Documenttitle>
    <style>
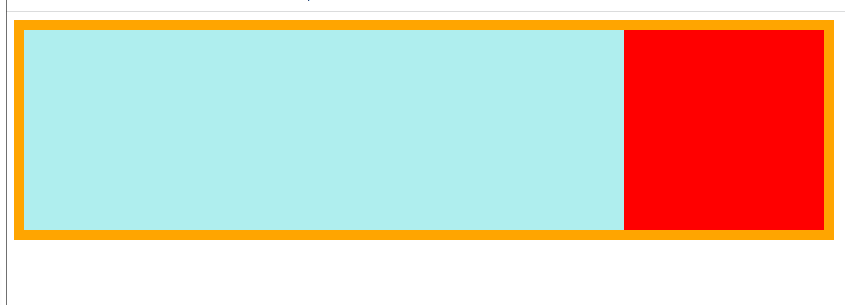
        .outer{
            /* w200+tab键快速生成下面的代码 */
            width: 800px;
            height: 200px;
            background-color: red;
            border: 10px orange solid;
        }
        .inner{
            width: 200px;
            height: 200px;
            background-color: paleturquoise;
        }
    style>
head>
<body>
    <div class="outer">
        <div class="inner">div>
    div>
body>
html>
"margin-left"+"border-left"+"padding-left"+"width"+"padding-right"+"border-right"+"margin-right"
0 + 0 + 0 + 200 + 0 + 0 + 0 = 800 // 很显然这里等式不成立,称为过渡约束,调整后为
0 + 0 + 0 + 200 + 0 + 0 + 600 = 800  // 即将margin-right的值设置为600
如果在上面的.inner类属性中添加样式:
margin-left: 100px;
/*如果设置margin-right: 600px;等式又不成立了,浏览器会自动将margin-right的值强制更改为500px*/
此时的margin-right的值自动变化为:
100 + 0 + 0 + 200 + 0 + 0 + 500 = 800
1)如果将一个宽度和一个外边距设置为auto,则宽度会调整到最大,设置为auto的外边距会自动为0;
.inner{
    width: auto;
    height: 200px;
    background-color: paleturquoise;
    margin-left: auto;
    margin-right: 200px;
}
即外边距被设置为auto的样式的值为0:
0 + 0 + 0 + 600 + 0 + 0 + 200 = 800
2)如果将三个值都设置为auto,则外边距都是0,宽度最大;
.inner{
    width: auto;
    height: 200px;
    background-color: paleturquoise;
    margin-left: auto;
    margin-right: auto;
}
即:
0 + 0 + 0 + 800 + 0 + 0 + 0 = 800
3)如果将两个外边距设置为auto,宽度固定值,则会将外边距设置为相同的值;
.inner{
    width: 200px;
    height: 200px;
    background-color: paleturquoise;
    margin-left: auto;
    margin-right: auto;
}
即:
300 + 0 + 0 + 200 + 0 + 0 + 300 = 800
所以我们经常利用这个特点来使一个元素在其父元素中水平居中。如:
width: xxxpx;
margin: 0px auto;
17、盒子的垂直布局
默认情况下父元素的高度是被内容撑开的高度,如果父元素中设置了height样式,则父元素的高度就是height的值。子元素是在父元素的内容区中排列的,如果子元素的大小超过了父元素,则子元素会从父元素中溢出。
使用overflow属性来属性父元素如何处理溢出的子元素,可选值:
- visible,默认值,子元素会从父元素中溢出,在父元素外部的位置显示;
- hidden,溢出内容将会被裁剪不会显示;
- scroll,生成两个滚动条(水平与垂直),通过滚动条来查看完整的内容;
- auto根据需要生成滚动条,通常比scroll生成的滚动条更加的灵活;
另外还有overflow-x处理水平溢出、overflow-y处理垂直溢出。
DOCTYPE html>
<html lang="en">
<head>
    <meta charset="UTF-8">
    <title>Documenttitle>
    <style>
        .outer{
            background-color: #bfa;
            height: 200px;
            width: 200px;
            /* overflow: auto; */
            overflow-y: auto;
        }
    style>
head>
<body>
    <div class="outer">
        一切存在严格地说都需要“时间”。时间证实一切,因为它改变一切。气候寒暑,草木枯荣,人从生到死,都不能缺少时间,都从时间上发生作用。

常说到“生命的意义”或“生命的价值”。其实一个人活下去真正的意义和价值,不过占有几十个年头的时间罢了。生前世界没有他,他是无意义和价值可言的,活到不能再活死掉了,他没有生命,他自然更无意义和价值可言。

正仿佛多数人的愚昧与少数人的聪明,对生命下的结论差不多都以为是“生命的意义同价值是活个几十年”,因此都肯定生活,那么吃、喝、睡觉、吵架、恋爱……活下去等待死,死后让棺木来装殓他,黄土来掩埋他,蛆虫来收拾他。

生命的意义解释的即如此单纯,“活下去、活着、倒下、死了”,未免太可怕了。因此,次一等的聪明人,同次一等的愚人,对生命的意义和价值找出第二种结论,就是“怎么样来耗费这几十个年头”。虽更肯定生活,那么吃、喝、睡觉、吵架、恋爱……然而生活得失取舍之间,到底就有了分歧,这分歧一看就明白的。大而言之,聪明人要理解生活,愚蠢人要习惯生活。聪明人以为目前并不完全好,一切应比目前更好,且竭力追求那个理想。愚蠢人对习惯完全满意,安于现状,保证习惯(在世俗观念上,这两种人称呼常常相反,安于习惯的被称为聪明人,怀抱理想的人却称愚蠢的家伙)。

两种人即同样有个“怎么来耗费这几十个年头”的打算,要从人与人之间寻找生存的意义和价值,即或择业相同,成就却不相同。同样想征服颜色线条做画家,同样想征服乐器音声做音乐家,同样想征服木石铜牙及其他材料做雕刻家,甚至于同样想征服人身行为做帝王,同样想征服人心信仰做思想家或教主,一切结果都不会相同。因此世界上有大诗人,同时也就有蹩脚诗人,有伟大的革命家,同时也有虚伪的革命家。至于两种人目的不同,择业不同,那就更一目了然了。

看出生命的意义和价值,原来如此如此,却想在生前死后使生命发生一点特殊意义和永久价值,心性绝顶聪明,为人却好像傻头傻脑,历史上的释迦、孔子、耶稣,就是这种人。这种人或出世、或入世,或革命、或复古,活下来都显得很愚蠢,死后却显得很伟大。屈原算得这种人另外一格,历史上这种情况可并不多。可是每一时间或产生一个两个,就很像样子了。这种人自然也只能活个几十年,可是他的观念、他的意见、他的风度、他的文章却可以活在人类的记忆中几千年。一切人的生命都有时间的限制,这种人的生命又似乎不大受这种限制。

话说回来,万事万物需要时间证明,可是时间本身却又像是个极其抽象的东西,从无一个人说得明白时间是个什么样子。时间并不单独存在。时间无形、无声、无色、无臭。要说明时间的存在,还得回过头来从事物去取证。从日月来去,从草木荣枯,从生命存亡找证据。正因为事事物物都可为时间作注解,时间本身反而被疏忽了。所以多数人提问到生命的意义和价值时,没有一个人敢说“生命的意义和价值,只是一堆时间”。

“前不见古人,后不见来者”,这是一个真正明白生命意义同价值的人所说的话,老先生说这话时心中的寂寞可知!能说这话的是个伟人,能理解这话的也不是个凡人。目前的活人,大家都记得这两句话,却只有那些从日光下牵入牢狱,或从牢狱中牵上刑场的倾心理想的人,最了解这两句话的意义。因为说这话的人生命的耗费,同懂这话的人生命的耗费,异途同归,完全是为事实皱眉,却胆敢对理想倾心。

他们的方法不同,他们的时代不同,他们的环境不同,他们的遭遇也不相同,相同的是他们的心,同样为人类向上向前而跳跃。
    div>
body>
html>
18、外边距的折叠
垂直外边距的重叠(折叠):
- 相邻的垂直方向外边距会发生重叠现象;
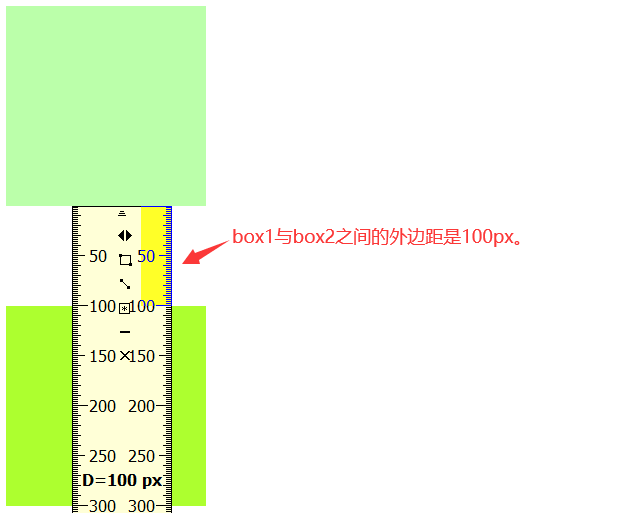
- 兄弟元素:兄弟元素键的相邻垂直外边距会去两者之间的较大值(两者都是正值)。特殊情况:①如果相邻的外边距一正一负,则取两者和的,②如果相邻的外边距都是负值,则取两者中绝对值较大的值。兄弟元素之间的外边距的重叠对于开发是有利的,所以我们不需要进行处理。
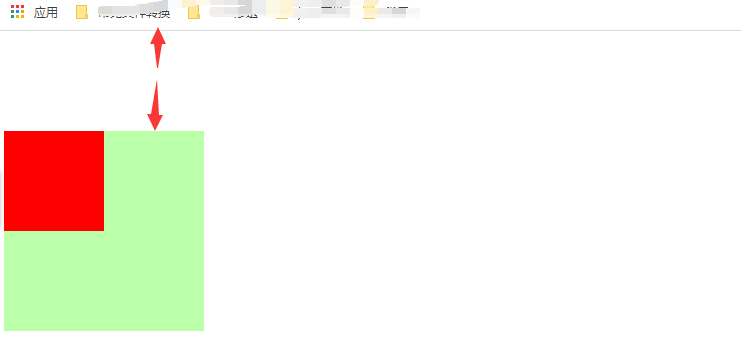
- 父子元素:父子元素键相邻外边距,子元素的会传播给父元素(上外边距)。父元素外边距的折叠会影响到页面的布局,必须要进行处理。
兄弟元素:
<div class="box1">div>
<div class="box2">div>
如上,两个兄弟元素box1与box2,都在其CSS中设置了外边距,分别为margin-bottom=100px和margin-top=100px,理论上,在页面中显示的时候,这两个元素的垂直方向之间的距离应该是200px,但实际上并不会,这是因为会发生外边距的折叠。
父元素:
1)传递性
<div class="box3">
    <div class="box4">div>
div>
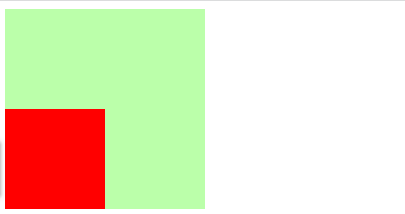
如上,元素box4添加margin-top=100px样式后,页面变为了:
这里可看到父元素box3和box4一起向下移动了,这里我们也可以称为元素的传递性,
第一种解决方法,在box3中添加padding-top=100px,然后将box3中的width设置为100px即可。
.box3{
    width: 200px;
    height: 100px;
    background-color: #bfa;
    padding-top: 100px;
}
第二种解决方法:将box3中设置一个边框即可。
DOCTYPE html>
<html lang="en">
<head>
    <meta charset="UTF-8">
    <title>Documenttitle>
    <style>
        .box1, .box2{
            width: 200px;
            height: 200px;
        }
        .box1{
            background-color: #bfa;
            margin-bottom: 100px;
        }
        .box2{
            background-color: greenyellow;
            margin-top: 100px;
        }
        .box3{
            width: 200px;
            height: 199px;
            background-color: #bfa;
            border-top: 1px #bfa solid;
        }
        .box4{
            width: 100px;
            height: 99px;
            background-color: red;
            margin-top: 100px;
        }
    style>
head>
<body>

    <div class="box3">
        <div class="box4">div>
    div>
body>
html>
19、行内元素的盒模型
- 行内元素不支持设置宽度和高度;
- 行内元素可以设置padding,且垂直方向padding不会影响页面的布局(但是可能会遮挡其他元素);
- 行内元素可以设置border,垂直方向的border不会影响页面的布局;
- 行内元素可以设置margin,垂直方向的margin不会影响页面的布局(水平方向元素之间margin的距离不会折叠);
19.1、display与visibility
**display:**用来设置元素显示的类型,可选值如下:
- inline,将元素设置为行内元素;
- block,将元素设置为块元素;
- inline-block,将元素设置为行内块元素,行内块元素,既可以设置宽度和高度又不会独占一行(使用较少);
- table,将元素设置为一个表格;
- none,将元素在页面中隐藏,即不会显示。
**visibility:**用来设置元素的显示状态,可选值如下:
- visible,默认值,元素在页面中正常显示;
- hidden,元素在页面中隐藏,不显示,但是依然占据页面的位置;
DOCTYPE html>
<html lang="en">
<head>
    <meta charset="UTF-8">
    <title>Documenttitle>
    <style>
        .s1{
            background-color: yellow;
            /* 设置宽度、高度 */
            /* width: 200px; */
            /* height: 200px; */
            /* 设置padding */
            /* padding: 100px; */
            /* 设置border */
            /* border: 10px solid orange; */
            /* 设置margin */
            margin: 100px;
        }
        .box1{
            width: 200px;
            height: 200px;
            background-color: #bfa;
        }
        a{
            width: 100px;
            height: 100px;
            background-color: orange;
            /* display */
            display: block;
            /* visibility */
            /* visibility: hidden; */
        }
    style>
head>
<body>
    <a href="javascript:;">超链接a>
    <span class="s1">我是spanspan>
    <span class="s1">我是spanspan>
    <div class="box1">div>
body>
html>
20、浏览器的默认样式
- 通常情况下,浏览器都会为元素设置一些默认样式;
- 默认样式的存在会影响到页面的布局,通常情况下编写网页时必须要去除浏览器的默认样式(主要是针对PC端);
简单页面的常用方法:
/* 去除默认格式的方法 */
*{
    padding: 0px;
    margin: 0px;
}
ul{
    /*去除ul标签中的圆点*/
    list-style: none;
}
这种方法适用于简单的页面,在较为复杂的页面中,不赞成使用这种方法进行去除,建议使用下面的方法。
复杂页面的常用方法:
链接:https://pan.baidu.com/s/1uoSIfJKdL0cVlRNW6AmRpw
提取码:la7l
重置样式表:专门用来对浏览器的样式进行重置的:
- reset.css直接去除浏览器对元素的默认样式;normalize.css对元素的默认样式在所有的浏览器中进行一个统一;
以上这两个方法任何一个都可以,但是第一个比较常用,使用方法,在页面中引入所下载的文件:
"stylesheet" href="./reset.css">
建议放在自定义样式的上面,以免对我们自定义的样式进行覆盖。
21、盒子大小
默认情况下,盒子可见框的大小有内容区、内边距和边框共同决定!
**box-sizing:**用来设置盒子尺寸的计算方式(设置width和height的作用域),可选值如下:
- content-box,默认值,宽度和高度用来设置内容区的大小;
- border-box,宽度和高度用来设置整个盒子可见框的大小,即width和height指的是内容区、内边距、边框的总大小;
提示,如果使用border-box设置为box-sizing的值,如果元素设置width与height样式而没有设置内边距与边框,则可见框就是width与height(即内容区)所指定的值的大小;如果设置了内边距与边框,由于可见框的大小不能改变,此时内容区(即width与height)的大小会适当的改变。
.box1{
    width: 200px;
    height: 200px;
    background-color: #bfa;
    padding: 10px;
    border: 10px orange solid;
    box-sizing: border-box;
}
22、轮廓、阴影、圆角
22.1轮廓
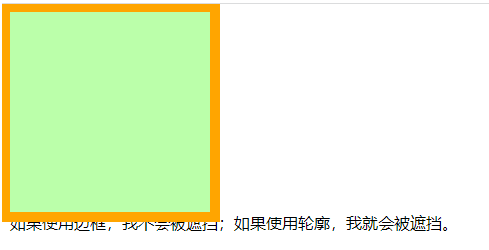
**outline:**用来设置元素的轮廓线,用法规则和border一模一样,轮廓和边框不同的点就是轮廓不会影响到可见框的大小(如果设置轮廓,它只会遮挡旁边离它比较近的元素)。
DOCTYPE html>
<html lang="en">
<head>
    <meta charset="UTF-8">
    <title>Documenttitle>
    <style>
        .box1{
            width: 200px;
            height: 200px;
            background-color: #bfa;
            /* 给元素添加边框,会改变元素自身可见框的大小 */
            /* border: 10px solid orange; */
            /* 给元素添加轮廓,轮廓的设置语法和设置边框一样,轮廓不会改变元素自身可见框的大小 */
            outline: 10px solid orange;
        }
    style>
head>
<body>
    <div class="box1">div>
    <span>如果使用边框,我不会被遮挡;如果使用轮廓,我就会被遮挡。span>
body>
html>
22.2、阴影
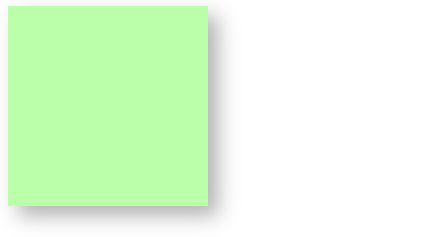
**box-shadow:**用来设置元素的阴影效果,阴影不会影响页面布局,其可值如下:
- 第一个值,水平偏移量,设置阴影的水平位置,正值向右移动,左值向左移动;
- 第二个值,垂直偏移量,设置阴影的垂直位置,正值向下移动,负值向上移动;
- 第三个值,阴影的模糊半径;
- 第四个值,阴影的颜色;
.box2{
    width: 200px;
    height: 200px;
    background-color: #bfa;
    box-shadow: 10px 10px 20px rgba(0, 0, 0, .3);
}
22.3、圆角
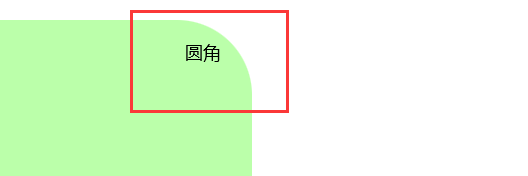
**border-radius:**用来设置圆角,圆角设置圆的半径大小。其四个方向分别为:
- border-top-left-radius,左上角;
- border-top-right-radius,右上角;
- border-bottom-right-radius,右下角;
- border-bottom-left-radius,左下角;
使用以上这四个样式时,每个样式都可以设置两个值,如下:
border-top-right-radius: 30px 30px;
其中第一个值设置水平方向圆的半径,而第二个值设置的是垂直方向圆的半径,如果第一个值和第二个值相等,对应的角是一个圆角:
如果第一个值和第二个值不相等,则对应的角会出现一个椭圆:
border-radius也可以分别指定四个角的圆角,分别:
- 四个值:左上、右上、右下、左下;
- 三个值:左上、右下/左下、右下;
- 两个值:左上/右下、右上/左下;
如果想将一个div设置为圆形,则可以像下面那样设置:
border-radius: 50%;
23、浮动的简介
通过浮动可以使一个元素想向其父元素的左侧或右侧移动,使用float属性来设置元素的浮动,可选值如下:
- none,默认值,元素不浮动;
- left,元素向其父元素的左侧浮动;
- right,元素向其父元素的右侧浮动;
注意:元素设置浮动以后,水平布局的等式便不需要强制成立,且会完全从文档六中脱离,不再占用文档流中的位置,所以元素下边还在文档流中的元素会自动向上移动。
浮动元素的特点:
- 浮动元素会完全脱离文档流,不再占据文档流中的位置;
- 设置浮动以后元素会向父元素的左侧或右侧移动;
- 浮动元素默认不会从父元素中移出;
- 浮动元素向左或向右移动时,元素的最左边或最右边不会超过(一般是指水平方向)它前边的的其他浮动元素;
- 如果浮动元素的上边是一个没有浮动的块元素,则浮动元素无法上移;
- 浮动元素不会超过(一般是指垂直方向的高度)它上边的浮动的兄弟元素,最多就是和它一样高;
**简单总结:**浮动目前来讲它的主要工作就是让页面中的元素可以水平排列,通过浮动可以制作一些水平方向的布局。
DOCTYPE html>
<html lang="en">
<head>
    <meta charset="UTF-8">
    <title>Documenttitle>
    <style>
        .box1{
            width: 200px;
            height: 200px;
            background-color: orange;
            float: left;
        }
        .box2{
            width: 500px;
            height: 200px;
            background-color: red;
            float: left;
        }
        .box3{
            width: 100px;
            height: 200px;
            background-color: #bfa;
            float: right;
        }
    style>
head>
<body>
    <div class="box1">div>
    <div class="box2">div>
    <div class="box3">div>
body>
html>
23.1、浮动的其它特点
- 浮动元素不会盖住文字,文字会自动环绕在浮动元素的周围,所以我们可以利用浮动来设置文字环绕图片的效果;
- 元素设置浮动以后,将会从文档流中脱离,脱离了文档流的元素的一些特点也会发生变化:
- 块元素
- 块元素不在独占页面的一行;
- 脱离文档流以后,块元素的宽度和高度默认都被内容撑开;
- 行内元素:
- 行内元素脱离文档流以后会变成块元素,特点和块元素一样;
- 块元素
- 即脱离文档流以后,不需要在区分块元素和行内元素了;
24、高度塌陷问题
在浮动布局中,父元素的高度默认是被子元素撑开的,当子元素浮动后,完全脱离文档流,子元素从文档流中脱离后将会无法撑起父元素的高度,导致父元素的高度丢失。父元素高度丢失以后,其下的元素会自动上移,导致页面的布局混乱,所以高度塌陷是浮动布局比较常见的问题,这个问题我们必须进行处理。
24.1、高度塌陷_BFC
**BFC(Block Formatting Context)块级格式化环境:**BFC是一个CSS中的一个隐含属性,可以为一个元素开启BFC,开启BFC后该元素会变成一个独立的布局区域。
元素开启BFC后的特点:
- 开启BFC的元素会不被浮动元素所覆盖;
- 开启BFC的元素的子元素和父元素的外边距不会重叠;
- 开启BFC的元素可以包含浮动的子元素;
开启元素BFC的一些特殊方式:
- 设置元素的浮动(不推荐);
- 将元素设置为行内块元素(不推荐);
- 将元素的overflow设置为一个非visible的值,常用的方式,为元素设置overflow=hidden即可开启BFC,以使其可以包含浮动元素。
DOCTYPE html>
<html lang="zh">
<head>
    <meta charset="UTF-8">
    <title>高度塌陷title>
    <style>
        .outer{
            border: 10px orange solid;
            /* 通过设置浮动开启BFC */
            /* float: left; */
            /* 将元素转换为行内块元素开启BFC */
            /* display: inline-block; */
            /* 设置元素的overflow来开启BFC(推荐使用) */
            overflow: auto;
        }
        .inner{
            width: 200px;
            height: 200px;
            background-color: #bfa;
            float: left;
        }
        .box1{
            width: 300px;
            height: 300px;
            background-color: yellowgreen;
        }
    style>
head>
<body>
    <div class="outer">
        <div class="inner">div>
    div>
    <div class="box1">div>
body>
html>
24.2、高度塌陷_clear
如果我们不希望某个元素因为其他元素浮动的影响而改变位置,可以通过clear属性来清除浮动元素对当前元素所产生的影响。注意:这个规则只能影响使用的元素本身,不能影响其他元素。
clear:
- 作用:清除浮动元素对当前元素所产生的影响;
- 可选值:
- left,清除左侧浮动元素对当前元素的影响;
- right,清除右侧浮动元素对当前元素的影响;
- both,清除两侧中影响最大的那个元素;
- 原理:设置清除浮动以后,浏览器会自动为元素添加一个上外边距,以使其位置不会受到其他元素的影响;
clear
1
2
3
24.3、高度塌陷_after
可以通过after伪元素在div的后面进行更改,代码如下:
DOCTYPE html>
<html lang="en">
<head>
    <meta charset="UTF-8">
    <title>高度塌陷_aftertitle>
    <style>
        .outer{
            border: 10px red solid;
        }
        .inner{
            width: 200px;
            height: 200px;
            background-color: #bfa;
            float: left;
        }
        /*
        通过HTML结构来解决高度塌陷的问题,
        这种办法本身没有多大问题,只是HTML是负责页面的结构,页面的样式应该是由CSS来进行设置,所以这里不赞成适用这种方式。
        */
        .box1{
            clear: both;
        }
        /* 推荐使用如下方法 */
        /* 通过伪元素::after来最终完美的解决高度塌陷的问题 */
        .outer::after{
            content: '';
            clear: both;
            /* 伪元素after默认情况就是一个行内元素,所以这里还需要将其转换为块元素 */
            display: block;
        }
    style>
head>
<body>
    <div class="outer">
        <div class="inner">div>

    div>
body>
html>
24.4、clearfix
这个样式可以同时解决高度塌陷和外边距重叠的问题,当遇到这些问题时,直接使用clearfix这个类即可。
DOCTYPE html>
<html lang="en">
<head>
    <meta charset="UTF-8">
    <title>clearfixtitle>
    <style>
        .box1{
            width: 200px;
            height: 200px;
            background-color: #bfa;
        }
        .box2{
            width: 100px;
            height: 100px;
            background-color: yellowgreen;
            margin-top: 100px;
        }
        .clearfix::before,
        .clearfix::after{
            /* 下面两行解决外边距重叠问题 */
            content: '';
            display: table;
            /* 解决高度塌陷问题 */
            clear: both;
        }
    style>
head>
<body>
    <div class="box1 clearfix">
        <div class="box2">div>
    div>
body>
html>
25、元素定位
**定位(position):**定位是一种更加高级的布局手段,通过定位可以将元素摆放到页面的任意位置,使用position属性来设置元素的定位,其可选值如下:
- static,默认值,元素是静止的没有开启定位;
- relative,开启元素的相对定位;
- absolute,开启元素的绝对定位;
- fixed,开启元素的固定定位;
- sticky,开启元素的粘滞定位;
偏移量(offset):当元素开启了定位以后,可以通过变异量来设置元素的位置,值如下:
- top,定位元素与参照物的上边距离,正值,元素向下移动,负值,元素向上移动,其它的几个值类似;
- bottom,定位元素与参照物的下边距离,正值,元素向上移动,负值,元素向下移动;
- left,定位元素与参照物的左侧位置;
- right,定位元素与参照物的右侧位置;
定位元素垂直方向的位置由top和bottom两个属性来控制,通常情况下这两个值中我们只会选择其中之一,top值越大,定位元素越向下,bottom值越大,定位元素越向上;定位元素水平方向由left和right两个属性来控制,通常情况下在这两个属性中我们也只会使用一个,left值越大越靠右,right越大越靠左。
25.1、相对定位
当元素的position属性设置为relative时,则开启了元素的相对定位,其特点如下:
- 元素开启相对定位以后,如果不设置偏移量元素不会发生任何变化;
- 相对定位是参照于元素自身在文档流中的位置进行定位的;
- 相对定位会提升元素的层级(相对于没有设置相对定位的元素来说,会被设置了相对定位的元素所覆盖);
- 相对定位不会使元素脱离文档流;
- 相对定位不会改变元素的性质,块元素还是块元素,行内元素还是行内元素;
DOCTYPE html>
<html lang="en">
<head>
    <meta charset="UTF-8">
    <title>定位的简介title>
    <style>
        .box1,
        .box2,
        .box3{
            width: 200px;
            height: 200px;
            font-size: 50px;
        }
        .box1{
            background-color: #bfa;
        }
        .box2{
            background-color: orange;
            /* 通过相对定位,将box2元素移动到box1元素的后面 */
            position: relative;
            left: 200px;
            top: -200px;
        }
        .box3{
            background-color: yellow;
        }
    style>
head>
<body>
    <div class="box1">1div>
    <div class="box2">2div>
    <div class="box3">3div>
body>
html>
25.2、绝对定位
**绝对定位(absolute)(常用):**当元素的position属性值设置为absolute时,则开启了元素的绝对定位,绝对定位有如下特点:
- 开启绝对定位后,如果不设置偏移量元素的位置不会发生变化;
- 开启绝对定位后,元素会从文档流中脱离;
- 绝对定位会改变元素的性质,行内变块,块的宽高被内容撑开;
- 绝对定位会使元素提升一个层级;
- 绝对定位元素时相对于其包含块进行定位的;
包含块(containing block):
- 正常情况下包含块就是离当前最近的祖先块元素,如:
<div class="parent">
    <div class="child">

    div>
div>
像这种情况下,child的最近的祖先块元素就是parent,所以它的包含块就是parent;
- 绝对定位的包含块:包含块就是离它最近的开启了定位的祖先元素,如果所有的祖先元素都没有开启定位,则根元素(即HTML,也称根元素、初始包含块)就是它的包含块。
DOCTYPE html>
<html lang="en">
<head>
    <meta charset="UTF-8">
    <title>绝对定位title>
    <style>
        div{
            font-size: 50px;
        }
        .box1,.box2,.box3{
            width: 200px;
            height: 200px;

        }
        .box1{
            background-color: #bfa;
        }
        .box2{
            background-color: orange;
            position: absolute;
            left: 0px;
            top: 0px;
        }
        .box3{
            background-color: yellow;
        }
        .box4{
            width: 400px;
            height: 400px;
            background-color: violet;
            position: relative;
        }
        .box5{
            width: 300px;
            height: 300px;
            background-color: yellowgreen;
            position: relative;
        }
    style>
head>
<body>
    <div class="box1">1div>
    <div class="box4">
        4
        <div class="box5">
            5
            <div class="box2">2div>
        div>
    div>

    <div class="box3">3div>
body>
html>
25.3、固定定位
固定定位(fixed):将元素的position属性设置为fixed,则开启了元素的固定定位,固定定位也是一种绝对定位,所以固定定位的大部分特点和绝对定位一样,唯一不同的是固定定位永远参照于浏览器的视口进行定位,固定定位的元素不会随着网页的滚动条滚动;
数学中,通常以一条横轴(x轴)和一条纵轴(y轴)来表示平面中的任何一点,其中的圆点(O点)可以在任意地方。同样浏览器也是使用了类似的特点,不过浏览器通常是以浏览器页面窗口的左上角的横轴与纵轴作为X轴和Y轴的起始点(O点),从左上角向下,表示Y加大,左上角向右,表示X加大,而也左上角为圆点的坐标轴的平面就可以称为==视口==。
DOCTYPE html>
<html lang="en">
<head>
    <meta charset="UTF-8">
    <title>固定定位title>
    <style>
        body{
            height: 2000px;
        }
        .box1{
            font-size: 50px;
            width: 200px;
            height: 200px;
            background-color: #bfa;
            /* 设置固定定位后,元素不会随着页面的滚动而滚动 */
            position: fixed;
        }

    style>
head>
<body>
    <div class="box1">1div>
body>
html>
25.4、粘滞定位
**粘滞定位(sticky):**当元素的position属性设置为sticky时,则开启了元素的粘滞定位,粘滞定位和相对定位的特点基本一致,不同的是粘滞定位可以在元素到达某个位置时将其固定住,因为兼容性不好,作为了解即可。
position: sticky;
top: 100px;  /*当元素随着页面的滚动到达距离页面100像素时,将其固定住*/
25.5、绝对定位元素的布局
当我们开启了绝对定位后,元素的水平方向的布局等式就需要添加left和right两个值,此时规则和之前一样只是多添加了两个值:
left + margin-left + border-left + padding-left + width +
padding-right + border-right + margin-right + right = 父元素内容区宽度
当发生过渡约束时,如果这9个值中没有auto,自自动调整right的值以使等式满足,如果有auto,则自动调整auto的值以使等式满足,可以设置auto的值有:margin、width、left、right。因为left和right的值默认是auto,所以如果不知道left和right且等式不满足时,会自动调整这两个值。
与文档流中的元素不同的是,垂直方向布局的等式也必须满足:
top + margin-top/bottom + padding-top/bottom + border-top/bottom + bottom = 等于包含块的高度
即垂直方向的9个属性也必须满足以上等式。
DOCTYPE html>
<html lang="en">
<head>
    <meta charset="UTF-8">
    <title>绝对定位元素的布局title>
    <style>
        .box1{
            width: 500px;
            height: 500px;
            background-color: #bfa;
            /* 开启相对定位 */
            position: relative;
        }
        .box2{
            /* 注意,如果要将width的值设置为auto,必须要先将left与right的值设置为0px */
            /* width: auto; */
            width: 200px;
            height: 200px;
            background-color: orange;
            /* 开启绝对定位 */
            position: absolute;
            /* 通过以下margin-left/right的的设置为auto,可以使元素水平居中,但是left与right的值必须设置 */
            margin-left: auto;
            margin-right: auto;
            left: 0px;
            right: 0px;
            /* 通过以下margin-top/bottom的值设置为auto,可以使元素垂直居中,但是top与bottom的值必须设置 */
            margin-top: auto;
            margin-bottom: auto;
            top: 0px;
            bottom: 0px;
            /* 通过以上的设置,可以使一个元素再其父元素中居中 */
        }
    style>
head>
<body>
    <div class="box1">
        <div class="box2">div>
    div>
body>
html>
25.6、元素的层级
对于开启了定位的元素,可以通过z-index属性来指定元素的层级,z-index需要一个整数作为参数,值越大,元素的层级越高,元素的层级越高,越优先显示。如果元素的层级一样,则优先显示靠下(HTML结构中)的元素,祖先元素的层级再高也不会盖住后代元素。
DOCTYPE html>
<html lang="en">
<head>
    <meta charset="UTF-8">
    <title>元素的层级title>
    <style>
        div{
            font-size: 40px;
        }
        .box1,.box2,.box3{
            width: 200px;
            height: 200px;
        }
        .box1{
            background-color: #bfa;
            position: absolute;
            z-index: 1;
        }
        .box2{
            background-color: rgba(255, 0, 0, .3);
            position: absolute;
            top: 50px;
            left: 50px;
            z-index: 0;
        }
        .box3{
            background-color: yellow;
            position: absolute;
            top: 100px;
            left: 100px;
            z-index: 3;
        }
        .box4{
            width: 100px;
            height: 100px;
            background-color: orange;
        }
    style>
head>
<body>
    <div class="box1">1div>
    <div class="box2">2div>
    <div class="box3">
        3
        <div class="box4">4div>
    div>
body>
html>
26、字体族
字体的相关样式:
color 设置字体的颜色
font-size 设置字体大小,与font-size相关的单位:
	em 相当于当前元素的一个font-size;
	rem 相当于根元素的一个font-size;
font-family 字体族(字体的格式),指定字体的类别。浏览器会自动使用该类别下的字体,可选值如下:
	serif   衬线字体;
	sans-serif 非衬线字体;
	monospace 等宽字体;
font-family 可以同时指定多个字体,多个字体间使用英文,号隔开,字体生效时,优先使用第一个,第一个无法使用则使用第二个,依次类推。如:font-family: 'Courier New', Courier, monospace;
指定客户端所使用的字体:
/*
font-face可以将服务器中的字体直接提供给用户去使用
使用这中方式指定指定,会有两个问题:
	1. 页面加载速度;
	2. 版权;
	3. 字体格式(ttf、woff);
*/
@font-face {
    /* font-family 是你给字体取的名字,这个只要符合标识符命名规则即可 */
    font-family: 'myFont';
    /* 服务器中字体的路径 */
    src: url('./font/xxxx.ttf');
}
p{
    /* 通过上面的定义,这里我们就可以使用自定义在服务器中的字体 */
    font-family: myFont;
}
26.1、图标字体简介
**图标字体(iconfont):**在网页中经常需要使用一些图标,可以通过图片来引入图标,但是图片大小本身比较大,并且非常不灵活,所以在使用图标时,我们还可以将图标直接设置为字体,然后通过font-face的形式来对字体进行引入,这样我们就可以通过使用字体的形式来使用图标了。
fontawesome使用步骤:
-
下载 官网:https://www.fontawesome.com 中文网:https://fa5.dashgame.com/#/
-
解压
-
将css和webfonts移动到项目中
-
使用图标字体;直接通过类名来使用图标字体:
class = "fas fa-bell";
class = "fab fa-accessible-icon";
DOCTYPE html>
<html lang="en">
<head>
    <meta charset="UTF-8">
    <title>图标字体title>
    <link rel="stylesheet" href="./fontawesome/css/all.css">
    <style>
        .fa-bell{
            font-size: 60px;
            color: yellowgreen;
        }
        .fa-accessible-icon{
            font-size: 60px;
            color: blue;
        }
    style>
head>
<body>
    <i class="fas fa-bell">i>
    <i class="fab fa-accessible-icon">i>
body>
html>
26.2、图标字体的使用
通过伪元素来设置图标字体:
-
找到要设置图标图标的元素通过before或after选中;
-
在content中设置字体的编码;
-
设置字体的样式:
fab: font-family: 'Font Awesome 5 Brands'; fas: font-family: 'Font Awesome 5 Free'; font-weight: 900; -
通过实体来使用图标字体:
&#x图标的编码;
DOCTYPE html>
<html lang="en">
<head>
<meta charset="UTF-8">
<title>图标字体的使用title>
<link rel="stylesheet" href="./fontawesome/css/all.css">
<style>
li{
list-style: none;
}
li::before{
content: '\f1b0';
/* 注意,这里的font-family雨font-weight是必须的,缺一不可。 */
/* font-family: 'Font Awesome 5 Brands'; */
font-family: 'Font Awesome 5 Free';
font-weight: 900;
}
.fa-dog{
font-size: 100px;
}
style>
head>
<body>
<i class="fas fa-dog">i>
<i style="font-size: 40px;">i>
<ul>
<li>锄禾日当午,li>
<li>汗滴禾下土。li>
<li>谁知盘中餐,li>
<li>粒粒皆辛苦。li>
ul>
/*这里的类fas必须写,如果不写是不会生效的*/
<span class="fas">span>
body>
html>
26.3、iconfont
注意:在选择图标的时候要选择单色图标库,将下载下来的文件解压后,文件里面的所有文件都复制到项目文件中,然后在style标签中使用link标签去引入iconfont.css即可。
DOCTYPE html>
<html lang="en">
<head>
<meta charset="UTF-8">
<title>阿里云字体库title>
<link rel="stylesheet" href="./font_aliyun/iconfont.css">
<style>
*{
margin: 0px;
padding: 0px;
}
.iconfont{
font-size: 50px;
color: red;
}
p::before{
content: '\e619';
font-family: 'iconfont';
font-size: 40px;
}
style>
head>
<body>
<i class="iconfont">i>
<i class="iconfont icon-Android">i>
<i class="iconfont icon-BugIt">i>
<p>图形表p>
body>
html>
26.4、行高
行高(line height):行高指的是文字占有的实际高度。可以通过line-height来设置行高且当行高的值与其父元素的高度值一样时,这时单行文字在一个元素中会垂直居中,行高可以直接指定一个大小(单位:px、em),也可以直接为行高设置一个整数,如果是一个整数的话,行高将会是字体的指定的倍数。
行高经常还用来设置文件的行间距,行间距 = 行高 - 字体大小。字体框就是字体存在的格子,设置font-size实际上就是在设置字体框的高度,行高会在字体框的上下平均分配。
DOCTYPE html>
<html lang="en">
<head>
    <meta charset="UTF-8">
    <title>行高title>
    <style>
        div{
            /* 设置容器div的高度为500px,宽度为默认值auto */
            font-size: 50px;
            height: 500px;
            border: 1px orange solid;
            /* 将文本垂直居中 */
            /* line-height: 500px; */
            /* line-height的默认值是1.33 */
            /* 这时的行高为font-size的一倍,即50px。如果是2则是font-size的两倍,即100px */
            line-height: 2;
            /* 注意:line-height指定的是一行的的高度,而不是一个容器中多行的高度。多行高度之间的行间距=行高-字体大小*/
        }
    style>
head>
<body>
    <div>今天天气真不错。good nice.今天天气真不错。good nice.今天天气真不错。good nice.今天天气真不错。good nice.div>

body>
html>
26.5、字体的简写属性
font可以设置字体的相关属性,语法如下:
font: [font-style] [font-weight] font-size[/line-height] font-family;
其中的带方括号的属性值可以省略不写,且前面的font-style与font-weight顺序可以颠倒,但是后面的font-size与font-family必须写且顺序不能颠倒,每个属性之间使用空格隔开。
注意:使用font简写设置字体属性时,如果其中的一些属性没写,则会使用默认值normal,且normal可能会覆盖前面已经设置了的相关属性,如font-style、font-weight、line-height。
**font-weight 字重 **字体的加粗,可选值如下:
- normal,默认值,不加粗;
- bold,加粗;
- 100 ~ 900 九个级别(基本没用);
font-style 字体风格,可选值如下:
- normal,正常的;
- italic,斜体;
DOCTYPE html>
<html lang="en">
<head>
    <meta charset="UTF-8">
    <title>字体的简写属性title>
    <style>
        div{
            /* font-size: 50px;
            font-family: 微软雅黑, Arial, "Helvetica Neue", Helvetica, sans-serif; */
            /* 通过font属性的简写,使用下面的一行就可以代替上面的两行 */
            /* font: 50px 微软雅黑, Arial, "Helvetica Neue", Helvetica, sans-serif; */

            /* 将字体font-weight=bold、font-style=italic、font-size=50px、line-height=2、font-family:微软雅黑 */
            font: bold italic 50px/2 微软雅黑, Arial, "Helvetica Neue", Helvetica, sans-serif;
        }
    style>
head>
<body>
    <div>今天天气真不错 Hello Hello.div>
body>
html>
26.6、文本的水平与垂直对齐
**text-align **文本的水平对齐,可选值如下:
- left,左侧对齐;
- right,右对齐;
- center,居中对齐;
- justify,两端对齐;
vertical-align 设置元素垂直对齐,可选值如下:
- baseline,默认值,基线对齐;
- top,与父元素的顶部对齐;
- bottom,与父元素的底部对齐;
- middle,居中对齐(并不是实际意义上的居中);
- 可以直接指定值来设置居中,如:10px上移,10个像素,-10px,下移10px;
- 也可以使用vertical-align处理图片的基线问题;
DOCTYPE html>
<html lang="en">
<head>
    <meta charset="UTF-8">
    <title>字体的水平与垂直对齐title>
    <style>
        div{
            width: 500px;
            border: 1px solid orange;
            /* 水平方向对齐 */
            /* text-align: center; */
            font-size: 50px;
        }
        /* 垂直方向对齐 */
        span{
            font-size: 20px;
            border: 1px blue solid;
        }
        /* 图片的基线 */
        p{
            border: 1px solid orange;
        }
        /* 处理图片的基线 */
        img{
            /* top、middle、bottom这三个值都可以,但是不能是baseline。 */
            vertical-align: top;
        }
    style>
head>
<body>

    <div>今天天气Hello<span>真不错hellospan>div>


    <p>
        <img src="../exercise/img/01/1.jpg" alt="">
    p>
body>
html>
26.7、文本的其他样式
text-decoration: 设置文本修饰,可选值如下:
- none,默认值,什么都没有;
- underline,下划线;
- line-through,删除线;
- overline,上划线;
text-decoration: underline;
使页面中多余的信息以点的形式显示:
white-space: 设置网页如何处理空白,可选值如下:
- normal,正常;
- nowrap,不换行;
- pre,保留空白,即,源代码中有多少空格,浏览器解析的时候就会显示多少空格;
DOCTYPE html>
<html lang="en">
<head>
    <meta charset="UTF-8">
    <title>文本的其他样式title>
    <style>
        .box1{
            text-decoration: line-through;

            /* text-decoration可以使用新的语法,但是这种在IE中不支持,在Chrome和Firefox中都可以。 */
            /* 即设置了红色的点点下滑线 */
            text-decoration: underline red dotted;
        }
        /* 将box2中未显示的信息以点点的形式隐藏。 */
        .box2{
            width: 200px;
            white-space: nowrap;
            overflow: hidden;
            text-overflow: ellipsis;
        }
    style>
head>
<body>
    <div class="box1">今天气真不错。div>
    <div class="box2">Lorem, ipsum dolor sit amet consectetur adipisicing elit. Similique, hic ad tempora recusandae nesciunt dignissimos excepturi repellendus eos distinctio nostrum tenetur est, autem iste voluptatum possimus quam debitis accusamus rem?div>
body>
html>
27、背景
**background-color:**设置背景颜色;
background-color: red;
**background-image:**设置背景图片;
backgound-image: url("./img/1.png"); /*这里的路径最好使用引号包裹*/
- 可以同时设置背景图片和背景颜色,这样背景颜色将会成为图片的背景色;
- 如果背景的图片小于外面的容器元素,则背景图片会自动在元素中平铺,将容器元素铺满;
- 如果背景的图片大于外面的容器元素,则图片将会无法完全显示;
- 如果背景图片和外面的容器元素一样大,则会正常显示;
**background-repeat:**用来设置背景的重复方式,可选值如下:
- repeat,默认值,背景会沿着x轴、y轴双方向重复;
- repeat-x,沿着x轴方向重复;
- repeat-y,沿着y轴方向重复;
- no-repeat,背景图片不重复;
**background-position:**设置背景图片的位置,设置方式如下:
- 通过top、left、right、bottom、center几个表示方位的次来设置背景图片的位置,使用方位词时必须要同时指定两个值,如果值写一个则第二个默认就是center,例如:设置图片在右上角显示则为:background-position: top right; 在中间显示:background-position:center;
- 通过偏移量来指定背景图片的位置:水平方向偏移量 垂直方向的偏移量(偏移量可以为负值)。例如:background-position:10px 10px;
**background-clip:**设置背景的范围,可选值如下:
- border-box,默认值,背景会出现在边框的下边;
- padding-box,背景不会出现在边框的下边,只出现在内容区和内边距中;
- content-box,背景值会出现在内容区;
**background-origin:**背景图片偏移量的计算的点(原点),可选值如下:
- padding-box,默认值,background-position从内边距出开始计算;
- content-box,背景图片的偏移量从内容区处开始计算;
- border-box,背景图片的偏移量从边框处开始计算;
**background-size:**设置背景图片大小,
- 第一个值表示宽度;
- 第二个值表示高度;
- 如果只写一个,则第二个值默认是auto;
- 也可以只指定一个,cover图片的比例不变,将元素铺满(可能现实不完整);contain图片比例不变,将图片在元素中完整显示(容器元素不会完全铺满);
**background-attachment:**设置图片是否跟随元素移动,可选值如下:
- scroll,默认值,背景图片会跟随元素移动;
- fixed,背景图片会固定在页面中,不会随元素移动;
**background:**背景相关的简写属性,所有背景相关的样式都可以通过该样式来设置,并且该样式没有顺序要求,也没有那个属性是必须要写的。注意点:
- background-size必须写在background-position的后边,并且使用/号隔开,background-position/background-size;
- background-origin、background-clip这两个样式,origin要写在clip的前面;
练习
01_图片列表
DOCTYPE html>
<html lang="en">

<head>
    <meta charset="UTF-8">
    <title>图片列表title>
    <link rel="stylesheet" href="../../02_CSS/CSS/reset.css">
    <style>
        /* 设置页面背景颜色 */
        body {
            background-color: plum;
        }

        /* 设置图片列表容器大小、位置、溢出处理 */
        .img-list {
            width: 190px;
            height: 470px;
            margin: 50px auto;
            overflow: hidden;
            background-color: silver;
        }
        /* 设置图片之间的间距为9px,not(:last-child)除了最后一个不设置 */
        .img-list li:not(:last-child){
            margin-bottom:9px;
        }

        /* 设置图片大小 */
        .img-list .img-items img {
            width: 100%;
        }
    style>
head>

<body>
    <ul class="img-list">
        <li class="img-items">
            <a href="#">
                <img src="./img/1.jpg" alt="">
            a>
        li>
        <li class="img-items">
            <a href="#">
                <img src="./img/2.jpg" alt="">
            a>
        li>
        <li class="img-items">
            <a href="#">
                <img src="./img/3.jpg" alt="">
            a>
        li>
    ul>
body>

html>
02_京东左侧导航条
DOCTYPE html>
<html lang="en">
<head>
    <meta charset="UTF-8">
    <title>京东左侧导航条title>
    <link rel="stylesheet" href="../../02_CSS/CSS/reset.css">
    <style>
        body{
            background-color: rgb(255, 254, 254);
        }
        .wapper{
            width: 190px;
            height: 450px;
            background-color: rgb(250, 239, 250);
            padding: 10px 0px;
            /* 使整个边框居中 */
            margin: 50px auto;
        }
        .wapper .items{
            /*
            这里如果width不指定值,那么width的默认值为auto。
            这里使用auto是较好的选择,因为这样是浏览器自动进行计算的,如果将width设置为指定值,则可能会导致数据的溢出。
            */
            /* width: 172px; */
            height: 25px;
            /* 这里不能使用margin-left,因为如果使用margin,那么空出来的值属于父元素.wapper,不再是.items的区域。 */
            /* 设置items的右内边距,将文字向内移动。 */
            padding: 0px 0px 0px 18px;
            /* 让文字在父元素中垂直居中,只需要将父元素的line-height设置为一个与父元素height相同的值。 */
            line-height: 25px;
        }
        li span{
            font-size: 12px;
            padding: 0px 2px;
        }
        .items a{
            font-size: 14px;
            /* 去除超链接的下划线。 */
            /* text-decoration: none; */
        }
        /* 设置items的hover背景颜色。 */
        .items:hover{
            background-color: #f7b4b4;
        }
        /* 设置超链接的hover样式。 */
        .items a:hover{
            color: red;
        }
    style>
head>
<body>
    <ul class="wapper">
        <li class="items">
            <a href="#">家用电器a>
        li>
        <li class="items">
            <a href="#">手机a><span>/span>
            <a href="#">运营商a><span>/span>
            <a href="#">数码a>
        li>
        <li class="items">
            <a href="#">电脑a><span>/span>
            <a href="#">办公a>
        li>
        <li class="items">
            <a href="#">家居a><span>/span>
            <a href="#">家具a><span>/span>
            <a href="#">家装a><span>/span>
            <a href="#">厨具a>
        li>
        <li class="items">
            <a href="#">男装a><span>/span>
            <a href="#">女装a><span>/span>
            <a href="#">童装a><span>/span>
            <a href="#">内衣a>
        li>
        <li class="items">
            <a href="#">美妆a><span>/span>
            <a href="#">个人护肤a><span>/span>
            <a href="#">宠物a><span>/span>
        li>
        <li class="items">
            <a href="#">女鞋a><span>/span>
            <a href="#">箱包a><span>/span>
            <a href="#">钟表a><span>/span>
            <a href="#">珠宝a>
        li>
        <li class="items">
            <a href="#">男鞋a><span>/span>
            <a href="#">运动a><span>/span>
            <a href="#">户外a>
        li>
        <li class="items">
            <a href="#">房产a><span>/span>
            <a href="#">汽车a><span>/span>
            <a href="#">汽车用品a>
        li>
        <li class="items">
            <a href="#">母婴a><span>/span>
            <a href="#">玩具乐器a>
        li>
        <li class="items">
            <a href="#">食品a><span>/span>
            <a href="#">酒类a><span>/span>
            <a href="#">生鲜a><span>/span>
            <a href="#">特产a>
        li>
        <li class="items">
            <a href="#">艺术a><span>/span>
            <a href="#">礼品鲜花a><span>/span>
            <a href="#">农资绿植a>
        li>
        <li class="items">
            <a href="#">医药保健a><span>/span>
            <a href="#">计生情趣a>
        li>
        <li class="items">
            <a href="#">图书a><span>/span>
            <a href="#">文娱a><span>/span>
            <a href="#">教育a><span>/span>
            <a href="#">电子书a>
        li>
        <li class="items">
            <a href="#">机票a><span>/span>
            <a href="#">酒店a><span>/span>
            <a href="#">旅游a><span>/span>
            <a href="#">生活a>
        li>
        <li class="items">
            <a href="#">理财a><span>/span>
            <a href="#">众筹a><span>/span>
            <a href="#">白条a><span>/span>
            <a href="#">保险a>

        li>
        <li class="items">
            <a href="#">安装a><span>/span>
            <a href="#">维修a><span>/span>
            <a href="#">清洗a><span>/span>
            <a href="#">二手a>
        li>
        <li class="items">
            <a href="#">工业品a>
        li>
    ul>
body>
html>
03_网页新闻的右侧导航条
DOCTYPE html>
<html lang="en">
<head>
    <meta charset="UTF-8">
    <title>网页新闻的右侧导航条title>
    <link rel="stylesheet" href="../../02_CSS/CSS/reset.css">
    <style>
        .wapper{
            width: 300px;
            height: 323px;
            margin: 50px auto;
            border-top: 1px solid #DDDDDD;
        }
        .title{
            /* 为了边框和文字边框宽度一致,需要将h3转换为行内块元素。 */
            display: inline-block;
            /* 如果宽度不设置时,默认为auto,为了这里的特殊性,这里不设置width的固定值。*/
            /* width: 300px; */
            height: 42px;
            font-size: 16px;
            font-weight: bold;
            color: #404040;
            line-height: 42px;
            /* 通过margin-top将h3上移一个像素,盖住上边框。 */
            margin-top: -1px;
            /* 设置上边框 */
            border-top: tomato 1px solid;
        }
        /* 设置图片容器的高度 */
        .wapper-img{
            height: 150px;
        }
        h3{
            height: 40px;
            color: #fff;
            /* 加粗字体 */
            font-weight: bold;
            line-height: 40px;
            /* 将文字上移40个像素 */
            margin-top: -40px;
            padding-left: 30px;
        }
        .li-list{
            /* width: 300px; */
            height: 120px;
            margin-top: 12px;
        }
        .li-list .items{
            height: 30px;
            font-size: 14px;
            line-height: 30px;
        }
        /* 设置容器中超链接的颜色、下划线。 */
        .wapper a{
            text-decoration: none;
            color: #666;
        }
        /* 通过before伪元素为每一个li添加项目符号。 */
        li::before{
            content: '■';
            font-size: 12px;
            padding-right: 5px;
            color: rgba(0, 0, 0, .3)
        }
        .title a:hover, .li-list a:hover{
            color: red;
        }
    style>
head>
<body>
    <div class="wapper">
        <div class="title">
            <a href="#">科技a>
        div>
        <div class="wapper-img">
            <a href="#">
                <img src="./img/4.jpeg" alt="">
                <h3>阿里连发三封内部信,新年能治病?h3>
            a>
        div>
        <ul class="li-list">
            <li class="items">
                <a href="#">爆料:苹果MR设置不想涉足元宇宙a>
            li>
            <li class="items">
                <a href="#">数字人民币APP上架掀体验潮a>
            li>
            <li class="items">
                <a href="#">硅谷人:逃离大厂,拥抱Web3a>
            li>
            <li class="items">
                <a href="#">一切顺利!韦伯望远镜完成“完全部署”a>
            li>
        ul>
    div>
body>
html>
 保险


        安装/
        维修/
        清洗/
        二手


        工业品
03_网页新闻的右侧导航条
DOCTYPE html>
<html lang="en">
<head>
    <meta charset="UTF-8">
    <title>网页新闻的右侧导航条title>
    <link rel="stylesheet" href="../../02_CSS/CSS/reset.css">
    <style>
        .wapper{
            width: 300px;
            height: 323px;
            margin: 50px auto;
            border-top: 1px solid #DDDDDD;
        }
        .title{
            /* 为了边框和文字边框宽度一致,需要将h3转换为行内块元素。 */
            display: inline-block;
            /* 如果宽度不设置时,默认为auto,为了这里的特殊性,这里不设置width的固定值。*/
            /* width: 300px; */
            height: 42px;
            font-size: 16px;
            font-weight: bold;
            color: #404040;
            line-height: 42px;
            /* 通过margin-top将h3上移一个像素,盖住上边框。 */
            margin-top: -1px;
            /* 设置上边框 */
            border-top: tomato 1px solid;
        }
        /* 设置图片容器的高度 */
        .wapper-img{
            height: 150px;
        }
        h3{
            height: 40px;
            color: #fff;
            /* 加粗字体 */
            font-weight: bold;
            line-height: 40px;
            /* 将文字上移40个像素 */
            margin-top: -40px;
            padding-left: 30px;
        }
        .li-list{
            /* width: 300px; */
            height: 120px;
            margin-top: 12px;
        }
        .li-list .items{
            height: 30px;
            font-size: 14px;
            line-height: 30px;
        }
        /* 设置容器中超链接的颜色、下划线。 */
        .wapper a{
            text-decoration: none;
            color: #666;
        }
        /* 通过before伪元素为每一个li添加项目符号。 */
        li::before{
            content: '■';
            font-size: 12px;
            padding-right: 5px;
            color: rgba(0, 0, 0, .3)
        }
        .title a:hover, .li-list a:hover{
            color: red;
        }
    style>
head>
<body>
    <div class="wapper">
        <div class="title">
            <a href="#">科技a>
        div>
        <div class="wapper-img">
            <a href="#">
                <img src="./img/4.jpeg" alt="">
                <h3>阿里连发三封内部信,新年能治病?h3>
            a>
        div>
        <ul class="li-list">
            <li class="items">
                <a href="#">爆料:苹果MR设置不想涉足元宇宙a>
            li>
            <li class="items">
                <a href="#">数字人民币APP上架掀体验潮a>
            li>
            <li class="items">
                <a href="#">硅谷人:逃离大厂,拥抱Web3a>
            li>
            <li class="items">
                <a href="#">一切顺利!韦伯望远镜完成“完全部署”a>
            li>
        ul>
    div>
body>
html>
