机器学习——集成学习实验
实验名称:实验四、集成学习
一、实验目的
(1)掌握 AdaBoost 算法、随机森林算法的基本原理;
(2)掌握 AdaBoost 算法实现和使用方法、以及随机森林算法的使用方法。
二、实验内容
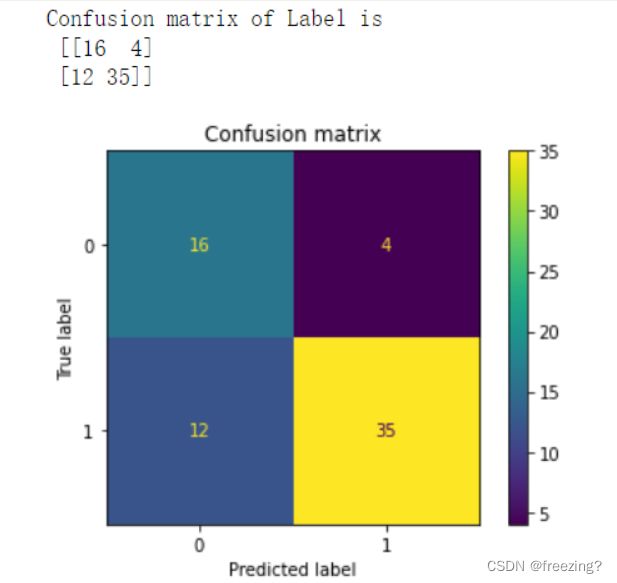
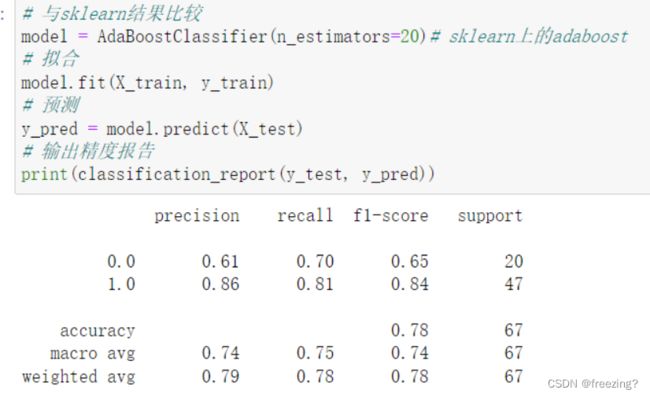
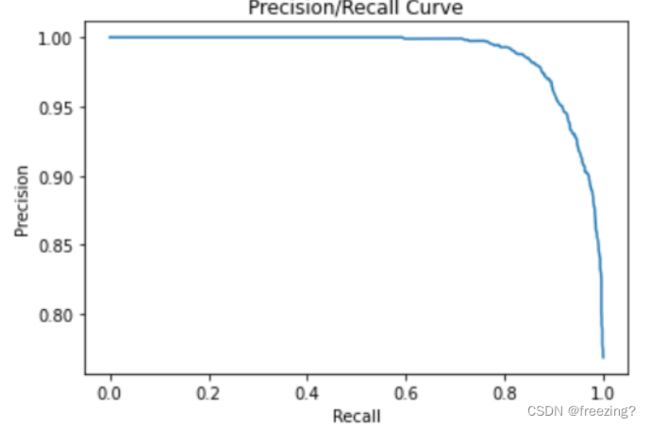
\1. 使用 Python 语言实现 AdaBoost 算法,在马氙气数据集(horseColicTest.txt,horseColicTraining.txt)上训练一个集成分类器,估计马疝气的死亡率。要求:输出混淆矩阵,计算查准率、查全率和 F1 度量,并绘制 P-R 曲线。
说明:数据集 horseColicTraining.txt 的最后一列为马的类别:1—仍存活,0—未能存活。
\2. 使用第三方模块 sklearn 中的随机森林分类器 RandomForestClassfier 为两栖动物数据集(Electrical-Grid-Data.csv)实现一个分类模型,并完成数据分析任务。要求:
1)使用数据集的 75%作为训练数据,25%作为测试数据;
2)对基础决策树的个数(假定为 50,100, 300)和每个基础决策树的深度(假定为 3, 5, 7, 9)使用网格搜索方法(使用类GridSearchCV);
3)输出混淆矩阵,计算查准率、查全率和 F1 度量,并绘制 P-R 曲线和 ROC 曲线。
说明:数据集的最后一列为电网稳定类别。
三、实验代码和过程
(1)
1、导入库
import numpy as np
from matplotlib import pyplot as plt
from sklearn.ensemble import AdaBoostClassifier
from sklearn.metrics import confusion_matrix, ConfusionMatrixDisplay, precision_score, recall_score, \
    f1_score, classification_report
from sklearn.tree import DecisionTreeClassifier
2、将数据转为数字,分割特征和标签
def loadDataSet(filename):
    # 获取每个样本的维度(包括标签)
    dim = len(open(filename).readline().split('\t'))
    # 特征
    data = []
    # 标签
    label = []
    fr = open(filename)
    for line in fr.readlines():  #一行行的读取
        # 空列表,用来存放每一行数据
        LineArr = []
        # 以tab键划分,去除掉每个的空格
        curline = line.strip().split('\t')
        for i in range(dim-1):
            LineArr.append(float(curline[i]))
        data.append(LineArr)
        # 最后一列
        label.append(float(curline[-1]))

    # 返回特征和标签
    return data,label
3、加载数据集
X_train,y_train = loadDataSet("horseColicTraining.txt")
X_test,y_test = loadDataSet("horseColicTest.txt")
print(np.shape(X_train)) # (299, 21)
print(np.shape(X_test)) # (67, 21)
print(np.shape(y_train)) # (299,)
print(np.shape(y_test)) # (67,)
4、弱分类器,决策树
clf_tree = DecisionTreeClassifier(max_depth = 2, random_state = 42)
5、AdaBoost算法
def My_Adaboost(X_train,Y_train, X_test,Y_test, M=20, weak_clf=DecisionTreeClassifier(max_depth = 3)):
    n_train, n_test = len(X_train), len(X_test) # n_train=299,训练样本个数;n_test=67,测试样本个数
    # 初始化权重w
    w = np.ones(n_train) / n_train # ones生成全1数组 D = (w11,w12,...,w1N),w1i = 1 / N,i=1,2,..,N
    pred_train, pred_test = [np.zeros(n_train), np.zeros(n_test)] # 生成空列表
    for i in range(M):    # M为基学习器个数
        # 使用特定权重拟合分类器
        weak_clf.fit(X_train, Y_train, sample_weight = w) # 用训练器数据拟合分类器模型
        pred_train_i = weak_clf.predict(X_train) # 预测(-1/1)
        pred_test_i = weak_clf.predict(X_test)

        # miss相当于I(Gm(x)!=y),I为指示函数;pred_train_i相当于Gm(x)
        miss = [int(x) for x in (pred_train_i != Y_train)] # pred_train_i != Y_train:x=0;pred_train_i == Y_train:x=1
        print("weak_clf_%02d train acc: %.4f"% (i + 1, 1 - sum(miss) / n_train))
        # 基学习器Gm(x)
        # err_m = w * I(Gm(x)!=y),I为指示函数,err_m相当于分类误差率em
        # 错分率=分类错误样本权之和(经过归一化)
        err_m = np.dot(w, miss) # 矩阵乘积
        # Gm(x)的系数:Alpha_m,即最终集成使用的的基学习器的权重
        alpha_m = 0.5 * np.log((1 - err_m) / float(err_m))
        # 更新训练样本的权重,if x==1返回x,else 返回-1
        miss2 = [x if x==1 else -1 for x in miss] # miss2 = -1 * y_i * G(x_i) = 1 / -1
        w = np.multiply(w, np.exp([float(x) * alpha_m for x in miss2])) #multiply()函数对应元素相乘
        w = w / sum(w)

        # 添加到prediction
        pred_train_i = [1 if x == 1 else -1 for x in pred_train_i] # 返回-1/1
        pred_test_i = [1 if x == 1 else -1 for x in pred_test_i]
        # 组合分类器,构建最终的分类器线性组合f(x),pred_train = f(x)
        pred_train = pred_train + np.multiply(alpha_m, pred_train_i)
        pred_test = pred_test + np.multiply(alpha_m, pred_test_i)

    # 当x>0,sign(x)=1;当x=0,sign(x)=0; 当x<0, sign(x)=-1
    pred_train = (pred_train > 0) * 1 # * 1 是为了将True/False变成1/0
    pred_test = (pred_test > 0) * 1
    # 训练精度
    print("Accuracy of train is",sum(pred_train == y_train) / n_train)
    # 测试精度
    print("Accuracy of test is",sum(pred_test == y_test) / n_test)

    return  pred_train,pred_test
6、预测测试集标签
y_train_pred,y_test_pred = My_Adaboost(X_train,y_train, X_test,y_test, M=20, weak_clf=DecisionTreeClassifier(max_depth = 2))
7、输出混淆矩阵
cm = confusion_matrix(y_test,y_test_pred) # 混淆矩阵
print("Confusion matrix of Label is \n",cm)
# confusion_matrix(混淆矩阵), display_labels(标签名称列表)
disp = ConfusionMatrixDisplay(confusion_matrix=cm, display_labels=['0','1'])
# 画出混淆矩阵
disp.plot()
plt.title("Confusion matrix")
# 保存
plt.savefig("Confusion_matrix")
# 显示
plt.show()
8、绘制P-R曲线
def PR_curve(y,pred):
    # pos为真实的正例标签个数
    pos = np.sum(y == 1)
    # 从大到小排序
    pred_sort = np.sort(pred)[::-1]
    # 从大到小排序的索引
    index = np.argsort(pred)[::-1]
    y_sort = y[index]

    # Precision
    Pre = []
    # Recall
    Rec = []
    for i, item in enumerate(pred_sort):
        if i == 0:
            # 因为计算precision的时候分母要用到i,当i为0时会出错,所以单独列出
            Pre.append(0)
            Rec.append(0)
        else:
            # Precision = TP / TP + FP,i = TP + FP,预测为1的个数
            Pre.append(np.sum((y_sort[:i] == 1)) /i)
            # Recall = TP / TP + FN
            Rec.append(np.sum((y_sort[:i] == 1)) / pos)

    # 画图
    # 横坐标Rec,纵坐标pre
    plt.plot(Rec, Pre, 'r')
    plt.title('Precision/Recall Curve')
    plt.xlim([-0.01, 1.01])
    plt.ylim([-0.01, 01.01])
    plt.ylabel('Precision')
    plt.xlabel('Recall')
    # 保存
    plt.savefig("P_R_Curve")
    plt.show()
from sklearn.metrics import precision_recall_curve

precision, recall, threshold = precision_recall_curve(y_test, y_test_pred,pos_label=1)
fig = plt.figure()
plt.plot(precision, recall, label='Horse Colic')

plt.xlabel('Recall')
plt.ylabel('Precision')
plt.legend()
(2)
1、导入库
import pandas as pd
from matplotlib import pyplot as plt
import seaborn as sns
from sklearn import preprocessing
from sklearn.ensemble import RandomForestClassifier
from sklearn.metrics import confusion_matrix, ConfusionMatrixDisplay, accuracy_score, precision_score, recall_score, \
    f1_score, precision_recall_curve
from sklearn.model_selection import train_test_split, GridSearchCV
2、数据处理,sep表示用逗号","分割数据
data  = pd.read_csv('Electrical Grid Data.csv',sep=',')
print(data)
3、查看各列相关性,p1 = abs(p2 + p3 + p4),p1和p2、p3和p4为负相关
corr = data.corr()
corr.head()
sns.heatmap(corr,xticklabels=corr.columns.values,yticklabels=corr.columns.values)
plt.savefig("Correlation")
plt.show()
4、将标签字符转换成数字
# 获取一个LabelEncoder
enc = preprocessing.LabelEncoder()
# 训练LabelEncoder,'unstable'对应1, 'stable'对应0
enc=enc.fit(['unstable', 'stable'])
# 使用训练好的LabelEncoder对原数据进行编码
y = enc.transform(y)
5、划分训练集和训练集
X_train, X_test, y_train, y_test = train_test_split(X, y, test_size=0.25, random_state=0)
6、随机森林模型
# 配置参数
param = {'n_estimators':list((50,100,300)),'max_depth':list((3,5,7,9)),'criterion':['gini','entropy']}
# 随机森林模型
forest = RandomForestClassifier(param)
# 用GridSearchCV进行调参
gsearsh = GridSearchCV(estimator=forest,param_grid=param,n_jobs=-1).fit(X_train, y_train)
7、预测
# 对y_test进行预测
y_pred = rfc.predict(X_test)
# predict_proba返回的是对于预测为0/1的概率
y_proba = rfc.predict_proba(X_test)
# 正例的概率
y_scores = y_proba[:,1]
8、输出并绘制混淆矩阵
# 输出混淆矩阵,混淆矩阵格式如下:
# [TN FP]
# [FN TP]
cm = confusion_matrix(y_test,y_pred)
print("Confusion matrix is \n",cm)
# confusion_matrix(混淆矩阵), display_labels(标签名称列表)
disp = ConfusionMatrixDisplay(confusion_matrix=cm, display_labels=['0','1'])
disp.plot()
plt.title("Confusion matrix")
plt.savefig("Confusion_matrix")
plt.show()
9、绘制P-R曲线
precision, recall, thresholds = precision_recall_curve(y_test, y_scores)
plt.figure("P-R Curve")
plt.title('Precision/Recall Curve')
plt.xlabel('Recall')
plt.ylabel('Precision')
plt.plot(recall,precision)
plt.savefig("P_R_Curve")
plt.show()
10、绘制ROC曲线
# 绘制ROC曲线
from sklearn import metrics
# 计算不同阈值下,fpr和tpr的组合值,其中fpr表示1-Specificity,tpr表示Sensitivity
fpr,tpr,threshold = metrics.roc_curve(y_test, y_scores)

# 计算AUC的值
roc_auc = metrics.auc(fpr,tpr)
# 绘制面积图
plt.stackplot(fpr, tpr, color='steelblue', alpha = 0.5, edgecolor = 'black')
# 添加边际线
plt.plot(fpr, tpr, color='black', lw = 1)
# 添加对角线
plt.plot([0,1],[0,1], color = 'red', linestyle = '--')
# 添加文本信息
plt.text(0.5,0.3,'ROC curve (area = %0.2f)' % roc_auc)
# 添加x轴与y轴标签
plt.xlabel('1-Specificity')
plt.ylabel('Sensitivity')
# 显示图形
plt.show()


