为JETSON TX2开发板部署YoloV5
- 参考资料一:nvidia为JETSON Tx2编译的pytorch
- 参考资料二:Jetson软件包下载
- 参考资料三:Tx2安装工具的使用
- 参考资料四: Jetson烧录工具
- 参考资料五: B站下载的行人视频
一、升级TX2系统版本到最新版(JetPack4.6)
- 我拿到的板子的版本太低了,在工作的过程中会有很多问题,因此要先升级到最新版
- 下载参考资料四中的烧录工具,在
Ubuntu18.04中安装,只能,必须,一定是Ubuntu18.04 - 安装完成后使用非root用户启动
SDK Manger,登录Nvidia账户 - 关机之后按住电源键(POWER BTN),然后在按REC键,接着按一下RST键就会进入恢复模式。
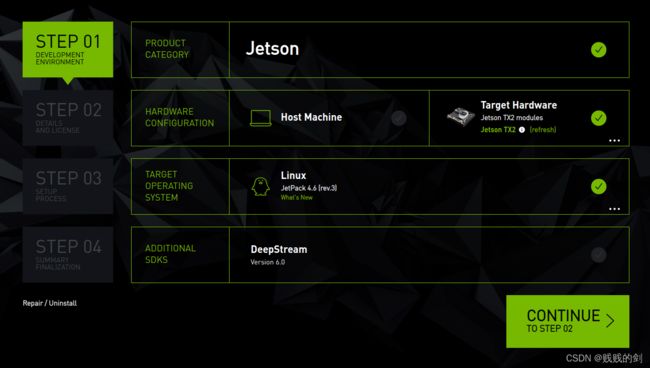
- 参照下图进行选择

- 点击之后会先烧录系统,系统烧录完成TX2会重启。请重启之后换掉系统中的源,之后执行
sudo apt-get update升级一下
deb http://mirrors.tuna.tsinghua.edu.cn/ubuntu-ports/ bionic-updates main restricted universe multiverse
#deb-src http://mirrors.tuna.tsinghua.edu.cn/ubuntu-ports/ bionic-updates main restricted universe multiverse
deb http://mirrors.tuna.tsinghua.edu.cn/ubuntu-ports/ bionic-security main restricted universe multiverse
#deb-src http://mirrors.tuna.tsinghua.edu.cn/ubuntu-ports/ bionic-security main restricted universe multiverse
deb http://mirrors.tuna.tsinghua.edu.cn/ubuntu-ports/ bionic-backports main restricted universe multiverse
#deb-src http://mirrors.tuna.tsinghua.edu.cn/ubuntu-ports/ bionic-backports main restricted universe multiverse
deb http://mirrors.tuna.tsinghua.edu.cn/ubuntu-ports/ bionic main universe restricted
#deb-src http://mirrors.tuna.tsinghua.edu.cn/ubuntu-ports/ bionic main universe restricted
二、编译安装Pytorch
注:这一部分没有成功,但还是记录一下
YoloV5的官方要求是Python>=3.7.0,PyTorch>=1.7.但是打开参考资料一发现,所有提供的pytorch版本的python都是3.6的,这就不满足YoloV5的运行要求。因此准备使用源代码编译的方式进行安装。
之前安装Pytorch都是先安装conda然后再安装pytorch,所以这个思路也被放到了TX2上,工作完全做完之后发现浪费了好多时间。
2.1 安装conda
- conda从2021年4月份发布的版本开始有aarch64构架,但是它的python的3.9版本,太新了。越新的东西需要解决的问题就更高。因此我们用miniconda来安装即可。我这里选择python3.7中的
Miniconda3 Linux-aarch64 64-bit文件,只有100.9MiB。BUT,根本装不上!

- 查看了解压好的某个文件的构架,发现是
ARM aarch64,而TX2的是aarch64,这有啥区别? - 最后安装的是
archiconda3,这个直接上官网下载后安装就可以了。 - 安装完毕后关闭当前的终端重新开启一下新的,再往下操作。
2.2 编译安装pytorch
1. 源码拉取V1.7.1版本并下载第三方库
#!/usr/bin/env bash

while [ 1 ]
do
    git clone --recursive --branch v1.7.1 https://github.com/pytorch/pytorch
    [ "$?" = "0" ] && break
done

echo "clone finished"
cd pytorch
while [ 1 ]
do
   echo "submodule"
   git submodule update --init --recursive
   [ "$?" = "0" ] && break
done
- 将以上的命令保存成一个脚本文件,并使用
chmod +x filename来添加可执行权限 - 先执行命令
$ sudo nvpmodel -m 0 && sudo jetson_clocks,然后使用./filename来运行git脚本 - 脚本主要的工作在两个git上,由于国内访问github经常断线,因此用一个循环来实现,如果成功执行则退出while循环
2. 打补丁
diff --git a/aten/src/ATen/cpu/vec256/vec256_float_neon.h b/aten/src/ATen/cpu/vec256/vec256_float_neon.h
index cfe6b0ea0f..d1e75ab9af 100644
--- a/aten/src/ATen/cpu/vec256/vec256_float_neon.h
+++ b/aten/src/ATen/cpu/vec256/vec256_float_neon.h
@@ -25,6 +25,8 @@ namespace {
 //    https://bugs.llvm.org/show_bug.cgi?id=45824
 // Most likely we will do aarch32 support with inline asm.
 #if defined(__aarch64__)
+// See https://github.com/pytorch/pytorch/issues/47098
+#if defined(__clang__) || (__GNUC__ > 8 || (__GNUC__ == 8 && __GNUC_MINOR__ > 3))

 #ifdef __BIG_ENDIAN__
 #error "Big endian is not supported."
@@ -665,6 +667,7 @@ Vec256<float> inline fmadd(const Vec256<float>& a, const Vec256<float>& b, const
   return Vec256<float>(r0, r1);
 }

-#endif
+#endif /* defined(__clang__) || (__GNUC__ > 8 || (__GNUC__ == 8 && __GNUC_MINOR__ > 3)) */
+#endif /* defined(aarch64) */

 }}}
diff --git a/aten/src/ATen/cuda/CUDAContext.cpp b/aten/src/ATen/cuda/CUDAContext.cpp
index fd51cc45e7..e3be2fd3bc 100644
--- a/aten/src/ATen/cuda/CUDAContext.cpp
+++ b/aten/src/ATen/cuda/CUDAContext.cpp
@@ -24,6 +24,8 @@ void initCUDAContextVectors() {
 void initDeviceProperty(DeviceIndex device_index) {
   cudaDeviceProp device_prop;
   AT_CUDA_CHECK(cudaGetDeviceProperties(&device_prop, device_index));
+  // patch for "too many resources requested for launch"
+  device_prop.maxThreadsPerBlock = device_prop.maxThreadsPerBlock / 2;
   device_properties[device_index] = device_prop;
 }

diff --git a/aten/src/ATen/cuda/detail/KernelUtils.h b/aten/src/ATen/cuda/detail/KernelUtils.h
index 45056ab996..81a0246ceb 100644
--- a/aten/src/ATen/cuda/detail/KernelUtils.h
+++ b/aten/src/ATen/cuda/detail/KernelUtils.h
@@ -22,7 +22,10 @@ namespace at { namespace cuda { namespace detail {


 // Use 1024 threads per block, which requires cuda sm_2x or above
-constexpr int CUDA_NUM_THREADS = 1024;
+//constexpr int CUDA_NUM_THREADS = 1024;
+
+// patch for "too many resources requested for launch"
+constexpr int CUDA_NUM_THREADS = 512;

 // CUDA: number of blocks for threads.
 inline int GET_BLOCKS(const int64_t N) {
diff --git a/aten/src/THCUNN/common.h b/aten/src/THCUNN/common.h
index 69b7f3a4d3..85b0b1305f 100644
--- a/aten/src/THCUNN/common.h
+++ b/aten/src/THCUNN/common.h
@@ -5,7 +5,10 @@
   "Some of weight/gradient/input tensors are located on different GPUs. Please move them to a single one.")

 // Use 1024 threads per block, which requires cuda sm_2x or above
-const int CUDA_NUM_THREADS = 1024;
+//constexpr int CUDA_NUM_THREADS = 1024;
+
+// patch for "too many resources requested for launch"
+constexpr int CUDA_NUM_THREADS = 512;

 // CUDA: number of blocks for threads.
 inline int GET_BLOCKS(const int64_t N)
- 将上面的文件保存成
.patch的后缀名,并将其和下载的pytorch项目放到同一级文件夹下 - 执行命令
patch -d pytorch/ -p1 < xxx.patch打补丁
3. 安装依赖
sudo apt-get install python3-pip cmake libopenblas-dev libopenmpi-dev
pip3 install -r requirements.txt
pip3 install scikit-build
pip3 install ninja
4. 编译
- 进入下载好的pytorch目录执行
USE_NCCL=0 USE_DISTRIBUTED=0 USE_QNNPACK=0 USE_PYTORCH_QNNPACK=0 TORCH_CUDA_ARCH_LIST="10.0;10.1" PYTORCH_BUILD_VERSION=1.7.1 PYTORCH_BUILD_NUMBER=1 python3 setup.py install
- 将最后的
install改成bdist_wheel会生成安装文件 - 如果出现如下图所示的错误,那就只能手动去下载
third_party下的QNNPACK组件,然后放到相应的目录下。 - 下载的时候注意把pytorch的tag打到
v1.7.1
- 将所有提示的
third_party下缺失的组件放置完成后,重新执行上述命令 - 最后会报错
- 按照提示打开
CMakeError.log文件,发现文档的最后报错src.c:(.text+0x30):对‘vld1q_f32_x2’未定义的引用 - 最终查询得到
vld1q_f32_x2是在gcc10里面定义的,因此要先编译gcc10,这过程太繁杂了,所以先放弃这种安装方式
三. 安装官方的Pytorch1.7
编译安装的pytorch无法运行,那么只能先安装官方编译好的1.7版本,遇到问题再解决
- 下载参考资料一的
torch-1.7.0-cp36-cp36m-linux_aarch64.whl文件,由于要求的python版本是3.6,因此我们使用系统中自带的python。 - 打开
~/.bashrc文件,将安装Archiconda3时所加的最后几行注释 - 关闭当前终端并重新启动一个
- 使用
pip install --user torch-1.7.0-cp36-cp36m-linux_aarch64.whl命令安装,等安装完成后测试。发现torch能正常加载并且cuda也能正常使用
四. 安装YoloV5的依赖包
- 设置pip3的清华源。创建目录
mkdir ~/.pip,打开文件~/.pip/pip.conf并填入以下内容
[global]
index-url=https://pypi.tuna.tsinghua.edu.cn/simple
- 依次执行命令
pip3 install --upgrade pip
python -m pip install Cython scikit-build matplotlib numpy opencv-python PyYAML requests scipy tqdm tensorboard pandas seabornls
python -m pip install pillow --no-cache-dir
- 下载匹配的torchvision源码
#!/usr/bin/env bash
sudo apt-get install libavcodec-dev libavformat-dev libswscale-dev libfreetype6-dev
while [ 1 ]
do
   git clone -b v0.8.1 https://github.com/pytorch/vision torchvision
   [ "$?" = "0" ] && break
done
- 脚本开头安装必须的库文件
- 然后用循环实现代码的克隆以避免掉线的问题
- 进入torchvision目录后打开
setup.py文件,将version变量由0.8.0a0改成0.8.1 - 使用下面的命令进行编译与安装
sudo python setup.py install
五. 运行YoloV5测试
- 在b站下载了一段五分钟的行人视频进行测试
- 运行命令
python detect.py --view-img --source person.mp4
六、使用TensorRT加速
- 不加速的模型在进行1080p视频测试的时候只有15帧,这不满足使用要求,因此使用TensorRT以及修改参数大小进行模型的推理加速
1 代码修改
- 系统中自带的TensorRT的版本是
'8.0.1.6',这有时候会导致onnx文件生成错误,此时打开export.py文件,将if trt.__version__[0] == '7':中的7改为8,让代码走TensorRT的版本原本属于7的部分
2. 生成过程
1. 导出为TensorRT模型
python export.py --weights yolov5s.pt --include engine --imgsz 512 --device 0
- 据实验得到,将
imgsz的值改到512,可使1080p视频的单帧处理时间降到0.4秒以下,这样就达到了一秒25帧的目标 - 这一步将会生成一个
yolov5s.engine文件
2. 使用导出的模型
python detect.py --weights yolov5s.engine --source person.mp4 --view-img --imgsz 512
- 加载上一步生成的文件,将
imgsz的参数做相同的大小调整即可 - 在使用与不使用TensorRT做测试,时间消耗上基本差了一倍


