iOS应用组件化/模块化探究
组件化是近几年流行起的概念,它是当代码扩张到一定程度时,所采取的一种代码组织架构策略。阿里、蘑菇街等大厂也在近几年陆续完成了其代码组件化的过程。
提到组件化,给人的感觉似乎很高大上,很神秘的感觉。但是,正如大多数真正优秀的架构一样,组件化的代码实现并不是很困难。
本文主要在Casa的文章以及WeRead团队博客文章的基础上,对组件化思路和实现方式做一个总结。
组件 vs 模块
初次接触组件化,很容易混淆两个概念:组件 和 模块。
其实所谓“组件化”这个名词,个人认为是不恰当的。至于为什么,我们需要了解组件 和 模块的概念。
所谓组件(Component),应该是较小的功能块,其实现功能单一,组件间也没有太多通信的需求,而且组件并没有要求必须从主工程中分离作为单独的工程编译。组件用面向对象的思想实现即可。举例来说我们常用的网络组件AFNetWorking,图片下载SDWebImage,数据库操作FMDB,甚至是我们平常封装的一些UI控件(如MJRefresh),这些都可以看做是组件。
所谓模块(Module),是从更大粒度来(多是从业务层面)表示代码的范围,比如一个电商App,其可能的模块包括:商品展示模块,用户信息模块,购物车模块,支付模块,登录模块等。从这些模块分类中,公司可以将开发划分为不同的业务线,如商品展示团队,购物车团队,支付团队等。每个团队专注于自己的业务模块开发,各个团队维护自己的代码仓库,各自编译自己的模块工程。平常开发时互不搅和,直到需要联调时,各个模块才像插积木一样,组装成一个完整的App。
而所谓的模块化,就是将一个现有的工程,拆分成一个个可独立编译的子模块的过程,同时,需要提供一种机制,让各个模块间可以相互调用通信(你不可能指望仅一个登录模块就完成整个电商App的功能)。因此,这里的组件化,应该称作“模块(Module)化”更为恰当。关于这点,在WeRead团队博客文章以及阿里开源工程BeeHive中均有涉及。
但是,为了符合通常的称呼与行文方便,下面提到的“组件”和“模块”,都是指“模块(Module)”的意思。
为什么需要模块化
上面我们提到了电商App的例子,可能有的同学会觉得,商品展示,用户信息等功能为什么非要拆分成不同工程模块呢?都在同一个工程里面不是也可以吗?确实,当代码和团队还没膨胀到一定规模时,做模块化并不是必须的。但是,如果你的App膨胀到如淘宝手机客户端时,模块化,也许就是代码管理最优的选择。
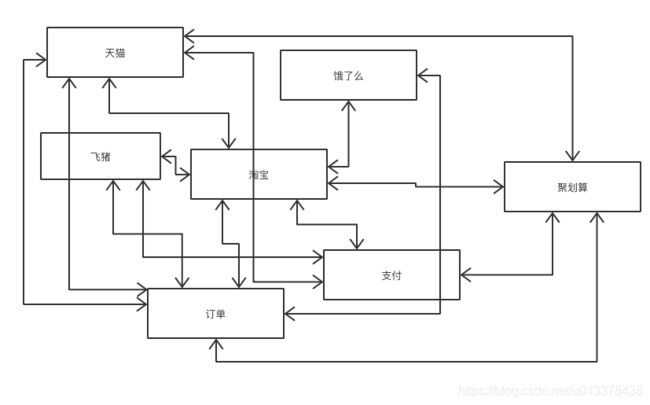
你会发现,在淘宝的首页里,还集成了天猫、聚划算、饿了么、飞猪旅行等入口。与其说淘宝App是一个App,不如说是一个App集合。而在这些App间,肯定是要相互通信的,最直白的就是从淘宝首页,可以跳转到任何一个子App,而从任何子App,又可以回到淘宝,同时,还有一些公用的模块,如支付,订单页(你在淘宝App中可以看到在饿了么,飞猪等下的订单)。这些公共模块和各个子App间,构成了复杂的关系网:
这一坨是什么鬼?!
如果按照上面这张关系图来编写有淘宝首页跳转到天猫,飞猪的代码,那么就需要这么写:
#import "TMallHomePageViewController.h"
#import "FlyPigHomePageViewController.h"
#import "TaoBaoHomePageViewController.h"

@implementation TaoBaoHomePageViewController
- (void)gotoTMall:(NSString *)userID {
    TMallHomePageViewController *tmallVC = [[TMallHomePageViewController alloc] initWithUserID:userID];
    [self.navigationController pushViewController:tmallVC];
}

- (void)gotoFlyPig:(NSString *)userID {
    FlyPigHomePageViewController *flyPigVC = [[FlyPigHomePageViewController alloc] initWithUserID:userID];
    [self.navigationController pushViewController:flyPigVC];
}
@end
可以看到,天猫和飞猪的代码完全暴露在淘宝的代码中,而这些,其实是和淘宝的业务逻辑不相干的。
而且,我们可以断定,在阿里内部,这些功能模块肯定不属于同一个业务部门,平常开发估计交集也不会太多,但如果我们将不同模块的代码直接揉在同一个工程里面的话,试想一下,每次饿了么部门的员工在编译工程的时候,还需要编译飞猪,天猫,聚划算等不相干的代码,心里想的一定是MMP。
除了严重影响不同业务部门代码的编译速度外,让这么多不同业务部门的代码都在一个工程里面管理,其维护成本/扩展性/测试都会是不小的问题。
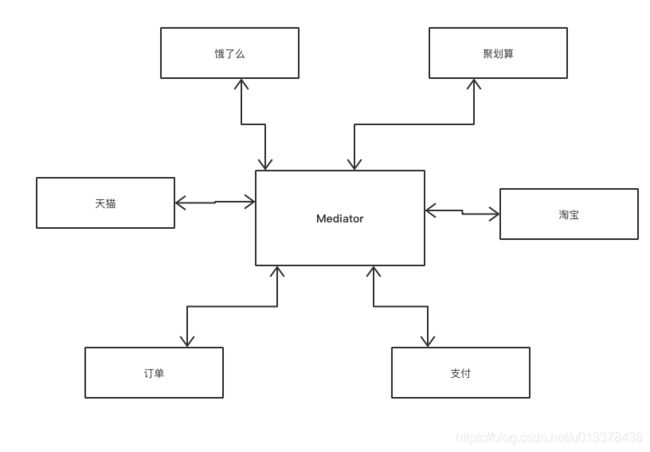
造成上面问题的根本原因在于,不同模块之间相互直接引用造成的代码耦合。如何解决这个问题?很自然的,我们想到了设计模式中的中介模式:
各模块间通过中介者Mediator通信,使得各个模块间没有直接的引用。而这,也就是模块化思想的核心。
虽然核心思想很简单,但是为了真正的实现模块化,我们还需要解决三个问题:
- Mediator如何调度不同的模块?
- 不同模块仅和Mediator通信,那不同模块又如何知道其他模块能够提供的接口(服务)?
- 从上图中可以看到,模块和Mediator之间是双向依赖的,模块还好,仅知道Mediator就行(这也是必须的)。但是对于Mediator来说,岂不是要知道所有的模块?如何避免让Mediator成为一个巨无霸?
其实问题1、3可以看做是同一个问题:Mediator和模块间的通信问题。
模块化方案
方案1
还是以淘宝App为例子,当引入了模块化思想后,模块间通过中介Mediator通信。我们把天猫、飞猪、淘宝分割成不同的模块。那么,通过淘宝首页进入天猫、飞猪的代码就可能是这样写:
Mediator:
// Mediator.m
#import "TMallComponent.h"
#import "FlyPigComponent.h"

@implementation Mediator
- (UIViewController *)HomePageForTmall:(NSString *)userID {
    return [TMallComponent homePage:userID];
}

- (UIViewController *)HomePageForFlyPig:(NSString *)userID {
    return [FlyPigComponent homePage:userID];
}
@end
天猫模块:
// TMallComponent.m
#import "Mediator.h"
#import "TMallHomePageViewController.h"

@implementation TMallComponent
+ (UIViewController *)homePage:(NSString *)userID {
    TMallHomePageViewController *vc = [[TMallHomePageViewController alloc] initWithUserID:userID];
    return vc;
}
@end
飞猪模块:
// FlyPigComponent.m
#import "Mediator.h"
#import "FlyPigHomePageViewController.h"

@implementation FlyPigComponent
+ (UIViewController *)homePage:(NSString *)userID {
    FlyPigHomePageViewController *vc = [[FlyPigHomePageViewController alloc] initWithUserID:userID];
    return vc;
}
@end
那么在淘宝首页的跳转响应函数应该这样写:
#import "Mediator.h"
#import "TaoBaoHomePageViewController.h"

@implementation TaoBaoHomePageViewController
- (void)gotoTMall:(NSString *)userID {
    UIViewController *tmallVC = [[Mediator sharedInstance] HomePageForTmall:userID];
    [self.navigationController pushViewController:tmallVC];
}

- (void)gotoFlyPig:(NSString *)userID {
    UIViewController *flyPigVC = [[Mediator sharedInstance] HomePageForFlyPig:userID];
    [self.navigationController pushViewController:flyPigVC];
}
@end
让我们从下往上看这段代码。可以看到,在淘宝的代码里面,已经看不到对天猫和飞猪相关代码的直接引用,而是统一借助于Mediator 。 这很好,符合我们的预期。
而天猫和飞猪相关业务代码都被拆分封装为对应的模块TmallComponent和FlyPigComponent,所有天猫和飞猪相关的业务代码都被封装到各自的模块里面,这样也不错。
让我们再把目光聚焦到Mediator中,在Mediator的实现中,引入了天猫和飞猪模块的头文件TMallComponent.h,FlyPigComponent.h。
也就是说,Mediator 必须知道每一个模块的存在,这就在模块和Mediator间产生了强耦合。这也是我们第一张关于Mediator结构图中存在的问题。
而这样做的缺点是:
- Mediator必须知道每一个模块以及模块所能够提供的所有接口,会使得Mediator变得十分臃肿甚至难以维护。(试想一下,如果你负责维护Mediator,你需要知道每个业务部门的业务接口逻辑,包括天猫、饿了么、飞猪、聚划算、淘宝… 是不是晕了)
- 由于Mediator与模块的强耦合性,导致每当模块添加或修改接口,都需要Mediator跟着变动,而Mediator又是所有模块都会引用到的一个中介,这么一个三天两头就会变化的Mediator,你用着不蛋疼?
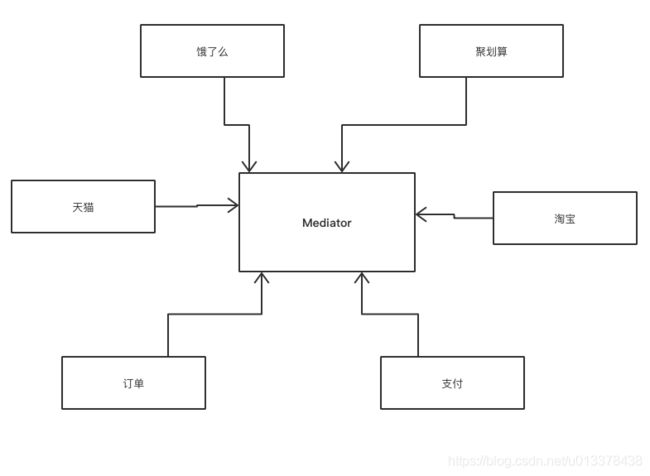
究其原因,是因为模块和Mediator间产生了强耦合。那么该如何设计?使得模块和Mediator的关系变为如下图所示?
业界给出了两种方式:
- 运用OC特有的语言机制,就是
runtime反射调用。 - 设计注册机制,每一个模块主动向
Mediator注册自己,在Mediator中统一通过抽象的Class类型来管理这些模块。用户通过模块对应的key向Mediator索要对应的模块,然后在Mediator外部自行调用模块的功能。
这两种方式,都可以使得Mediator不再关心具体的模块类型,使得Mediator的实现与模块解耦。
runtime反射调用方案
runtime反射调用方案,可以说是充分利用了Objective-C语言的运行时特性,来将各模块和Mediator进行解耦。根据OC的运行时特点,我们可以通过字符串反射的方式,获取类、类对象以及调用方法。
利用了反射后,我们需要修改的仅是Mediator。案例1中的代码我可以做如下改写:
Mediator:
// Mediator.m
#import
@implementation Mediator
- (UIViewController *)HomePageForTmall:(NSString *)userID {
    Class cls = NSClassFromString(@"TMallComponent");
    id obj = [[cls alloc] init];
    return [obj performSelector:@selector(homePage:) withObject:@{kUserID:userID}];
}

- (UIViewController *)HomePageForFlyPig:(NSString *)userID {
    Class cls = NSClassFromString(@"FlyPigComponent");
    id obj = [[cls alloc] init];
    return [obj performSelector:@selector(homePage:) withObject:@{kUserID:userID}];
}
@end
可以看到,在Mediator中,已经不需要再引用TMallComponent和FlyPigComponent的头文件,而是引入了runtime.h 。Mediator 已经不需要再关心TMall和FlyPig的具体类型,而是统一用Class和id代替,Mediator 与模块间做到了解耦。
不过,这仅仅是来演示如何通过runtime反射机制进行解耦的。如果需要真正在项目中应用,还需要对我们的代码再进行设计一下。
上面的代码的缺点在于:虽然形式上Mediator 和模块实现了解耦,但是在Mediator 的实现中,还是需要知道模块的名称,以及对应接口的名称及参数。这是一种伪解耦。有没有什么好的方法,使得Mediator 仅专注于runtime反射的实现,而不去关心其具体的类名,方法名呢?
方法当然是有的,Casa就在反射机制的基础上,写了一套模块化开源库-CTMediator。写的很漂亮,核心代码也就才200多行。大道至简,也就是这个道理吧。
这里说一下CTMediator的核心思路。
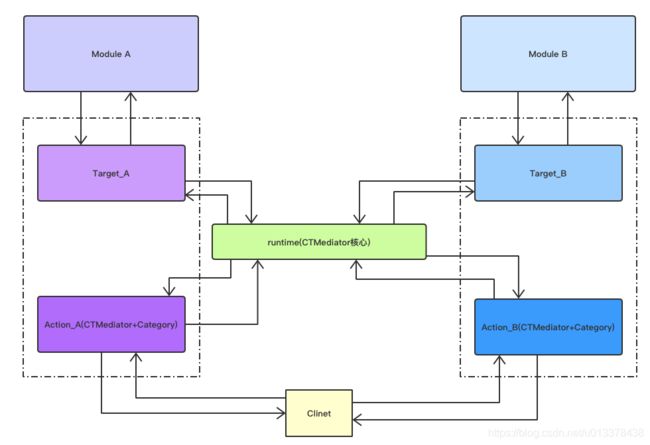
CTMediator被分成两大部分:
- CTMediator核心,负责runtime反射的核心实现,不需要引入其他模块任何内容。
- CTMediator的Category们,这些分类是跟模块走的,有几个模块,就应该有几个Category。Category用于告诉调用者该模块可以提供哪些功能,在CTMediator库中,所提供的这些功能被称为
action。Category会调用CTMediator核心的runtime接口,将任务发送到对应的target。
2.1 为了能够让CTMediator Category中能够真正调用到对应模块的功能,每个模块还会提供一个对应的target。target和模块是强耦合的,target会直接引用模块中的类型和接口。
整体上,CTMediator采用了target-action的模式:
每个模块或target-action的负责人,根据该模块能够提供的具体功能,编写对应的CTMediator 的Category。这称为action,即我能够做什么。 而与Category配套的,还需要提供一个和模块具体相关的target,target会具体调用到模块的类型及接口。
用户调用action,最终会由target来响应。而连接action和target调用的,则是由CTMediator核心提供的runtime 接口。因为action是CTMediator的分类,因此可以用self 的形式来调用这些核心接口
让我们来看一下Casa给出的demo代码:
Client调用action 接口:
// DemoViewController.m
 UIViewController *viewController = [[CTMediator sharedInstance] CTMediator_viewControllerForDetail];

        // 获得view controller之后,在这种场景下,到底push还是present,其实是要由使用者决定的,mediator只要给出view controller的实例就好了
        [self presentViewController:viewController animated:YES completion:nil];
Action 实现:
// CTMediator+CTMediatorModuleAActions.m

NSString * const kCTMediatorTargetA = @"A";
NSString * const kCTMediatorActionNativFetchDetailViewController = @"nativeFetchDetailViewController";

- (UIViewController *)CTMediator_viewControllerForDetail
{
	// 注意,这里是调用CTMediator核心的runtime反射接口performTarget
    UIViewController *viewController = [self performTarget:kCTMediatorTargetA
                                                    action:kCTMediatorActionNativFetchDetailViewController
                                                    params:@{@"key":@"value"}
                                         shouldCacheTarget:NO
                                        ];
    if ([viewController isKindOfClass:[UIViewController class]]) {
        // view controller 交付出去之后,可以由外界选择是push还是present
        return viewController;
    } else {
        // 这里处理异常场景,具体如何处理取决于产品
        return [[UIViewController alloc] init];
    }
}
Target 实现:
#import "Target_A.h"
#import "DemoModuleADetailViewController.h"

typedef void (^CTUrlRouterCallbackBlock)(NSDictionary *info);

@implementation Target_A

- (UIViewController *)Action_nativeFetchDetailViewController:(NSDictionary *)params
{
    // 因为action是从属于ModuleA的,所以action直接可以使用ModuleA里的所有声明
    DemoModuleADetailViewController *viewController = [[DemoModuleADetailViewController alloc] init];
    viewController.valueLabel.text = params[@"key"];
    return viewController;
}

@end
我们再来看一下CTMediator核心提供的runtime接口 :
- (id)performTarget:(NSString *)targetName action:(NSString *)actionName params:(NSDictionary *)params shouldCacheTarget:(BOOL)shouldCacheTarget
{
    NSString *swiftModuleName = params[kCTMediatorParamsKeySwiftTargetModuleName];

    // generate target
    NSString *targetClassString = nil;
    if (swiftModuleName.length > 0) {
        targetClassString = [NSString stringWithFormat:@"%@.Target_%@", swiftModuleName, targetName];
    } else {
        targetClassString = [NSString stringWithFormat:@"Target_%@", targetName];
    }
    NSObject *target = self.cachedTarget[targetClassString];
    if (target == nil) {
        Class targetClass = NSClassFromString(targetClassString);
        target = [[targetClass alloc] init];
    }

    // generate action
    NSString *actionString = [NSString stringWithFormat:@"Action_%@:", actionName];
    SEL action = NSSelectorFromString(actionString);

    if (target == nil) {
        // 这里是处理无响应请求的地方之一,这个demo做得比较简单,如果没有可以响应的target,就直接return了。实际开发过程中是可以事先给一个固定的target专门用于在这个时候顶上,然后处理这种请求的
        [self NoTargetActionResponseWithTargetString:targetClassString selectorString:actionString originParams:params];
        return nil;
    }

    if (shouldCacheTarget) {
        self.cachedTarget[targetClassString] = target;
    }

    if ([target respondsToSelector:action]) {
        return [self safePerformAction:action target:target params:params];
    } else {
        // 这里是处理无响应请求的地方,如果无响应,则尝试调用对应target的notFound方法统一处理
        SEL action = NSSelectorFromString(@"notFound:");
        if ([target respondsToSelector:action]) {
            return [self safePerformAction:action target:target params:params];
        } else {
            // 这里也是处理无响应请求的地方,在notFound都没有的时候,这个demo是直接return了。实际开发过程中,可以用前面提到的固定的target顶上的。
            [self NoTargetActionResponseWithTargetString:targetClassString selectorString:actionString originParams:params];
            [self.cachedTarget removeObjectForKey:targetClassString];
            return nil;
        }
    }
}
CTMediator核心 是通过NSString * 的形式,传入target和action的,因此,这里和具体的模块类型并没有耦合。同时,对于action的参数,则是以字典的形式传入。最后,还有一个BOOL 参数,说明target是否需要被cache起来,以备下次使用。
CTMediator核心接受这些字符串参数后,会利用runtime的反射机制,转换成实际的target和action:
// generate target
	...
	NSObject *target = self.cachedTarget[targetClassString];
    if (target == nil) {
        Class targetClass = NSClassFromString(targetClassString);
        target = [[targetClass alloc] init];
    }

 // generate action
    NSString *actionString = [NSString stringWithFormat:@"Action_%@:", actionName];
    SEL action = NSSelectorFromString(actionString);
最后CTMediator会调用safePerformAction:target:params:方法,来fire this action on target :
return [self safePerformAction:action target:target params:params];
- (id)safePerformAction:(SEL)action target:(NSObject *)target params:(NSDictionary *)params
{
    NSMethodSignature* methodSig = [target methodSignatureForSelector:action];
    if(methodSig == nil) {
        return nil;
    }
    const char* retType = [methodSig methodReturnType];

	// 对于通用返回类型,使用NSInvocation 来触发action
    if (strcmp(retType, @encode(void)) == 0) {
        NSInvocation *invocation = [NSInvocation invocationWithMethodSignature:methodSig];
        [invocation setArgument:¶ms atIndex:2];
        [invocation setSelector:action];
        [invocation setTarget:target];
        [invocation invoke];
        return nil;
    }

    if (strcmp(retType, @encode(NSInteger)) == 0) {
        NSInvocation *invocation = [NSInvocation invocationWithMethodSignature:methodSig];
        [invocation setArgument:¶ms atIndex:2];
        [invocation setSelector:action];
        [invocation setTarget:target];
        [invocation invoke];
        NSInteger result = 0;
        [invocation getReturnValue:&result];
        return @(result);
    }

    if (strcmp(retType, @encode(BOOL)) == 0) {
        NSInvocation *invocation = [NSInvocation invocationWithMethodSignature:methodSig];
        [invocation setArgument:¶ms atIndex:2];
        [invocation setSelector:action];
        [invocation setTarget:target];
        [invocation invoke];
        BOOL result = 0;
        [invocation getReturnValue:&result];
        return @(result);
    }

    if (strcmp(retType, @encode(CGFloat)) == 0) {
        NSInvocation *invocation = [NSInvocation invocationWithMethodSignature:methodSig];
        [invocation setArgument:¶ms atIndex:2];
        [invocation setSelector:action];
        [invocation setTarget:target];
        [invocation invoke];
        CGFloat result = 0;
        [invocation getReturnValue:&result];
        return @(result);
    }

    if (strcmp(retType, @encode(NSUInteger)) == 0) {
        NSInvocation *invocation = [NSInvocation invocationWithMethodSignature:methodSig];
        [invocation setArgument:¶ms atIndex:2];
        [invocation setSelector:action];
        [invocation setTarget:target];
        [invocation invoke];
        NSUInteger result = 0;
        [invocation getReturnValue:&result];
        return @(result);
    }

#pragma clang diagnostic push
#pragma clang diagnostic ignored "-Warc-performSelector-leaks"
	// 对于id类型,直接调用NSObject的runtime方法performSelector:withObject
    return [target performSelector:action withObject:params];
#pragma clang diagnostic pop
}
这就是CTMediator的整体架构。其优点在于,
- 充分利用了Objective-C语言的动态特性,使得CTMediator可以和各模块间充分解耦。
- CTMediator对于模块业务代码没有任何侵入,而是在模块中通过扩展分类的方式,实现CTMediaor与其他模块间的协作。(即每个模块必须提供自己的CTMediator Category action和 target。这里CTMediator Category其实不是必须的,但是由于CTMediator Category的存在,使得函数可以使用函数参数的方式传参,并使得各模块提供能接口易读性更强。在Category的内部,则可以将外部传入的参数转换为param字典的形式,来达到去model化的目的)。
- 不必在CTMediator中使用注册的方式来管理各个模块。
基于注册的方案
除了基于runtime反射机制的解耦方案,业界还有另一种思路来将Mediator和模块进行解耦:基于注册的方案。
所谓基于注册的模块化方案,核心思想是:在Mediator中,维护一个key-vaule形式的字典。模块所提供的所有服务(或称功能),作为key,而其真正提供服务的模块对象,则作为vaule。当客户需要特定服务时,只需要向Mediator输入对应的key,便可以得到其对应的服务对象。
基于注册方案的实现有,阿里开源库BeeHive,以及蘑菇街的模块化方案。
在基于注册的方案中,关键在于确定Mediator维护的key-vaule字典中,key和vaule应该使用什么形式。
一般的,都会选取Protocol *(也就是OC中的协议)作为key。因为Protocol天生就是具有说明接口的特性,用它来表示模块能够提供的服务,对OC用户来说,可读写性高而且符合OC程序员的使用习惯。(顺便说一下,在蘑菇街的方案中,还使用了URL作为key,用openURL的形式调用模块。首先,URL的可读性很差,而且在OC编程中,openURL常作为App之间的跨进程调用形式,如果作为App内部模块间调用用途,则会让用户感觉很奇怪。关于蘑菇街的方案,在其他博客里面也有很多的异议,因此,我们就干脆忽略掉URL的这种形式,而是主要以阿里开源库BeeHive作为讲解)
确定了key-vaule中key的形式,接下来就是vaule。vaule很简单,直接用Class类型来对应模块的类。当需要服务时,Mediator就根据所给的key,到其字典中找到对应的Class返回即可。而调用方(用户),则会将该Class实例化id obj = [[Class alloc] init],然后根据Protocol形式的key,调用obj相关的接口即可。
根据上面注册方案的核心思想,再回到我们开头淘宝的例子中。此时的Mediator需要提供注册模块和获取模块接口:
Mediator:
// Mediator

@interface Mediator()
@property(nonatomic, strong) NSMutableDictionary *serviceDict;
@end

@implementation Mediator
- (void)registerService:(Protocol *)proto forService:(Class)serviceClass {
    [self.serviceDict setObject:serviceClass forKey:NSStringFromProtocol(proto)];
}

- (Class)fetchService:(Protocol *)proto {
    return self.serviceDict[NSStringFromProtocol(proto)];
}
@end
TMall模块:
TMallComponentProtocol :
// TMallComponentProtocol
@protocol TMallComponentProtocol
- (UIViewController *)homePage:(NSString *)userID;
@end
TMallComponent(符合TMallComponentProtocol协议) :
// TMallComponent.m
#import "Mediator.h"
#import "TMallComponentProtocol.h"
#import "TMallHomePageViewController.h"

@implementation TMallComponent
// 添加initComponent接口,将自身注册到Mediator中
+ initComponent {
    [[Mediator shardInstance] registerService:@protocol(TMallComponentProtocol)  forService:[self class]];
}

- (UIViewController *)homePage:(NSString *)userID {
    TMallHomePageViewController *vc = [[TMallHomePageViewController alloc] initWithUserID:userID];
    return vc;
}
@end
FlyPig模块:
FlyPigComponentProtocol :
// FlyPigComponentProtocol
@protocol FlyPigComponentProtocol
- (UIViewController *)homePage:(NSString *)userID;
@end
FlyPigComponent(符合FlyPigComponentProtocol协议):
// FlyPigComponent.m
#import "Mediator.h"
#import "FlyPigComponentProtocol.h"
#import "FlyPigHomePageViewController.h"

@implementation FlyPigComponent
// 添加initComponent接口,将自身注册到Mediator中
+ initComponent {
    [[Mediator shardInstance] registerService:@protocol(FlyPigComponentProtocol)  forService:[self class]];
}

- (UIViewController *)homePage:(NSString *)userID {
    FlyPigHomePageViewController *vc = [[FlyPigHomePageViewController alloc] initWithUserID:userID];
    return vc;
}
@end
在淘宝首页跳转逻辑中,需要这样使用:
#import "Mediator.h"
#import "TMallComponentProtocol.h"
#import "FlyPigComponentProtocol.h"
#import "TaoBaoHomePageViewController.h"

@implementation TaoBaoHomePageViewController
- (void)gotoTMall:(NSString *)userID {
	Class cls = [[Mediator sharedInstance] fetchService:@protocol(TMallComponentProtocol)];
	id obj = [[cls alloc] init];
	UIViewController *tmallVC = [obj homePage:userID];
	if ([cls isKindofClass:[UIViewController class]]) {
			[self.navigationController pushViewController:tmallVC];
	}
}

- (void)gotoFlyPig:(NSString *)userID {
    Class cls = [[Mediator sharedInstance] fetchService:@protocol(FlyPigComponentProtocol)];
	id obj = [[cls alloc] init];
	UIViewController *flyPigVC = [obj homePage:userID];
	if ([cls isKindofClass:[UIViewController class]]) {
			[self.navigationController pushViewController:flyPigVC];
	}
}
@end
上面就是基于注册的模块化实现代码。可以看到,在Mediator中,并没有引入其他模块的头文件,实现了Mediator和模块间的彻底解耦。与runtime模式不同的是,注册模式的Mediator会返回一个符合某个service Protocol的对象,让用户在Mediator外面自行调用相关的服务。
说白了,基于注册的模块化方案,Mediator仅负责生成模块对象,至于模块对象所提供的服务,由用户自行调用。 这和基于runtime的CTMediator的实现思路有很大的区别。在CTMediator中采用了target-action的形式,用户仅需要调用action提供的接口,CTMediator会在内部通过runtime机制,自动定位到target并触发函数。也就是说,CTMediator的函数都是在CTMediator内部触发的,这也就给了CTMediator一个机会,可以统一的在内部处理异常情况。而基于注册的方案,由于是在Mediator外部由用户触发函数,因此是不能够在Mediator内部统一处理函数调用异常的。
基于注册的方案也有其优点:因为所有的模块都被注册到Mediator中,因此对于一些模块关心的系统或自定义事件,在Mediator中可以很方便的传递给每个模块。这其实就是设计模式中的观察者模式。而对于CTMediator而言,要实现这种全局的事件传递,必须要借助iOS的Notification机制才行。
我们来看一下阿里开源库BeeHive是如何实现注册型模块化的。
-
BeeHive将每个模块都抽象为一个对应的
Module,并且遵从BHModuleProtocol协议。这层Module是对模块的一层封装,同时,还用来接收来自Mediator发送给模块的事件。 -
针对每个模块能够提供的功能,这些可以提供的功能在BeeHive中被称作是service。这些service分别写做
XXServiceProtocol格式命名的协议,用来当做向Mediator注册的key,以及用来向其他模块作接口说明。 -
这些
XXServiceProtocol,还要对应具体的实现文件。如UserTrackServiceProtocol对应了BHUserTrackViewController。这种对应关系,需要注册到Mediator中。在BeeHive中,注册过程被称作注册Service,而Mediator被称作是BeeHive。
BeeHive提供了三种注册Service形式:
API形式
[[BeeHive shareInstance] registerService:@protocol(HomeServiceProtocol) service:[BHViewController class]];
BHService.plist注册
        HomeServiceProtocol
        BHViewController
还有一种更吊的方式,但是在Git的文档上没有提及。就是用编译命令,将Protocol和对应实现关系写到App 二进制文件的特定段中:
编译命令@BeeHiveService
// BHViewController.m
@BeeHiveService(HomeServiceProtocol,BHViewController)
关于编译命令的具体解释,可以参考这篇博客attribute
当通过把service注册到Mediator中后,用户就可以根据key获取对应的service了。
不过,你如果还想监听来自Mediator的事件的话,还需要将模块对应的遵从BHModuleProtocol协议的Module注册到Mediator中。
注册Module同样有三种形式:
静态注册
通过在BeeHive.plist文件中注册符合BHModuleProtocol协议模块类:

动态注册
在模块入口类实现中 使用BH_EXPORT_MODULE()宏声明该类为模块入口实现类。
@implementation HomeModule

BH_EXPORT_MODULE()  // 声明该类为模块入口

@end
展开宏定义后,其实是调用了BeeHive对应的注册Module接口:
#define BH_EXPORT_MODULE(isAsync) \
+ (void)load { [BeeHive registerDynamicModule:[self class]]; } \
-(BOOL)async { return [[NSString stringWithUTF8String:#isAsync] boolValue];}
编译命令@BeeHiveMod
// ShopModule.m
@BeeHiveMod(ShopModule)
BeeHive中Module和Service的关系:
这里要单独拎出来说一下。在BeeHive中,除了作为Mediator的BeeHive,还有两个比较重要的概念,就是Module和Service。Module是对具体模块的抽象,符合BHModuleProtocol协议。用来表示模块这一个大的概念。BeeHive中事件,也是通过Module传递给模块的,因此需要注册Module的步骤。相对于Module,Service则表示该模块能够对外提供的服务,Service应该是从属与Module的,但是这种从属关系,在官方文档中也没有给出特别的说明,因此在刚开始看BeeHive给出的demo程序时,会对Module和Service的关系及作用感到有些迷惑。Service在BeeHive中会通过注册Service的方式注册到BeeHive中,用户需要服务时,可以直接拿Service Protocol去向BeeHive要对应的Service的。或者,在Module内部,当特定的系统事件来临时,初始化对应的Service(并不是强制的)。
理清了Module和Service的关系,我们就来看用户是如何通过BeeHive调用模块的:
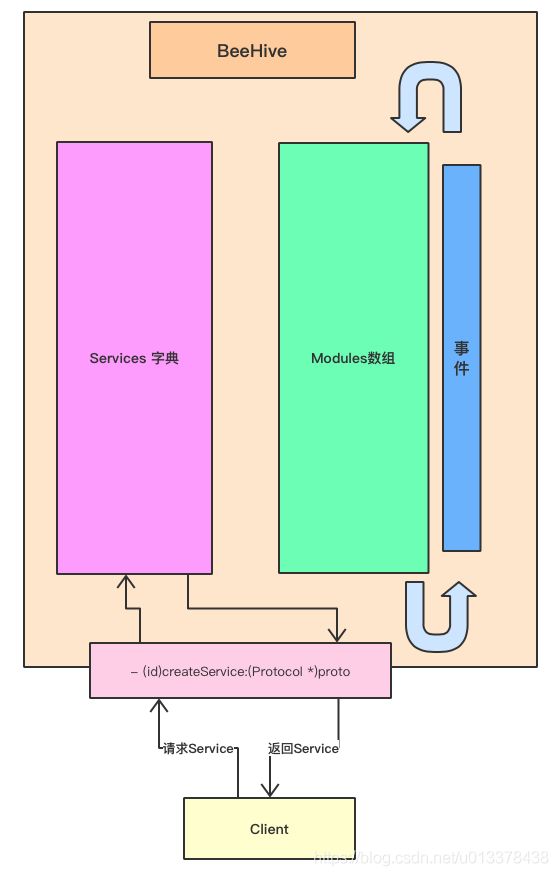
在BeeHive中,无论是对Module或Service的操作,对外统一的接口都是BeeHive对象。而在BeeHive内部,又关联了BHModuleManager和BHServiceManager来分别管理Module和Service。BeeHive更像是一个wrapper的存在。
我们来看一下实现的具体代码:
先注册Service,可以在Module的BHMSetupEvent事件中来注册本模块所提供的Service:
// TradeModule.m
- (void)modSetUp:(BHContext *)context
{
    [[BeeHive shareInstance]  registerService:@protocol(TradeServiceProtocol) service:[BHTradeViewController class]];

    NSLog(@"TradeModule setup");

}
Client 通过Protocol作为Key,向BeeHive索要对应的Service实例:
// BHViewController.m
 		id v2 = [[BeeHive shareInstance] createService:@protocol(TradeServiceProtocol)];
        if ([v2 isKindOfClass:[UIViewController class]]) {
            v2.itemId = @"sdfsdfsfasf";
            [self registerViewController:(UIViewController *)v2 title:@"交易2" iconName:nil];
        }
TradeServiceProtocol定义:
@protocol TradeServiceProtocol
@property(nonatomic, strong) NSString *itemId;
@end
对于用户来说,使用BeeHive就需要这些代码。
我们可以深入看一下BeeHive内部是如何register与create service的:
Register Service :
// BeeHive.m
- (void)registerService:(Protocol *)proto service:(Class) serviceClass
{
    [[BHServiceManager sharedManager] registerService:proto implClass:serviceClass];
}
// BHServiceManager.m
- (void)registerService:(Protocol *)service implClass:(Class)implClass
{
    NSParameterAssert(service != nil);
    NSParameterAssert(implClass != nil);

    if (![implClass conformsToProtocol:service]) {
        if (self.enableException) {
            @throw [NSException exceptionWithName:NSInternalInconsistencyException reason:[NSString stringWithFormat:@"%@ module does not comply with %@ protocol", NSStringFromClass(implClass), NSStringFromProtocol(service)] userInfo:nil];
        }
        return;
    }

    if ([self checkValidService:service]) {
        if (self.enableException) {
            @throw [NSException exceptionWithName:NSInternalInconsistencyException reason:[NSString stringWithFormat:@"%@ protocol has been registed", NSStringFromProtocol(service)] userInfo:nil];
        }
        return;
    }

    NSString *key = NSStringFromProtocol(service);
    NSString *value = NSStringFromClass(implClass);

    if (key.length > 0 && value.length > 0) {
        [self.lock lock];
        [self.allServicesDict addEntriesFromDictionary:@{key:value}];
        [self.lock unlock];
    }

}
Create Service:
// BeeHive.m
- (id)createService:(Protocol *)proto;
{
    return [[BHServiceManager sharedManager] createService:proto];
}
- (id)createService:(Protocol *)service
{
    return [self createService:service withServiceName:nil];
}

- (id)createService:(Protocol *)service withServiceName:(NSString *)serviceName {
    return [self createService:service withServiceName:serviceName shouldCache:YES];
}

- (id)createService:(Protocol *)service withServiceName:(NSString *)serviceName shouldCache:(BOOL)shouldCache {
    if (!serviceName.length) {
        serviceName = NSStringFromProtocol(service);
    }
    id implInstance = nil;

    if (![self checkValidService:service]) {
        if (self.enableException) {
            @throw [NSException exceptionWithName:NSInternalInconsistencyException reason:[NSString stringWithFormat:@"%@ protocol does not been registed", NSStringFromProtocol(service)] userInfo:nil];
        }

    }

    NSString *serviceStr = serviceName;
    if (shouldCache) {
        id protocolImpl = [[BHContext shareInstance] getServiceInstanceFromServiceName:serviceStr];
        if (protocolImpl) {
            return protocolImpl;
        }
    }

    Class implClass = [self serviceImplClass:service];
    if ([[implClass class] respondsToSelector:@selector(singleton)]) {
        if ([[implClass class] singleton]) {
            if ([[implClass class] respondsToSelector:@selector(shareInstance)])
                implInstance = [[implClass class] shareInstance];
            else
                implInstance = [[implClass alloc] init];
            if (shouldCache) {
                [[BHContext shareInstance] addServiceWithImplInstance:implInstance serviceName:serviceStr];
                return implInstance;
            } else {
                return implInstance;
            }
        }
    }
    return [[implClass alloc] init];
}
在BeeHive中,用户调用- (id)createService:(Protocol *)service 方法一定会Cache service实例的。因为最后- (id)createService:(Protocol *)service withServiceName:(NSString *)serviceName shouldCache:(BOOL)shouldCache这个方法里面shouldCache一定是YES。很奇怪,并不像CTMediator,shouldCache这个参数并没有暴露给最外层的调用者,这也许和BeeHive在阿里的具体应用场景有关吧?
上面,就是BeeHive代码的大体流程。里面有很多有趣的技巧值得学习,大家有兴趣的话去看看源码。
不过最后还是忍不住要吐槽一下,BeeHive现在到底有没有在维护啊?怎么给的工程都编译不过的??
总结
我们在本文中,了解了什么是模块化以及实现模块化的两种思路:基于runtime和基于注册的机制,并各自给出了对应的开源库分析。
其实通过本文就可以发现,模块化在代码实现的层面上,并不是很复杂。其实好的模式就应该是这样,上手不能让人有懵的感觉,不然为了理解这个模式就要花好大力气,那怎么能用好呢?让人懵的模式,多半不是好的模式。
模块化是一种思想,难的并不是代码实现,难点在于该如何划分模块,以及如何封装各个模块能够对外提供的service,这些需要程序员对工程有一个整体的认识,同时需要平日里对工程代码良好的设计和维护(不然就很难拆分成单独的模块)。这是编程外的功夫,需要我们平日里敲代码的时候,多想多看,不能够仅局限于自己负责的部分。
最后,再试着总结一下CTMediator和BeeHive这两个开源库的优缺点:
CTMediator
- CTMediator写的很简洁,代码很漂亮,核心代码也就200行多一点。
- 利用了OC语言runtime的特性,实现了Mediator与模块的完全解耦。
- 由于所有的Service都是通过
target-action方式在Mediator内部触发,因此Mediator可以对Service做全局的控制(如调用异常的统一处理等)。 - 不过正是因为这种完全解耦,使得Mediator根本不知道模块的存在。这样使得Mediator对于模块没有任何控制力,像一些需要全局模块间传递的事件,CTMediator就有些乏力。
target-action方式对于程序员封装接口的能力要求较高。当然这不是CTMediator本身的问题,如果用的好,CTMediator会很简洁,但是如果封装接口能力不强的话,很容易把CTMediator的核心思想target-action方式用跑偏。
BeeHive
- BeeHive基于注册的机制。需要将所有的Service注册到Mediator中,虽然由统一的基类来存储,做到了Mediator和模块的解耦,但是感觉还是没有runtime来得彻底。
- BeeHive中有Module的概念(模块)。Module会被注册到Mediator中,这就使得BeeHive对模块的把控力比CTMediator更强一些,容易做到模块间的消息传递。
- BeeHive由用户通过Protocol Key的方式获取对应的Service 实例,再由用户在Mediator外部触发需要的服务。这样做对于Service的接口设计要求会比CTMediator的Action来的低,更容易上手。但是缺点在于,BeeHive无法做到对Service接口的统一处理。

