使用 Mediapipe 和 Yolov5 进行多人姿态估计
介绍
基于图像和视频的人体姿态估计可以在许多应用中发挥重要作用,例如健身活动识别、肢体语言检测、手语识别、量化体育锻炼和全身手势控制。
MediaPipe Pose 是一种用于高保真人体姿态跟踪的机器学习解决方案,从 RGB 视频帧中推断出全身的 33 个 3D 地标和背景分割蒙版。不同姿势的分类也可以使用自定义对象检测模块来完成,但它需要大量数据并且训练将是耗时且复杂的。我们可以简单地使用 MediaPipe 中的关键点,并使用这些关键点通过简单的机器学习模型进行分类。
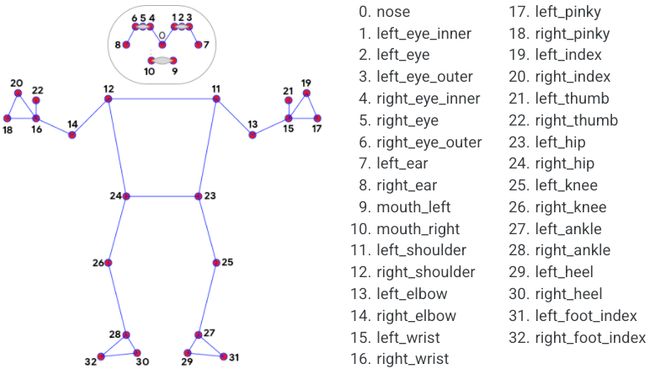
MediaPipe Pose 中的界标模型预测了 33 个姿势界标的位置,如下图所示。

33个被 MediaPipe 识别的姿势地标
问题陈述
在大多数情况下,使用 MediaPipe 的姿势估计效果非常好,但是当单个帧上有多个人时就会出现问题。在撰写本文时,MediaPipe 不支持多人姿态估计,但每个问题都有解决方案。
解决此问题的一种灵活方法是使用对象检测模型并获取帧中存在的多个人,然后估计每个人的姿势,最后将图像聚合到单个帧中。对于对象检测模型,将使用 YOLOv5 。
YOLOv5
YOLO 是“You only look once”的首字母缩写,是一种将图像划分为网格系统的对象检测算法。网格中的每个单元都负责检测自身内部的对象。由于其速度和准确性,YOLO 是最著名的对象检测算法之一。开源代码可在 Github (https://github.com/ultralytics/yolov5)上获得。
实施解决方案
要求
对于这个解决方案,我们将为 yolo、opencv 和 Mediapipe 使用 pytorch hub 模型。这些可以使用 pip 命令安装,如下所示:
pip install -qr https://raw.githubusercontent.com/ultralytics/yolov5/master/requirements.txt
pip install opencv-python mediapipe torch
代码
import os
import matplotlib.pyplot as plt

from PIL import Image
import cv2

import mediapipe as mp
from mediapipe.python.solutions import pose as mp_pose

#if you are using colab
from google.colab.patches import cv2_imshow

# PyTorch Hub
import torch

# Model
yolo_model = torch.hub.load('ultralytics/yolov5', 'yolov5s')

#since we are only intrested in detecting person
yolo_model.classes=[0]

mp_drawing = mp.solutions.drawing_utils
mp_pose =mp.solutions.pose

video_path ="/content/Best 3 Dancers In The World 2017 - Dytto, Poppin John Dance_Trim.mp4"

#get the dimension of the video
cap = cv2.VideoCapture(video_path)
while cap.isOpened():
    ret, frame = cap.read()
    h, w, _ = frame.shape
    size = (w, h)
    print(size)
    break

cap = cv2.VideoCapture(video_path)

#for webacam cv2.VideoCapture(NUM) NUM -> 0,1,2 for primary and secondary webcams..

#For saving the video file as output.avi
out = cv2.VideoWriter("output.avi", cv2.VideoWriter_fourcc(*"MJPG"), 20, size)
while cap.isOpened():
    ret, frame = cap.read()
    if not ret:
      break
    # Recolor Feed from RGB to BGR
    image = cv2.cvtColor(frame, cv2.COLOR_BGR2RGB)
    #making image writeable to false improves prediction
    image.flags.writeable = False

    result = yolo_model(image)

    # Recolor image back to BGR for rendering
    image.flags.writeable = True
    image = cv2.cvtColor(image, cv2.COLOR_RGB2BGR)
    # print(result.xyxy)  # img1 predictions (tensor)

    #This array will contain crops of images incase we need it
    img_list =[]

    #we need some extra margin bounding box for human crops to be properly detected
    MARGIN=10

    for (xmin, ymin, xmax,   ymax,  confidence,  clas) in result.xyxy[0].tolist():
      with mp_pose.Pose(min_detection_confidence=0.3, min_tracking_confidence=0.3) as pose:
        #Media pose prediction ,we are
        results = pose.process(image[int(ymin)+MARGIN:int(ymax)+MARGIN,int(xmin)+MARGIN:int(xmax)+MARGIN:])

        #Draw landmarks on image, if this thing is confusing please consider going through numpy array slicing
        mp_drawing.draw_landmarks(image[int(ymin)+MARGIN:int(ymax)+MARGIN,int(xmin)+MARGIN:int(xmax)+MARGIN:], results.pose_landmarks, mp_pose.POSE_CONNECTIONS,
                            mp_drawing.DrawingSpec(color=(245,117,66), thickness=2, circle_radius=2),
                            mp_drawing.DrawingSpec(color=(245,66,230), thickness=2, circle_radius=2)
                              )
        img_list.append(image[int(ymin):int(ymax),int(xmin):int(xmax):])
    # cv2_imshow(image)

    # writing in the video file
    out.write(image)

    ## Code to quit the video incase you are using the webcam
    # cv2.imshow('Activity recognition', image)
    # if cv2.waitKey(10) & 0xFF == ord('q'):
    #     break

cap.release()
out.release()
cv2.destroyAllWindows()
结果
请观看视频:https://youtu.be/7C6sAej0zlA
☆ END ☆
如果看到这里,说明你喜欢这篇文章,请转发、点赞。微信搜索「uncle_pn」,欢迎添加小编微信「 woshicver」,每日朋友圈更新一篇高质量博文。
↓扫描二维码添加小编↓
