- 深度学习模型性能全景评估与优化指南
niuTaylor
深度学习人工智能
深度学习模型性能全景评估与优化指南一、算力性能指标体系1.核心算力指标对比指标计算方式适用场景硬件限制TOPS(TeraOperationsPerSecond)每秒万亿次整数运算量化模型推理NVIDIAJetsonNano仅支持FP16/FP32TFLOPS(TeraFLoating-pointOPerationsperSecond)TFLOPS=Cores×FLOPs/Cycle×Frequen
- 利用Python和深度学习方法实现手写数字识别的高精度解决方案——从数据预处理到模型优化的全流程解析
快撑死的鱼
Python算法精解python深度学习开发语言
利用Python和深度学习方法实现手写数字识别的高精度解决方案——从数据预处理到模型优化的全流程解析在人工智能的众多应用领域中,手写数字识别是一项经典且具有重要实际应用价值的任务。随着深度学习技术的飞速发展,通过构建和训练神经网络模型,手写数字识别的精度已经可以达到99%以上。本文将以Python为主要编程语言,结合深度学习的核心技术,详细解析手写数字识别的实现过程,并探讨如何进一步优化模型以提高
- 强化学习中的深度卷积神经网络设计与应用实例
数字扫地僧
计算机视觉cnn人工智能神经网络
I.引言强化学习(ReinforcementLearning,RL)是机器学习的一个重要分支,通过与环境的交互来学习最优策略。深度学习,特别是深度卷积神经网络(DeepConvolutionalNeuralNetworks,DCNNs)的引入,为强化学习在处理高维度数据方面提供了强大工具。本文将探讨强化学习中深度卷积神经网络的设计原则及其在不同应用场景中的实例。II.深度卷积神经网络在强化学习中的
- 腾讯云大模型知识引擎与DeepSeek:打造懒人专属的谷歌浏览器翻译插件
大富大贵7
程序员知识储备1程序员知识储备2程序员知识储备3腾讯云云计算
摘要:随着人工智能技术的飞速发展,越来越多的前沿技术和工具已走入日常生活。翻译工具作为跨语言沟通的桥梁,一直处于技术创新的风口浪尖。本文探讨了腾讯云大模型知识引擎与DeepSeek结合谷歌浏览器插件的可能性,旨在为用户提供一种便捷、高效的翻译体验。通过应用深度学习、自然语言处理和知识图谱技术,该插件不仅能实时翻译网页内容,还能根据上下文进行智能推荐,实现精准的语境转换。本文将详细阐述其设计思路、技
- 【猫狗分类】Pytorch VGG16 实现猫狗分类1-数据清洗+制作标签文件
努力的小巴掌
pytorch分类项目pytorch分类人工智能
Pytorch猫狗分类用Pytorch框架,实现分类问题,好像是学习了一些基础知识后的一个小项目阶段,通过这个分类问题,可以知道整个pytorch的工作流程是什么,会了一个分类,那就可以解决其他的分类问题,当然了,其实最重要的还是,了解她的核心是怎么工作的。那首先,我们的第一个项目,就做猫狗的分类。声明:整个数据和代码来自于b站,链接:使用pytorch框架手把手教你利用VGG16网络编写猫狗分类
- PyTorch深度学习框架60天进阶学习计划 - 第28天:多模态模型实践(二)
凡人的AI工具箱
深度学习pytorch学习AI编程人工智能python
PyTorch深度学习框架60天进阶学习计划-第28天:多模态模型实践(二)5.跨模态检索系统应用场景5.1图文匹配系统的实际应用应用领域具体场景优势电子商务商品图像搜索、视觉购物用户可以上传图片查找相似商品或使用文本描述查找商品智能媒体内容推荐、图片库搜索通过内容的语义理解提供更精准的推荐和搜索社交网络基于内容的帖子推荐理解用户兴趣,提供更相关的内容推荐教育技术多模态教学资源检索教师和学生可以更
- PyTorch深度学习框架60天进阶学习计划 - 第28天:多模态模型实践(一)
凡人的AI工具箱
深度学习pytorch学习AI编程人工智能python
PyTorch深度学习框架60天进阶学习计划-第28天:多模态模型实践(一)引言:跨越感知的边界欢迎来到我们的PyTorch学习旅程第28天!今天我们将步入AI世界中最激动人心的领域之一:多模态学习。想象一下,如果你的模型既能"看"又能"读",并且能够理解图像与文字之间的联系,这将为我们打开怎样的可能性?今天我们将专注于构建图文匹配系统,学习如何使用CLIP(ContrastiveLanguage
- 10.2 如何解决从复杂 PDF 文件中提取数据的问题?
墨染辉
大语言模型pdf
10.2如何解决从复杂PDF文件中提取数据的问题?解决方案:嵌入式表格检索解释:嵌入式表格检索是一种专门针对从复杂PDF文件中的表格提取数据的技术。它结合了表格识别、解析和语义理解,使得从复杂结构的表格中检索信息成为可能。具体步骤:表格检测和识别:目标:在PDF页面中准确地定位和识别表格区域。方法:使用计算机视觉和深度学习技术,如卷积神经网络(CNN)或其他先进的图像处理算法。效果:能够检测出页面
- TensorFlow深度学习实战项目:从入门到精通
点我头像干啥
Ai深度学习tensorflow人工智能
引言深度学习作为人工智能领域的一个重要分支,近年来取得了显著的进展。TensorFlow作为Google开源的深度学习框架,因其强大的功能和灵活的架构,成为了众多开发者和研究者的首选工具。本文将带领大家通过一个实战项目,深入理解TensorFlow的使用方法,并掌握深度学习的基本流程。1.TensorFlow简介1.1TensorFlow是什么?TensorFlow是一个开源的机器学习框架,由Go
- 国外7个最佳大语言模型 (LLM) API推荐
幂简集成
API新理念语言模型人工智能自然语言处理
大型语言模型(LLM)API将彻底改变我们处理语言的方式。在深度学习和机器学习算法的支持下,LLMAPI提供了前所未有的自然语言理解能力。通过利用这些新的API,开发人员现在可以创建能够以前所未有的方式理解和响应书面文本的应用程序。下面,我们将比较从Bard到ChatGPT、PaLM等市场上顶级LLMAPI。我们还将探讨整合这些LLM的潜在用例,并考虑其对语言处理的影响。什么是大语言模型(LLM)
- 【深度学习】DeepSeek模型介绍与部署
Nerous_
深度学习深度学习人工智能
原文链接:DeepSeek-V31.介绍DeepSeek-V3,一个强大的混合专家(MoE)语言模型,拥有671B总参数,其中每个token激活37B参数。为了实现高效推理和成本效益的训练,DeepSeek-V3采用了多头潜在注意力(MLA)和DeepSeekMoE架构,这些架构在DeepSeek-V2中得到了充分验证。此外,DeepSeek-V3首次提出了无辅助损失的负载平衡策略,并设置了多to
- 【深度学习】 PyTorch一文详解
Nerous_
深度学习深度学习pytorch人工智能机器学习python
“PyTorchisadeeplearningframeworkthatprioritizessimplicityandflexibility,makingitthego-tochoiceforbothresearchersanddevelopers.”—Anonymous1.PyTorch简介1.1PyTorch的背景与发展PyTorch是由Facebook人工智能研究院(FAIR)开发的一个开
- 【DNN量化工具】QKeras 工具简介
kanhao100
笔记dnn人工智能神经网络
QKeras工具简介QKeras是一个用于量化深度学习模型的Keras扩展库,旨在使深度学习模型的量化(即将模型的浮点权重转换为低精度格式)变得简单而高效。QKeras主要目标是优化模型的存储和推理速度,特别适用于需要在资源受限的设备(如移动设备和嵌入式系统)上运行深度学习模型的场景。QKeras的主要特点量化支持:QKeras提供了对不同类型量化的支持,包括权重量化和激活量化。用户可以根据需求选
- Softmax温度调节与注意力缩放:深度神经网络中的平滑艺术
Mark White
dnn人工智能神经网络
Softmax温度调节与注意力缩放:深度神经网络中的平滑艺术在深度学习的精密机械中,有些细微的调整机制往往被视为理所当然,却实际上蕴含着深刻的数学洞察和巧妙的工程智慧。今天,我们将探讨两个看似独立却本质相通的机制:生成模型中的温度参数与Transformer注意力机制中的缩放因子。这两个设计都围绕着同一个核心概念——softmax分布的平滑控制。Softmax函数:概率分布的催化剂在深入讨论之前,
- QKeras、Brevitas和QONNX量化工具对比
kanhao100
笔记深度学习边缘计算
QKeras、Brevitas和QONNX量化工具对比一、引言在深度学习模型部署领域,量化技术已成为提升模型执行效率的关键手段。通过将浮点权重转换为低精度表示,量化能显著减小模型体积、降低内存占用并加速推理过程。对于资源受限的设备(如移动设备、嵌入式系统和边缘计算设备),量化技术尤为重要。本文深入对比三款主流量化工具:QKeras、Brevitas和QONNX,从用户实际应用角度剖析它们的技术特点
- Umi-OCR:解锁高效文字识别的新时代
水熠芝Dark-Haired
Umi-OCR:解锁高效文字识别的新时代Umi-OCR一款强大而高效的文字识别工具项目地址:https://gitcode.com/Resource-Bundle-Collection/6adda项目介绍在数字化浪潮席卷全球的今天,文字识别技术已成为提升工作效率和生活质量的关键工具。Umi-OCR,作为一款基于深度学习技术的开源文字识别工具,凭借其强大的功能和高效的性能,迅速成为众多用户的首选。无
- Umi-OCR:一款强大而高效的文字识别工具
裘心国Trent
Umi-OCR:一款强大而高效的文字识别工具Umi-OCR一款强大而高效的文字识别工具项目地址:https://gitcode.com/Resource-Bundle-Collection/6adda介绍Umi-OCR是一款基于深度学习技术的开源文字识别工具,特别适合日常办公、学术研究及数据分析等场景。它能有效解决将图像中的文字快速转化为可编辑文本的需求,极大提升工作效率。此工具依托于先进的计算机
- 自动语音识别(ASR):技术、应用与未来
ajie1117
语音识别人工智能
自动语音识别(ASR):技术、应用与未来1.ASR简介自动语音识别(ASR,AutomaticSpeechRecognition)是一种将语音转换为文本的技术。它利用人工智能(AI)、深度学习和自然语言处理(NLP)技术来识别和理解人类的语言,使计算机能够与人类进行更自然的交互。2.ASR的工作原理ASR的核心流程通常包括以下几个步骤:语音信号采集:通过麦克风或其他设备获取音频数据。预处理:去除噪
- 机器学习是怎么一步一步由神经网络发展到今天的Transformer架构的?
yuanpan
机器学习神经网络transformer
机器学习和神经网络的发展经历了一系列重要的架构和技术阶段。以下是更全面的总结,涵盖了从早期神经网络到卷积神经网络之前的架构演变:1.早期神经网络:感知机(Perceptron)时间:1950年代末至1960年代。背景:感知机由FrankRosenblatt提出,是第一个具有学习能力的神经网络模型。它由单层神经元组成,可以用于简单的二分类任务。特点:输入层和输出层之间直接连接,没有隐藏层。使用简单的
- 关于误差平面小记
文弱_书生
乱七八糟平面算法神经网络机器学习
四维曲面的二维切片:误差平面详解在深度学习优化过程中,我们通常研究损失函数(LossFunction)的变化,试图找到权重的最优配置。由于神经网络的参数空间通常是高维的,我们需要使用低维可视化的方法来理解优化过程和误差平面(ErrorSurface)。在这里,我们讨论一个四维曲面的二维切片,其中:三个维度是网络的权重(w1,w2,w3w_1,w_2,w_3w1,w2,w3)。第四个维度是误差(损失
- 关于神经网络中的激活函数
文弱_书生
乱七八糟神经网络人工智能深度学习
激活函数(ActivationFunction)详解理解首先煮波解释一下这四个字,“函数”相信大家都不陌生,能点进来看这篇文章说明你一定经历至少长达十年的数学的摧残,关于这个概念煮波就不巴巴了,煮波主要说一下“激活”,大家可能或多或少的看过类似于古装,玄幻,修仙等类型的小说或者电视剧。剧中的主角往往是天赋异禀或则什么神啊仙啊的转世,但是这一世他却被当成了普通人,指导某一时刻才会迸发出全部的能量(主
- 常见经典目标检测算法
109702008
人工智能#深度学习目标检测人工智能
ChatGPT目标检测(ObjectDetection)是计算机视觉领域的一个重要分支,其目的是识别数字图像中的不同对象,并给出它们的位置和类别。近年来,许多经典的目标检测算法被提出并广泛应用。以下是一些常见的经典目标检测算法:1.R-CNN(RegionswithCNNfeatures):R-CNN通过使用区域提议方法(如选择性搜索)首先生成潜在的边界框,然后使用卷积神经网络(CNN)提取特征,
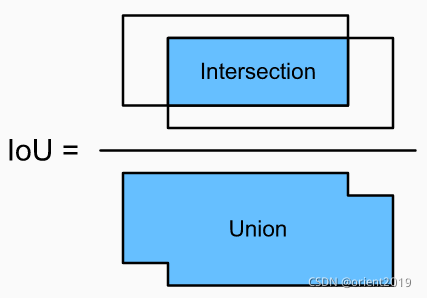
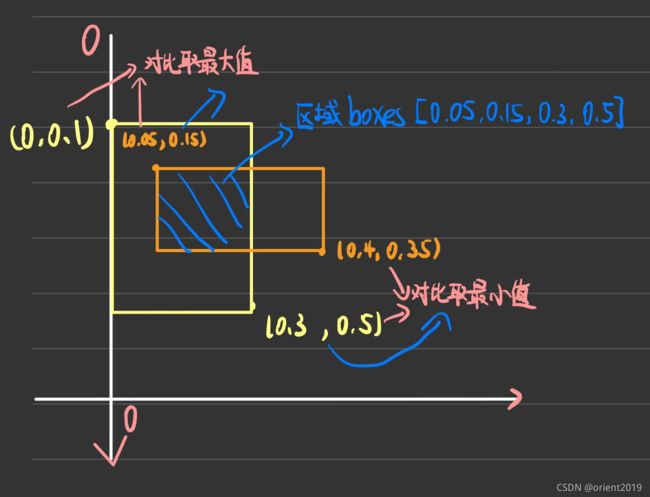
- 目标检测中归一化的目的?
林语微光
kaggle目标检测目标跟踪人工智能
在目标检测任务中,归一化坐标和尺寸时需要除以图像的宽度和高度,主要有以下几个原因:1.统一尺度不同图像可能具有不同的宽度和高度。通过将坐标和尺寸除以图像的宽度和高度,可以将所有图像的标注信息统一到相同的尺度范围([0,1])。这使得模型在训练和推理时能够处理任意尺寸的图像,而不需要关心图像的具体像素尺寸。2.位置和尺寸的相对性归一化后的坐标和尺寸是相对于图像尺寸的,而不是绝对像素值。这种相对性使得
- 关于神经网络中的正则化
文弱_书生
乱七八糟神经网络人工智能深度学习
神经网络训练中的正则化正则化(Regularization)是神经网络训练中的一个关键技术,主要用于防止模型过拟合(overfitting),提高泛化能力。1.为什么需要正则化?在神经网络训练过程中,模型的目标是找到能在训练数据上表现良好的参数,同时也能泛化到未见过的数据。如果一个模型过于复杂(如参数过多、层数过深),它可能会记住训练数据中的噪声,而不是学习数据的本质模式。这种情况称为过拟合(ov
- GraphCube、Spark和深度学习技术赋能快消行业关键运营环节
weixin_30777913
开发语言大数据深度学习人工智能spark
在快消品(FMCG)行业,需求计划(DemandPlanning)、库存管理(InventoryManagement)和需求供应管理(DemandSupplyManagement)是影响企业整体效率和利润水平的关键运营环节。GraphCube图多维数据集技术、Spark大数据分析处理技术和深度学习技术的结合,为这些环节提供了智能化、动态化和实时化的解决方案,显著提升业务运营效率和企业利润。一、技术
- 基于Matlab_simulink仿真相关 控制算法、优化算法相关帮助代做,原理讲解
985计算机硕士
仿真模型matlab算法开发语言
Matlab/simulink仿真相关控制算法、优化算法相关帮助代做,原理讲解:1.优化算法相关:蚁群优化算法,遗传优化算法等2.控制器相关:ADRC控制,鲁棒控制,神经网络控制,MPC等3.神经网络相关:BP神经网络,RBF神经网络,LSTM神经网络等文章目录1.优化算法相关蚁群优化算法(ACO)2.控制器相关ADRC控制3.神经网络相关BP神经网络1.构建光伏系统模型1.1光伏电池模型1.2控
- Marker可以快速且准确地将PDF转换为markdown格式。
星霜笔记
开源关注简介免费源码pdf
MarkerMarker可以快速且准确地将PDF转换为markdown格式。支持多种文档类型(针对书籍和科学论文进行了优化)支持所有语言移除页眉/页脚/其他杂质格式化表格和代码块提取并保存图像以及markdown将大多数方程转换为latex支持在GPU、CPU或MPS上运行工作原理Marker是一个由深度学习模型组成的管道:提取文本,必要时进行OCR处理(启发式算法,surya,tesseract
- Hugging Face预训练GPT微调ChatGPT(微调入门!新手友好!)
y江江江江
机器学习大模型gptchatgpt
HuggingFace预训练GPT微调ChatGPT(微调入门!新手友好!)在实战中,⼤多数情况下都不需要从0开始训练模型,⽽是使⽤“⼤⼚”或者其他研究者开源的已经训练好的⼤模型。在各种⼤模型开源库中,最具代表性的就是HuggingFace。HuggingFace是⼀家专注于NLP领域的AI公司,开发了⼀个名为Transformers的开源库,该开源库拥有许多预训练后的深度学习模型,如BERT、G
- Open-Sora - 为所有人实现高效的视频制作大众化
小众AI
AI开源音视频人工智能AI编程
GitHub:https://github.com/hpcaitech/Open-Sora更多AI开源软件:发现分享好用的AI工具、AI开源软件、AI模型、AI变现-小众AI这是一款开源的SOTA(State-of-the-Art)视频生成模型,仅用20万美元(224张GPU)就能训练出商业级11B参数的视频生成大模型。它采用Python语言和PyTorch深度学习框架开发,具有生成速度快、资源消
- 图像识别技术与应用课后总结(20)
一元钱面包
人工智能
图像分割概念图像分割是把图像中不同像素划分到不同类别,预测目标轮廓,属于细粒度分类。比如将图像里不同物体、背景等区分开来,就像把一幅画里的各个元素精准归类。应用场景人像抠图:能精准分离人物和背景,用于图片编辑、影视制作等,比如去除照片背景换背景。医学组织提取:在医学影像(如CT、MRI图像)中分离出不同组织,辅助疾病诊断、手术规划等。遥感图像分析:分析卫星或航空遥感图像时,区分土地、植被、建筑等不
- 二分查找排序算法
周凡杨
java二分查找排序算法折半
一:概念 二分查找又称
折半查找(
折半搜索/
二分搜索),优点是比较次数少,查找速度快,平均性能好;其缺点是要求待查表为有序表,且插入删除困难。因此,折半查找方法适用于不经常变动而 查找频繁的有序列表。首先,假设表中元素是按升序排列,将表中间位置记录的关键字与查找关键字比较,如果两者相等,则查找成功;否则利用中间位置记录将表 分成前、后两个子表,如果中间位置记录的关键字大于查找关键字,则进一步
- java中的BigDecimal
bijian1013
javaBigDecimal
在项目开发过程中出现精度丢失问题,查资料用BigDecimal解决,并发现如下这篇BigDecimal的解决问题的思路和方法很值得学习,特转载。
原文地址:http://blog.csdn.net/ugg/article/de
- Shell echo命令详解
daizj
echoshell
Shell echo命令
Shell 的 echo 指令与 PHP 的 echo 指令类似,都是用于字符串的输出。命令格式:
echo string
您可以使用echo实现更复杂的输出格式控制。 1.显示普通字符串:
echo "It is a test"
这里的双引号完全可以省略,以下命令与上面实例效果一致:
echo Itis a test 2.显示转义
- Oracle DBA 简单操作
周凡杨
oracle dba sql
--执行次数多的SQL
select sql_text,executions from (
select sql_text,executions from v$sqlarea order by executions desc
) where rownum<81;
&nb
- 画图重绘
朱辉辉33
游戏
我第一次接触重绘是编写五子棋小游戏的时候,因为游戏里的棋盘是用线绘制的,而这些东西并不在系统自带的重绘里,所以在移动窗体时,棋盘并不会重绘出来。所以我们要重写系统的重绘方法。
在重写系统重绘方法时,我们要注意一定要调用父类的重绘方法,即加上super.paint(g),因为如果不调用父类的重绘方式,重写后会把父类的重绘覆盖掉,而父类的重绘方法是绘制画布,这样就导致我们
- 线程之初体验
西蜀石兰
线程
一直觉得多线程是学Java的一个分水岭,懂多线程才算入门。
之前看《编程思想》的多线程章节,看的云里雾里,知道线程类有哪几个方法,却依旧不知道线程到底是什么?书上都写线程是进程的模块,共享线程的资源,可是这跟多线程编程有毛线的关系,呜呜。。。
线程其实也是用户自定义的任务,不要过多的强调线程的属性,而忽略了线程最基本的属性。
你可以在线程类的run()方法中定义自己的任务,就跟正常的Ja
- linux集群互相免登陆配置
林鹤霄
linux
配置ssh免登陆
1、生成秘钥和公钥 ssh-keygen -t rsa
2、提示让你输入,什么都不输,三次回车之后会在~下面的.ssh文件夹中多出两个文件id_rsa 和 id_rsa.pub
其中id_rsa为秘钥,id_rsa.pub为公钥,使用公钥加密的数据只有私钥才能对这些数据解密 c
- mysql : Lock wait timeout exceeded; try restarting transaction
aigo
mysql
原文:http://www.cnblogs.com/freeliver54/archive/2010/09/30/1839042.html
原因是你使用的InnoDB 表类型的时候,
默认参数:innodb_lock_wait_timeout设置锁等待的时间是50s,
因为有的锁等待超过了这个时间,所以抱错.
你可以把这个时间加长,或者优化存储
- Socket编程 基本的聊天实现。
alleni123
socket
public class Server
{
//用来存储所有连接上来的客户
private List<ServerThread> clients;
public static void main(String[] args)
{
Server s = new Server();
s.startServer(9988);
}
publi
- 多线程监听器事件模式(一个简单的例子)
百合不是茶
线程监听模式
多线程的事件监听器模式
监听器时间模式经常与多线程使用,在多线程中如何知道我的线程正在执行那什么内容,可以通过时间监听器模式得到
创建多线程的事件监听器模式 思路:
1, 创建线程并启动,在创建线程的位置设置一个标记
2,创建队
- spring InitializingBean接口
bijian1013
javaspring
spring的事务的TransactionTemplate,其源码如下:
public class TransactionTemplate extends DefaultTransactionDefinition implements TransactionOperations, InitializingBean{
...
}
TransactionTemplate继承了DefaultT
- Oracle中询表的权限被授予给了哪些用户
bijian1013
oracle数据库权限
Oracle查询表将权限赋给了哪些用户的SQL,以备查用。
select t.table_name as "表名",
t.grantee as "被授权的属组",
t.owner as "对象所在的属组"
- 【Struts2五】Struts2 参数传值
bit1129
struts2
Struts2中参数传值的3种情况
1.请求参数绑定到Action的实例字段上
2.Action将值传递到转发的视图上
3.Action将值传递到重定向的视图上
一、请求参数绑定到Action的实例字段上以及Action将值传递到转发的视图上
Struts可以自动将请求URL中的请求参数或者表单提交的参数绑定到Action定义的实例字段上,绑定的规则使用ognl表达式语言
- 【Kafka十四】关于auto.offset.reset[Q/A]
bit1129
kafka
I got serveral questions about auto.offset.reset. This configuration parameter governs how consumer read the message from Kafka when there is no initial offset in ZooKeeper or
- nginx gzip压缩配置
ronin47
nginx gzip 压缩范例
nginx gzip压缩配置 更多
0
nginx
gzip
配置
随着nginx的发展,越来越多的网站使用nginx,因此nginx的优化变得越来越重要,今天我们来看看nginx的gzip压缩到底是怎么压缩的呢?
gzip(GNU-ZIP)是一种压缩技术。经过gzip压缩后页面大小可以变为原来的30%甚至更小,这样,用
- java-13.输入一个单向链表,输出该链表中倒数第 k 个节点
bylijinnan
java
two cursors.
Make the first cursor go K steps first.
/*
* 第 13 题:题目:输入一个单向链表,输出该链表中倒数第 k 个节点
*/
public void displayKthItemsBackWard(ListNode head,int k){
ListNode p1=head,p2=head;
- Spring源码学习-JdbcTemplate queryForObject
bylijinnan
javaspring
JdbcTemplate中有两个可能会混淆的queryForObject方法:
1.
Object queryForObject(String sql, Object[] args, Class requiredType)
2.
Object queryForObject(String sql, Object[] args, RowMapper rowMapper)
第1个方法是只查
- [冰川时代]在冰川时代,我们需要什么样的技术?
comsci
技术
看美国那边的气候情况....我有个感觉...是不是要进入小冰期了?
那么在小冰期里面...我们的户外活动肯定会出现很多问题...在室内呆着的情况会非常多...怎么在室内呆着而不发闷...怎么用最低的电力保证室内的温度.....这都需要技术手段...
&nb
- js 获取浏览器型号
cuityang
js浏览器
根据浏览器获取iphone和apk的下载地址
<!DOCTYPE html>
<html>
<head>
<meta charset="utf-8" content="text/html"/>
<meta name=
- C# socks5详解 转
dalan_123
socketC#
http://www.cnblogs.com/zhujiechang/archive/2008/10/21/1316308.html 这里主要讲的是用.NET实现基于Socket5下面的代理协议进行客户端的通讯,Socket4的实现是类似的,注意的事,这里不是讲用C#实现一个代理服务器,因为实现一个代理服务器需要实现很多协议,头大,而且现在市面上有很多现成的代理服务器用,性能又好,
- 运维 Centos问题汇总
dcj3sjt126com
云主机
一、sh 脚本不执行的原因
sh脚本不执行的原因 只有2个
1.权限不够
2.sh脚本里路径没写完整。
二、解决You have new mail in /var/spool/mail/root
修改/usr/share/logwatch/default.conf/logwatch.conf配置文件
MailTo =
MailFrom
三、查询连接数
- Yii防注入攻击笔记
dcj3sjt126com
sqlWEB安全yii
网站表单有注入漏洞须对所有用户输入的内容进行个过滤和检查,可以使用正则表达式或者直接输入字符判断,大部分是只允许输入字母和数字的,其它字符度不允许;对于内容复杂表单的内容,应该对html和script的符号进行转义替换:尤其是<,>,',"",&这几个符号 这里有个转义对照表:
http://blog.csdn.net/xinzhu1990/articl
- MongoDB简介[一]
eksliang
mongodbMongoDB简介
MongoDB简介
转载请出自出处:http://eksliang.iteye.com/blog/2173288 1.1易于使用
MongoDB是一个面向文档的数据库,而不是关系型数据库。与关系型数据库相比,面向文档的数据库不再有行的概念,取而代之的是更为灵活的“文档”模型。
另外,不
- zookeeper windows 入门安装和测试
greemranqq
zookeeper安装分布式
一、序言
以下是我对zookeeper 的一些理解: zookeeper 作为一个服务注册信息存储的管理工具,好吧,这样说得很抽象,我们举个“栗子”。
栗子1号:
假设我是一家KTV的老板,我同时拥有5家KTV,我肯定得时刻监视
- Spring之使用事务缘由(2-注解实现)
ihuning
spring
Spring事务注解实现
1. 依赖包:
1.1 spring包:
spring-beans-4.0.0.RELEASE.jar
spring-context-4.0.0.
- iOS App Launch Option
啸笑天
option
iOS 程序启动时总会调用application:didFinishLaunchingWithOptions:,其中第二个参数launchOptions为NSDictionary类型的对象,里面存储有此程序启动的原因。
launchOptions中的可能键值见UIApplication Class Reference的Launch Options Keys节 。
1、若用户直接
- jdk与jre的区别(_)
macroli
javajvmjdk
简单的说JDK是面向开发人员使用的SDK,它提供了Java的开发环境和运行环境。SDK是Software Development Kit 一般指软件开发包,可以包括函数库、编译程序等。
JDK就是Java Development Kit JRE是Java Runtime Enviroment是指Java的运行环境,是面向Java程序的使用者,而不是开发者。 如果安装了JDK,会发同你
- Updates were rejected because the tip of your current branch is behind
qiaolevip
学习永无止境每天进步一点点众观千象git
$ git push joe prod-2295-1
To
[email protected]:joe.le/dr-frontend.git
! [rejected] prod-2295-1 -> prod-2295-1 (non-fast-forward)
error: failed to push some refs to '
[email protected]
- [一起学Hive]之十四-Hive的元数据表结构详解
superlxw1234
hivehive元数据结构
关键字:Hive元数据、Hive元数据表结构
之前在 “[一起学Hive]之一–Hive概述,Hive是什么”中介绍过,Hive自己维护了一套元数据,用户通过HQL查询时候,Hive首先需要结合元数据,将HQL翻译成MapReduce去执行。
本文介绍一下Hive元数据中重要的一些表结构及用途,以Hive0.13为例。
文章最后面,会以一个示例来全面了解一下,
- Spring 3.2.14,4.1.7,4.2.RC2发布
wiselyman
Spring 3
Spring 3.2.14、4.1.7及4.2.RC2于6月30日发布。
其中Spring 3.2.1是一个维护版本(维护周期到2016-12-31截止),后续会继续根据需求和bug发布维护版本。此时,Spring官方强烈建议升级Spring框架至4.1.7 或者将要发布的4.2 。
其中Spring 4.1.7主要包含这些更新内容。