【项目一、xxx病虫害检测项目】2、网络结构尝试改进:Resnet50、SE、CBAM、Feature Fusion
目录
- 前言
- 一、整体
-
- 2.1、整体网络结构
- 2.2、ResNet50
-
- 2.2.1、BasicBlock
- 2.2.2、Bottleneck
- 2.3、SE
- 2.4、CBAM
- 2.5、Feature Fusion
- Reference
前言
马上要找工作了,想总结下自己做过的几个小项目。
先总结下实验室之前的一个病虫害检测相关的项目。选用的baseline是SSD,代码是在这个仓库的基础上改的 lufficc/SSD.这个仓库写的ssd还是很牛的,github有1.3k个star。
选择这个版本的代码,主要有两个原因:
它的backbone代码是支持直接加载pytorch官方预训练权重的,所以很方便我做实验
代码高度模块化,类似mmdetection和Detectron2,写的很高级,不过对初学者不是很友好,但是很能提高工程代码能力。
原仓库主要实现了SSD-VGG16、SSD-Mobilenet-V2、SSD-Mobilenet-V3、SSD-EfficientNet等网络,在我数据集上几个改进版本都还不如SSD-VGG16效果好,所以我在原仓库的基础上进行了自己的实验,加了一些也不算很高级的trick吧,主要是在我的数据集上确实好使,疯狂调参,哈哈哈。
同系列讲解:
【项目一、xxx病虫害检测项目】1、SSD原理和源码分析.
【项目一、xxx病虫害检测项目】3、损失函数尝试:Focal loss.
第二篇,介绍下对网络结构作的几个改进:
- Resnet50替换VGG16;
- 在Resnet50中加入注意力机制SE、CBAM;
- 最后加入更加轻量高效的特征融合层
代码已全部上传GitHub: HuKai-cv/FFSSD-ResNet..
一、整体
2.1、整体网络结构
如图是我改进的整体网络结构图,左上部分是传统的Resnet50结构,并且舍去了后面的Conv5、avg pool、fc、softmax等结构,左下角基于Resnet生成的3个特征图进行特征融合,融合后的特征图再送入一系列的额外特征层(1个bottleneck),得到多尺度特征,送入检测器中进行检测,最后nms输出预测结果。

2.2、ResNet50
提出背景/解决问题:随着网络的加深,很可能会发生梯度消失和梯度爆炸,传统的方法是使用数据初始化和BN来解决这个问题,虽然解决了梯度问题,但是随着网络的加深,会带来另一个问题-网络退化问题(不是过拟合),即随着网络深度的加深,网络性能反而在下降。
网络退化不是过拟合,过拟合是测试误差大而训练误差小,而忘了退化是训练误差和测试误差都大。
为了解决上述问题,本文提出残差思想,用于解决这种退化问题,同时在一定程度上也缓解了梯度消失和梯度爆炸问题,提升网络的性能。
残差模块:残差模块分为恒等映射和残差部分组成。残差部分有两种实现方式,一种是连接两个3x3conv,另一种是先1x1降维再3x3conv最后1x1升维(可以有效减少参数),最后将恒等映射和残差部分生成的特征图进行逐像素相加操作。通过这种前面层和后面层的"短路连接",有助于训练过程中梯度的反向传播,抑制网络退化。
下图来自 b站霹雳吧啦Wz: 6.2 使用pytorch搭建ResNet并基于迁移学习训练.

2.2.1、BasicBlock
这种结构专门在resnet18、resbnet34中使用。主要有两种形式:一种为实线残差结构,一种为虚线残差结构。之所以在恒等映射分支加入一个1x1conv,是因为在resnet34的conv3_1、conv4_1、conv5_1输入的模块的channel的输出的channel是不相等的,所以无法作像素级相加操作,所以在恒等映射分支加一个1x1conv用于调节输入输出channel。

实线残差结构用于resnet34的conv3_1、conv4_1、conv5_1;而虚线残差结构用于conv2_x、conv3_2-4、conv4_2-6、conv5_2-4中。
代码如ssd/modeling/backbone/resnet_input_512.py中:
def conv3x3(in_planes, out_planes, stride=1, groups=1, dilation=1):
    """3x3 convolution with padding"""
    return nn.Conv2d(in_planes, out_planes, kernel_size=3, stride=stride,
                     padding=dilation, groups=groups, bias=False, dilation=dilation)


def conv1x1(in_planes, out_planes, stride=1):
    """1x1 convolution"""
    return nn.Conv2d(in_planes, out_planes, kernel_size=1, stride=stride, bias=False)


class BasicBlock(nn.Module):
    # resnet18 and resnet34
    expansion = 1   # 每一层内部channel是否发生变换  1=不变

    def __init__(self, inplanes, planes, stride=1, downsample=None, groups=1,
                 base_width=64, dilation=1, norm_layer=None, reduction=16, se=False, cbam=False):
        """
        Args:
            inplanes: 模块输入特征图channel
            planes: 模块输出特征图channel
            stride: 步长 模块第一个卷积的步长 =1实线残差结构 不下采样  =2虚线残差结构 下采样
            downsample: 下采样 虚线残差结构 conv1x1 s=2 + bn
            groups: 分组卷积组数  1=普通卷积  BasicBlock只支持=1
            base_width:
            dilation: 空洞卷积 BasicBlock不支持
            norm_layer: bn
            reduction: 模块中间层的channel
            se: se注意力机制
            cbam: cbam注意力机制
        """
        super(BasicBlock, self).__init__()
        if norm_layer is None:
            norm_layer = nn.BatchNorm2d
        if groups != 1 or base_width != 64:
            raise ValueError('BasicBlock only support groups = 1 and base_width = 64')
        if dilation > 1:
            raise NotImplementedError("Dilation > 1 not support in BasicBlock")
        # Both self.conv1 and self.downsample layer downsample the input when stride != 1
        # 是否使用注意力机制
        self.se = se
        self.cbam = cbam
        # conv+bn+relu
        self.conv1 = conv3x3(inplanes, planes, stride)
        self.bn1 = norm_layer(planes)
        self.relu =nn.ReLU(inplace=True)
        # conv + bn
        self.conv2 = conv3x3(planes, planes)
        self.bn2 = norm_layer(planes)

        # attention layers
        self.se_layer = SELayer(planes, reduction)
        self.ca_layer = Channel_Attention(planes, reduction)
        self.sa_layer = Spatial_Attention()

        self.downsample = downsample
        self.stride = stride

    def forward(self, x):
        identity = x          # 残差分支

        out = self.conv1(x)   # conv + bn + relu
        out = self.bn1(out)
        out = self.relu(out)

        out = self.conv2(out)   # conv + bn
        out = self.bn2(out)

        if self.se and not self.cbam:   # se
            out = self.se_layer(out)
        if not self.se and self.cbam:   # cbam
            out = self.ca_layer(out)
            out = self.sa_layer(out)

        # 是否需要下采样  实线残差结构不需要下采样  虚线残差结构需要下采样
        if self.downsample is not None:
            identity = self.downsample(x)

        out += identity           # add
        out = self.relu(out)      # relu

        return out
2.2.2、Bottleneck
这种结构专门在resnet50、resbnet101中使用。主要也有两种形式:一种为实线残差结构,一种为虚线残差结构。之所以在恒等映射分支加入一个1x1conv,是因为在resnet50的conv3_1、conv4_1、conv5_1输入的模块的channel的输出的channel是不相等的,所以无法作像素级相加操作,所以在恒等映射分支加一个1x1conv用于调节输入输出channel。
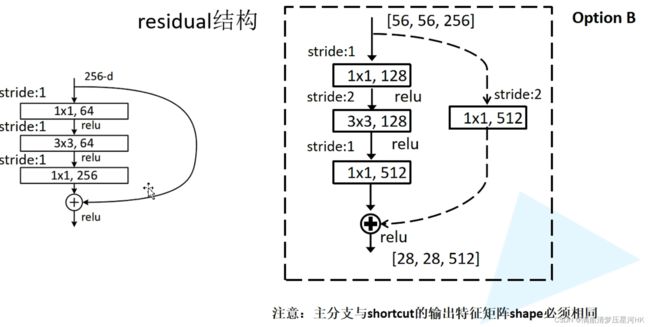
左边的实线残差结构用于resnet50的conv2_x、conv3_2-4、conv2-6、conv2-3;右边的虚线残差结构用于conv3_1、conv4_x、conv5_1。
代码如ssd/modeling/backbone/resnet_input_512.py中:
class Bottleneck(nn.Module):
    # resnet50 and resnet101
    expansion = 4   # 每一层内部channel是否发生变换  第三个卷积是第一个和第二个卷积channel的4倍

    def __init__(self, inplanes, planes, stride=1, downsample=None, groups=1,
                 base_width=64, dilation=1, norm_layer=None, reduction=16, se=False, cbam=False):
        """
        Args:
            inplanes: 模块输入特征图channel
            planes: 模块输出特征图channel
            stride: 步长 1  第二个卷积的步长  =1不下采样=实线残差结构  =2下采样=虚线残差结构
            downsample: 下采样 虚线残差结构 conv1x1 s=2 + bn
            groups: 分组卷积组数  1=普通卷积
            base_width: 64
            dilation: 空洞卷积
            norm_layer: bn
            reduction: 模块中间层的channel  16
            se: se注意力机制 默认False
            cbam: cbam注意力机制 默认False
        """
        super(Bottleneck, self).__init__()
        if norm_layer is None:
            norm_layer = nn.BatchNorm2d
        width = int(planes * (base_width / 64.)) * groups  # 默认情况下inplanes = width

        # 是否使用attention机制
        self.se = se
        self.cbam = cbam
        #
        self.conv1 = conv1x1(inplanes, width)
        # Both self.conv2 and self.downsample layers downsample the input when stride != 1
        self.bn1 = norm_layer(width)
        self.conv2 = conv3x3(width, width, stride, groups, dilation)
        self.bn2 = norm_layer(width)
        self.conv3 = conv1x1(width, planes * self.expansion)
        self.bn3 = norm_layer(planes * self.expansion)

        self.se_layer = SELayer(planes * self.expansion, reduction)
        self.ca_layer = Channel_Attention(planes * self.expansion, reduction)
        self.sa_layer = Spatial_Attention()

        self.relu = nn.ReLU(inplace=True)
        self.downsample = downsample
        self.stride = stride

    def forward(self, x):
        # 残差结构
        identity = x

        # conv + bn + relu
        out = self.conv1(x)
        out = self.bn1(out)
        out = self.relu(out)

        # conv + bn + relu
        out = self.conv2(out)
        out = self.bn2(out)
        out = self.relu(out)

        # conv + bn
        out = self.conv3(out)
        out = self.bn3(out)

        if self.se and not self.cbam:   # se
            out = self.se_layer(out)
        if not self.se and self.cbam:   # cbam
            out = self.ca_layer(out)
            out = self.sa_layer(out)

        if self.downsample is not None:  # 空=实线残差结构   非空=虚线残差结构
            identity = self.downsample(x)

        out += identity         # add
        out = self.relu(out)    # relu

        return out
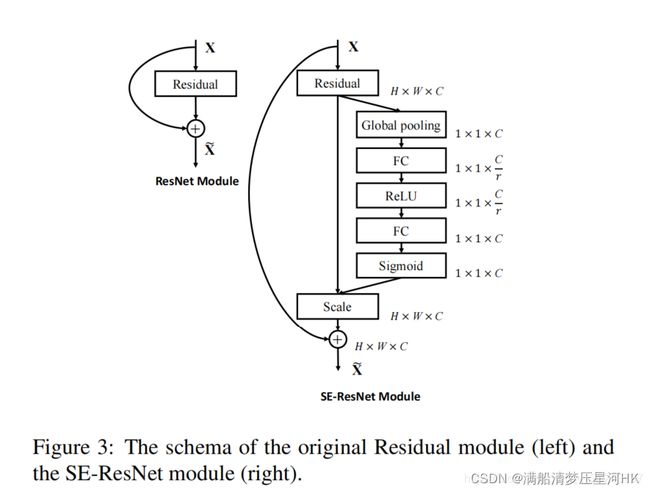
2.3、SE

SE注意力集中是一个经典的通道注意力机制。SE注意力机制包括三个步骤:Sequeeze、excitation、Scale。
- Sequeeze:在channel维度上使用1个全局平均池化求每个channel上所有元素的均值;
- Excitation:通过连接两个全连接层(第一个relu第二个sigmoid),先降维再升维,可以根据loss去自动学习各个维度的特征权重(se的核心),使有效的信息量大的特征权重更大;
- scale:用Excitation计算的每个channel的权重去乘以对应channel中的每个元素。
几个注意点:
1、Sequeeze使用全局平均池化是为了保留整体的语义信息,虽然会丢失一些突出的信息;如果使用卷积,参数太大了;如果使用最大池化会丢失太大语义信息。
2、Excitation为什么接两个全连接层?为什么不用一个?1、增加非线性;2、减少参数量,两个可以先降维再升维;3、可以更好的拟合通道之间的相关性;
代码如ssd/modeling/backbone/resnet_input_512.py中:
class SELayer(nn.Module):
    def __init__(self, channel, reduction=16):
        super(SELayer, self).__init__()
        self.avg_pool = nn.AdaptiveAvgPool2d(1)
        self.fc = nn.Sequential(
            nn.Linear(channel, channel // reduction, bias=False),
            nn.ReLU(inplace=True),
            nn.Linear(channel // reduction, channel, bias=False),
            nn.Sigmoid()
        )

    def forward(self, x):
        b, c, _, _ = x.size()
        y = self.avg_pool(x).view(b, c)   # sequeeze
        y = self.fc(y).view(b, c, 1, 1)   # expansion

        return x * y.expand_as(x)         # scale
2.4、CBAM
CBAM注意力机制是一个经典的通道+空间注意力机制。整个模块分为通道注意力模块CAM和空间注意力模块SAM。
- 通道注意力模块CAM和SE注意力机制类似。还是Sequeeze、Excitation和scale三个部分。不同的是这里的Sequeeze使用的是全局平均池化和全局最大池化并联的形式;Excitation也抛弃了全连接层采用了Conv层代替,第一个卷积降维16倍(ReLU)第二个卷积升维(Sigmoid)。
- 空间注意力模块SAM,先对每个像素在channel维度上作一个全局平均池化和全局最大池化,得到两个HxWx1的特征图,再concat这两个特征图,得到1个HxWx2的特征图。再经过一个7x7/3x3卷积降维HxWx1,再经过sigmoid处理生成通道注意力特征图,最后和逐像素与输入特征图相乘。
几个注意的点:
1、CAM增加一个全局最大池化层可以作为平均池化的一个补充,增加对突出点的关注。并联比串联丢失的信息相对更少。
2、通道注意力机制关注的是哪个通道更重要,空间注意力机制是更关注哪个像素的更重要。
代码如ssd/modeling/backbone/resnet_input_512.py中:
class Channel_Attention(nn.Module):   # CAM

    def __init__(self, channel, r=16):
        super(Channel_Attention, self).__init__()
        self._avg_pool = nn.AdaptiveAvgPool2d(1)
        self._max_pool = nn.AdaptiveMaxPool2d(1)

        self._fc = nn.Sequential(
            nn.Conv2d(channel, channel // r, 1, bias=False),
            nn.ReLU(inplace=True),
            nn.Conv2d(channel // r, channel, 1, bias=False)
        )

        self._sigmoid = nn.Sigmoid()

    def forward(self, x):
        y1 = self._avg_pool(x)   # avg pooling
        y1 = self._fc(y1)

        y2 = self._max_pool(x)   # max pooling
        y2 = self._fc(y2)

        y = self._sigmoid(y1 + y2)  # add sigmoid
        return x * y                # scale


class Spatial_Attention(nn.Module):

    def __init__(self, kernel_size=3):
        super(Spatial_Attention, self).__init__()

        assert kernel_size % 2 == 1, "kernel_size = {}".format(kernel_size)
        padding = (kernel_size - 1) // 2

        self._layer = nn.Sequential(
            nn.Conv2d(2, 1, kernel_size=kernel_size, padding=padding),
            nn.Sigmoid()
        )

    def forward(self, x):
        avg_mask = torch.mean(x, dim=1, keepdim=True)    # avg pool in every pixel
        max_mask, _ = torch.max(x, dim=1, keepdim=True)  # max pool in every pixel
        mask = torch.cat([avg_mask, max_mask], dim=1)    # concat

        mask = self._layer(mask)   # conv
        return x * mask            # scale
2.5、Feature Fusion
这种特征融合方式来自论文:FSSD: Feature Fusion Single Shot Multibox Detector.
下图来自FSSD解读.

- (a) image pyramid
- (b) rcnn系列,只在最后一层feature预测
- © FPN,语义信息一层传递回去,而且有很多相加的计算
- (d) SSD,在各个level的feature上直接预测,每个level之间没联系
- (e) 本文的做法,把各个level的feature concat,然后从fusion feature上生成feature pyramid
更多细节如下图:

将浅层的3个特征层进行concat,并且抛弃了resnet50后面的conv4、avg pool、fc、softmax等结构,直接在特征融合层后面连接7个额外添加层,用于生成多尺度特征图,再用这些多尺度特征进行目标检测。
代码如ssd/modeling/backbone/resnet_input_512.py中:
class ResNet(nn.Module):
    def __init__(self, block=None, blocks=None, zero_init_residual=False,
                 groups=1, width_per_group=64, replace_stride_with_dilation=None,
                 norm_layer=None, extras=None, se=False, cbam=False, ff=False):
        """
        Args:
            block: res18/34=BasicBlock   res50/101=Bottleneck
            blocks: [3, 4, 6, 3] conv2_x  conv3_x  conv4_x  conv5_x中堆叠的次数
            zero_init_residual:
            groups:
            width_per_group:
            replace_stride_with_dilation:
            norm_layer: bn
            extras: resnet    [512, 256, 128, 64, 128]  一系列额外添加层的输出channel
                    resnet-ff [128, 256, 512, 256, 128, 64, 128]
            se: 是否使用se
            cbam: 是否使用cbam
            ff: 是否使用feature fusion结构
        """
        super().__init__()
        if norm_layer is None:
            norm_layer = nn.BatchNorm2d

        self._norm_layer = norm_layer  # bn

        self.inplanes = 64  # max pool之后第一个卷积层的输入channel
        self.dilation = 1

        self.blocks = blocks  # [3, 4, 6, 3]
        if replace_stride_with_dilation is None:
            # each element in the tuple indicates if we should replace
            # the 2x2 stride with a dilated convolution instead
            replace_stride_with_dilation = [False, False, False]
        if len(replace_stride_with_dilation) != 3:
            raise ValueError("replace_stride_with_dilation should be None "
                             "or a 3-element tuple, got {}".format(replace_stride_with_dilation))
        self.se = se  # Squeeze-and-Excitation Module
        self.cbam = cbam  # Convolutional Block Attention Module
        self.ff = ff  # Feature Fusion Module
        self.groups = groups
        self.base_width = width_per_group
        self.conv1 = nn.Conv2d(3, self.inplanes, kernel_size=7, stride=2, padding=3, bias=False)
        self.bn1 = self._norm_layer(self.inplanes)
        self.relu = nn.ReLU(inplace=True)
        self.maxpool = nn.MaxPool2d(kernel_size=3, stride=2, padding=1)
        self.layer1 = self._make_layer(block, 64, self.blocks[0])               # conv2_x
        self.layer2 = self._make_layer(block, 128, self.blocks[1], stride=2,    # conv3_x
                                       dilate=replace_stride_with_dilation[0])
        self.conv2 = nn.Conv2d(512, 256, 1)
        self.layer3 = self._make_layer(block, 256, self.blocks[2], stride=2,    # conv4_x
                                       dilate=replace_stride_with_dilation[1])
        self.conv3 = nn.Conv2d(1024, 256, 1)
        self.bi1 = nn.UpsamplingBilinear2d(scale_factor=2)   # 2倍上采样
        self.layer4 = self._make_layer(block, 512, self.blocks[3], stride=2,    # conv5_x
                                       dilate=replace_stride_with_dilation[2])

        self.conv4 = nn.Conv2d(2048, 256, 1)
        self.bi2 = nn.UpsamplingBilinear2d(scale_factor=4)         # 4倍上采样

        self.conv5 = nn.Conv2d(768, 512, 1)
        self.bn2 = nn.BatchNorm2d(512)

        if self.ff:
            self.extra_layers_ff = nn.Sequential(* self._add_extras_ff(block, extras))
        else:
            self.extra_layers = nn.Sequential(*self._add_extras(block, extras))

        for m in self.modules():       # init
            if isinstance(m, nn.Conv2d):
                nn.init.kaiming_normal_(m.weight, mode='fan_out', nonlinearity='relu')
            elif isinstance(m, (nn.BatchNorm2d, nn.GroupNorm)):
                nn.init.constant_(m.weight, 1)
                nn.init.constant_(m.bias, 0)

        # Zero-initialize the last BN in each residual branch,
        # so that the residual branch starts with zeros, and each residual block behaves like an identity.
        # This improves the model by 0.2~0.3% according to https://arxiv.org/abs/1706.02677
        if zero_init_residual:
            for m in self.modules():
                if isinstance(m, Bottleneck):
                    nn.init.constant_(m.bn3.weight, 0)
                elif isinstance(m, BasicBlock):
                    nn.init.constant_(m.bn2.weight, 0)

    def _make_layer(self, block, planes, blocks, stride=1, dilate=False):
        norm_layer = self._norm_layer
        downsample = None
        previous_dilation = self.dilation
        if dilate:
            self.dilation *= stride
            stride = 1
        if stride != 1 or self.inplanes != planes * block.expansion:
            downsample = nn.Sequential(
                conv1x1(self.inplanes, planes * block.expansion, stride),
                norm_layer(planes * block.expansion),
            )

        layers = []
        layers.append(block(self.inplanes, planes, stride, downsample, self.groups,
                            self.base_width, previous_dilation, norm_layer, se=self.se, cbam=self.cbam))
        self.inplanes = planes * block.expansion
        for _ in range(1, blocks):
            layers.append(block(self.inplanes, planes, groups=self.groups,
                                base_width=self.base_width, dilation=self.dilation,
                                norm_layer=norm_layer, se=self.se, cbam=self.cbam))

        return nn.Sequential(*layers)

    def _add_extras(self, block, extras):
        layers = []
        layers += self._make_layer(block, extras[1], 2, stride=2)
        layers += self._make_layer(block, extras[2], 2, stride=2)
        layers += self._make_layer(block, extras[3], 2, stride=2)
        in_channels = extras[3] * block.expansion
        layers += [nn.Conv2d(in_channels, extras[4] * block.expansion, kernel_size=2)]
        return layers

    def _add_extras_ff(self, block, extras):
        self.inplanes = 512
        layers = []
        layers += self._make_layer(block, extras[0], 1)
        layers += self._make_layer(block, extras[1], 1, stride=2)
        layers += self._make_layer(block, extras[2], 1, stride=2)
        layers += self._make_layer(block, extras[3], 1, stride=2)
        layers += self._make_layer(block, extras[4], 1, stride=2)
        layers += self._make_layer(block, extras[5], 1, stride=2)
        layers += self._make_layer(block, extras[6], 1, stride=2)
        return layers

    def forward(self, x):
        if not self.ff:           # 不使用特征融合
            features = []         # 存放7个预测特征层
            x = self.conv1(x)     # conv1+bn+relu
            x = self.bn1(x)
            x = self.relu(x)
            x = self.maxpool(x)   # max pool

            x = self.layer1(x)    # layer1

            x = self.layer2(x)    # layer2
            features.append(x)    # 预测特征层1

            x = self.layer3(x)    # layer3
            features.append(x)    # 预测特征层2

            x = self.layer4(x)    # layer4
            features.append(x)    # 预测特征层3

            x = self.extra_layers[0](x)
            x = self.extra_layers[1](x)
            features.append(x)              # 预测特征层4

            x = self.extra_layers[2](x)
            x = self.extra_layers[3](x)
            features.append(x)              # 预测特征层5

            x = self.extra_layers[4](x)
            x = self.extra_layers[5](x)
            features.append(x)              # 预测特征层6

            x = self.extra_layers[6](x)
            features.append(x)              # 预测特征层7

            return tuple(features)
        else:      # 使用特征融合
            features = []

            x = self.conv1(x)     # conv1+bn+relu
            x = self.bn1(x)
            x = self.relu(x)
            x = self.maxpool(x)   # max pool

            x = self.layer1(x)    # layer1

            x = self.layer2(x)               # layer2
            features.append(self.conv2(x))   # 预测特征层1

            x = self.layer3(x)                         # layer3
            features.append(self.bi1(self.conv3(x)))   # 预测特征层3  2倍上采样

            x = self.layer4(x)                         # layer4
            features.append(self.bi2(self.conv4(x)))   # 预测特征层4  4倍上采样

            x = torch.cat((features), 1)               # 特征融合

            x = self.conv5(x)                          # 在融合后的特征图上进行conv
            x = self.bn2(x)

            feature_map = []

            x = self.extra_layers_ff[0](x)             # 1
            feature_map.append(x)

            x = self.extra_layers_ff[1](x)             # 2
            feature_map.append(x)

            x = self.extra_layers_ff[2](x)             # 3
            feature_map.append(x)

            x = self.extra_layers_ff[3](x)             # 4
            feature_map.append(x)

            x = self.extra_layers_ff[4](x)             # 5
            feature_map.append(x)

            x = self.extra_layers_ff[5](x)             # 6
            feature_map.append(x)

            x = self.extra_layers_ff[6](x)             # 7
            feature_map.append(x)

            return tuple(feature_map)
Reference
FSSD解读.