![]()
前言
Amazon Aurora 是亚马逊云科技自研的一项关系数据库服务,它在提供和开源数据库MySQL、PostgreSQL的完好兼容性同时,也能够提供和商业数据库媲美的性能和可用性。性能方面,Aurora MySQL能够支持到与开源标准MySQL同等配置下五倍的吞吐量,Amazon Aurora PostgreSQL能够支持与开源标准PostgreSQL同等配置下三倍的吞吐量的提升。在扩展性的角度,Amazon Aurora在存储与计算、横向与纵向方面都进行了功能的增强和创新。
Amazon Aurora的最大数据存储量现在支持多达128TB,而且可以支持存储的动态收缩。计算方面,Amazon Aurora提供多个读副本的可扩展性配置支持一个区域内15个多达15个读副本的扩展,提供多主的架构来支持同一个区域内4个写节点的扩展,提供Serverless无服务器化的架构实例级别的秒级纵向扩展,提供全球数据库来实现数据库的低延迟跨区域扩展。
随着用户数据量的增长,Amazon Aurora已经提供了很好的扩展性,那是否可以进一步增强更多的数据量、更多的并发访问能力呢?您可以考虑利用分库分表的方式,来支持底层多个Amazon Aurora集群的配置。基于此,包含这篇博客在内的系列博客会进行相应的介绍,旨在为您进行分库分表时代理选择提供参考。
本篇博客会聚焦如何使用开源的Gaea proxy ,一个开源的分库分表中间件工具,来进行数据库集群的构建。会涵盖分库分表、读写分离、分片表关联查询和failover自动识别等方面。
Gaea 介绍
Gaea 是某互联网电商开源的基于mySQL协议的数据库中间件,Gaea 支持分库分表、SQL 路由、读写分离,配置热加载,连接池,自定义SQL拦截与过滤等基本特性,并支持分片表和全局表的join、支持多个分片表但是路由规则相同的join。
更多功能介绍,请参阅 Github https://github.com/XiaoMi/Gaea 最新说明
1、设计架构图
Gaea包含四个模块,分别是Gaea-proxy、Gaea-cc、Gaea-agent、Gaea-web。Gaea-proxy为在线代理,负责承接SQL流量,Gaea-cc是中控模块,负责Gaea-proxy的配置管理及一些后台任务,Gaea-agent部署在mysql所在的机器上,负责实例创建、管理、回收等工作,Gaea-web是Gaea的一个管理界面,使Gaea整体使用更加方便。
2、基本概念
cluster
集群, 按照业务重要程度划分集群, 一个集群内可包含多个Gaea-proxy实例, 通过指定Gaea-proxy启动时依赖的配置文件中的cluster_name 确定该proxy所属集群。集群内的proxy实例只为该集群内的namespace提供服务, 起到物理隔离的作用。一套集群可为多个namespace提供服务。
namespace
命名空间,每一个业务系统对应一个namespace,一个namespace对应多个database,业务方可以自由切换。每个namespace理论上只会属于一个集群。通过Gaea-cc配置管理接口, 指定namespace所属集群。
slice
分片,逻辑上的分组,一个分片包含mysql一主多从。
shard
分表规则,确定一个表如何分表,包括分表的类型、分布的分片位置。
proxy
指代理本身,承接线上流量。
gaea_cc
代理控制模块,主要负责配置下发、实例监控等。
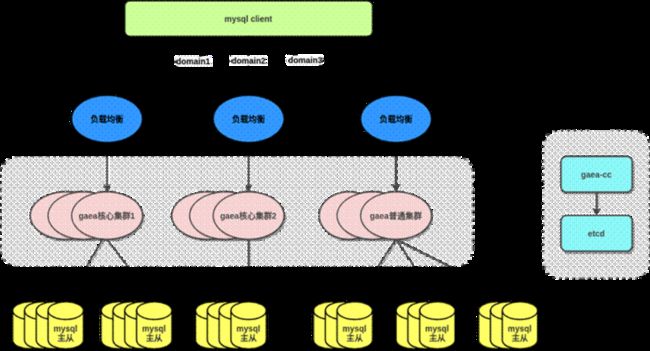
3、部署架构图
在生产环境中可以参考以下部署架构图来实现多 mySQL 集群的代理和集中式的配置管理,图中Gaea核心集群和普通集群没有区别。
环境构建
1、Amazon Aurora 集群
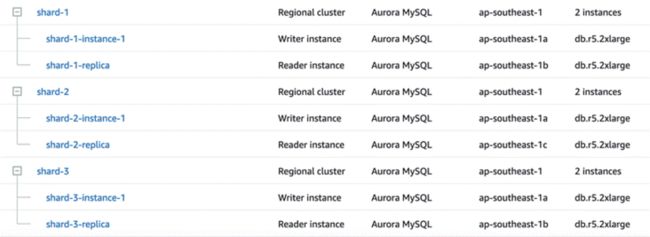
首先创建三套 Aurora MySQL 集群,机型为db.r5.2xlarge,每套集群有一个写节点一个读节点。
2、Gaea proxy 搭建
1)安装Go 语言环境
2)下载源码并编译
git clone https://github.com/XiaoMi/Gae...
cd Gaea && make
完成后会在bin 目录出现gaea and gaea-cc
[ec2-user@ip-172-31-29-68 bin]$ ls
gaea gaea-cc
3、Proxy 配置
Gaea配置由两部分组成,本地配置为Gaea_proxy直接使用的配置内容,一般不需要在运行时改变。gaea为多租户模式,每个租户称为一个namespace,namespace 的配置在运行时都可变,一般存放在etcd中,以下以json 文件替代etcd 做演示,配置的详细说明请参考Github 的说明。
1)准备好本地基础配置文件,该文件用于Gaea 的全局配置,该配置文件放在$Gaea_Home/etc,参考以下例子:
; 配置类型,目前支持file/etcd两种方式,file方式不支持热加载,但是可以快速体验功能
; file 模式下读取file_config_path下的namespace配置文件
; etcd 模式下读取coordinator_addr/cluster_name下的namespace配置文件
config_type=file
;file config path, 具体配置放到file_config_path的namespace目录下,该下级目录为固定目录
file_config_path=/data/gaea/Gaea/etc/file
;配置中心地址,目前只支持etcd
;coordinator_addr=http://127.0.0.1:2379
;配置中心用户名和密码
;username=test
;password=test
;环境划分、test、online
environ=test
;service name
service_name=gaea_proxy
;gaea_proxy 当前proxy所属的集群名称
cluster_name=gaea_default_cluster
;日志配置
log_path=/data/gaea/Gaea/log
log_level=Notice
log_filename=gaea
log_output=file
;管理地址
admin_addr=0.0.0.0:13399
;basic auth
admin_user=admin
admin_password=admin
;代理服务监听地址
proto_type=tcp4
proxy_addr=0.0.0.0:13306
; 默认编码
proxy_charset=utf8
;慢sql阈值,单位: 毫秒
slow_sql_time=100
;空闲会话超时时间,单位: 秒
session_timeout=3600
;打点统计配置
stats_enabled=true
stats_interval=10
;encrypt key, 用于对etcd中存储的namespace配置加解密
encrypt_key=1234abcd5678efg*
;server_version 服务器版本号配置
server_version=5.7-gaea
;auth plugin mysql_native_password or caching_sha2_password or ''
;自定义认证插件,支持 5.x 和 8.x 版本认证,认证插件为 caching_sha2_password 时,不支持低版本客户端认证
auth_plugin=mysql_native_password
左滑查看更多
2)准备好sharding 的配置文件
Gaea 支持多租户,每个租户单独一个namespace,每个namespace 一个配置文件
Gaea 支持kingshard 和mycat 两种sharding 方式,本次测试使用kingshard 的hash方式分表,
namespace 配置文件必须位于 Gaea 编译目录 etc/file/namespace 目录下,以下配置主要做这些事项:
- 同时开启kingshard 和mycat 两种分库分表方式(测试只用kingshard 这种)
- 配置前端接受请求的用户(Gaea)和后端连接 Amazon Aurora 的用户(root)
- 启用读写分离
- 数据分片规则如下:
- 使用 kingshard 的hash 方式对tbl_ks 做了3个物理集群(slice),分片key 配置的是id 字段
- 3个物理分片下都有一个分表(location 1,1,1)
- 把tbl_ks2表配置成tbl_ks 的关联表(proxy自动会根据父表的分片规则把子表数据分布到同slice中以方便做join和关联查询)
- 把tbl_global 配置成全局表(所有分片都有这个表的全量数据)
- 非分片查询的 SQL 默认发送到slice 1(default_slice”: “slice-1)
{
    "name": "gaea_namespace_1",
    "online": true,
    "read_only": true,
    "allowed_dbs": {
        "db_ks": true,
        "db_mycat": true
    },
    "default_phy_dbs": {
        "db_ks": "db_ks",
        "db_mycat": "db_mycat"
    },
    "slow_sql_time": "1000",
    "black_sql": [
        ""
    ],
    "allowed_ip": null,
    "slices": [
        {
            "name": "slice-1",
            "user_name": "root",
            "password": "Pass1234",
            "master": "shard-1.cluster-c3luzotrlr7v.ap-southeast-1.rds.amazonaws.com:3306",
            "slaves": ["shard-1.cluster-ro-c3luzotrlr7v.ap-southeast-1.rds.amazonaws.com:3306"],
            "capacity": 32,
            "max_capacity": 1024,
            "idle_timeout": 3600
        },
        {
            "name": "slice-2",
            "user_name": "root",
            "password": "Pass1234",
            "master": "shard-2.cluster-c3luzotrlr7v.ap-southeast-1.rds.amazonaws.com:3306",
            "slaves": ["shard-2.cluster-ro-c3luzotrlr7v.ap-southeast-1.rds.amazonaws.com:3306"],
            "capacity": 32,
            "max_capacity": 1024,
            "idle_timeout": 3600
        },
        {
            "name": "slice-3",
            "user_name": "root",
            "password": "Pass1234",
            "master": "shard-3.cluster-c3luzotrlr7v.ap-southeast-1.rds.amazonaws.com:3306",
            "slaves": ["shard-3.cluster-ro-c3luzotrlr7v.ap-southeast-1.rds.amazonaws.com:3306"],
            "capacity": 32,
            "max_capacity": 1024,
            "idle_timeout": 3600
        }
    ],
    "shard_rules": [
        {
            "db": "db_ks",
            "table": "tbl_ks",
            "type": "hash",
            "key": "id",
            "locations": [
                1,
                1,
                1
            ],
            "slices": [
                "slice-1",
                "slice-2",
                "slice-3"
            ]
        },
        {
           "db": "db_ks",
           "table": "tbl_ks2",
           "type": "linked",
           "parent_table": "tbl_ks",
           "key": "id"
        },
        {
            "db": "db_ks",
            "table": "tbl_global",
            "type": "global",
            "locations": [
                1,
                1,
                1
            ],
    "slices": [
        "slice-1",
        "slice-2",
        "slice-3"
              ]

        }

    ],
    "global_sequences": [

    ],
    "users": [
        {
            "user_name": "gaea",
            "password": "gaea_password",
            "namespace": "gaea_namespace_1",
            "rw_flag": 2,
            "rw_split": 1
        }
    ],
    "default_slice": "slice-1",
    "open_general_log": false,
    "max_sql_execute_time": 5000,
    "max_sql_result_size": 100000
}
左滑查看更多
4、启动 Proxy
使用 bin 目录下的 Gaea 二进制文件启动,指定好静态配置文件路径
[root@ip-172-31-29-68 etc]# ../bin/gaea -config ./test.ini
Build Version Information:Version: fbac80acdd922a3d563bc703994f7f9145c2d41b
GitRevision: fbac80acdd922a3d563bc703994f7f9145c2d41b
User: [email protected]
GolangVersion: go1.17.6
BuildStatus: Clean
BuildTime: 2022-02-09--07:13:01
BuildBranch: master
BuildGitDirty: 0
[GIN-debug] [WARNING] Running in "debug" mode. Switch to "release" mode in production.
using env: export GIN_MODE=release
using code: gin.SetMode(gin.ReleaseMode)
[GIN-debug] GET /api/proxy/ping --> github.com/XiaoMi/Gaea/proxy/server.(AdminServer).ping-fm (2 handlers)
[GIN-debug] PUT /api/proxy/config/prepare/:name --> github.com/XiaoMi/Gaea/proxy/server.(AdminServer).prepareConfig-fm (2 handlers)
[GIN-debug] PUT /api/proxy/config/commit/:name --> github.com/XiaoMi/Gaea/proxy/server.(AdminServer).commitConfig-fm (2 handlers)
[GIN-debug] PUT /api/proxy/namespace/delete/:name --> github.com/XiaoMi/Gaea/proxy/server.(AdminServer).deleteNamespace-fm (2 handlers)
[GIN-debug] GET /api/proxy/config/fingerprint --> github.com/XiaoMi/Gaea/proxy/server.(AdminServer).configFingerprint-fm (2 handlers)
[GIN-debug] GET /api/proxy/stats/sessionsqlfingerprint/:namespace --> github.com/XiaoMi/Gaea/proxy/server.(AdminServer).getNamespaceSessionSQLFingerprint-fm (2 handlers)
[GIN-debug] GET /api/proxy/stats/backendsqlfingerprint/:namespace --> github.com/XiaoMi/Gaea/proxy/server.(AdminServer).getNamespaceBackendSQLFingerprint-fm (2 handlers)
[GIN-debug] DELETE /api/proxy/stats/sessionsqlfingerprint/:namespace --> github.com/XiaoMi/Gaea/proxy/server.(AdminServer).clearNamespaceSessionSQLFingerprint-fm (2 handlers)
[GIN-debug] DELETE /api/proxy/stats/backendsqlfingerprint/:namespace --> github.com/XiaoMi/Gaea/proxy/server.(*AdminServer).clearNamespaceBackendSQLFingerprint-fm (2 handlers)
[GIN-debug] GET /api/metric/metrics --> github.com/gin-gonic/gin.WrapH.func1 (2 handlers)
[GIN-debug] GET /debug/pprof/ --> github.com/gin-gonic/gin.WrapF.func1 (2 handlers)
[GIN-debug] GET /debug/pprof/cmdline --> github.com/gin-gonic/gin.WrapF.func1 (2 handlers)
[GIN-debug] GET /debug/pprof/profile --> github.com/gin-gonic/gin.WrapF.func1 (2 handlers)
[GIN-debug] POST /debug/pprof/symbol --> github.com/gin-gonic/gin.WrapF.func1 (2 handlers)
[GIN-debug] GET /debug/pprof/symbol --> github.com/gin-gonic/gin.WrapF.func1 (2 handlers)
[GIN-debug] GET /debug/pprof/trace --> github.com/gin-gonic/gin.WrapF.func1 (2 handlers)
[GIN-debug] GET /debug/pprof/block --> github.com/gin-gonic/gin.WrapF.func1 (2 handlers)
[GIN-debug] GET /debug/pprof/goroutine --> github.com/gin-gonic/gin.WrapF.func1 (2 handlers)
[GIN-debug] GET /debug/pprof/heap --> github.com/gin-gonic/gin.WrapF.func1 (2 handlers)
[GIN-debug] GET /debug/pprof/mutex --> github.com/gin-gonic/gin.WrapF.func1 (2 handlers)
[GIN-debug] GET /debug/pprof/threadcreate --> github.com/gin-gonic/gin.WrapF.func1
左滑查看更多
5、验证连接
使用动态配置文件中指定的用户名和密码连接 proxy,因为上面的动态配置文件开启了kingshard 和mycat 两种分库分表方式,所以登陆后默认看到两个预先配置好的proxy里的database:
[root@ip-172-31-29-68 namespace]# mysql -ugaea -pgaea_password -P13306 -h172.31.29.68
Welcome to the MariaDB monitor. Commands end with ; or \g.
Your MySQL connection id is 10001
Server version: 5.6.20-gaea MySQL Community Server (GPL)
Copyright (c) 2000, 2018, Oracle, MariaDB Corporation Ab and others.
Type 'help;' or '\h' for help. Type '\c' to clear the current input statement.
MySQL [(none)]> show databases;
+----------+
| Database |
+----------+
| db_ks |
| db_mycat |
+----------+
2 rows in set (0.00 sec)
左滑查看更多
功能测试
1、分库分表验证
Gaea 因为对DDL兼容性一般,官网建议预先在后端数据库创建好对应的数据库然后再在proxy应用规则。因为我们使用kingshard 的hash 规则分表,我们预先在每个 Amazon Aurora 建好相应的数据库和表,注意:table 必须是从0000 开始
CREATE TABLE IF NOT EXISTS tbl_ks_0000(
id INT UNSIGNED AUTO_INCREMENT,
col1 VARCHAR(100) NOT NULL,
col2 VARCHAR(40) NOT NULL,
col_date DATE,
PRIMARY KEY ( id )
)ENGINE=InnoDB DEFAULT CHARSET=utf8;
左滑查看更多
- 插入数据并查看
MySQL [db_ks]> select * from tbl_ks;
+----+-------+-------+------------+
| id | col1 | col2 | col_date |
+----+-------+-------+------------+
| 3 | name3 | addr3 | 2022-02-11 |
| 1 | name1 | addr1 | 2022-02-11 |
| 4 | name4 | addr4 | 2022-02-11 |
| 2 | name2 | addr2 | 2022-02-11 |
+----+-------+-------+------------+
4 rows in set (0.03 sec)
左滑查看更多
- 分别登陆3个 Amazon Aurora 检查数据,验证按id 做了hash 分布
[root@ip-172-31-29-68 ec2-user]# mysql -uroot -pPass1234 -hshard-1.cluster-c3luzotrlr7v.ap-southeast-1.rds.amazonaws.com -P3306 -e "select * from db_ks.tbl_ks_0000"
+----+-------+-------+------------+
| id | col1 | col2 | col_date |
+----+-------+-------+------------+
| 3 | name3 | addr3 | 2022-02-11 |
+----+-------+-------+------------+
[root@ip-172-31-29-68 ec2-user]# mysql -uroot -pPass1234 -hshard-2.cluster-c3luzotrlr7v.ap-southeast-1.rds.amazonaws.com -P3306 -e "select * from db_ks.tbl_ks_0001"
+----+-------+-------+------------+
| id | col1 | col2 | col_date |
+----+-------+-------+------------+
| 1 | name1 | addr1 | 2022-02-11 |
| 4 | name4 | addr4 | 2022-02-11 |
+----+-------+-------+------------+
[root@ip-172-31-29-68 ec2-user]# mysql -uroot -pPass1234 -hshard-3.cluster-c3luzotrlr7v.ap-southeast-1.rds.amazonaws.com -P3306 -e "select * from db_ks.tbl_ks_0002"
+----+-------+-------+------------+
| id | col1 | col2 | col_date |
+----+-------+-------+------------+
| 2 | name2 | addr2 | 2022-02-11 |
左滑查看更多
2、全局表测试
全局表是在各个slice上 (准确的说是各个slice的各个DB上) 数据完全一致的表,方便执行一些跨分片查询,如果是小表和分片表做join推荐使用全局表这种方式,对应在shard_rules 的配置如下这段:
 {
            "db": "db_ks",
            "table": "tbl_global",
            "type": "global",
            "locations": [
                1,
                1,
                1
            ],
    "slices": [
        "slice-1",
        "slice-2",
        "slice-3"
    ]
左滑查看更多
测试过程如下:
- 在 Amazon Aurora 后端数据库建表
同样的,因为Gaea 不支持DDL,需要先在所有后端数据库建好表,再应用规则
CREATE TABLE IF NOT EXISTS tbl_global(
   id INT UNSIGNED AUTO_INCREMENT,
   PRIMARY KEY ( id )
   )ENGINE=InnoDB DEFAULT CHARSET=utf8;
左滑查看更多
- 连接proxy并 插入数据
插入一行会提示3 rows affected
MySQL [db_ks]> insert into tbl_global (id) values (1);
Query OK, 3 rows affected (0.02 sec)
MySQL [db_ks]> insert into tbl_global (id) values (2);
Query OK, 3 rows affected (0.02 sec)
MySQL [db_ks]> insert into tbl_global (id) values (3);
Query OK, 3 rows affected (0.02 sec)
左滑查看更多
- 登陆每一个 Amazon Aurora 看是否插入了3行数据
[ec2-user@ip-172-31-29-68 ~]$ mysql -uroot -pPass1234 -hshard-1.cluster-c3luzotrlr7v.ap-southeast-1.rds.amazonaws.com -e "select * from db_ks.tbl_global"
+----+
| id |
+----+
|  1 |
|  2 |
|  3 |
+----+
左滑查看更多
- 做全局表和分片表join的测试
MySQL [db_ks]> select * from tbl_global,tbl_ks where tbl_ks.id=tbl_global.id;
+----+----+-------+-------+------------+
| id | id | col1  | col2  | col_date   |
+----+----+-------+-------+------------+
|  2 |  2 | name2 | addr2 | 2022-02-11 |
|  3 |  3 | name3 | addr3 | 2022-02-11 |
|  1 |  1 | name1 | addr1 | 2022-02-11 |
+----+----+-------+-------+------------+
3 rows in set (0.05 sec)
左滑查看更多
- 通过执行计划来验证
MySQL [db_ks]> explain select * from tbl_global,tbl_ks where tbl_ks.id=tbl_global.id;
+-------+---------+-------+--------------------------------------------------------------------------------------------+
| type  | slice   | db    | sql                                                                                        |
+-------+---------+-------+--------------------------------------------------------------------------------------------+
| shard | slice-1 | db_ks | SELECT * FROM (`tbl_global`) JOIN `tbl_ks_0000` WHERE `tbl_ks_0000`.`id`=`tbl_global`.`id` |
| shard | slice-2 | db_ks | SELECT * FROM (`tbl_global`) JOIN `tbl_ks_0001` WHERE `tbl_ks_0001`.`id`=`tbl_global`.`id` |
| shard | slice-3 | db_ks | SELECT * FROM (`tbl_global`) JOIN `tbl_ks_0002` WHERE `tbl_ks_0002`.`id`=`tbl_global`.`id` |
+-------+---------+-------+--------------------------------------------------------------------------------------------+
3 rows in set (0.00 sec)
左滑查看更多
3、全局表数据一致性测试
先说结论,通过proxy写全局表的时候,这个事务不是原子性的。
假如分片1的全局表存在了id=1,其他两个分片没有这条数据,这时候从proxy insert id=1会报错但是分片2 和3 都可以成功写入本地, 所以需要定期检查全局表是否数据一致。
# 在分片1 手动插入id=4 制造不一致
mysql -uroot -pPass1234 -hshard-1.cluster-c3luzotrlr7v.ap-southeast-1.rds.amazonaws.com -e "insert into db_ks.tbl_global values (4)"
# 在proxy insert id=4 会报错
MySQL [db_ks]>  insert into tbl_global (id) values (4);
ERROR 1105 (HY000): unknown error: execute in InsertPlan error: ERROR 1062 (23000): Duplicate entry '4' for key 'PRIMARY'
# 在分片2 和3 查看全局表能发现id=4 这条数据
[ec2-user@ip-172-31-29-68 ~]$ mysql -uroot -pPass1234 -hshard-2.cluster-c3luzotrlr7v.ap-southeast-1.rds.amazonaws.com -e "select * from db_ks.tbl_global"
+----+
| id |
+----+
|  1 |
|  2 |
|  3 |
|  4 |
+----+
左滑查看更多
4、父表和子表做 join 查询
1) 验证子表的数据分布
# 连接proxy手动插入3条数据到
MySQL [db_ks]> insert into tbl_ks2 (id) values (1);
Query OK, 1 row affected (0.01 sec)
MySQL [db_ks]>
MySQL [db_ks]> insert into tbl_ks2 (id) values (2);
Query OK, 1 row affected (0.01 sec)
MySQL [db_ks]> insert into tbl_ks2 (id) values (3);
Query OK, 1 row affected (0.01 sec)

MySQL [db_ks]> explain select * from tbl_ks2;
+-------+---------+-------+------------------------------+
| type  | slice   | db    | sql                          |
+-------+---------+-------+------------------------------+
| shard | slice-1 | db_ks | SELECT * FROM `tbl_ks2_0000` |
| shard | slice-2 | db_ks | SELECT * FROM `tbl_ks2_0001` |
| shard | slice-3 | db_ks | SELECT * FROM `tbl_ks2_0002` |
+-------+---------+-------+------------------------------+
3 rows in set (0.00 sec)
左滑查看更多
从上面的执行结果确认子表也是按照父表的规则做了分片,并且 id 字段hash后和父表在同分片
2)验证父表和子表做 join 查询
# 先看看父表的数据
MySQL [db_ks]> select * from tbl_ks;
+----+----------+-------+------------+
| id | col1     | col2  | col_date   |
+----+----------+-------+------------+
|  2 | name2    | addr2 | 2022-02-11 |
|  3 | name3    | addr3 | 2022-02-11 |
|  1 | failover | addr1 | 2022-02-11 |
|  4 | name4    | addr4 | 2022-02-11 |
+----+----------+-------+------------+
4 rows in set (0.04 sec)
左滑查看更多
join 测试
MySQL [db_ks]> select * from tbl_ks,tbl_ks2 where tbl_ks.id=tbl_ks2.id;
+----+----------+-------+------------+----+
| id | col1     | col2  | col_date   | id |
+----+----------+-------+------------+----+
|  3 | name3    | addr3 | 2022-02-11 |  3 |
|  1 | failover | addr1 | 2022-02-11 |  1 |
|  2 | name2    | addr2 | 2022-02-11 |  2 |
+----+----------+-------+------------+----+
MySQL [db_ks]> explain select * from tbl_ks,tbl_ks2 where tbl_ks.id=tbl_ks2.id;
+-------+---------+-------+------------------------------------------------------------------------------------------------+
| type  | slice   | db    | sql                                                                                            |
+-------+---------+-------+------------------------------------------------------------------------------------------------+
| shard | slice-2 | db_ks | SELECT * FROM (`tbl_ks_0001`) JOIN `tbl_ks2_0001` WHERE `tbl_ks_0001`.`id`=`tbl_ks2_0001`.`id` |
| shard | slice-3 | db_ks | SELECT * FROM (`tbl_ks_0002`) JOIN `tbl_ks2_0002` WHERE `tbl_ks_0002`.`id`=`tbl_ks2_0002`.`id` |
| shard | slice-1 | db_ks | SELECT * FROM (`tbl_ks_0000`) JOIN `tbl_ks2_0000` WHERE `tbl_ks_0000`.`id`=`tbl_ks2_0000`.`id` |
+-------+---------+-------+------------------------------------------------------------------------------------------------+
3 rows in set (0.00 sec)
左滑查看更多
从上面执行结果看,父表和子表可以通过sharding key 做关联做join 查询。
5、检查读写分离是否实现
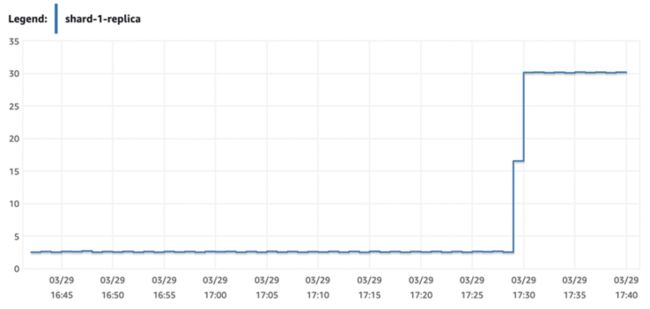
编写脚本验证读请求是否都发往从库执行
#!/bin/bash
while true;do
mysql -ugaea -pgaea_password -P13306 -h172.31.29.68 -e "use db_ks;select  * from tbl_ks;"
sleep 0.1
done
左滑查看更多
结果如下图所示,所有的读请求都发往了replica 节点执行,主节点没有收到查询请求
6、故障恢复验证
此测试在于验证当 Aurora failover 的时候验证 proxy 是否能在不改变配置的情况下自动识别 failover 的发生并自动恢复。
测试脚本如下:
[root@ip-172-31-29-68 ec2-user]# cat test_failover.sh
#!/bin/bash
while true
do
     mysql -ugaea -pgaea_password -P13306 -h172.31.29.68 -e "use db_ks; update  tbl_ks set col1='failover' where id = 1;"
    now=$(date +"%T")
    echo "update done: $now"
    sleep 1

done
左滑查看更多
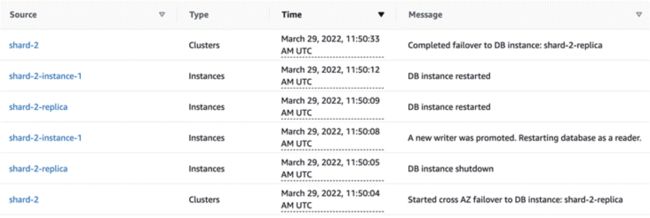
运行脚本,然后在Amazon Aurora集群的写节点上点击Action→Failover。会启动Amazon Aurora写节点和读节点的自动切换。在切换过程中,整个集群的读/写endpoint和只读endpoint维持不变,只是底层映射的节点发生变化。
从 Event 看 Amazon Aurora 30 秒内完成 failover
但是从脚本输出看,proxy 一直在报错,不能自动发现 failover 事件
ERROR 1105 (HY000) at line 1: unknown error: execute in UpdatePlan error: ERROR 1290 (HY000): The MySQL server is running with the --read-only option so it cannot execute this statement
update done: 11:52:09
ERROR 1105 (HY000) at line 1: unknown error: execute in UpdatePlan error: ERROR 1290 (HY000): The MySQL server is running with the --read-only option so it cannot execute this statement
左滑查看更多
需要重启 proxy 才能恢复正常的写入
结语
本篇文章通过数据库中间件的方法来拓展了 Amazon Aurora 的分库分表能力和读写分离的能力。通过Gaea,这个方案能够实现连接池、SQL的兼容性、跨分片路由、读写分离、分片表和全局表 join 以及父表和子表做关联查询的能力。不足之处在于 Gaea 在 Aurora failover 发生后不能识别和自动恢复,需要重启或者手动刷新配置等方式才能恢复。
后续我们会继续推出对其他中间件的拓展和研究系列博客。
本篇作者
张振威
亚马逊云科技APN解决方案架构师
主要负责合作伙伴架构咨询和方案设计,同时致力于亚马逊云科技云服务在国内的应用及推广,擅长数据迁移,数据库调优和数据分析相关。


