快速从零搭建一个SpringBoot Web项目
SprinBoot 系列文章:
Spring Boot入门之Hello Spring Boot
SpringBoot 配置多个JdbcTemplate
SpringBoot 整合Mybatis
CAS统一登录认证(3): CAS 客户端接入实践
SpringBoot 整合Mail实现邮件发送
数据库连接池优化配置(druid,dbcp,c3p0)
SpringBoot+SpringSecurity+mysql实现认证与授
SpringBoot+Spring Security基于内存用户认证
SpringBoot+WebSocket在线聊天室、消息推送
SpringBoot+SpringData JPA操作Mysql数据库
SpringBoot热部署值devtools配置
Spring Boot 资源文件属性配置
Spring Boot Server等内容的配置
Spring Boot + FreeMarker模板
SpringBoot+thymeleaf模板
SpringBoot +JDBC连接Mysql数据库
Zipkin分布式任务追踪
SpringBoot应用部署到外置Tomcat
Spring Boot + Swagger2 自动生成api接口文档
SpringBoot整合Shiro安全框架
SpringBoot+CAS Client 实现单点登录
SpringBoot 整合MyBatis-Plus
SpringBoot + validation 接口参数校验
Springboot+Redis 实现API接口防刷限流
ShardingSphere-ShardingJdbc 数据分片(分库、分表)
ShardingSphere-ShardingJdbc 读写分离
ShardingSphere-ShardingJdbc 数据脱敏
springboot+sms 集成腾讯云短信平台
SpringBoot+RabbitMQ 实现消息队列
快速从零搭建一个SpringBoot Web项目
从零快速搭建一个SpringBoot Web项目
SpringBoot+ElasticSearch 实现全文检索
访问ElasticSearch的几种方式
SpringBoot + Activiti 工作流引擎(一、基本概念与环境搭建)
SpringBoot + Activiti 工作流引擎(二、流程&任务操作)
SpringBoot 定时任务 实现方式
SpringBoot + EhCache实现本地缓存
SpringBoot + Redis 实现分布式缓存
从零快速搭建一个SpringBoot Web项目
环境:
- IDEA+Navicat+Jdk1.8+Mysql5.7
- SpringBoot+Thymeleaf+Mybatis+SpringSecurity
目录
从零快速搭建一个SpringBoot Web项目
一、新建一个SpringBoot项目
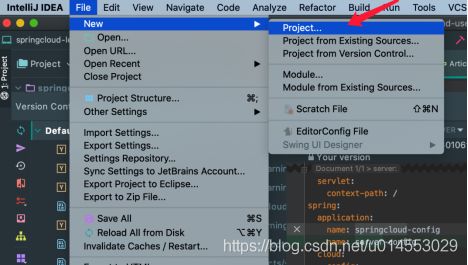
1.1 选择新增:File->New->Project
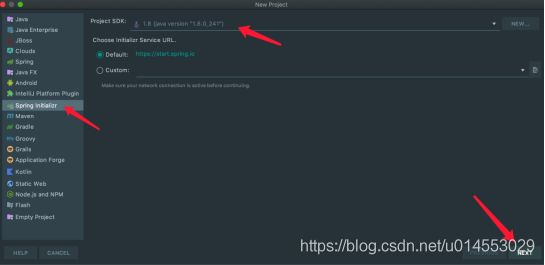
1.2 选择Spring Initializr,指定JDK版本,直接下一步
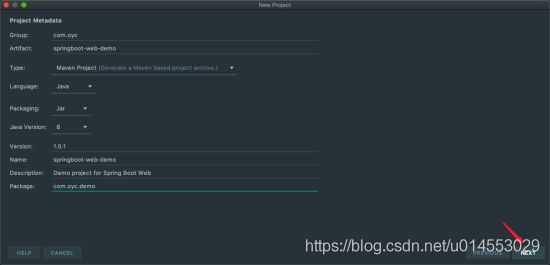
1.3填写项目相关信息,然后下一步
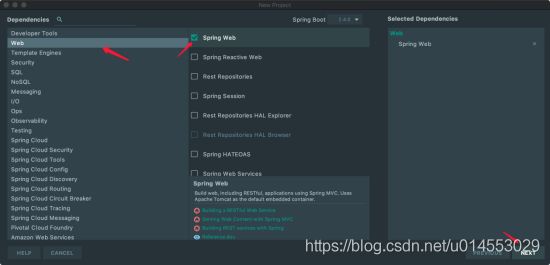
1.4 选择Web,勾选中间Spring Web,然后下一步
1.5 选择代码存放位置(可默认),点击完成。
1.6 等待代码下载完成,代码结构如下:
1.7 至此,已经可以直接运行项目(默认端口8080,项目访问路径为/)。
1.8 将项目端口改为8888,项目名称改为demo。新增application.yml(也可以直接在application.properties里面配置,主要取决于个人习惯)
1.9 添加HelloController测试Web,代码如下:
1.10 测试项目,启动应用,使用浏览器访问:127.0.0.1:8888/demo/hello,结果如下:
二、 集成前端框架thymeleaf框架(或freemarker)
2.1 在pom.xml中添加thymeleaf依赖
2.2 添加UserController用于测试Thymeleaf,代码如下:
2.3 在resources/templates添加user.html,代码如下:
2.4 测试Thymeleaf
三、 集成Mybatis-->MybatisPlus(或SpringDataJPA)
3.1 在pom.xml中引入MybatisPlus相关依赖
3.2 配置数据源、MybatisPlus
3.3 编写MybatisPlus配置类
3.4 完成User、UserMapper、UserService、UserServiceImpl
3.4.1新增类domain.User,代码如下:
3.4.2新增接口mapper.UserMapper,代码如下:
3.4.3新增接口service.UserService,代码如下:
3.4.4新增类service.impl.UserServiceImpl,代码如下:
3.5 在UserController中使用UserService
3.6 改造user.html,显示用户列表
3.7 集成效果查看
四、 安全框架SpringScerity(或Apache Shiro)
4.1 在pom.xml中添加SpringSecurity依赖,配置如下:
4.2 重写UserDetailsService的loadUserByUsername方法
4.3 添加CustomPasswordEncoder密码加密类,代码如下:
4.4添加WebSecurity 配置类,代码如下:
4.5 添加公共控制类CommonController,定义登录界面和欢迎界面接口,代码如下:
4.6 添加登录界面login.html,代码如下:
4.7 添加欢迎界面index.html,代码如下:
4.8 添加管理界面admin.html,代码如下:
4.8 测试集成效果
4.9 其他优化
一、新建一个SpringBoot项目
1.1 选择新增:File->New->Project
1.2 选择Spring Initializr,指定JDK版本,直接下一步
1.3填写项目相关信息,然后下一步
1.4 选择Web,勾选中间Spring Web,然后下一步
1.5 选择代码存放位置(可默认),点击完成。
1.6 等待代码下载完成,代码结构如下:
1.7 至此,已经可以直接运行项目(默认端口8080,项目访问路径为/)。
1.8 将项目端口改为8888,项目名称改为demo。新增application.yml(也可以直接在application.properties里面配置,主要取决于个人习惯)
配置内容如下:
server:
  port: 8888
  servlet:
    context-path: /demo
1.9 添加HelloController测试Web,代码如下:
package com.oyc.demo.controller;

import org.springframework.web.bind.annotation.GetMapping;
import org.springframework.web.bind.annotation.RequestMapping;
import org.springframework.web.bind.annotation.RestController;

/**
 * @Description: Hello测试控制器
 * @Author oyc
 * @Date 2020/12/1 11:26 下午
 */
@RestController
@RequestMapping("hello")
public class HelloController {

    @GetMapping
    public String hello(){
        return "Hello World";
    }
}
1.10 测试项目,启动应用,使用浏览器访问:127.0.0.1:8888/demo/hello,结果如下:
二、集成前端框架thymeleaf框架(或freemarker)
2.1 在pom.xml中添加thymeleaf依赖
    org.springframework.boot
    spring-boot-starter-thymeleaf
2.2 添加UserController用于测试Thymeleaf,代码如下:
package com.oyc.demo.controller;

import org.springframework.stereotype.Controller;
import org.springframework.ui.Model;
import org.springframework.web.bind.annotation.GetMapping;
import org.springframework.web.bind.annotation.RequestMapping;

/**
 * @Description:用户控制器
 * @Author oyc
 * @Date 2020/12/1 11:26 下午
 */
@Controller
@RequestMapping("user")
public class UserController {

    @GetMapping
    public String user(Model model) {
        model.addAttribute("title", "欢迎来到用户界面");
        return "user";
    }
}
2.3 在resources/templates添加user.html,代码如下:
    用户


用户管理
2.4 测试Thymeleaf
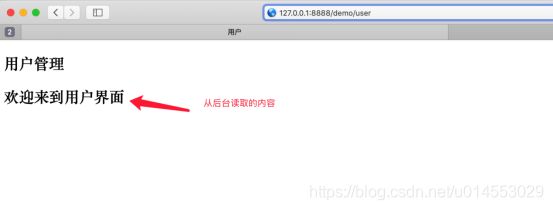
启动项目,打开浏览器,访问:127.0.0.1:8888/demo/user,效果如下:
三、集成Mybatis-->MybatisPlus(或SpringDataJPA)
3.1 在pom.xml中引入MybatisPlus相关依赖
    mysql
    mysql-connector-java
    runtime


    com.alibaba
    druid
    1.1.9


    com.baomidou
    mybatis-plus-boot-starter
    3.1.2


    org.projectlombok
    lombok
    1.16.18
    provided
3.2 配置数据源、MybatisPlus
#### spring  ####
spring:
  datasource:
    url: jdbc:mysql://146.56.192.87:3306/oyc?useUnicode=true&characterEncoding=utf8&zeroDateTimeBehavior=convertToNull&serverTimezone=GMT%2B8
    username: oyc
    password: 111111
    driver-class-name: com.mysql.cj.jdbc.Driver
    ###  数据源类别
    type: com.alibaba.druid.pool.DruidDataSource
    ### 初始化大小,最小,最大
    initialSize: 5
    minIdle: 5
    maxActive: 20
    ### 配置获取连接等待超时的时间,单位是毫秒
    maxWait: 60000
    ### 配置间隔多久才进行一次检测,检测需要关闭的空闲连接,单位是毫秒
    timeBetweenEvictionRunsMillis: 60000
    ### 配置一个连接在池中最小生存的时间,单位是毫秒
    minEvictableIdleTimeMillis: 300000
    validationQuery: SELECT 1 FROM DUAL
    testWhileIdle: true
    testOnBorrow: false
    testOnReturn: false
    ### 打开PSCache,并且指定每个连接上PSCache的大小
    poolPreparedStatements: true
    maxPoolPreparedStatementPerConnectionSize: 20
    ### 配置监控统计拦截的filters,去掉后监控界面sql无法统计,'wall'用于防火墙
    filters: stat,wall,log4j
    ### 通过connectProperties属性来打开mergeSql功能;慢SQL记录
    connectionProperties: druid.stat.mergeSql=true;druid.stat.slowSqlMillis=5000

#### mybatis-plus ###
mybatis-plus:
  # 如果是放在src/main/java目录下 classpath:/com/yourpackage/*/mapper/*Mapper.xml
  # 如果是放在resource目录 classpath:/mapper/*Mapper.xml
  mapper-locations: classpath:mapper/*.xml
  #实体扫描,多个package用逗号或者分号分隔
  type-aliases-package: com.oycbest.springbootssm.domain
  configuration:
    map-underscore-to-camel-case: true
    cache-enabled: false
  #主键类型  0:"数据库ID自增", 1:"用户输入ID",2:"全局唯一ID (数字类型唯一ID)", 3:"全局唯一ID UUID";
  global-config:
    db-config:
      id-type: auto
      #字段策略 0:"忽略判断",1:"非 NULL 判断"),2:"非空判断"
      field-strategy: not_empty
      #驼峰下划线转换
      column-underline: true
      #逻辑删除配置
      logic-delete-value: 0
      logic-not-delete-value: 1
      db-type: mysql
  #刷新mapper 调试神器
  refresh: false
3.3 编写MybatisPlus配置类
添加类config.MybatisPlusConfig,代码如下:
package com.oyc.demo.config;

import com.baomidou.mybatisplus.extension.plugins.PaginationInterceptor;
import org.mybatis.spring.annotation.MapperScan;
import org.springframework.context.annotation.Bean;
import org.springframework.context.annotation.Configuration;
import org.springframework.transaction.annotation.EnableTransactionManagement;

/**
 * @Description:
 * @Author oyc
 * @Date 2020/12/02 00:16 上午
 */
@EnableTransactionManagement
@Configuration
//扫描的mapper文件路径
@MapperScan(value = "com.oyc.demo.mapper")
public class MybatisPlusConfig {

    /**
     * 分页插件
     */
    @Bean
    public PaginationInterceptor paginationInterceptor() {
        return new PaginationInterceptor();
    }
}
3.4 完成User、UserMapper、UserService、UserServiceImpl
3.4.1新增类domain.User,代码如下:
package com.oyc.demo.domain;

import lombok.Data;

import java.io.Serializable;

/**
 * @Description:
 * @Author oyc
 * @Date 2020/12/2 12:23 上午
 */
@Data
public class User implements Serializable {
    private int id;
    private String name;
    private String account;
    private String password;
}
3.4.2新增接口mapper.UserMapper,代码如下:
package com.oyc.demo.mapper;

import com.baomidou.mybatisplus.core.mapper.BaseMapper;
import com.oyc.demo.domain.User;

/**
 * @Description: user Mapper
 * @Author oyc
 * @Date 2020/12/2 12:27 上午
 */
public interface UserMapper extends BaseMapper {
}
3.4.3新增接口service.UserService,代码如下:
package com.oyc.demo.service;

import com.baomidou.mybatisplus.extension.service.IService;
import com.oyc.demo.domain.User;
/**
 * @Description: 用户服务类接口
 * @Author oyc
 * @Date 2020/12/2 12:24 上午
 */
public interface UserService extends IService {
} 3.4.4新增类service.impl.UserServiceImpl,代码如下:
package com.oyc.demo.service.impl;


import com.baomidou.mybatisplus.extension.service.impl.ServiceImpl;
import com.oyc.demo.domain.User;
import com.oyc.demo.mapper.UserMapper;
import com.oyc.demo.service.UserService;
import org.springframework.stereotype.Service;
/**
 * @Description:
 * @Author oyc
 * @Date 2020/12/2 12:24 上午
 */
@Service
public class UserServiceImpl extends ServiceImpl implements UserService  {
}
3.5 在UserController中使用UserService
添加:
@Autowired
private UserService userService;
和
model.addAttribute("userList", userService.list());UserController的整体代码如下:
package com.oyc.demo.controller;

import com.oyc.demo.service.UserService;
import org.springframework.beans.factory.annotation.Autowired;
import org.springframework.stereotype.Controller;
import org.springframework.ui.Model;
import org.springframework.web.bind.annotation.GetMapping;
import org.springframework.web.bind.annotation.RequestMapping;
/**
 * @Description:用户控制器
 * @Author oyc
 * @Date 2020/12/1 11:26 下午
 */
@Controller
@RequestMapping("user")
public class UserController {

    @Autowired
    private UserService userService;

    @GetMapping
    public String user(Model model) {
        model.addAttribute("title", "欢迎来到用户界面");
        model.addAttribute("userList", userService.list());
        return "user";
    }
}
3.6 改造user.html,显示用户列表
添加代码:
        id
        用户名
3.7 集成效果查看
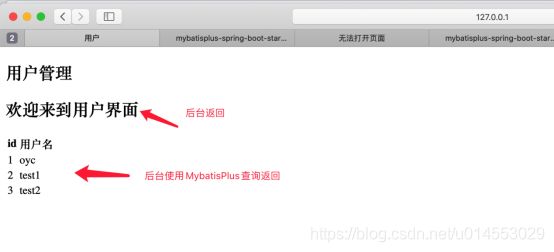
启动项目,打开浏览器,访问:127.0.0.1:8888/demo/user,效果如下:
三、安全框架SpringScerity(或Apache Shiro)
4.1 在pom.xml中添加SpringSecurity依赖,配置如下:
    org.springframework.boot
    spring-boot-starter-security
4.2 重写UserDetailsService的loadUserByUsername方法
添加类CustomUserDetailsService重写UserDetailsService的loadUserByUsername方法(用户角色先默认给admin,后期更改为从数据库获取--RBAC),代码如下:
package com.oyc.demo.service;

import com.baomidou.mybatisplus.core.conditions.query.QueryWrapper;
import org.springframework.beans.factory.annotation.Autowired;
import org.springframework.security.core.GrantedAuthority;
import org.springframework.security.core.authority.SimpleGrantedAuthority;
import org.springframework.security.core.userdetails.User;
import org.springframework.security.core.userdetails.UserDetails;
import org.springframework.security.core.userdetails.UserDetailsService;
import org.springframework.security.core.userdetails.UsernameNotFoundException;
import org.springframework.stereotype.Service;
import java.util.ArrayList;
import java.util.Collection;
/**
 * @ClassName CustomUserDetailsService
 * @Description
 * @Author oyc
 * @Date 2020/12/2 8:53
 * @Version
 */
@Service("userDetailsService")
public class CustomUserDetailsService implements UserDetailsService {
    @Autowired
    private UserService userService;

//    @Autowired
//    private RoleService roleService;

//    @Autowired
//    private UserRoleService userRoleService;

    @Override
    public UserDetails loadUserByUsername(String username) throws UsernameNotFoundException {
        Collection authorities = new ArrayList<>();
        // 从数据库中取出用户信息
        QueryWrapper queryWrapper = new QueryWrapper();
        queryWrapper.eq("account", username);
        com.oyc.demo.domain.User user = userService.getOne(queryWrapper);

        // 判断用户是否存在
        if (user == null) {
            throw new UsernameNotFoundException("用户名不存在");
        }
        // 添加权限
        /*List userRoles = userRoleService.listByUserId(user.getId());
        for (SysUserRole userRole : userRoles) {
            SysRole role = roleService.selectById(userRole.getRoleId());
            authorities.add(new SimpleGrantedAuthority(role.getName()));
        }*/
        // 默认先给一个admin角色和user角色
        authorities.add(new SimpleGrantedAuthority("ROLE_ADMIN"));
        authorities.add(new SimpleGrantedAuthority("ROLE_USER"));

        // 返回UserDetails实现类
        return new User(user.getName(), user.getPassword(), authorities);
    }
}
4.3 添加CustomPasswordEncoder密码加密类,代码如下:
package com.oyc.demo.config;

import org.springframework.security.crypto.password.PasswordEncoder;
import org.springframework.stereotype.Component;

/**
 * @ClassName CustomPasswordEncoder
 * @Description 密码加密器,因为我们数据库是明文存储的,所以明文返回即可
 * @Author oyc
 * @Date 2020/12/2 9:23
 * @Version
 */
@Component
public class CustomPasswordEncoder implements PasswordEncoder {

    @Override
    public String encode(CharSequence charSequence) {
        return charSequence.toString();
    }

    @Override
    public boolean matches(CharSequence charSequence, String s) {
        return s.equals(charSequence.toString());
    }
}
4.4添加WebSecurity 配置类,代码如下:
package com.oyc.demo.config;

import com.oyc.demo.service.CustomUserDetailsService;
import org.springframework.beans.factory.annotation.Autowired;
import org.springframework.context.annotation.Configuration;
import org.springframework.security.config.annotation.authentication.builders.AuthenticationManagerBuilder;
import org.springframework.security.config.annotation.method.configuration.EnableGlobalMethodSecurity;
import org.springframework.security.config.annotation.web.builders.HttpSecurity;
import org.springframework.security.config.annotation.web.builders.WebSecurity;
import org.springframework.security.config.annotation.web.configuration.EnableWebSecurity;
import org.springframework.security.config.annotation.web.configuration.WebSecurityConfigurerAdapter;

/**
 * @Description WebSecurity 配置类
 * Spring Security 的配置类,该类的三个注解分别是标识该类是配置类、开启 Security 服务、开启全局 Securtiy 注解。
 * 首先将我们自定义的 userDetailsService 注入进来,在 configure() 方法中使用 auth.userDetailsService() 方法替换掉默认的 userDetailsService。
 * @Author oyc
 * @Date 2020/12/2 8:35
 * @Version
 */
@Configuration
@EnableWebSecurity
@EnableGlobalMethodSecurity(prePostEnabled = true)
public class WebSecurityConfig extends WebSecurityConfigurerAdapter {
    @Autowired
    private CustomUserDetailsService userDetailsService;

    @Autowired
    private CustomPasswordEncoder customPasswordEncoder;

    @Override
    protected void configure(AuthenticationManagerBuilder auth) throws Exception {
        auth.userDetailsService(userDetailsService).passwordEncoder(customPasswordEncoder);
    }

    @Override
    protected void configure(HttpSecurity http) throws Exception {
        //使用SpringScurity提供的默认登录页面,访问/login时转到登录页面
        //http.formLogin();
        //http.logout().logoutSuccessUrl("/");
        http.authorizeRequests()
                //不需要身份认证
                .antMatchers("/", "/index", "/login").permitAll()
                .antMatchers("/js/**", "/css/**", "/images/**").permitAll()
                //拥有某种角色才能访问
                .antMatchers("/user/**").hasAnyRole("USER")
                .antMatchers("/admin/**").hasAnyRole("ADMIN")
                // 需要登录才能访问
                .anyRequest().authenticated()
                .and()
                // 设置登录页
                .formLogin().loginPage("/login").failureUrl("/login?error").permitAll()
                // 设置登录成功页
                .defaultSuccessUrl("/")
                // 自定义登录用户名和密码参数,默认为username和password
                // .usernameParameter("username")
                // .passwordParameter("password")
                .and()
                .logout().permitAll();

        // 关闭CSRF跨域
        http.csrf().disable();
    }

    @Override
    public void configure(WebSecurity web) throws Exception {
        // 设置拦截忽略文件夹,可以对静态资源放行
        web.ignoring().antMatchers("/css/**", "/js/**", "/img/**");
    }
}
4.5 添加公共控制类CommonController,定义登录界面和欢迎界面接口,代码如下:
package com.oyc.demo.controller;

import org.springframework.stereotype.Controller;
import org.springframework.web.bind.annotation.GetMapping;
import org.springframework.web.bind.annotation.RequestMapping;

/**
 * @ClassName CommonController
 * @Description 公共配置类
 * @Author oyc
 * @Date 2020/12/2 9:36
 * @Version
 */
@Controller
@RequestMapping
public class CommonController {
    /**
     * 登录界面
     * @return
     */
    @GetMapping("login")
    private String login() {
        return "login";
    }
    /**
     * 欢迎界面
     * @return
     */
    @GetMapping({"","index"})
    private String index() {
        return "index";
    }
    /**
     * 欢迎界面
     * @return
     */
    @GetMapping({"admin"})
    private String admin() {
        return "admin";
    }
}
4.6 添加登录界面login.html,代码如下:
登录
登录
4.7 添加欢迎界面index.html,代码如下:
    欢迎使用系统


欢迎使用系统
4.8 添加管理界面admin.html,代码如下:
    欢迎使用系统


登录成功,欢迎使用系统
4.8 测试集成效果
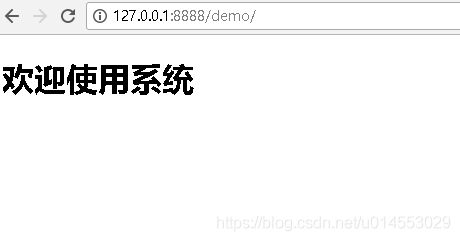
启动项目,打开浏览器访问:127.0.0.1:8888/demo,可以正常访问。访问:127.0.0.1:8888/demo/admin,会先出现登录界面,输入正确的用户名和密码之后,点击登录,正常跳转到管理界面。效果如下:
欢迎界面:
登录界面:
管理界面:
4.9 其他优化
密码加密、用户角色从数据库获取(user-->user_role-->role、user-->role_menu-->menu)
未完待续
注:
源码地址: https://gitee.com/oycyqr/springboot-web-demo.git
