使用 Python +OpenCV+Deepface实现人脸、情感和种族检测
我们使用 OpenCV、deepface 库和 haarcascade_frontalface_default.xml 文件来检测图像中的人脸、面部表情和人种。


从 https://unsplash.com/photos/vtwjyEelY08 下载此图片
在我们开始之前,假设你了解python基础并且已经安装了python
需要的其他安装包是:
Opencv — 使用安装它
deepface — 使用安装它
matplotlib——使用安装它
从 https://raw.githubusercontent.com/opencv/opencv/master/data/haarcascades/haarcascade_frontalface_default.xml 下载 haarcascade_frontalface_default.xm并将其保存在与你的项目相同的文件夹中。
什么是 haarcascade_frontalface_default.xml 文件?
它是一个经过预训练以检测面部并给出一些用于在面部绘制矩形、正方形或任何形状的点的文件。
现在让我们进入编码部分(在 jupyter notebook 中这样做)。
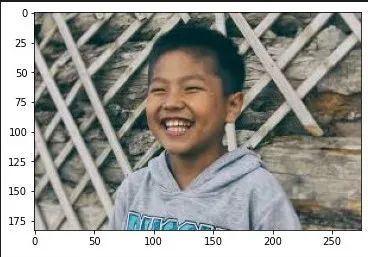
首先,让我们导入所需的库并加载 happy_boy.jpg(我们之前下载的图像),并显示该图像。
#importing cv2 and matplotlid
import cv2
import matplotlib.pyplot as plt

#loading image
img =  cv2.imread("happy_boy.jpg") #loading image

#showing image using plt
plt.imshow(img)
输出 :

每次我们显示图像时,它都会在 BGR 中,在显示之前我们需要将其转换为彩色照片。为此,我们使用 cv2 中的 cvtColor() 函数。
color_img = cv2.cvtColor(img, cv2.COLOR_BGR2RGB)
plt.imshow(color_img)
输出 :
使用 Deepface 预测图片中人/孩子的情绪和种族
导入 DeepFace 并分析我们的图片。
它将分析图像并将检测到的情绪和种族保存到“prediction”变量中。
#importing deepface library and DeepFace
from deepface import DeepFace


#this analyses the given image and gives values
#when we use this for 1st time, it may give many errors and some google drive links to download some '.h5' and zip files, download and save them in the location where it shows that files are missing.
prediction = DeepFace.analyze(color_img)
让我们看看它预测了什么
#lets check what all the things DeepFace.analyze() function has analyzed
prediction
输出:

在输出中,预测值是dominant_emotion 和dominant_race。剩下的是所有用于预测情绪和种族的点。
我们可以像访问任何其他字典数据类型一样访问dominant_emotion 和dominant_race 的键值。
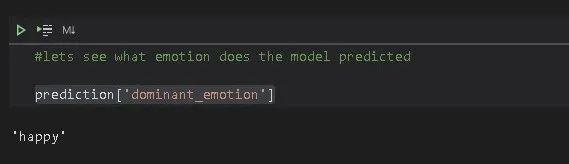
所以 DeepFace.analyze() 预测了那个孩子的情绪——快乐和种族——亚洲人。
检测人脸
使用 OpenCV 检测人脸的代码非常短。
我们只需要haarcascade_frontalface_default.xml文件和 OpenCV 库来检测图像中的人脸。这是代码。
#loading our xml file into faceCascade using cv2.CascadeClassifier
faceCascade = cv2.CascadeClassifier(cv2.data.haarcascades +'haarcascade_frontalface_default.xml')

#detecting face in color_image and getting 4 points(x,y,u,v) around face from the image, and assigning those values to 'faces' variable
faces = faceCascade.detectMultiScale(color_img, 1.1, 4)

#using that 4 points to draw a rectangle around face in the image
for (x, y, u, v) in faces:
    cv2.rectangle(color_img, (x,y), (x+u, y+v), (0, 0, 225), 2)

plt.imshow(color_img)
输出:

汇总
如你所见,我们检测到图像中孩子的情绪、种族和面孔,现在是将所有内容整合在一起的最后一部分。这意味着现在我们要在图像上展示情感和种族。
#choose font for text
font = cv2.FONT_HERSHEY_SIMPLEX

#for showing emotion on image
cv2.putText(color_img, prediction['dominant_emotion'], (0, 50), font, 1,
(225,0,0), 2, cv2.LINE_4)

#for showing race on image
cv2.putText(color_img, prediction['dominant_race'], (40, 100),font,  0.5,
(0,0,0), 2, cv2.LINE_4)

#finally displaying image
plt.imshow(color_img)
输出:

如果你不知道/理解我们在 cv.putText() 函数中写的所有东西,这里的语法如下
cv.putText(img, '要放置的文字*', '*要放置文字的位置', 字体, 文字大小, 颜色, 文字粗细, 文字纹理)
这就是我们检测人脸、人类情感和种族的方式。
现在去尝试其他图像。
我们也可以将它与网络摄像头或前置摄像头一起使用,但速度非常慢。
☆ END ☆
如果看到这里,说明你喜欢这篇文章,请转发、点赞。微信搜索「uncle_pn」,欢迎添加小编微信「 mthler」,每日朋友圈更新一篇高质量博文。
↓扫描二维码添加小编↓
